- Using HTML File Input for Uploading Native iOS/Android Files
- Outline Before we get started If you have not already read (or watched) the previous tutorial, it would be a good idea to complete it before reading this one. The previous tutorial provides a lot of important context around how the HTML elements works when specifying the file type, and also around how those files can be uploaded to a backend server with multipart/form-data and the FormData API. What is the difference between web and native for file uploads? When we use the element in a standard desktop/web environment, we can be quite certain of its behaviour. We click the Choose file button and a file explorer window is launched where we can select any file on our computer. When we try to do this on mobile the behaviour is quite different and exactly how it behaves will depend on the platform. Generally speaking, the process is still more or less the same — the user clicks the button, selects a file, and then we are able to get a reference to that file. However, we don’t have a standard «file explorer» window that pops up and allows the user to select any file on their device. Depending on the context, the camera might be launched directly, or the user might be prompted to choose a file directly from the file system, or the user might be offered a choice between browsing files, taking a photo, taking a video, and so on. Let’s take a look at different ways to set up the file input. Differences in file input behaviour between iOS and Android Although the following is not an exhaustive list of ways to set up the file input element, these are a pretty good set of examples that we could default to. NOTE: The examples below use Angular event bindings to handle the change event, but otherwise the implementation will be the same with vanilla JavaScript, StencilJS, React, Vue, or whatever else you are using. Standard File Input On iOS, this will prompt the user to choose between Take Photo or Video , Photo Library , or Browse in order to return the desired file. On Android, this will directly launch the native file selection screen to select any file on the device. Limiting File Input to Images On iOS, this will prompt the user to choose between Take Photo , Photo Library , or Browse in order to return the desired file. Note that Video is no longer a choice in the first option and videos (and other files) will also be excluded from being listed if the user chooses to select an existing photo. On Android, this will launch the same native file selection screen again, but this time it will be filtered to only show images. Using Camera for File Input On iOS, this will directly launch the camera in Photo mode and allow the user to take a photo. Once the user takes a photo they will be able to choose whether to use that photo or if they want to retake the photo. Once the user chooses Use Photo the file will be supplied to the application. On Android, this will directly launch the camera allowing the user to take a photo (not a video). The user can then accept the taken photo or take another. Limiting File Input to Videos On iOS, this will prompt the user to choose between Take Video , Photo Library , or Browse in order to return the desired file. Note that Photo is no longer a choice in the first option and photos (and other files) will also be excluded from being listed if the user chooses to select an existing video. On Android, this will launch the native file selection screen again, but this time it will be filtered to only show videos. Limiting File Input to Audio On iOS, this will prompt the user to choose between Take Photo or Video , Photo Library , or Browse in order to return the desired file. Note that there is no restriction to audio files only in this case. On Android, this will launch the native file selection screen again, but this time it will be filtered to only show audio files. Keep in mind that the specification for the file input element has changed over the years, so you might find many different examples of ways to set up this element and force certain behaviours. In general, my advice would be not to try to «game the system». Use the simplest options and focus on telling the browser what you want, then let the platform decide how best to fulfill that request. If you try to get too tricky and take over this process to enforce what you want, you will leave yourself vulnerable to different behaviours on different platforms/versions and also your solution will be more prone to breaking in the future. If you do need more control over this process, in ways that using the file input element does not allow (or at least it does not allow it consistently across platforms), you can look into using native plugins/APIs instead. The Camera API, for example, will give you much greater control over the process of selecting/capturing a photo than the element will. How do we upload these files to a server? Fortunately, the resulting file reference can be uploaded in the same way as a file retrieved from a normal desktop/web file input element. You will just need to make a POST request that includes multipart/form-data that contains the file(s) you want to upload. For more details on doing that, check out the previous tutorial: Handling File Uploads in Ionic. Summary The standard element provides a surprisingly smooth file selection experience on native iOS and Android platforms, and these files can be easily sent as standard multipart/form-data to your backend server. This will probably be all you need a lot of the time, but for certain specialised circumstances or use cases you might need to look into using native plugins or APIs to fulfil your file selection and transferring needs. If you enjoyed this article, feel free to share it with others! Discussion Need some help with this tutorial? Spotted an error? Got some helpful advice for others? Join the discussion on Twitter If there are no active discussions, start one by including the URL of this post and tag me (@joshuamorony) in a new tweet. I’ll try to help out directly whenever I have the time, but you might also want to include other relevant tags to attract attention from others who might also be able to help. To make it super easy for others to help you out, you might consider setting up an example on Stack Blitz so others can jump right into your code. Источник Accessing the Camera and Stored Media This guide covers how to work with the camera and how to access media stored on the phone. The camera implementation depends on the level of customization required: The easy way — launch the camera with an intent, designating a file path, and handle the onActivityResult. The hard way — use the Camera API to embed the camera preview within your app, adding your own custom controls. You must configure a FileProvider as show in this section. The example below uses com.codepath.fileprovider and should match the authorities XML tag specified. If you see a «INSTALL_FAILED_CONFLICTING_PROVIDER» error when attempting to run the app, change this to something unique, such as com.codepath.fileprovider.YOUR_APP_NAME_HERE , and also update the value in your XML tag to match. In your AndroidManifest.xml, add the following queries block: Easy way works in most cases, using the intent to launch the camera: We need to define the getPhotoFileUri() function: When the camera app finishes, the onActivityResult() method will be called: Check out the official Photo Basics guide for more details. In certain cases, when loading a bitmap with BitmapFactory.decodeFile(file) decoding the Bitmap in memory may actually cause a crash with a OutOfMemoryError: Failed to allocate error. Check out the Loading Bitmaps Efficiently guide and this stackoverflow post for an overview of the solutions. Photos taken with the Camera intent are often quite large and take a very long time to load from disk. After taking a photo, you should strongly consider resizing the Bitmap to a more manageable size and then storing that smaller bitmap to disk. We can then use that resized bitmap before displaying in an ImageView . Resizing a large bitmap and writing to disk can be done with: Then we can write that smaller bitmap back to disk with: Now, we can store the path to that resized image and load that from disk instead for much faster load times. When using the Camera intent to capture a photo, the picture is always taken in the orientation the camera is built into the device. To get your image rotated correctly you’ll have to read the orientation information that is stored into the picture (EXIF meta data) and perform the following transformation using the ExifInterface Support Library: See this guide for the source for this answer. Be aware that on certain devices even the EXIF data isn’t set properly, in which case you should checkout this workaround for a fix. You can read more here about the ExifInterface Support Library. If you need to lookup the image type, there is the guessContentTypeFromStream() in the Java library that allows you to get back the mime type (i.e. image/jpeg ). It will read the first 16 bytes to determine the type of file. In order to use this API call, you must pass in a BufferedInputStream() which supports the mark() and reset() method calls required for the guessContentTypeFromStream() to work. For applying filters to your captured images, check out the following libraries: CameraFilter — Realtime camera filters. Process frames by OpenGL shaders. photofilter — Apply filters to images after they are captured. If you sure to enable access to the external storage to save to the public image, you must add this permission to your AndroidManifest.xml file: Note: The permissions model has changed starting in Marshmallow. If your targetSdkVersion >= 23 and you are running on a Marshmallow (or later) device, you may need to enable runtime permissions. You should also read more about the runtime permissions changes. Instead of using the capture intent to capture photos «the easy way», a custom camera can be used within your app directly leveraging the Camera2 API. This custom camera is much more complicated to implement but sample code can be found here and this CameraView from Google aims to help Android developers easily integrate Camera features. There is also a Google video overview of Camera2 which explains how Camera2 works. There are a number of Camera2 tutorials you can review: There are also a number of third-party libraries available to make custom cameras easier: Leveraging Camera2 or the libraries above, apps can develop a camera that functions in anyway required including custom overlays for depositing checks, taking pictures with a particular form factor, or scanning custom barcodes. Similar to the camera, the media picker implementation depends on the level of customization required: The easy way — launch the Gallery with an intent, and get the media URI in onActivityResult. The hard way — fetch thumbnail and full-size URIs from the MediaStore ContentProvider. Make sure to enable access to the external storage first before using the camera (Note: The permissions model has changed starting in Marshmallow. If your targetSdkVersion >= 23 and you are running on a Marshmallow (or later) device, you may need to enable runtime permissions. You should also read more about the runtime permissions changes): Easy way is to use an intent to launch the gallery: Check out this Stack Overflow post for an alternate approach using mimetypes to restrict content user can select. First, from the above example, we can add the Intent.EXTRA_ALLOW_MULTIPLE flag to the intent: and then inside of onActivityResult , we can access all the photos selected with: Note: that you may need to load the selected bitmaps efficiently or resize them if they are large images to avoid encountering OutOfMemoryError exceptions. Alternatively, we can use a custom gallery selector that is implemented inside of our application to take full control over the gallery picking user experience. Check out this custom gallery source code gist or older libraries wrapping this up for reference. You can also take a look at older tutorials on custom galleries. For allowing users to pick files from their system or online services, check out these helpful filepicker libraries: These allow users to pick files beyond just images and are easy to drop into any app. Источник Mobile Photo Uploads with HTML5 Asynchronous file uploading on the web and especially the mobile web used to be a struggle. Three reasons come to mind: AJAX’s inability to send file data meant Flash and hidden frames became the go-to solutions Mobile browser support for Flash ranged from non-existent to extremely limited Many mobile operating systems — including older versions of iOS, Android, Windows Phone, and BlackBerry — lacked support in their browsers for the HTML input type=file attribute Thankfully, the task of asynchronous file uploading on web and mobile web has been greatly simplified recently. In this post I share some considerations and details that went into the cross-platform, photo uploading app on our mobile web app. Feature Detection vs Browser Detection Many older mobile browsers lack support for HTML file input. Support on current devices is pretty good, but there are a significant number of old devices still in use that cannot handle HTML file input. In order to provide the best possible user experience, we can’t show users a feature their device cannot support — so we need to perform some sort of check to assess if the feature is supported. One way of doing this is to check the browser’s user agent and cross reference that with a list of browsers or devices that are known (either by manual testing or documentation; caniuse is a nice place to start) to support the feature. This is known as browser detection, and is problematic for many reasons. For one, it is difficult to verify all possible device/browser configurations that support the feature of interest. Additionally, it isn’t future-proof: the code you write today may not work tomorrow. For these reasons, it is much better to detect if the feature of interest is available to use in the user’s browser, a practice known as feature detection. This is the goal behind the popular open source JavaScript library Modernizr. The ideal solution would use only feature detection without any browser detection; however, this is not always possible since many browsers will report false positives on certain features. The compromise is to use a mix of the two methods when using only feature detection is not possible. Below is a snippet of code adapted from Modernizr that detects support for HTML file input using a mix of feature and browser detection: Selecting a File Once we know that file input is supported, we can show the HTML input field to the user. When tapped on a mobile device, this input field will prompt the user to either take a new photo with the camera, or to select an existing photo on their device. It’s also possible to allow the user to select multiple photos at once on some devices, by adding the multiple attribute to the input element; however, be aware that on iOS this will remove the option to use the camera as a source. Note that here we use client-side validation to ensure that the selected file is an image, but it is important to validate on the server side as well. In general, validation on the client side provides better feedback to the user, whereas server-side validation is important for security purposes. A look at the file input dialogue on iOS and Android Reading and Processing the File The improvement of camera technology in mobile devices brings with it an increase in the size of photos. Unfortunately, most people don’t have the bandwidth (or the patience) to upload uncompressed 8+ megapixel photos on a regular basis! So what can we do? One solution is to compress and/or downscale photos on the client side before we send the photo over the network. In the past this would not have been a trivial task, but the introduction of HTML5, the FileReader interface, and the Canvas API makes this fairly simple. Let’s break this down into two parts: Using the FileReader interface to read the file Using the Canvas API to downscale and compress the image 1. Reading the File In order to read the file, we first need to listen for changes to the HTML input element described earlier. We can do this with a little jQuery (although the native JavaScript implementation is not much different): In this step it can also be worthwhile to validate that the file is under a given size, as loading a very large image into memory with the Canvas API is expensive, slow, and could cause the browser to crash. When the user selects an image file, the readFile function will be called with the file object. To read the file, we create a new FileReader object and define the success and failure conditions of reading. We must read the file in one of several different formats including array buffer, binary string, data URL, and text. You can refer to the FileReader documentation for details on each of these, but for our purposes reading the file as a data URL is fine as it works quite seamlessly with the Canvas API. 2. Processing the File Once reading the image has completed, we can process it with Canvas. First we create a new image and set its source to the data URL obtained from reading the file. When the image has loaded, we calculate the desired dimensions of the new image. Note that if the size of the new image is smaller than the original, there is no need to process the image (if scaling is our only objective). Next, we create a canvas element which will hold our output image. The canvas getContext method returns an object that provides methods and properties for manipulating the canvas. We use the drawImage method to place the source image on the canvas, resulting in a downscaled version of the original image. The canvas element provides two methods to retrieve image data: toDataURL and toBlob . Both toDataURL and toBlob take as arguments the output image type and the image quality. If the image type is specified as image/jpeg or image/webp , the quality argument (a number between 0 and 1 with a default of 0.92) can be used to further compress the image. This is a fairly simple use case of the Canvas API, though the possibilities extend far beyond scaling. Some examples include client side image editing, cropping, and thumbnail generation. An issue particularly relevant to the mobile web is the problem of lost metadata: most browsers will ignore the EXIF metadata of photos, including the orientation tag, resulting in photos being oriented incorrectly. This is not a problem if we upload the original photo, but since we are generating a new image with Canvas, the EXIF data of the original photo is lost. One solution is to read the EXIF data on the client side and use Canvas to correctly orient the image. Uploading the File In recent years, the technology behind AJAX has evolved to be able to handle file uploads, so we take advantage of this to upload the file asynchronously. There are many benefits to asynchronous file uploading, including the ability to monitor the progress of the upload, and allowing the user to perform additional actions while they wait for the upload to finish. Additionally, if the upload fails for whatever reason, we can provide the user with a hassle-free way of retrying the upload: Tap to retry a failed upload on Hootsuite’s mobile web app To keep things simple, we will use jQuery’s ajax method to perform the request, but if you are familiar with the XMLHttpRequest (XHR) object this task should be no more difficult. We use a FormData object to construct the data payload that we want to send to the server. Using the FormData append method, we can add key/value pairs for files, blobs, and strings to the data payload. When using jQuery and FormData, it is important to set the processData and contentType properties to false. Setting processData to false prevents jQuery from automatically converting the data into a string, while setting contentType to false will prevent jQuery from incorrectly setting the content type to its default of application/x-www-form-urlencoded . Once the file data reaches the server we can handle it with the backend technology of our choice. In PHP, the file data can be accessed in POST if the file data was sent as a data URL, or FILES if the file data was sent as a file or blob. While asynchronous file uploading on the mobile web has long been a headache, the introduction of XMLHttpRequest Level 2 and various HTML5 APIs make this task much much easier. This post only covers the logic behind file processing and uploading, but with a bit of styling and polishing it’s quite easy to provide an awesome user experience. Check out the final product on Hootsuite’s mobile website. Photo sharing via Hootsuite’s mobile web app Thanks to Adam Arsenault, Lars Vedo, Jeff Stautz, Kimli Welsh, and Noel Pullen for their advice and valuable feedback. About the Author Jacob Lee is a co-op student on Hootsuite’s mobile web team, studying computer science at UBC. When he’s not creating web and mobile apps, he enjoys tinkering with digital media, playing hockey and tennis, and jamming on the guitar. Follow him on Twitter @jacobtwlee. Источник
- Before we get started If you have not already read (or watched) the previous tutorial, it would be a good idea to complete it before reading this one. The previous tutorial provides a lot of important context around how the HTML elements works when specifying the file type, and also around how those files can be uploaded to a backend server with multipart/form-data and the FormData API. What is the difference between web and native for file uploads? When we use the element in a standard desktop/web environment, we can be quite certain of its behaviour. We click the Choose file button and a file explorer window is launched where we can select any file on our computer. When we try to do this on mobile the behaviour is quite different and exactly how it behaves will depend on the platform. Generally speaking, the process is still more or less the same — the user clicks the button, selects a file, and then we are able to get a reference to that file. However, we don’t have a standard «file explorer» window that pops up and allows the user to select any file on their device. Depending on the context, the camera might be launched directly, or the user might be prompted to choose a file directly from the file system, or the user might be offered a choice between browsing files, taking a photo, taking a video, and so on. Let’s take a look at different ways to set up the file input. Differences in file input behaviour between iOS and Android Although the following is not an exhaustive list of ways to set up the file input element, these are a pretty good set of examples that we could default to. NOTE: The examples below use Angular event bindings to handle the change event, but otherwise the implementation will be the same with vanilla JavaScript, StencilJS, React, Vue, or whatever else you are using. Standard File Input On iOS, this will prompt the user to choose between Take Photo or Video , Photo Library , or Browse in order to return the desired file. On Android, this will directly launch the native file selection screen to select any file on the device. Limiting File Input to Images On iOS, this will prompt the user to choose between Take Photo , Photo Library , or Browse in order to return the desired file. Note that Video is no longer a choice in the first option and videos (and other files) will also be excluded from being listed if the user chooses to select an existing photo. On Android, this will launch the same native file selection screen again, but this time it will be filtered to only show images. Using Camera for File Input On iOS, this will directly launch the camera in Photo mode and allow the user to take a photo. Once the user takes a photo they will be able to choose whether to use that photo or if they want to retake the photo. Once the user chooses Use Photo the file will be supplied to the application. On Android, this will directly launch the camera allowing the user to take a photo (not a video). The user can then accept the taken photo or take another. Limiting File Input to Videos On iOS, this will prompt the user to choose between Take Video , Photo Library , or Browse in order to return the desired file. Note that Photo is no longer a choice in the first option and photos (and other files) will also be excluded from being listed if the user chooses to select an existing video. On Android, this will launch the native file selection screen again, but this time it will be filtered to only show videos. Limiting File Input to Audio On iOS, this will prompt the user to choose between Take Photo or Video , Photo Library , or Browse in order to return the desired file. Note that there is no restriction to audio files only in this case. On Android, this will launch the native file selection screen again, but this time it will be filtered to only show audio files. Keep in mind that the specification for the file input element has changed over the years, so you might find many different examples of ways to set up this element and force certain behaviours. In general, my advice would be not to try to «game the system». Use the simplest options and focus on telling the browser what you want, then let the platform decide how best to fulfill that request. If you try to get too tricky and take over this process to enforce what you want, you will leave yourself vulnerable to different behaviours on different platforms/versions and also your solution will be more prone to breaking in the future. If you do need more control over this process, in ways that using the file input element does not allow (or at least it does not allow it consistently across platforms), you can look into using native plugins/APIs instead. The Camera API, for example, will give you much greater control over the process of selecting/capturing a photo than the element will. How do we upload these files to a server? Fortunately, the resulting file reference can be uploaded in the same way as a file retrieved from a normal desktop/web file input element. You will just need to make a POST request that includes multipart/form-data that contains the file(s) you want to upload. For more details on doing that, check out the previous tutorial: Handling File Uploads in Ionic. Summary The standard element provides a surprisingly smooth file selection experience on native iOS and Android platforms, and these files can be easily sent as standard multipart/form-data to your backend server. This will probably be all you need a lot of the time, but for certain specialised circumstances or use cases you might need to look into using native plugins or APIs to fulfil your file selection and transferring needs. If you enjoyed this article, feel free to share it with others! Discussion Need some help with this tutorial? Spotted an error? Got some helpful advice for others? Join the discussion on Twitter If there are no active discussions, start one by including the URL of this post and tag me (@joshuamorony) in a new tweet. I’ll try to help out directly whenever I have the time, but you might also want to include other relevant tags to attract attention from others who might also be able to help. To make it super easy for others to help you out, you might consider setting up an example on Stack Blitz so others can jump right into your code. Источник Accessing the Camera and Stored Media This guide covers how to work with the camera and how to access media stored on the phone. The camera implementation depends on the level of customization required: The easy way — launch the camera with an intent, designating a file path, and handle the onActivityResult. The hard way — use the Camera API to embed the camera preview within your app, adding your own custom controls. You must configure a FileProvider as show in this section. The example below uses com.codepath.fileprovider and should match the authorities XML tag specified. If you see a «INSTALL_FAILED_CONFLICTING_PROVIDER» error when attempting to run the app, change this to something unique, such as com.codepath.fileprovider.YOUR_APP_NAME_HERE , and also update the value in your XML tag to match. In your AndroidManifest.xml, add the following queries block: Easy way works in most cases, using the intent to launch the camera: We need to define the getPhotoFileUri() function: When the camera app finishes, the onActivityResult() method will be called: Check out the official Photo Basics guide for more details. In certain cases, when loading a bitmap with BitmapFactory.decodeFile(file) decoding the Bitmap in memory may actually cause a crash with a OutOfMemoryError: Failed to allocate error. Check out the Loading Bitmaps Efficiently guide and this stackoverflow post for an overview of the solutions. Photos taken with the Camera intent are often quite large and take a very long time to load from disk. After taking a photo, you should strongly consider resizing the Bitmap to a more manageable size and then storing that smaller bitmap to disk. We can then use that resized bitmap before displaying in an ImageView . Resizing a large bitmap and writing to disk can be done with: Then we can write that smaller bitmap back to disk with: Now, we can store the path to that resized image and load that from disk instead for much faster load times. When using the Camera intent to capture a photo, the picture is always taken in the orientation the camera is built into the device. To get your image rotated correctly you’ll have to read the orientation information that is stored into the picture (EXIF meta data) and perform the following transformation using the ExifInterface Support Library: See this guide for the source for this answer. Be aware that on certain devices even the EXIF data isn’t set properly, in which case you should checkout this workaround for a fix. You can read more here about the ExifInterface Support Library. If you need to lookup the image type, there is the guessContentTypeFromStream() in the Java library that allows you to get back the mime type (i.e. image/jpeg ). It will read the first 16 bytes to determine the type of file. In order to use this API call, you must pass in a BufferedInputStream() which supports the mark() and reset() method calls required for the guessContentTypeFromStream() to work. For applying filters to your captured images, check out the following libraries: CameraFilter — Realtime camera filters. Process frames by OpenGL shaders. photofilter — Apply filters to images after they are captured. If you sure to enable access to the external storage to save to the public image, you must add this permission to your AndroidManifest.xml file: Note: The permissions model has changed starting in Marshmallow. If your targetSdkVersion >= 23 and you are running on a Marshmallow (or later) device, you may need to enable runtime permissions. You should also read more about the runtime permissions changes. Instead of using the capture intent to capture photos «the easy way», a custom camera can be used within your app directly leveraging the Camera2 API. This custom camera is much more complicated to implement but sample code can be found here and this CameraView from Google aims to help Android developers easily integrate Camera features. There is also a Google video overview of Camera2 which explains how Camera2 works. There are a number of Camera2 tutorials you can review: There are also a number of third-party libraries available to make custom cameras easier: Leveraging Camera2 or the libraries above, apps can develop a camera that functions in anyway required including custom overlays for depositing checks, taking pictures with a particular form factor, or scanning custom barcodes. Similar to the camera, the media picker implementation depends on the level of customization required: The easy way — launch the Gallery with an intent, and get the media URI in onActivityResult. The hard way — fetch thumbnail and full-size URIs from the MediaStore ContentProvider. Make sure to enable access to the external storage first before using the camera (Note: The permissions model has changed starting in Marshmallow. If your targetSdkVersion >= 23 and you are running on a Marshmallow (or later) device, you may need to enable runtime permissions. You should also read more about the runtime permissions changes): Easy way is to use an intent to launch the gallery: Check out this Stack Overflow post for an alternate approach using mimetypes to restrict content user can select. First, from the above example, we can add the Intent.EXTRA_ALLOW_MULTIPLE flag to the intent: and then inside of onActivityResult , we can access all the photos selected with: Note: that you may need to load the selected bitmaps efficiently or resize them if they are large images to avoid encountering OutOfMemoryError exceptions. Alternatively, we can use a custom gallery selector that is implemented inside of our application to take full control over the gallery picking user experience. Check out this custom gallery source code gist or older libraries wrapping this up for reference. You can also take a look at older tutorials on custom galleries. For allowing users to pick files from their system or online services, check out these helpful filepicker libraries: These allow users to pick files beyond just images and are easy to drop into any app. Источник Mobile Photo Uploads with HTML5 Asynchronous file uploading on the web and especially the mobile web used to be a struggle. Three reasons come to mind: AJAX’s inability to send file data meant Flash and hidden frames became the go-to solutions Mobile browser support for Flash ranged from non-existent to extremely limited Many mobile operating systems — including older versions of iOS, Android, Windows Phone, and BlackBerry — lacked support in their browsers for the HTML input type=file attribute Thankfully, the task of asynchronous file uploading on web and mobile web has been greatly simplified recently. In this post I share some considerations and details that went into the cross-platform, photo uploading app on our mobile web app. Feature Detection vs Browser Detection Many older mobile browsers lack support for HTML file input. Support on current devices is pretty good, but there are a significant number of old devices still in use that cannot handle HTML file input. In order to provide the best possible user experience, we can’t show users a feature their device cannot support — so we need to perform some sort of check to assess if the feature is supported. One way of doing this is to check the browser’s user agent and cross reference that with a list of browsers or devices that are known (either by manual testing or documentation; caniuse is a nice place to start) to support the feature. This is known as browser detection, and is problematic for many reasons. For one, it is difficult to verify all possible device/browser configurations that support the feature of interest. Additionally, it isn’t future-proof: the code you write today may not work tomorrow. For these reasons, it is much better to detect if the feature of interest is available to use in the user’s browser, a practice known as feature detection. This is the goal behind the popular open source JavaScript library Modernizr. The ideal solution would use only feature detection without any browser detection; however, this is not always possible since many browsers will report false positives on certain features. The compromise is to use a mix of the two methods when using only feature detection is not possible. Below is a snippet of code adapted from Modernizr that detects support for HTML file input using a mix of feature and browser detection: Selecting a File Once we know that file input is supported, we can show the HTML input field to the user. When tapped on a mobile device, this input field will prompt the user to either take a new photo with the camera, or to select an existing photo on their device. It’s also possible to allow the user to select multiple photos at once on some devices, by adding the multiple attribute to the input element; however, be aware that on iOS this will remove the option to use the camera as a source. Note that here we use client-side validation to ensure that the selected file is an image, but it is important to validate on the server side as well. In general, validation on the client side provides better feedback to the user, whereas server-side validation is important for security purposes. A look at the file input dialogue on iOS and Android Reading and Processing the File The improvement of camera technology in mobile devices brings with it an increase in the size of photos. Unfortunately, most people don’t have the bandwidth (or the patience) to upload uncompressed 8+ megapixel photos on a regular basis! So what can we do? One solution is to compress and/or downscale photos on the client side before we send the photo over the network. In the past this would not have been a trivial task, but the introduction of HTML5, the FileReader interface, and the Canvas API makes this fairly simple. Let’s break this down into two parts: Using the FileReader interface to read the file Using the Canvas API to downscale and compress the image 1. Reading the File In order to read the file, we first need to listen for changes to the HTML input element described earlier. We can do this with a little jQuery (although the native JavaScript implementation is not much different): In this step it can also be worthwhile to validate that the file is under a given size, as loading a very large image into memory with the Canvas API is expensive, slow, and could cause the browser to crash. When the user selects an image file, the readFile function will be called with the file object. To read the file, we create a new FileReader object and define the success and failure conditions of reading. We must read the file in one of several different formats including array buffer, binary string, data URL, and text. You can refer to the FileReader documentation for details on each of these, but for our purposes reading the file as a data URL is fine as it works quite seamlessly with the Canvas API. 2. Processing the File Once reading the image has completed, we can process it with Canvas. First we create a new image and set its source to the data URL obtained from reading the file. When the image has loaded, we calculate the desired dimensions of the new image. Note that if the size of the new image is smaller than the original, there is no need to process the image (if scaling is our only objective). Next, we create a canvas element which will hold our output image. The canvas getContext method returns an object that provides methods and properties for manipulating the canvas. We use the drawImage method to place the source image on the canvas, resulting in a downscaled version of the original image. The canvas element provides two methods to retrieve image data: toDataURL and toBlob . Both toDataURL and toBlob take as arguments the output image type and the image quality. If the image type is specified as image/jpeg or image/webp , the quality argument (a number between 0 and 1 with a default of 0.92) can be used to further compress the image. This is a fairly simple use case of the Canvas API, though the possibilities extend far beyond scaling. Some examples include client side image editing, cropping, and thumbnail generation. An issue particularly relevant to the mobile web is the problem of lost metadata: most browsers will ignore the EXIF metadata of photos, including the orientation tag, resulting in photos being oriented incorrectly. This is not a problem if we upload the original photo, but since we are generating a new image with Canvas, the EXIF data of the original photo is lost. One solution is to read the EXIF data on the client side and use Canvas to correctly orient the image. Uploading the File In recent years, the technology behind AJAX has evolved to be able to handle file uploads, so we take advantage of this to upload the file asynchronously. There are many benefits to asynchronous file uploading, including the ability to monitor the progress of the upload, and allowing the user to perform additional actions while they wait for the upload to finish. Additionally, if the upload fails for whatever reason, we can provide the user with a hassle-free way of retrying the upload: Tap to retry a failed upload on Hootsuite’s mobile web app To keep things simple, we will use jQuery’s ajax method to perform the request, but if you are familiar with the XMLHttpRequest (XHR) object this task should be no more difficult. We use a FormData object to construct the data payload that we want to send to the server. Using the FormData append method, we can add key/value pairs for files, blobs, and strings to the data payload. When using jQuery and FormData, it is important to set the processData and contentType properties to false. Setting processData to false prevents jQuery from automatically converting the data into a string, while setting contentType to false will prevent jQuery from incorrectly setting the content type to its default of application/x-www-form-urlencoded . Once the file data reaches the server we can handle it with the backend technology of our choice. In PHP, the file data can be accessed in POST if the file data was sent as a data URL, or FILES if the file data was sent as a file or blob. While asynchronous file uploading on the mobile web has long been a headache, the introduction of XMLHttpRequest Level 2 and various HTML5 APIs make this task much much easier. This post only covers the logic behind file processing and uploading, but with a bit of styling and polishing it’s quite easy to provide an awesome user experience. Check out the final product on Hootsuite’s mobile website. Photo sharing via Hootsuite’s mobile web app Thanks to Adam Arsenault, Lars Vedo, Jeff Stautz, Kimli Welsh, and Noel Pullen for their advice and valuable feedback. About the Author Jacob Lee is a co-op student on Hootsuite’s mobile web team, studying computer science at UBC. When he’s not creating web and mobile apps, he enjoys tinkering with digital media, playing hockey and tennis, and jamming on the guitar. Follow him on Twitter @jacobtwlee. Источник
- What is the difference between web and native for file uploads? When we use the element in a standard desktop/web environment, we can be quite certain of its behaviour. We click the Choose file button and a file explorer window is launched where we can select any file on our computer. When we try to do this on mobile the behaviour is quite different and exactly how it behaves will depend on the platform. Generally speaking, the process is still more or less the same — the user clicks the button, selects a file, and then we are able to get a reference to that file. However, we don’t have a standard «file explorer» window that pops up and allows the user to select any file on their device. Depending on the context, the camera might be launched directly, or the user might be prompted to choose a file directly from the file system, or the user might be offered a choice between browsing files, taking a photo, taking a video, and so on. Let’s take a look at different ways to set up the file input. Differences in file input behaviour between iOS and Android Although the following is not an exhaustive list of ways to set up the file input element, these are a pretty good set of examples that we could default to. NOTE: The examples below use Angular event bindings to handle the change event, but otherwise the implementation will be the same with vanilla JavaScript, StencilJS, React, Vue, or whatever else you are using. Standard File Input On iOS, this will prompt the user to choose between Take Photo or Video , Photo Library , or Browse in order to return the desired file. On Android, this will directly launch the native file selection screen to select any file on the device. Limiting File Input to Images On iOS, this will prompt the user to choose between Take Photo , Photo Library , or Browse in order to return the desired file. Note that Video is no longer a choice in the first option and videos (and other files) will also be excluded from being listed if the user chooses to select an existing photo. On Android, this will launch the same native file selection screen again, but this time it will be filtered to only show images. Using Camera for File Input On iOS, this will directly launch the camera in Photo mode and allow the user to take a photo. Once the user takes a photo they will be able to choose whether to use that photo or if they want to retake the photo. Once the user chooses Use Photo the file will be supplied to the application. On Android, this will directly launch the camera allowing the user to take a photo (not a video). The user can then accept the taken photo or take another. Limiting File Input to Videos On iOS, this will prompt the user to choose between Take Video , Photo Library , or Browse in order to return the desired file. Note that Photo is no longer a choice in the first option and photos (and other files) will also be excluded from being listed if the user chooses to select an existing video. On Android, this will launch the native file selection screen again, but this time it will be filtered to only show videos. Limiting File Input to Audio On iOS, this will prompt the user to choose between Take Photo or Video , Photo Library , or Browse in order to return the desired file. Note that there is no restriction to audio files only in this case. On Android, this will launch the native file selection screen again, but this time it will be filtered to only show audio files. Keep in mind that the specification for the file input element has changed over the years, so you might find many different examples of ways to set up this element and force certain behaviours. In general, my advice would be not to try to «game the system». Use the simplest options and focus on telling the browser what you want, then let the platform decide how best to fulfill that request. If you try to get too tricky and take over this process to enforce what you want, you will leave yourself vulnerable to different behaviours on different platforms/versions and also your solution will be more prone to breaking in the future. If you do need more control over this process, in ways that using the file input element does not allow (or at least it does not allow it consistently across platforms), you can look into using native plugins/APIs instead. The Camera API, for example, will give you much greater control over the process of selecting/capturing a photo than the element will. How do we upload these files to a server? Fortunately, the resulting file reference can be uploaded in the same way as a file retrieved from a normal desktop/web file input element. You will just need to make a POST request that includes multipart/form-data that contains the file(s) you want to upload. For more details on doing that, check out the previous tutorial: Handling File Uploads in Ionic. Summary The standard element provides a surprisingly smooth file selection experience on native iOS and Android platforms, and these files can be easily sent as standard multipart/form-data to your backend server. This will probably be all you need a lot of the time, but for certain specialised circumstances or use cases you might need to look into using native plugins or APIs to fulfil your file selection and transferring needs. If you enjoyed this article, feel free to share it with others! Discussion Need some help with this tutorial? Spotted an error? Got some helpful advice for others? Join the discussion on Twitter If there are no active discussions, start one by including the URL of this post and tag me (@joshuamorony) in a new tweet. I’ll try to help out directly whenever I have the time, but you might also want to include other relevant tags to attract attention from others who might also be able to help. To make it super easy for others to help you out, you might consider setting up an example on Stack Blitz so others can jump right into your code. Источник Accessing the Camera and Stored Media This guide covers how to work with the camera and how to access media stored on the phone. The camera implementation depends on the level of customization required: The easy way — launch the camera with an intent, designating a file path, and handle the onActivityResult. The hard way — use the Camera API to embed the camera preview within your app, adding your own custom controls. You must configure a FileProvider as show in this section. The example below uses com.codepath.fileprovider and should match the authorities XML tag specified. If you see a «INSTALL_FAILED_CONFLICTING_PROVIDER» error when attempting to run the app, change this to something unique, such as com.codepath.fileprovider.YOUR_APP_NAME_HERE , and also update the value in your XML tag to match. In your AndroidManifest.xml, add the following queries block: Easy way works in most cases, using the intent to launch the camera: We need to define the getPhotoFileUri() function: When the camera app finishes, the onActivityResult() method will be called: Check out the official Photo Basics guide for more details. In certain cases, when loading a bitmap with BitmapFactory.decodeFile(file) decoding the Bitmap in memory may actually cause a crash with a OutOfMemoryError: Failed to allocate error. Check out the Loading Bitmaps Efficiently guide and this stackoverflow post for an overview of the solutions. Photos taken with the Camera intent are often quite large and take a very long time to load from disk. After taking a photo, you should strongly consider resizing the Bitmap to a more manageable size and then storing that smaller bitmap to disk. We can then use that resized bitmap before displaying in an ImageView . Resizing a large bitmap and writing to disk can be done with: Then we can write that smaller bitmap back to disk with: Now, we can store the path to that resized image and load that from disk instead for much faster load times. When using the Camera intent to capture a photo, the picture is always taken in the orientation the camera is built into the device. To get your image rotated correctly you’ll have to read the orientation information that is stored into the picture (EXIF meta data) and perform the following transformation using the ExifInterface Support Library: See this guide for the source for this answer. Be aware that on certain devices even the EXIF data isn’t set properly, in which case you should checkout this workaround for a fix. You can read more here about the ExifInterface Support Library. If you need to lookup the image type, there is the guessContentTypeFromStream() in the Java library that allows you to get back the mime type (i.e. image/jpeg ). It will read the first 16 bytes to determine the type of file. In order to use this API call, you must pass in a BufferedInputStream() which supports the mark() and reset() method calls required for the guessContentTypeFromStream() to work. For applying filters to your captured images, check out the following libraries: CameraFilter — Realtime camera filters. Process frames by OpenGL shaders. photofilter — Apply filters to images after they are captured. If you sure to enable access to the external storage to save to the public image, you must add this permission to your AndroidManifest.xml file: Note: The permissions model has changed starting in Marshmallow. If your targetSdkVersion >= 23 and you are running on a Marshmallow (or later) device, you may need to enable runtime permissions. You should also read more about the runtime permissions changes. Instead of using the capture intent to capture photos «the easy way», a custom camera can be used within your app directly leveraging the Camera2 API. This custom camera is much more complicated to implement but sample code can be found here and this CameraView from Google aims to help Android developers easily integrate Camera features. There is also a Google video overview of Camera2 which explains how Camera2 works. There are a number of Camera2 tutorials you can review: There are also a number of third-party libraries available to make custom cameras easier: Leveraging Camera2 or the libraries above, apps can develop a camera that functions in anyway required including custom overlays for depositing checks, taking pictures with a particular form factor, or scanning custom barcodes. Similar to the camera, the media picker implementation depends on the level of customization required: The easy way — launch the Gallery with an intent, and get the media URI in onActivityResult. The hard way — fetch thumbnail and full-size URIs from the MediaStore ContentProvider. Make sure to enable access to the external storage first before using the camera (Note: The permissions model has changed starting in Marshmallow. If your targetSdkVersion >= 23 and you are running on a Marshmallow (or later) device, you may need to enable runtime permissions. You should also read more about the runtime permissions changes): Easy way is to use an intent to launch the gallery: Check out this Stack Overflow post for an alternate approach using mimetypes to restrict content user can select. First, from the above example, we can add the Intent.EXTRA_ALLOW_MULTIPLE flag to the intent: and then inside of onActivityResult , we can access all the photos selected with: Note: that you may need to load the selected bitmaps efficiently or resize them if they are large images to avoid encountering OutOfMemoryError exceptions. Alternatively, we can use a custom gallery selector that is implemented inside of our application to take full control over the gallery picking user experience. Check out this custom gallery source code gist or older libraries wrapping this up for reference. You can also take a look at older tutorials on custom galleries. For allowing users to pick files from their system or online services, check out these helpful filepicker libraries: These allow users to pick files beyond just images and are easy to drop into any app. Источник Mobile Photo Uploads with HTML5 Asynchronous file uploading on the web and especially the mobile web used to be a struggle. Three reasons come to mind: AJAX’s inability to send file data meant Flash and hidden frames became the go-to solutions Mobile browser support for Flash ranged from non-existent to extremely limited Many mobile operating systems — including older versions of iOS, Android, Windows Phone, and BlackBerry — lacked support in their browsers for the HTML input type=file attribute Thankfully, the task of asynchronous file uploading on web and mobile web has been greatly simplified recently. In this post I share some considerations and details that went into the cross-platform, photo uploading app on our mobile web app. Feature Detection vs Browser Detection Many older mobile browsers lack support for HTML file input. Support on current devices is pretty good, but there are a significant number of old devices still in use that cannot handle HTML file input. In order to provide the best possible user experience, we can’t show users a feature their device cannot support — so we need to perform some sort of check to assess if the feature is supported. One way of doing this is to check the browser’s user agent and cross reference that with a list of browsers or devices that are known (either by manual testing or documentation; caniuse is a nice place to start) to support the feature. This is known as browser detection, and is problematic for many reasons. For one, it is difficult to verify all possible device/browser configurations that support the feature of interest. Additionally, it isn’t future-proof: the code you write today may not work tomorrow. For these reasons, it is much better to detect if the feature of interest is available to use in the user’s browser, a practice known as feature detection. This is the goal behind the popular open source JavaScript library Modernizr. The ideal solution would use only feature detection without any browser detection; however, this is not always possible since many browsers will report false positives on certain features. The compromise is to use a mix of the two methods when using only feature detection is not possible. Below is a snippet of code adapted from Modernizr that detects support for HTML file input using a mix of feature and browser detection: Selecting a File Once we know that file input is supported, we can show the HTML input field to the user. When tapped on a mobile device, this input field will prompt the user to either take a new photo with the camera, or to select an existing photo on their device. It’s also possible to allow the user to select multiple photos at once on some devices, by adding the multiple attribute to the input element; however, be aware that on iOS this will remove the option to use the camera as a source. Note that here we use client-side validation to ensure that the selected file is an image, but it is important to validate on the server side as well. In general, validation on the client side provides better feedback to the user, whereas server-side validation is important for security purposes. A look at the file input dialogue on iOS and Android Reading and Processing the File The improvement of camera technology in mobile devices brings with it an increase in the size of photos. Unfortunately, most people don’t have the bandwidth (or the patience) to upload uncompressed 8+ megapixel photos on a regular basis! So what can we do? One solution is to compress and/or downscale photos on the client side before we send the photo over the network. In the past this would not have been a trivial task, but the introduction of HTML5, the FileReader interface, and the Canvas API makes this fairly simple. Let’s break this down into two parts: Using the FileReader interface to read the file Using the Canvas API to downscale and compress the image 1. Reading the File In order to read the file, we first need to listen for changes to the HTML input element described earlier. We can do this with a little jQuery (although the native JavaScript implementation is not much different): In this step it can also be worthwhile to validate that the file is under a given size, as loading a very large image into memory with the Canvas API is expensive, slow, and could cause the browser to crash. When the user selects an image file, the readFile function will be called with the file object. To read the file, we create a new FileReader object and define the success and failure conditions of reading. We must read the file in one of several different formats including array buffer, binary string, data URL, and text. You can refer to the FileReader documentation for details on each of these, but for our purposes reading the file as a data URL is fine as it works quite seamlessly with the Canvas API. 2. Processing the File Once reading the image has completed, we can process it with Canvas. First we create a new image and set its source to the data URL obtained from reading the file. When the image has loaded, we calculate the desired dimensions of the new image. Note that if the size of the new image is smaller than the original, there is no need to process the image (if scaling is our only objective). Next, we create a canvas element which will hold our output image. The canvas getContext method returns an object that provides methods and properties for manipulating the canvas. We use the drawImage method to place the source image on the canvas, resulting in a downscaled version of the original image. The canvas element provides two methods to retrieve image data: toDataURL and toBlob . Both toDataURL and toBlob take as arguments the output image type and the image quality. If the image type is specified as image/jpeg or image/webp , the quality argument (a number between 0 and 1 with a default of 0.92) can be used to further compress the image. This is a fairly simple use case of the Canvas API, though the possibilities extend far beyond scaling. Some examples include client side image editing, cropping, and thumbnail generation. An issue particularly relevant to the mobile web is the problem of lost metadata: most browsers will ignore the EXIF metadata of photos, including the orientation tag, resulting in photos being oriented incorrectly. This is not a problem if we upload the original photo, but since we are generating a new image with Canvas, the EXIF data of the original photo is lost. One solution is to read the EXIF data on the client side and use Canvas to correctly orient the image. Uploading the File In recent years, the technology behind AJAX has evolved to be able to handle file uploads, so we take advantage of this to upload the file asynchronously. There are many benefits to asynchronous file uploading, including the ability to monitor the progress of the upload, and allowing the user to perform additional actions while they wait for the upload to finish. Additionally, if the upload fails for whatever reason, we can provide the user with a hassle-free way of retrying the upload: Tap to retry a failed upload on Hootsuite’s mobile web app To keep things simple, we will use jQuery’s ajax method to perform the request, but if you are familiar with the XMLHttpRequest (XHR) object this task should be no more difficult. We use a FormData object to construct the data payload that we want to send to the server. Using the FormData append method, we can add key/value pairs for files, blobs, and strings to the data payload. When using jQuery and FormData, it is important to set the processData and contentType properties to false. Setting processData to false prevents jQuery from automatically converting the data into a string, while setting contentType to false will prevent jQuery from incorrectly setting the content type to its default of application/x-www-form-urlencoded . Once the file data reaches the server we can handle it with the backend technology of our choice. In PHP, the file data can be accessed in POST if the file data was sent as a data URL, or FILES if the file data was sent as a file or blob. While asynchronous file uploading on the mobile web has long been a headache, the introduction of XMLHttpRequest Level 2 and various HTML5 APIs make this task much much easier. This post only covers the logic behind file processing and uploading, but with a bit of styling and polishing it’s quite easy to provide an awesome user experience. Check out the final product on Hootsuite’s mobile website. Photo sharing via Hootsuite’s mobile web app Thanks to Adam Arsenault, Lars Vedo, Jeff Stautz, Kimli Welsh, and Noel Pullen for their advice and valuable feedback. About the Author Jacob Lee is a co-op student on Hootsuite’s mobile web team, studying computer science at UBC. When he’s not creating web and mobile apps, he enjoys tinkering with digital media, playing hockey and tennis, and jamming on the guitar. Follow him on Twitter @jacobtwlee. Источник
- Differences in file input behaviour between iOS and Android Although the following is not an exhaustive list of ways to set up the file input element, these are a pretty good set of examples that we could default to. NOTE: The examples below use Angular event bindings to handle the change event, but otherwise the implementation will be the same with vanilla JavaScript, StencilJS, React, Vue, or whatever else you are using. Standard File Input On iOS, this will prompt the user to choose between Take Photo or Video , Photo Library , or Browse in order to return the desired file. On Android, this will directly launch the native file selection screen to select any file on the device. Limiting File Input to Images On iOS, this will prompt the user to choose between Take Photo , Photo Library , or Browse in order to return the desired file. Note that Video is no longer a choice in the first option and videos (and other files) will also be excluded from being listed if the user chooses to select an existing photo. On Android, this will launch the same native file selection screen again, but this time it will be filtered to only show images. Using Camera for File Input On iOS, this will directly launch the camera in Photo mode and allow the user to take a photo. Once the user takes a photo they will be able to choose whether to use that photo or if they want to retake the photo. Once the user chooses Use Photo the file will be supplied to the application. On Android, this will directly launch the camera allowing the user to take a photo (not a video). The user can then accept the taken photo or take another. Limiting File Input to Videos On iOS, this will prompt the user to choose between Take Video , Photo Library , or Browse in order to return the desired file. Note that Photo is no longer a choice in the first option and photos (and other files) will also be excluded from being listed if the user chooses to select an existing video. On Android, this will launch the native file selection screen again, but this time it will be filtered to only show videos. Limiting File Input to Audio On iOS, this will prompt the user to choose between Take Photo or Video , Photo Library , or Browse in order to return the desired file. Note that there is no restriction to audio files only in this case. On Android, this will launch the native file selection screen again, but this time it will be filtered to only show audio files. Keep in mind that the specification for the file input element has changed over the years, so you might find many different examples of ways to set up this element and force certain behaviours. In general, my advice would be not to try to «game the system». Use the simplest options and focus on telling the browser what you want, then let the platform decide how best to fulfill that request. If you try to get too tricky and take over this process to enforce what you want, you will leave yourself vulnerable to different behaviours on different platforms/versions and also your solution will be more prone to breaking in the future. If you do need more control over this process, in ways that using the file input element does not allow (or at least it does not allow it consistently across platforms), you can look into using native plugins/APIs instead. The Camera API, for example, will give you much greater control over the process of selecting/capturing a photo than the element will. How do we upload these files to a server? Fortunately, the resulting file reference can be uploaded in the same way as a file retrieved from a normal desktop/web file input element. You will just need to make a POST request that includes multipart/form-data that contains the file(s) you want to upload. For more details on doing that, check out the previous tutorial: Handling File Uploads in Ionic. Summary The standard element provides a surprisingly smooth file selection experience on native iOS and Android platforms, and these files can be easily sent as standard multipart/form-data to your backend server. This will probably be all you need a lot of the time, but for certain specialised circumstances or use cases you might need to look into using native plugins or APIs to fulfil your file selection and transferring needs. If you enjoyed this article, feel free to share it with others! Discussion Need some help with this tutorial? Spotted an error? Got some helpful advice for others? Join the discussion on Twitter If there are no active discussions, start one by including the URL of this post and tag me (@joshuamorony) in a new tweet. I’ll try to help out directly whenever I have the time, but you might also want to include other relevant tags to attract attention from others who might also be able to help. To make it super easy for others to help you out, you might consider setting up an example on Stack Blitz so others can jump right into your code. Источник Accessing the Camera and Stored Media This guide covers how to work with the camera and how to access media stored on the phone. The camera implementation depends on the level of customization required: The easy way — launch the camera with an intent, designating a file path, and handle the onActivityResult. The hard way — use the Camera API to embed the camera preview within your app, adding your own custom controls. You must configure a FileProvider as show in this section. The example below uses com.codepath.fileprovider and should match the authorities XML tag specified. If you see a «INSTALL_FAILED_CONFLICTING_PROVIDER» error when attempting to run the app, change this to something unique, such as com.codepath.fileprovider.YOUR_APP_NAME_HERE , and also update the value in your XML tag to match. In your AndroidManifest.xml, add the following queries block: Easy way works in most cases, using the intent to launch the camera: We need to define the getPhotoFileUri() function: When the camera app finishes, the onActivityResult() method will be called: Check out the official Photo Basics guide for more details. In certain cases, when loading a bitmap with BitmapFactory.decodeFile(file) decoding the Bitmap in memory may actually cause a crash with a OutOfMemoryError: Failed to allocate error. Check out the Loading Bitmaps Efficiently guide and this stackoverflow post for an overview of the solutions. Photos taken with the Camera intent are often quite large and take a very long time to load from disk. After taking a photo, you should strongly consider resizing the Bitmap to a more manageable size and then storing that smaller bitmap to disk. We can then use that resized bitmap before displaying in an ImageView . Resizing a large bitmap and writing to disk can be done with: Then we can write that smaller bitmap back to disk with: Now, we can store the path to that resized image and load that from disk instead for much faster load times. When using the Camera intent to capture a photo, the picture is always taken in the orientation the camera is built into the device. To get your image rotated correctly you’ll have to read the orientation information that is stored into the picture (EXIF meta data) and perform the following transformation using the ExifInterface Support Library: See this guide for the source for this answer. Be aware that on certain devices even the EXIF data isn’t set properly, in which case you should checkout this workaround for a fix. You can read more here about the ExifInterface Support Library. If you need to lookup the image type, there is the guessContentTypeFromStream() in the Java library that allows you to get back the mime type (i.e. image/jpeg ). It will read the first 16 bytes to determine the type of file. In order to use this API call, you must pass in a BufferedInputStream() which supports the mark() and reset() method calls required for the guessContentTypeFromStream() to work. For applying filters to your captured images, check out the following libraries: CameraFilter — Realtime camera filters. Process frames by OpenGL shaders. photofilter — Apply filters to images after they are captured. If you sure to enable access to the external storage to save to the public image, you must add this permission to your AndroidManifest.xml file: Note: The permissions model has changed starting in Marshmallow. If your targetSdkVersion >= 23 and you are running on a Marshmallow (or later) device, you may need to enable runtime permissions. You should also read more about the runtime permissions changes. Instead of using the capture intent to capture photos «the easy way», a custom camera can be used within your app directly leveraging the Camera2 API. This custom camera is much more complicated to implement but sample code can be found here and this CameraView from Google aims to help Android developers easily integrate Camera features. There is also a Google video overview of Camera2 which explains how Camera2 works. There are a number of Camera2 tutorials you can review: There are also a number of third-party libraries available to make custom cameras easier: Leveraging Camera2 or the libraries above, apps can develop a camera that functions in anyway required including custom overlays for depositing checks, taking pictures with a particular form factor, or scanning custom barcodes. Similar to the camera, the media picker implementation depends on the level of customization required: The easy way — launch the Gallery with an intent, and get the media URI in onActivityResult. The hard way — fetch thumbnail and full-size URIs from the MediaStore ContentProvider. Make sure to enable access to the external storage first before using the camera (Note: The permissions model has changed starting in Marshmallow. If your targetSdkVersion >= 23 and you are running on a Marshmallow (or later) device, you may need to enable runtime permissions. You should also read more about the runtime permissions changes): Easy way is to use an intent to launch the gallery: Check out this Stack Overflow post for an alternate approach using mimetypes to restrict content user can select. First, from the above example, we can add the Intent.EXTRA_ALLOW_MULTIPLE flag to the intent: and then inside of onActivityResult , we can access all the photos selected with: Note: that you may need to load the selected bitmaps efficiently or resize them if they are large images to avoid encountering OutOfMemoryError exceptions. Alternatively, we can use a custom gallery selector that is implemented inside of our application to take full control over the gallery picking user experience. Check out this custom gallery source code gist or older libraries wrapping this up for reference. You can also take a look at older tutorials on custom galleries. For allowing users to pick files from their system or online services, check out these helpful filepicker libraries: These allow users to pick files beyond just images and are easy to drop into any app. Источник Mobile Photo Uploads with HTML5 Asynchronous file uploading on the web and especially the mobile web used to be a struggle. Three reasons come to mind: AJAX’s inability to send file data meant Flash and hidden frames became the go-to solutions Mobile browser support for Flash ranged from non-existent to extremely limited Many mobile operating systems — including older versions of iOS, Android, Windows Phone, and BlackBerry — lacked support in their browsers for the HTML input type=file attribute Thankfully, the task of asynchronous file uploading on web and mobile web has been greatly simplified recently. In this post I share some considerations and details that went into the cross-platform, photo uploading app on our mobile web app. Feature Detection vs Browser Detection Many older mobile browsers lack support for HTML file input. Support on current devices is pretty good, but there are a significant number of old devices still in use that cannot handle HTML file input. In order to provide the best possible user experience, we can’t show users a feature their device cannot support — so we need to perform some sort of check to assess if the feature is supported. One way of doing this is to check the browser’s user agent and cross reference that with a list of browsers or devices that are known (either by manual testing or documentation; caniuse is a nice place to start) to support the feature. This is known as browser detection, and is problematic for many reasons. For one, it is difficult to verify all possible device/browser configurations that support the feature of interest. Additionally, it isn’t future-proof: the code you write today may not work tomorrow. For these reasons, it is much better to detect if the feature of interest is available to use in the user’s browser, a practice known as feature detection. This is the goal behind the popular open source JavaScript library Modernizr. The ideal solution would use only feature detection without any browser detection; however, this is not always possible since many browsers will report false positives on certain features. The compromise is to use a mix of the two methods when using only feature detection is not possible. Below is a snippet of code adapted from Modernizr that detects support for HTML file input using a mix of feature and browser detection: Selecting a File Once we know that file input is supported, we can show the HTML input field to the user. When tapped on a mobile device, this input field will prompt the user to either take a new photo with the camera, or to select an existing photo on their device. It’s also possible to allow the user to select multiple photos at once on some devices, by adding the multiple attribute to the input element; however, be aware that on iOS this will remove the option to use the camera as a source. Note that here we use client-side validation to ensure that the selected file is an image, but it is important to validate on the server side as well. In general, validation on the client side provides better feedback to the user, whereas server-side validation is important for security purposes. A look at the file input dialogue on iOS and Android Reading and Processing the File The improvement of camera technology in mobile devices brings with it an increase in the size of photos. Unfortunately, most people don’t have the bandwidth (or the patience) to upload uncompressed 8+ megapixel photos on a regular basis! So what can we do? One solution is to compress and/or downscale photos on the client side before we send the photo over the network. In the past this would not have been a trivial task, but the introduction of HTML5, the FileReader interface, and the Canvas API makes this fairly simple. Let’s break this down into two parts: Using the FileReader interface to read the file Using the Canvas API to downscale and compress the image 1. Reading the File In order to read the file, we first need to listen for changes to the HTML input element described earlier. We can do this with a little jQuery (although the native JavaScript implementation is not much different): In this step it can also be worthwhile to validate that the file is under a given size, as loading a very large image into memory with the Canvas API is expensive, slow, and could cause the browser to crash. When the user selects an image file, the readFile function will be called with the file object. To read the file, we create a new FileReader object and define the success and failure conditions of reading. We must read the file in one of several different formats including array buffer, binary string, data URL, and text. You can refer to the FileReader documentation for details on each of these, but for our purposes reading the file as a data URL is fine as it works quite seamlessly with the Canvas API. 2. Processing the File Once reading the image has completed, we can process it with Canvas. First we create a new image and set its source to the data URL obtained from reading the file. When the image has loaded, we calculate the desired dimensions of the new image. Note that if the size of the new image is smaller than the original, there is no need to process the image (if scaling is our only objective). Next, we create a canvas element which will hold our output image. The canvas getContext method returns an object that provides methods and properties for manipulating the canvas. We use the drawImage method to place the source image on the canvas, resulting in a downscaled version of the original image. The canvas element provides two methods to retrieve image data: toDataURL and toBlob . Both toDataURL and toBlob take as arguments the output image type and the image quality. If the image type is specified as image/jpeg or image/webp , the quality argument (a number between 0 and 1 with a default of 0.92) can be used to further compress the image. This is a fairly simple use case of the Canvas API, though the possibilities extend far beyond scaling. Some examples include client side image editing, cropping, and thumbnail generation. An issue particularly relevant to the mobile web is the problem of lost metadata: most browsers will ignore the EXIF metadata of photos, including the orientation tag, resulting in photos being oriented incorrectly. This is not a problem if we upload the original photo, but since we are generating a new image with Canvas, the EXIF data of the original photo is lost. One solution is to read the EXIF data on the client side and use Canvas to correctly orient the image. Uploading the File In recent years, the technology behind AJAX has evolved to be able to handle file uploads, so we take advantage of this to upload the file asynchronously. There are many benefits to asynchronous file uploading, including the ability to monitor the progress of the upload, and allowing the user to perform additional actions while they wait for the upload to finish. Additionally, if the upload fails for whatever reason, we can provide the user with a hassle-free way of retrying the upload: Tap to retry a failed upload on Hootsuite’s mobile web app To keep things simple, we will use jQuery’s ajax method to perform the request, but if you are familiar with the XMLHttpRequest (XHR) object this task should be no more difficult. We use a FormData object to construct the data payload that we want to send to the server. Using the FormData append method, we can add key/value pairs for files, blobs, and strings to the data payload. When using jQuery and FormData, it is important to set the processData and contentType properties to false. Setting processData to false prevents jQuery from automatically converting the data into a string, while setting contentType to false will prevent jQuery from incorrectly setting the content type to its default of application/x-www-form-urlencoded . Once the file data reaches the server we can handle it with the backend technology of our choice. In PHP, the file data can be accessed in POST if the file data was sent as a data URL, or FILES if the file data was sent as a file or blob. While asynchronous file uploading on the mobile web has long been a headache, the introduction of XMLHttpRequest Level 2 and various HTML5 APIs make this task much much easier. This post only covers the logic behind file processing and uploading, but with a bit of styling and polishing it’s quite easy to provide an awesome user experience. Check out the final product on Hootsuite’s mobile website. Photo sharing via Hootsuite’s mobile web app Thanks to Adam Arsenault, Lars Vedo, Jeff Stautz, Kimli Welsh, and Noel Pullen for their advice and valuable feedback. About the Author Jacob Lee is a co-op student on Hootsuite’s mobile web team, studying computer science at UBC. When he’s not creating web and mobile apps, he enjoys tinkering with digital media, playing hockey and tennis, and jamming on the guitar. Follow him on Twitter @jacobtwlee. Источник
- Standard File Input On iOS, this will prompt the user to choose between Take Photo or Video , Photo Library , or Browse in order to return the desired file. On Android, this will directly launch the native file selection screen to select any file on the device. Limiting File Input to Images On iOS, this will prompt the user to choose between Take Photo , Photo Library , or Browse in order to return the desired file. Note that Video is no longer a choice in the first option and videos (and other files) will also be excluded from being listed if the user chooses to select an existing photo. On Android, this will launch the same native file selection screen again, but this time it will be filtered to only show images. Using Camera for File Input On iOS, this will directly launch the camera in Photo mode and allow the user to take a photo. Once the user takes a photo they will be able to choose whether to use that photo or if they want to retake the photo. Once the user chooses Use Photo the file will be supplied to the application. On Android, this will directly launch the camera allowing the user to take a photo (not a video). The user can then accept the taken photo or take another. Limiting File Input to Videos On iOS, this will prompt the user to choose between Take Video , Photo Library , or Browse in order to return the desired file. Note that Photo is no longer a choice in the first option and photos (and other files) will also be excluded from being listed if the user chooses to select an existing video. On Android, this will launch the native file selection screen again, but this time it will be filtered to only show videos. Limiting File Input to Audio On iOS, this will prompt the user to choose between Take Photo or Video , Photo Library , or Browse in order to return the desired file. Note that there is no restriction to audio files only in this case. On Android, this will launch the native file selection screen again, but this time it will be filtered to only show audio files. Keep in mind that the specification for the file input element has changed over the years, so you might find many different examples of ways to set up this element and force certain behaviours. In general, my advice would be not to try to «game the system». Use the simplest options and focus on telling the browser what you want, then let the platform decide how best to fulfill that request. If you try to get too tricky and take over this process to enforce what you want, you will leave yourself vulnerable to different behaviours on different platforms/versions and also your solution will be more prone to breaking in the future. If you do need more control over this process, in ways that using the file input element does not allow (or at least it does not allow it consistently across platforms), you can look into using native plugins/APIs instead. The Camera API, for example, will give you much greater control over the process of selecting/capturing a photo than the element will. How do we upload these files to a server? Fortunately, the resulting file reference can be uploaded in the same way as a file retrieved from a normal desktop/web file input element. You will just need to make a POST request that includes multipart/form-data that contains the file(s) you want to upload. For more details on doing that, check out the previous tutorial: Handling File Uploads in Ionic. Summary The standard element provides a surprisingly smooth file selection experience on native iOS and Android platforms, and these files can be easily sent as standard multipart/form-data to your backend server. This will probably be all you need a lot of the time, but for certain specialised circumstances or use cases you might need to look into using native plugins or APIs to fulfil your file selection and transferring needs. If you enjoyed this article, feel free to share it with others! Discussion Need some help with this tutorial? Spotted an error? Got some helpful advice for others? Join the discussion on Twitter If there are no active discussions, start one by including the URL of this post and tag me (@joshuamorony) in a new tweet. I’ll try to help out directly whenever I have the time, but you might also want to include other relevant tags to attract attention from others who might also be able to help. To make it super easy for others to help you out, you might consider setting up an example on Stack Blitz so others can jump right into your code. Источник Accessing the Camera and Stored Media This guide covers how to work with the camera and how to access media stored on the phone. The camera implementation depends on the level of customization required: The easy way — launch the camera with an intent, designating a file path, and handle the onActivityResult. The hard way — use the Camera API to embed the camera preview within your app, adding your own custom controls. You must configure a FileProvider as show in this section. The example below uses com.codepath.fileprovider and should match the authorities XML tag specified. If you see a «INSTALL_FAILED_CONFLICTING_PROVIDER» error when attempting to run the app, change this to something unique, such as com.codepath.fileprovider.YOUR_APP_NAME_HERE , and also update the value in your XML tag to match. In your AndroidManifest.xml, add the following queries block: Easy way works in most cases, using the intent to launch the camera: We need to define the getPhotoFileUri() function: When the camera app finishes, the onActivityResult() method will be called: Check out the official Photo Basics guide for more details. In certain cases, when loading a bitmap with BitmapFactory.decodeFile(file) decoding the Bitmap in memory may actually cause a crash with a OutOfMemoryError: Failed to allocate error. Check out the Loading Bitmaps Efficiently guide and this stackoverflow post for an overview of the solutions. Photos taken with the Camera intent are often quite large and take a very long time to load from disk. After taking a photo, you should strongly consider resizing the Bitmap to a more manageable size and then storing that smaller bitmap to disk. We can then use that resized bitmap before displaying in an ImageView . Resizing a large bitmap and writing to disk can be done with: Then we can write that smaller bitmap back to disk with: Now, we can store the path to that resized image and load that from disk instead for much faster load times. When using the Camera intent to capture a photo, the picture is always taken in the orientation the camera is built into the device. To get your image rotated correctly you’ll have to read the orientation information that is stored into the picture (EXIF meta data) and perform the following transformation using the ExifInterface Support Library: See this guide for the source for this answer. Be aware that on certain devices even the EXIF data isn’t set properly, in which case you should checkout this workaround for a fix. You can read more here about the ExifInterface Support Library. If you need to lookup the image type, there is the guessContentTypeFromStream() in the Java library that allows you to get back the mime type (i.e. image/jpeg ). It will read the first 16 bytes to determine the type of file. In order to use this API call, you must pass in a BufferedInputStream() which supports the mark() and reset() method calls required for the guessContentTypeFromStream() to work. For applying filters to your captured images, check out the following libraries: CameraFilter — Realtime camera filters. Process frames by OpenGL shaders. photofilter — Apply filters to images after they are captured. If you sure to enable access to the external storage to save to the public image, you must add this permission to your AndroidManifest.xml file: Note: The permissions model has changed starting in Marshmallow. If your targetSdkVersion >= 23 and you are running on a Marshmallow (or later) device, you may need to enable runtime permissions. You should also read more about the runtime permissions changes. Instead of using the capture intent to capture photos «the easy way», a custom camera can be used within your app directly leveraging the Camera2 API. This custom camera is much more complicated to implement but sample code can be found here and this CameraView from Google aims to help Android developers easily integrate Camera features. There is also a Google video overview of Camera2 which explains how Camera2 works. There are a number of Camera2 tutorials you can review: There are also a number of third-party libraries available to make custom cameras easier: Leveraging Camera2 or the libraries above, apps can develop a camera that functions in anyway required including custom overlays for depositing checks, taking pictures with a particular form factor, or scanning custom barcodes. Similar to the camera, the media picker implementation depends on the level of customization required: The easy way — launch the Gallery with an intent, and get the media URI in onActivityResult. The hard way — fetch thumbnail and full-size URIs from the MediaStore ContentProvider. Make sure to enable access to the external storage first before using the camera (Note: The permissions model has changed starting in Marshmallow. If your targetSdkVersion >= 23 and you are running on a Marshmallow (or later) device, you may need to enable runtime permissions. You should also read more about the runtime permissions changes): Easy way is to use an intent to launch the gallery: Check out this Stack Overflow post for an alternate approach using mimetypes to restrict content user can select. First, from the above example, we can add the Intent.EXTRA_ALLOW_MULTIPLE flag to the intent: and then inside of onActivityResult , we can access all the photos selected with: Note: that you may need to load the selected bitmaps efficiently or resize them if they are large images to avoid encountering OutOfMemoryError exceptions. Alternatively, we can use a custom gallery selector that is implemented inside of our application to take full control over the gallery picking user experience. Check out this custom gallery source code gist or older libraries wrapping this up for reference. You can also take a look at older tutorials on custom galleries. For allowing users to pick files from their system or online services, check out these helpful filepicker libraries: These allow users to pick files beyond just images and are easy to drop into any app. Источник Mobile Photo Uploads with HTML5 Asynchronous file uploading on the web and especially the mobile web used to be a struggle. Three reasons come to mind: AJAX’s inability to send file data meant Flash and hidden frames became the go-to solutions Mobile browser support for Flash ranged from non-existent to extremely limited Many mobile operating systems — including older versions of iOS, Android, Windows Phone, and BlackBerry — lacked support in their browsers for the HTML input type=file attribute Thankfully, the task of asynchronous file uploading on web and mobile web has been greatly simplified recently. In this post I share some considerations and details that went into the cross-platform, photo uploading app on our mobile web app. Feature Detection vs Browser Detection Many older mobile browsers lack support for HTML file input. Support on current devices is pretty good, but there are a significant number of old devices still in use that cannot handle HTML file input. In order to provide the best possible user experience, we can’t show users a feature their device cannot support — so we need to perform some sort of check to assess if the feature is supported. One way of doing this is to check the browser’s user agent and cross reference that with a list of browsers or devices that are known (either by manual testing or documentation; caniuse is a nice place to start) to support the feature. This is known as browser detection, and is problematic for many reasons. For one, it is difficult to verify all possible device/browser configurations that support the feature of interest. Additionally, it isn’t future-proof: the code you write today may not work tomorrow. For these reasons, it is much better to detect if the feature of interest is available to use in the user’s browser, a practice known as feature detection. This is the goal behind the popular open source JavaScript library Modernizr. The ideal solution would use only feature detection without any browser detection; however, this is not always possible since many browsers will report false positives on certain features. The compromise is to use a mix of the two methods when using only feature detection is not possible. Below is a snippet of code adapted from Modernizr that detects support for HTML file input using a mix of feature and browser detection: Selecting a File Once we know that file input is supported, we can show the HTML input field to the user. When tapped on a mobile device, this input field will prompt the user to either take a new photo with the camera, or to select an existing photo on their device. It’s also possible to allow the user to select multiple photos at once on some devices, by adding the multiple attribute to the input element; however, be aware that on iOS this will remove the option to use the camera as a source. Note that here we use client-side validation to ensure that the selected file is an image, but it is important to validate on the server side as well. In general, validation on the client side provides better feedback to the user, whereas server-side validation is important for security purposes. A look at the file input dialogue on iOS and Android Reading and Processing the File The improvement of camera technology in mobile devices brings with it an increase in the size of photos. Unfortunately, most people don’t have the bandwidth (or the patience) to upload uncompressed 8+ megapixel photos on a regular basis! So what can we do? One solution is to compress and/or downscale photos on the client side before we send the photo over the network. In the past this would not have been a trivial task, but the introduction of HTML5, the FileReader interface, and the Canvas API makes this fairly simple. Let’s break this down into two parts: Using the FileReader interface to read the file Using the Canvas API to downscale and compress the image 1. Reading the File In order to read the file, we first need to listen for changes to the HTML input element described earlier. We can do this with a little jQuery (although the native JavaScript implementation is not much different): In this step it can also be worthwhile to validate that the file is under a given size, as loading a very large image into memory with the Canvas API is expensive, slow, and could cause the browser to crash. When the user selects an image file, the readFile function will be called with the file object. To read the file, we create a new FileReader object and define the success and failure conditions of reading. We must read the file in one of several different formats including array buffer, binary string, data URL, and text. You can refer to the FileReader documentation for details on each of these, but for our purposes reading the file as a data URL is fine as it works quite seamlessly with the Canvas API. 2. Processing the File Once reading the image has completed, we can process it with Canvas. First we create a new image and set its source to the data URL obtained from reading the file. When the image has loaded, we calculate the desired dimensions of the new image. Note that if the size of the new image is smaller than the original, there is no need to process the image (if scaling is our only objective). Next, we create a canvas element which will hold our output image. The canvas getContext method returns an object that provides methods and properties for manipulating the canvas. We use the drawImage method to place the source image on the canvas, resulting in a downscaled version of the original image. The canvas element provides two methods to retrieve image data: toDataURL and toBlob . Both toDataURL and toBlob take as arguments the output image type and the image quality. If the image type is specified as image/jpeg or image/webp , the quality argument (a number between 0 and 1 with a default of 0.92) can be used to further compress the image. This is a fairly simple use case of the Canvas API, though the possibilities extend far beyond scaling. Some examples include client side image editing, cropping, and thumbnail generation. An issue particularly relevant to the mobile web is the problem of lost metadata: most browsers will ignore the EXIF metadata of photos, including the orientation tag, resulting in photos being oriented incorrectly. This is not a problem if we upload the original photo, but since we are generating a new image with Canvas, the EXIF data of the original photo is lost. One solution is to read the EXIF data on the client side and use Canvas to correctly orient the image. Uploading the File In recent years, the technology behind AJAX has evolved to be able to handle file uploads, so we take advantage of this to upload the file asynchronously. There are many benefits to asynchronous file uploading, including the ability to monitor the progress of the upload, and allowing the user to perform additional actions while they wait for the upload to finish. Additionally, if the upload fails for whatever reason, we can provide the user with a hassle-free way of retrying the upload: Tap to retry a failed upload on Hootsuite’s mobile web app To keep things simple, we will use jQuery’s ajax method to perform the request, but if you are familiar with the XMLHttpRequest (XHR) object this task should be no more difficult. We use a FormData object to construct the data payload that we want to send to the server. Using the FormData append method, we can add key/value pairs for files, blobs, and strings to the data payload. When using jQuery and FormData, it is important to set the processData and contentType properties to false. Setting processData to false prevents jQuery from automatically converting the data into a string, while setting contentType to false will prevent jQuery from incorrectly setting the content type to its default of application/x-www-form-urlencoded . Once the file data reaches the server we can handle it with the backend technology of our choice. In PHP, the file data can be accessed in POST if the file data was sent as a data URL, or FILES if the file data was sent as a file or blob. While asynchronous file uploading on the mobile web has long been a headache, the introduction of XMLHttpRequest Level 2 and various HTML5 APIs make this task much much easier. This post only covers the logic behind file processing and uploading, but with a bit of styling and polishing it’s quite easy to provide an awesome user experience. Check out the final product on Hootsuite’s mobile website. Photo sharing via Hootsuite’s mobile web app Thanks to Adam Arsenault, Lars Vedo, Jeff Stautz, Kimli Welsh, and Noel Pullen for their advice and valuable feedback. About the Author Jacob Lee is a co-op student on Hootsuite’s mobile web team, studying computer science at UBC. When he’s not creating web and mobile apps, he enjoys tinkering with digital media, playing hockey and tennis, and jamming on the guitar. Follow him on Twitter @jacobtwlee. Источник
- Limiting File Input to Images On iOS, this will prompt the user to choose between Take Photo , Photo Library , or Browse in order to return the desired file. Note that Video is no longer a choice in the first option and videos (and other files) will also be excluded from being listed if the user chooses to select an existing photo. On Android, this will launch the same native file selection screen again, but this time it will be filtered to only show images. Using Camera for File Input On iOS, this will directly launch the camera in Photo mode and allow the user to take a photo. Once the user takes a photo they will be able to choose whether to use that photo or if they want to retake the photo. Once the user chooses Use Photo the file will be supplied to the application. On Android, this will directly launch the camera allowing the user to take a photo (not a video). The user can then accept the taken photo or take another. Limiting File Input to Videos On iOS, this will prompt the user to choose between Take Video , Photo Library , or Browse in order to return the desired file. Note that Photo is no longer a choice in the first option and photos (and other files) will also be excluded from being listed if the user chooses to select an existing video. On Android, this will launch the native file selection screen again, but this time it will be filtered to only show videos. Limiting File Input to Audio On iOS, this will prompt the user to choose between Take Photo or Video , Photo Library , or Browse in order to return the desired file. Note that there is no restriction to audio files only in this case. On Android, this will launch the native file selection screen again, but this time it will be filtered to only show audio files. Keep in mind that the specification for the file input element has changed over the years, so you might find many different examples of ways to set up this element and force certain behaviours. In general, my advice would be not to try to «game the system». Use the simplest options and focus on telling the browser what you want, then let the platform decide how best to fulfill that request. If you try to get too tricky and take over this process to enforce what you want, you will leave yourself vulnerable to different behaviours on different platforms/versions and also your solution will be more prone to breaking in the future. If you do need more control over this process, in ways that using the file input element does not allow (or at least it does not allow it consistently across platforms), you can look into using native plugins/APIs instead. The Camera API, for example, will give you much greater control over the process of selecting/capturing a photo than the element will. How do we upload these files to a server? Fortunately, the resulting file reference can be uploaded in the same way as a file retrieved from a normal desktop/web file input element. You will just need to make a POST request that includes multipart/form-data that contains the file(s) you want to upload. For more details on doing that, check out the previous tutorial: Handling File Uploads in Ionic. Summary The standard element provides a surprisingly smooth file selection experience on native iOS and Android platforms, and these files can be easily sent as standard multipart/form-data to your backend server. This will probably be all you need a lot of the time, but for certain specialised circumstances or use cases you might need to look into using native plugins or APIs to fulfil your file selection and transferring needs. If you enjoyed this article, feel free to share it with others! Discussion Need some help with this tutorial? Spotted an error? Got some helpful advice for others? Join the discussion on Twitter If there are no active discussions, start one by including the URL of this post and tag me (@joshuamorony) in a new tweet. I’ll try to help out directly whenever I have the time, but you might also want to include other relevant tags to attract attention from others who might also be able to help. To make it super easy for others to help you out, you might consider setting up an example on Stack Blitz so others can jump right into your code. Источник Accessing the Camera and Stored Media This guide covers how to work with the camera and how to access media stored on the phone. The camera implementation depends on the level of customization required: The easy way — launch the camera with an intent, designating a file path, and handle the onActivityResult. The hard way — use the Camera API to embed the camera preview within your app, adding your own custom controls. You must configure a FileProvider as show in this section. The example below uses com.codepath.fileprovider and should match the authorities XML tag specified. If you see a «INSTALL_FAILED_CONFLICTING_PROVIDER» error when attempting to run the app, change this to something unique, such as com.codepath.fileprovider.YOUR_APP_NAME_HERE , and also update the value in your XML tag to match. In your AndroidManifest.xml, add the following queries block: Easy way works in most cases, using the intent to launch the camera: We need to define the getPhotoFileUri() function: When the camera app finishes, the onActivityResult() method will be called: Check out the official Photo Basics guide for more details. In certain cases, when loading a bitmap with BitmapFactory.decodeFile(file) decoding the Bitmap in memory may actually cause a crash with a OutOfMemoryError: Failed to allocate error. Check out the Loading Bitmaps Efficiently guide and this stackoverflow post for an overview of the solutions. Photos taken with the Camera intent are often quite large and take a very long time to load from disk. After taking a photo, you should strongly consider resizing the Bitmap to a more manageable size and then storing that smaller bitmap to disk. We can then use that resized bitmap before displaying in an ImageView . Resizing a large bitmap and writing to disk can be done with: Then we can write that smaller bitmap back to disk with: Now, we can store the path to that resized image and load that from disk instead for much faster load times. When using the Camera intent to capture a photo, the picture is always taken in the orientation the camera is built into the device. To get your image rotated correctly you’ll have to read the orientation information that is stored into the picture (EXIF meta data) and perform the following transformation using the ExifInterface Support Library: See this guide for the source for this answer. Be aware that on certain devices even the EXIF data isn’t set properly, in which case you should checkout this workaround for a fix. You can read more here about the ExifInterface Support Library. If you need to lookup the image type, there is the guessContentTypeFromStream() in the Java library that allows you to get back the mime type (i.e. image/jpeg ). It will read the first 16 bytes to determine the type of file. In order to use this API call, you must pass in a BufferedInputStream() which supports the mark() and reset() method calls required for the guessContentTypeFromStream() to work. For applying filters to your captured images, check out the following libraries: CameraFilter — Realtime camera filters. Process frames by OpenGL shaders. photofilter — Apply filters to images after they are captured. If you sure to enable access to the external storage to save to the public image, you must add this permission to your AndroidManifest.xml file: Note: The permissions model has changed starting in Marshmallow. If your targetSdkVersion >= 23 and you are running on a Marshmallow (or later) device, you may need to enable runtime permissions. You should also read more about the runtime permissions changes. Instead of using the capture intent to capture photos «the easy way», a custom camera can be used within your app directly leveraging the Camera2 API. This custom camera is much more complicated to implement but sample code can be found here and this CameraView from Google aims to help Android developers easily integrate Camera features. There is also a Google video overview of Camera2 which explains how Camera2 works. There are a number of Camera2 tutorials you can review: There are also a number of third-party libraries available to make custom cameras easier: Leveraging Camera2 or the libraries above, apps can develop a camera that functions in anyway required including custom overlays for depositing checks, taking pictures with a particular form factor, or scanning custom barcodes. Similar to the camera, the media picker implementation depends on the level of customization required: The easy way — launch the Gallery with an intent, and get the media URI in onActivityResult. The hard way — fetch thumbnail and full-size URIs from the MediaStore ContentProvider. Make sure to enable access to the external storage first before using the camera (Note: The permissions model has changed starting in Marshmallow. If your targetSdkVersion >= 23 and you are running on a Marshmallow (or later) device, you may need to enable runtime permissions. You should also read more about the runtime permissions changes): Easy way is to use an intent to launch the gallery: Check out this Stack Overflow post for an alternate approach using mimetypes to restrict content user can select. First, from the above example, we can add the Intent.EXTRA_ALLOW_MULTIPLE flag to the intent: and then inside of onActivityResult , we can access all the photos selected with: Note: that you may need to load the selected bitmaps efficiently or resize them if they are large images to avoid encountering OutOfMemoryError exceptions. Alternatively, we can use a custom gallery selector that is implemented inside of our application to take full control over the gallery picking user experience. Check out this custom gallery source code gist or older libraries wrapping this up for reference. You can also take a look at older tutorials on custom galleries. For allowing users to pick files from their system or online services, check out these helpful filepicker libraries: These allow users to pick files beyond just images and are easy to drop into any app. Источник Mobile Photo Uploads with HTML5 Asynchronous file uploading on the web and especially the mobile web used to be a struggle. Three reasons come to mind: AJAX’s inability to send file data meant Flash and hidden frames became the go-to solutions Mobile browser support for Flash ranged from non-existent to extremely limited Many mobile operating systems — including older versions of iOS, Android, Windows Phone, and BlackBerry — lacked support in their browsers for the HTML input type=file attribute Thankfully, the task of asynchronous file uploading on web and mobile web has been greatly simplified recently. In this post I share some considerations and details that went into the cross-platform, photo uploading app on our mobile web app. Feature Detection vs Browser Detection Many older mobile browsers lack support for HTML file input. Support on current devices is pretty good, but there are a significant number of old devices still in use that cannot handle HTML file input. In order to provide the best possible user experience, we can’t show users a feature their device cannot support — so we need to perform some sort of check to assess if the feature is supported. One way of doing this is to check the browser’s user agent and cross reference that with a list of browsers or devices that are known (either by manual testing or documentation; caniuse is a nice place to start) to support the feature. This is known as browser detection, and is problematic for many reasons. For one, it is difficult to verify all possible device/browser configurations that support the feature of interest. Additionally, it isn’t future-proof: the code you write today may not work tomorrow. For these reasons, it is much better to detect if the feature of interest is available to use in the user’s browser, a practice known as feature detection. This is the goal behind the popular open source JavaScript library Modernizr. The ideal solution would use only feature detection without any browser detection; however, this is not always possible since many browsers will report false positives on certain features. The compromise is to use a mix of the two methods when using only feature detection is not possible. Below is a snippet of code adapted from Modernizr that detects support for HTML file input using a mix of feature and browser detection: Selecting a File Once we know that file input is supported, we can show the HTML input field to the user. When tapped on a mobile device, this input field will prompt the user to either take a new photo with the camera, or to select an existing photo on their device. It’s also possible to allow the user to select multiple photos at once on some devices, by adding the multiple attribute to the input element; however, be aware that on iOS this will remove the option to use the camera as a source. Note that here we use client-side validation to ensure that the selected file is an image, but it is important to validate on the server side as well. In general, validation on the client side provides better feedback to the user, whereas server-side validation is important for security purposes. A look at the file input dialogue on iOS and Android Reading and Processing the File The improvement of camera technology in mobile devices brings with it an increase in the size of photos. Unfortunately, most people don’t have the bandwidth (or the patience) to upload uncompressed 8+ megapixel photos on a regular basis! So what can we do? One solution is to compress and/or downscale photos on the client side before we send the photo over the network. In the past this would not have been a trivial task, but the introduction of HTML5, the FileReader interface, and the Canvas API makes this fairly simple. Let’s break this down into two parts: Using the FileReader interface to read the file Using the Canvas API to downscale and compress the image 1. Reading the File In order to read the file, we first need to listen for changes to the HTML input element described earlier. We can do this with a little jQuery (although the native JavaScript implementation is not much different): In this step it can also be worthwhile to validate that the file is under a given size, as loading a very large image into memory with the Canvas API is expensive, slow, and could cause the browser to crash. When the user selects an image file, the readFile function will be called with the file object. To read the file, we create a new FileReader object and define the success and failure conditions of reading. We must read the file in one of several different formats including array buffer, binary string, data URL, and text. You can refer to the FileReader documentation for details on each of these, but for our purposes reading the file as a data URL is fine as it works quite seamlessly with the Canvas API. 2. Processing the File Once reading the image has completed, we can process it with Canvas. First we create a new image and set its source to the data URL obtained from reading the file. When the image has loaded, we calculate the desired dimensions of the new image. Note that if the size of the new image is smaller than the original, there is no need to process the image (if scaling is our only objective). Next, we create a canvas element which will hold our output image. The canvas getContext method returns an object that provides methods and properties for manipulating the canvas. We use the drawImage method to place the source image on the canvas, resulting in a downscaled version of the original image. The canvas element provides two methods to retrieve image data: toDataURL and toBlob . Both toDataURL and toBlob take as arguments the output image type and the image quality. If the image type is specified as image/jpeg or image/webp , the quality argument (a number between 0 and 1 with a default of 0.92) can be used to further compress the image. This is a fairly simple use case of the Canvas API, though the possibilities extend far beyond scaling. Some examples include client side image editing, cropping, and thumbnail generation. An issue particularly relevant to the mobile web is the problem of lost metadata: most browsers will ignore the EXIF metadata of photos, including the orientation tag, resulting in photos being oriented incorrectly. This is not a problem if we upload the original photo, but since we are generating a new image with Canvas, the EXIF data of the original photo is lost. One solution is to read the EXIF data on the client side and use Canvas to correctly orient the image. Uploading the File In recent years, the technology behind AJAX has evolved to be able to handle file uploads, so we take advantage of this to upload the file asynchronously. There are many benefits to asynchronous file uploading, including the ability to monitor the progress of the upload, and allowing the user to perform additional actions while they wait for the upload to finish. Additionally, if the upload fails for whatever reason, we can provide the user with a hassle-free way of retrying the upload: Tap to retry a failed upload on Hootsuite’s mobile web app To keep things simple, we will use jQuery’s ajax method to perform the request, but if you are familiar with the XMLHttpRequest (XHR) object this task should be no more difficult. We use a FormData object to construct the data payload that we want to send to the server. Using the FormData append method, we can add key/value pairs for files, blobs, and strings to the data payload. When using jQuery and FormData, it is important to set the processData and contentType properties to false. Setting processData to false prevents jQuery from automatically converting the data into a string, while setting contentType to false will prevent jQuery from incorrectly setting the content type to its default of application/x-www-form-urlencoded . Once the file data reaches the server we can handle it with the backend technology of our choice. In PHP, the file data can be accessed in POST if the file data was sent as a data URL, or FILES if the file data was sent as a file or blob. While asynchronous file uploading on the mobile web has long been a headache, the introduction of XMLHttpRequest Level 2 and various HTML5 APIs make this task much much easier. This post only covers the logic behind file processing and uploading, but with a bit of styling and polishing it’s quite easy to provide an awesome user experience. Check out the final product on Hootsuite’s mobile website. Photo sharing via Hootsuite’s mobile web app Thanks to Adam Arsenault, Lars Vedo, Jeff Stautz, Kimli Welsh, and Noel Pullen for their advice and valuable feedback. About the Author Jacob Lee is a co-op student on Hootsuite’s mobile web team, studying computer science at UBC. When he’s not creating web and mobile apps, he enjoys tinkering with digital media, playing hockey and tennis, and jamming on the guitar. Follow him on Twitter @jacobtwlee. Источник
- Using Camera for File Input On iOS, this will directly launch the camera in Photo mode and allow the user to take a photo. Once the user takes a photo they will be able to choose whether to use that photo or if they want to retake the photo. Once the user chooses Use Photo the file will be supplied to the application. On Android, this will directly launch the camera allowing the user to take a photo (not a video). The user can then accept the taken photo or take another. Limiting File Input to Videos On iOS, this will prompt the user to choose between Take Video , Photo Library , or Browse in order to return the desired file. Note that Photo is no longer a choice in the first option and photos (and other files) will also be excluded from being listed if the user chooses to select an existing video. On Android, this will launch the native file selection screen again, but this time it will be filtered to only show videos. Limiting File Input to Audio On iOS, this will prompt the user to choose between Take Photo or Video , Photo Library , or Browse in order to return the desired file. Note that there is no restriction to audio files only in this case. On Android, this will launch the native file selection screen again, but this time it will be filtered to only show audio files. Keep in mind that the specification for the file input element has changed over the years, so you might find many different examples of ways to set up this element and force certain behaviours. In general, my advice would be not to try to «game the system». Use the simplest options and focus on telling the browser what you want, then let the platform decide how best to fulfill that request. If you try to get too tricky and take over this process to enforce what you want, you will leave yourself vulnerable to different behaviours on different platforms/versions and also your solution will be more prone to breaking in the future. If you do need more control over this process, in ways that using the file input element does not allow (or at least it does not allow it consistently across platforms), you can look into using native plugins/APIs instead. The Camera API, for example, will give you much greater control over the process of selecting/capturing a photo than the element will. How do we upload these files to a server? Fortunately, the resulting file reference can be uploaded in the same way as a file retrieved from a normal desktop/web file input element. You will just need to make a POST request that includes multipart/form-data that contains the file(s) you want to upload. For more details on doing that, check out the previous tutorial: Handling File Uploads in Ionic. Summary The standard element provides a surprisingly smooth file selection experience on native iOS and Android platforms, and these files can be easily sent as standard multipart/form-data to your backend server. This will probably be all you need a lot of the time, but for certain specialised circumstances or use cases you might need to look into using native plugins or APIs to fulfil your file selection and transferring needs. If you enjoyed this article, feel free to share it with others! Discussion Need some help with this tutorial? Spotted an error? Got some helpful advice for others? Join the discussion on Twitter If there are no active discussions, start one by including the URL of this post and tag me (@joshuamorony) in a new tweet. I’ll try to help out directly whenever I have the time, but you might also want to include other relevant tags to attract attention from others who might also be able to help. To make it super easy for others to help you out, you might consider setting up an example on Stack Blitz so others can jump right into your code. Источник Accessing the Camera and Stored Media This guide covers how to work with the camera and how to access media stored on the phone. The camera implementation depends on the level of customization required: The easy way — launch the camera with an intent, designating a file path, and handle the onActivityResult. The hard way — use the Camera API to embed the camera preview within your app, adding your own custom controls. You must configure a FileProvider as show in this section. The example below uses com.codepath.fileprovider and should match the authorities XML tag specified. If you see a «INSTALL_FAILED_CONFLICTING_PROVIDER» error when attempting to run the app, change this to something unique, such as com.codepath.fileprovider.YOUR_APP_NAME_HERE , and also update the value in your XML tag to match. In your AndroidManifest.xml, add the following queries block: Easy way works in most cases, using the intent to launch the camera: We need to define the getPhotoFileUri() function: When the camera app finishes, the onActivityResult() method will be called: Check out the official Photo Basics guide for more details. In certain cases, when loading a bitmap with BitmapFactory.decodeFile(file) decoding the Bitmap in memory may actually cause a crash with a OutOfMemoryError: Failed to allocate error. Check out the Loading Bitmaps Efficiently guide and this stackoverflow post for an overview of the solutions. Photos taken with the Camera intent are often quite large and take a very long time to load from disk. After taking a photo, you should strongly consider resizing the Bitmap to a more manageable size and then storing that smaller bitmap to disk. We can then use that resized bitmap before displaying in an ImageView . Resizing a large bitmap and writing to disk can be done with: Then we can write that smaller bitmap back to disk with: Now, we can store the path to that resized image and load that from disk instead for much faster load times. When using the Camera intent to capture a photo, the picture is always taken in the orientation the camera is built into the device. To get your image rotated correctly you’ll have to read the orientation information that is stored into the picture (EXIF meta data) and perform the following transformation using the ExifInterface Support Library: See this guide for the source for this answer. Be aware that on certain devices even the EXIF data isn’t set properly, in which case you should checkout this workaround for a fix. You can read more here about the ExifInterface Support Library. If you need to lookup the image type, there is the guessContentTypeFromStream() in the Java library that allows you to get back the mime type (i.e. image/jpeg ). It will read the first 16 bytes to determine the type of file. In order to use this API call, you must pass in a BufferedInputStream() which supports the mark() and reset() method calls required for the guessContentTypeFromStream() to work. For applying filters to your captured images, check out the following libraries: CameraFilter — Realtime camera filters. Process frames by OpenGL shaders. photofilter — Apply filters to images after they are captured. If you sure to enable access to the external storage to save to the public image, you must add this permission to your AndroidManifest.xml file: Note: The permissions model has changed starting in Marshmallow. If your targetSdkVersion >= 23 and you are running on a Marshmallow (or later) device, you may need to enable runtime permissions. You should also read more about the runtime permissions changes. Instead of using the capture intent to capture photos «the easy way», a custom camera can be used within your app directly leveraging the Camera2 API. This custom camera is much more complicated to implement but sample code can be found here and this CameraView from Google aims to help Android developers easily integrate Camera features. There is also a Google video overview of Camera2 which explains how Camera2 works. There are a number of Camera2 tutorials you can review: There are also a number of third-party libraries available to make custom cameras easier: Leveraging Camera2 or the libraries above, apps can develop a camera that functions in anyway required including custom overlays for depositing checks, taking pictures with a particular form factor, or scanning custom barcodes. Similar to the camera, the media picker implementation depends on the level of customization required: The easy way — launch the Gallery with an intent, and get the media URI in onActivityResult. The hard way — fetch thumbnail and full-size URIs from the MediaStore ContentProvider. Make sure to enable access to the external storage first before using the camera (Note: The permissions model has changed starting in Marshmallow. If your targetSdkVersion >= 23 and you are running on a Marshmallow (or later) device, you may need to enable runtime permissions. You should also read more about the runtime permissions changes): Easy way is to use an intent to launch the gallery: Check out this Stack Overflow post for an alternate approach using mimetypes to restrict content user can select. First, from the above example, we can add the Intent.EXTRA_ALLOW_MULTIPLE flag to the intent: and then inside of onActivityResult , we can access all the photos selected with: Note: that you may need to load the selected bitmaps efficiently or resize them if they are large images to avoid encountering OutOfMemoryError exceptions. Alternatively, we can use a custom gallery selector that is implemented inside of our application to take full control over the gallery picking user experience. Check out this custom gallery source code gist or older libraries wrapping this up for reference. You can also take a look at older tutorials on custom galleries. For allowing users to pick files from their system or online services, check out these helpful filepicker libraries: These allow users to pick files beyond just images and are easy to drop into any app. Источник Mobile Photo Uploads with HTML5 Asynchronous file uploading on the web and especially the mobile web used to be a struggle. Three reasons come to mind: AJAX’s inability to send file data meant Flash and hidden frames became the go-to solutions Mobile browser support for Flash ranged from non-existent to extremely limited Many mobile operating systems — including older versions of iOS, Android, Windows Phone, and BlackBerry — lacked support in their browsers for the HTML input type=file attribute Thankfully, the task of asynchronous file uploading on web and mobile web has been greatly simplified recently. In this post I share some considerations and details that went into the cross-platform, photo uploading app on our mobile web app. Feature Detection vs Browser Detection Many older mobile browsers lack support for HTML file input. Support on current devices is pretty good, but there are a significant number of old devices still in use that cannot handle HTML file input. In order to provide the best possible user experience, we can’t show users a feature their device cannot support — so we need to perform some sort of check to assess if the feature is supported. One way of doing this is to check the browser’s user agent and cross reference that with a list of browsers or devices that are known (either by manual testing or documentation; caniuse is a nice place to start) to support the feature. This is known as browser detection, and is problematic for many reasons. For one, it is difficult to verify all possible device/browser configurations that support the feature of interest. Additionally, it isn’t future-proof: the code you write today may not work tomorrow. For these reasons, it is much better to detect if the feature of interest is available to use in the user’s browser, a practice known as feature detection. This is the goal behind the popular open source JavaScript library Modernizr. The ideal solution would use only feature detection without any browser detection; however, this is not always possible since many browsers will report false positives on certain features. The compromise is to use a mix of the two methods when using only feature detection is not possible. Below is a snippet of code adapted from Modernizr that detects support for HTML file input using a mix of feature and browser detection: Selecting a File Once we know that file input is supported, we can show the HTML input field to the user. When tapped on a mobile device, this input field will prompt the user to either take a new photo with the camera, or to select an existing photo on their device. It’s also possible to allow the user to select multiple photos at once on some devices, by adding the multiple attribute to the input element; however, be aware that on iOS this will remove the option to use the camera as a source. Note that here we use client-side validation to ensure that the selected file is an image, but it is important to validate on the server side as well. In general, validation on the client side provides better feedback to the user, whereas server-side validation is important for security purposes. A look at the file input dialogue on iOS and Android Reading and Processing the File The improvement of camera technology in mobile devices brings with it an increase in the size of photos. Unfortunately, most people don’t have the bandwidth (or the patience) to upload uncompressed 8+ megapixel photos on a regular basis! So what can we do? One solution is to compress and/or downscale photos on the client side before we send the photo over the network. In the past this would not have been a trivial task, but the introduction of HTML5, the FileReader interface, and the Canvas API makes this fairly simple. Let’s break this down into two parts: Using the FileReader interface to read the file Using the Canvas API to downscale and compress the image 1. Reading the File In order to read the file, we first need to listen for changes to the HTML input element described earlier. We can do this with a little jQuery (although the native JavaScript implementation is not much different): In this step it can also be worthwhile to validate that the file is under a given size, as loading a very large image into memory with the Canvas API is expensive, slow, and could cause the browser to crash. When the user selects an image file, the readFile function will be called with the file object. To read the file, we create a new FileReader object and define the success and failure conditions of reading. We must read the file in one of several different formats including array buffer, binary string, data URL, and text. You can refer to the FileReader documentation for details on each of these, but for our purposes reading the file as a data URL is fine as it works quite seamlessly with the Canvas API. 2. Processing the File Once reading the image has completed, we can process it with Canvas. First we create a new image and set its source to the data URL obtained from reading the file. When the image has loaded, we calculate the desired dimensions of the new image. Note that if the size of the new image is smaller than the original, there is no need to process the image (if scaling is our only objective). Next, we create a canvas element which will hold our output image. The canvas getContext method returns an object that provides methods and properties for manipulating the canvas. We use the drawImage method to place the source image on the canvas, resulting in a downscaled version of the original image. The canvas element provides two methods to retrieve image data: toDataURL and toBlob . Both toDataURL and toBlob take as arguments the output image type and the image quality. If the image type is specified as image/jpeg or image/webp , the quality argument (a number between 0 and 1 with a default of 0.92) can be used to further compress the image. This is a fairly simple use case of the Canvas API, though the possibilities extend far beyond scaling. Some examples include client side image editing, cropping, and thumbnail generation. An issue particularly relevant to the mobile web is the problem of lost metadata: most browsers will ignore the EXIF metadata of photos, including the orientation tag, resulting in photos being oriented incorrectly. This is not a problem if we upload the original photo, but since we are generating a new image with Canvas, the EXIF data of the original photo is lost. One solution is to read the EXIF data on the client side and use Canvas to correctly orient the image. Uploading the File In recent years, the technology behind AJAX has evolved to be able to handle file uploads, so we take advantage of this to upload the file asynchronously. There are many benefits to asynchronous file uploading, including the ability to monitor the progress of the upload, and allowing the user to perform additional actions while they wait for the upload to finish. Additionally, if the upload fails for whatever reason, we can provide the user with a hassle-free way of retrying the upload: Tap to retry a failed upload on Hootsuite’s mobile web app To keep things simple, we will use jQuery’s ajax method to perform the request, but if you are familiar with the XMLHttpRequest (XHR) object this task should be no more difficult. We use a FormData object to construct the data payload that we want to send to the server. Using the FormData append method, we can add key/value pairs for files, blobs, and strings to the data payload. When using jQuery and FormData, it is important to set the processData and contentType properties to false. Setting processData to false prevents jQuery from automatically converting the data into a string, while setting contentType to false will prevent jQuery from incorrectly setting the content type to its default of application/x-www-form-urlencoded . Once the file data reaches the server we can handle it with the backend technology of our choice. In PHP, the file data can be accessed in POST if the file data was sent as a data URL, or FILES if the file data was sent as a file or blob. While asynchronous file uploading on the mobile web has long been a headache, the introduction of XMLHttpRequest Level 2 and various HTML5 APIs make this task much much easier. This post only covers the logic behind file processing and uploading, but with a bit of styling and polishing it’s quite easy to provide an awesome user experience. Check out the final product on Hootsuite’s mobile website. Photo sharing via Hootsuite’s mobile web app Thanks to Adam Arsenault, Lars Vedo, Jeff Stautz, Kimli Welsh, and Noel Pullen for their advice and valuable feedback. About the Author Jacob Lee is a co-op student on Hootsuite’s mobile web team, studying computer science at UBC. When he’s not creating web and mobile apps, he enjoys tinkering with digital media, playing hockey and tennis, and jamming on the guitar. Follow him on Twitter @jacobtwlee. Источник
- Limiting File Input to Videos On iOS, this will prompt the user to choose between Take Video , Photo Library , or Browse in order to return the desired file. Note that Photo is no longer a choice in the first option and photos (and other files) will also be excluded from being listed if the user chooses to select an existing video. On Android, this will launch the native file selection screen again, but this time it will be filtered to only show videos. Limiting File Input to Audio On iOS, this will prompt the user to choose between Take Photo or Video , Photo Library , or Browse in order to return the desired file. Note that there is no restriction to audio files only in this case. On Android, this will launch the native file selection screen again, but this time it will be filtered to only show audio files. Keep in mind that the specification for the file input element has changed over the years, so you might find many different examples of ways to set up this element and force certain behaviours. In general, my advice would be not to try to «game the system». Use the simplest options and focus on telling the browser what you want, then let the platform decide how best to fulfill that request. If you try to get too tricky and take over this process to enforce what you want, you will leave yourself vulnerable to different behaviours on different platforms/versions and also your solution will be more prone to breaking in the future. If you do need more control over this process, in ways that using the file input element does not allow (or at least it does not allow it consistently across platforms), you can look into using native plugins/APIs instead. The Camera API, for example, will give you much greater control over the process of selecting/capturing a photo than the element will. How do we upload these files to a server? Fortunately, the resulting file reference can be uploaded in the same way as a file retrieved from a normal desktop/web file input element. You will just need to make a POST request that includes multipart/form-data that contains the file(s) you want to upload. For more details on doing that, check out the previous tutorial: Handling File Uploads in Ionic. Summary The standard element provides a surprisingly smooth file selection experience on native iOS and Android platforms, and these files can be easily sent as standard multipart/form-data to your backend server. This will probably be all you need a lot of the time, but for certain specialised circumstances or use cases you might need to look into using native plugins or APIs to fulfil your file selection and transferring needs. If you enjoyed this article, feel free to share it with others! Discussion Need some help with this tutorial? Spotted an error? Got some helpful advice for others? Join the discussion on Twitter If there are no active discussions, start one by including the URL of this post and tag me (@joshuamorony) in a new tweet. I’ll try to help out directly whenever I have the time, but you might also want to include other relevant tags to attract attention from others who might also be able to help. To make it super easy for others to help you out, you might consider setting up an example on Stack Blitz so others can jump right into your code. Источник Accessing the Camera and Stored Media This guide covers how to work with the camera and how to access media stored on the phone. The camera implementation depends on the level of customization required: The easy way — launch the camera with an intent, designating a file path, and handle the onActivityResult. The hard way — use the Camera API to embed the camera preview within your app, adding your own custom controls. You must configure a FileProvider as show in this section. The example below uses com.codepath.fileprovider and should match the authorities XML tag specified. If you see a «INSTALL_FAILED_CONFLICTING_PROVIDER» error when attempting to run the app, change this to something unique, such as com.codepath.fileprovider.YOUR_APP_NAME_HERE , and also update the value in your XML tag to match. In your AndroidManifest.xml, add the following queries block: Easy way works in most cases, using the intent to launch the camera: We need to define the getPhotoFileUri() function: When the camera app finishes, the onActivityResult() method will be called: Check out the official Photo Basics guide for more details. In certain cases, when loading a bitmap with BitmapFactory.decodeFile(file) decoding the Bitmap in memory may actually cause a crash with a OutOfMemoryError: Failed to allocate error. Check out the Loading Bitmaps Efficiently guide and this stackoverflow post for an overview of the solutions. Photos taken with the Camera intent are often quite large and take a very long time to load from disk. After taking a photo, you should strongly consider resizing the Bitmap to a more manageable size and then storing that smaller bitmap to disk. We can then use that resized bitmap before displaying in an ImageView . Resizing a large bitmap and writing to disk can be done with: Then we can write that smaller bitmap back to disk with: Now, we can store the path to that resized image and load that from disk instead for much faster load times. When using the Camera intent to capture a photo, the picture is always taken in the orientation the camera is built into the device. To get your image rotated correctly you’ll have to read the orientation information that is stored into the picture (EXIF meta data) and perform the following transformation using the ExifInterface Support Library: See this guide for the source for this answer. Be aware that on certain devices even the EXIF data isn’t set properly, in which case you should checkout this workaround for a fix. You can read more here about the ExifInterface Support Library. If you need to lookup the image type, there is the guessContentTypeFromStream() in the Java library that allows you to get back the mime type (i.e. image/jpeg ). It will read the first 16 bytes to determine the type of file. In order to use this API call, you must pass in a BufferedInputStream() which supports the mark() and reset() method calls required for the guessContentTypeFromStream() to work. For applying filters to your captured images, check out the following libraries: CameraFilter — Realtime camera filters. Process frames by OpenGL shaders. photofilter — Apply filters to images after they are captured. If you sure to enable access to the external storage to save to the public image, you must add this permission to your AndroidManifest.xml file: Note: The permissions model has changed starting in Marshmallow. If your targetSdkVersion >= 23 and you are running on a Marshmallow (or later) device, you may need to enable runtime permissions. You should also read more about the runtime permissions changes. Instead of using the capture intent to capture photos «the easy way», a custom camera can be used within your app directly leveraging the Camera2 API. This custom camera is much more complicated to implement but sample code can be found here and this CameraView from Google aims to help Android developers easily integrate Camera features. There is also a Google video overview of Camera2 which explains how Camera2 works. There are a number of Camera2 tutorials you can review: There are also a number of third-party libraries available to make custom cameras easier: Leveraging Camera2 or the libraries above, apps can develop a camera that functions in anyway required including custom overlays for depositing checks, taking pictures with a particular form factor, or scanning custom barcodes. Similar to the camera, the media picker implementation depends on the level of customization required: The easy way — launch the Gallery with an intent, and get the media URI in onActivityResult. The hard way — fetch thumbnail and full-size URIs from the MediaStore ContentProvider. Make sure to enable access to the external storage first before using the camera (Note: The permissions model has changed starting in Marshmallow. If your targetSdkVersion >= 23 and you are running on a Marshmallow (or later) device, you may need to enable runtime permissions. You should also read more about the runtime permissions changes): Easy way is to use an intent to launch the gallery: Check out this Stack Overflow post for an alternate approach using mimetypes to restrict content user can select. First, from the above example, we can add the Intent.EXTRA_ALLOW_MULTIPLE flag to the intent: and then inside of onActivityResult , we can access all the photos selected with: Note: that you may need to load the selected bitmaps efficiently or resize them if they are large images to avoid encountering OutOfMemoryError exceptions. Alternatively, we can use a custom gallery selector that is implemented inside of our application to take full control over the gallery picking user experience. Check out this custom gallery source code gist or older libraries wrapping this up for reference. You can also take a look at older tutorials on custom galleries. For allowing users to pick files from their system or online services, check out these helpful filepicker libraries: These allow users to pick files beyond just images and are easy to drop into any app. Источник Mobile Photo Uploads with HTML5 Asynchronous file uploading on the web and especially the mobile web used to be a struggle. Three reasons come to mind: AJAX’s inability to send file data meant Flash and hidden frames became the go-to solutions Mobile browser support for Flash ranged from non-existent to extremely limited Many mobile operating systems — including older versions of iOS, Android, Windows Phone, and BlackBerry — lacked support in their browsers for the HTML input type=file attribute Thankfully, the task of asynchronous file uploading on web and mobile web has been greatly simplified recently. In this post I share some considerations and details that went into the cross-platform, photo uploading app on our mobile web app. Feature Detection vs Browser Detection Many older mobile browsers lack support for HTML file input. Support on current devices is pretty good, but there are a significant number of old devices still in use that cannot handle HTML file input. In order to provide the best possible user experience, we can’t show users a feature their device cannot support — so we need to perform some sort of check to assess if the feature is supported. One way of doing this is to check the browser’s user agent and cross reference that with a list of browsers or devices that are known (either by manual testing or documentation; caniuse is a nice place to start) to support the feature. This is known as browser detection, and is problematic for many reasons. For one, it is difficult to verify all possible device/browser configurations that support the feature of interest. Additionally, it isn’t future-proof: the code you write today may not work tomorrow. For these reasons, it is much better to detect if the feature of interest is available to use in the user’s browser, a practice known as feature detection. This is the goal behind the popular open source JavaScript library Modernizr. The ideal solution would use only feature detection without any browser detection; however, this is not always possible since many browsers will report false positives on certain features. The compromise is to use a mix of the two methods when using only feature detection is not possible. Below is a snippet of code adapted from Modernizr that detects support for HTML file input using a mix of feature and browser detection: Selecting a File Once we know that file input is supported, we can show the HTML input field to the user. When tapped on a mobile device, this input field will prompt the user to either take a new photo with the camera, or to select an existing photo on their device. It’s also possible to allow the user to select multiple photos at once on some devices, by adding the multiple attribute to the input element; however, be aware that on iOS this will remove the option to use the camera as a source. Note that here we use client-side validation to ensure that the selected file is an image, but it is important to validate on the server side as well. In general, validation on the client side provides better feedback to the user, whereas server-side validation is important for security purposes. A look at the file input dialogue on iOS and Android Reading and Processing the File The improvement of camera technology in mobile devices brings with it an increase in the size of photos. Unfortunately, most people don’t have the bandwidth (or the patience) to upload uncompressed 8+ megapixel photos on a regular basis! So what can we do? One solution is to compress and/or downscale photos on the client side before we send the photo over the network. In the past this would not have been a trivial task, but the introduction of HTML5, the FileReader interface, and the Canvas API makes this fairly simple. Let’s break this down into two parts: Using the FileReader interface to read the file Using the Canvas API to downscale and compress the image 1. Reading the File In order to read the file, we first need to listen for changes to the HTML input element described earlier. We can do this with a little jQuery (although the native JavaScript implementation is not much different): In this step it can also be worthwhile to validate that the file is under a given size, as loading a very large image into memory with the Canvas API is expensive, slow, and could cause the browser to crash. When the user selects an image file, the readFile function will be called with the file object. To read the file, we create a new FileReader object and define the success and failure conditions of reading. We must read the file in one of several different formats including array buffer, binary string, data URL, and text. You can refer to the FileReader documentation for details on each of these, but for our purposes reading the file as a data URL is fine as it works quite seamlessly with the Canvas API. 2. Processing the File Once reading the image has completed, we can process it with Canvas. First we create a new image and set its source to the data URL obtained from reading the file. When the image has loaded, we calculate the desired dimensions of the new image. Note that if the size of the new image is smaller than the original, there is no need to process the image (if scaling is our only objective). Next, we create a canvas element which will hold our output image. The canvas getContext method returns an object that provides methods and properties for manipulating the canvas. We use the drawImage method to place the source image on the canvas, resulting in a downscaled version of the original image. The canvas element provides two methods to retrieve image data: toDataURL and toBlob . Both toDataURL and toBlob take as arguments the output image type and the image quality. If the image type is specified as image/jpeg or image/webp , the quality argument (a number between 0 and 1 with a default of 0.92) can be used to further compress the image. This is a fairly simple use case of the Canvas API, though the possibilities extend far beyond scaling. Some examples include client side image editing, cropping, and thumbnail generation. An issue particularly relevant to the mobile web is the problem of lost metadata: most browsers will ignore the EXIF metadata of photos, including the orientation tag, resulting in photos being oriented incorrectly. This is not a problem if we upload the original photo, but since we are generating a new image with Canvas, the EXIF data of the original photo is lost. One solution is to read the EXIF data on the client side and use Canvas to correctly orient the image. Uploading the File In recent years, the technology behind AJAX has evolved to be able to handle file uploads, so we take advantage of this to upload the file asynchronously. There are many benefits to asynchronous file uploading, including the ability to monitor the progress of the upload, and allowing the user to perform additional actions while they wait for the upload to finish. Additionally, if the upload fails for whatever reason, we can provide the user with a hassle-free way of retrying the upload: Tap to retry a failed upload on Hootsuite’s mobile web app To keep things simple, we will use jQuery’s ajax method to perform the request, but if you are familiar with the XMLHttpRequest (XHR) object this task should be no more difficult. We use a FormData object to construct the data payload that we want to send to the server. Using the FormData append method, we can add key/value pairs for files, blobs, and strings to the data payload. When using jQuery and FormData, it is important to set the processData and contentType properties to false. Setting processData to false prevents jQuery from automatically converting the data into a string, while setting contentType to false will prevent jQuery from incorrectly setting the content type to its default of application/x-www-form-urlencoded . Once the file data reaches the server we can handle it with the backend technology of our choice. In PHP, the file data can be accessed in POST if the file data was sent as a data URL, or FILES if the file data was sent as a file or blob. While asynchronous file uploading on the mobile web has long been a headache, the introduction of XMLHttpRequest Level 2 and various HTML5 APIs make this task much much easier. This post only covers the logic behind file processing and uploading, but with a bit of styling and polishing it’s quite easy to provide an awesome user experience. Check out the final product on Hootsuite’s mobile website. Photo sharing via Hootsuite’s mobile web app Thanks to Adam Arsenault, Lars Vedo, Jeff Stautz, Kimli Welsh, and Noel Pullen for their advice and valuable feedback. About the Author Jacob Lee is a co-op student on Hootsuite’s mobile web team, studying computer science at UBC. When he’s not creating web and mobile apps, he enjoys tinkering with digital media, playing hockey and tennis, and jamming on the guitar. Follow him on Twitter @jacobtwlee. Источник
- Limiting File Input to Audio On iOS, this will prompt the user to choose between Take Photo or Video , Photo Library , or Browse in order to return the desired file. Note that there is no restriction to audio files only in this case. On Android, this will launch the native file selection screen again, but this time it will be filtered to only show audio files. Keep in mind that the specification for the file input element has changed over the years, so you might find many different examples of ways to set up this element and force certain behaviours. In general, my advice would be not to try to «game the system». Use the simplest options and focus on telling the browser what you want, then let the platform decide how best to fulfill that request. If you try to get too tricky and take over this process to enforce what you want, you will leave yourself vulnerable to different behaviours on different platforms/versions and also your solution will be more prone to breaking in the future. If you do need more control over this process, in ways that using the file input element does not allow (or at least it does not allow it consistently across platforms), you can look into using native plugins/APIs instead. The Camera API, for example, will give you much greater control over the process of selecting/capturing a photo than the element will. How do we upload these files to a server? Fortunately, the resulting file reference can be uploaded in the same way as a file retrieved from a normal desktop/web file input element. You will just need to make a POST request that includes multipart/form-data that contains the file(s) you want to upload. For more details on doing that, check out the previous tutorial: Handling File Uploads in Ionic. Summary The standard element provides a surprisingly smooth file selection experience on native iOS and Android platforms, and these files can be easily sent as standard multipart/form-data to your backend server. This will probably be all you need a lot of the time, but for certain specialised circumstances or use cases you might need to look into using native plugins or APIs to fulfil your file selection and transferring needs. If you enjoyed this article, feel free to share it with others! Discussion Need some help with this tutorial? Spotted an error? Got some helpful advice for others? Join the discussion on Twitter If there are no active discussions, start one by including the URL of this post and tag me (@joshuamorony) in a new tweet. I’ll try to help out directly whenever I have the time, but you might also want to include other relevant tags to attract attention from others who might also be able to help. To make it super easy for others to help you out, you might consider setting up an example on Stack Blitz so others can jump right into your code. Источник Accessing the Camera and Stored Media This guide covers how to work with the camera and how to access media stored on the phone. The camera implementation depends on the level of customization required: The easy way — launch the camera with an intent, designating a file path, and handle the onActivityResult. The hard way — use the Camera API to embed the camera preview within your app, adding your own custom controls. You must configure a FileProvider as show in this section. The example below uses com.codepath.fileprovider and should match the authorities XML tag specified. If you see a «INSTALL_FAILED_CONFLICTING_PROVIDER» error when attempting to run the app, change this to something unique, such as com.codepath.fileprovider.YOUR_APP_NAME_HERE , and also update the value in your XML tag to match. In your AndroidManifest.xml, add the following queries block: Easy way works in most cases, using the intent to launch the camera: We need to define the getPhotoFileUri() function: When the camera app finishes, the onActivityResult() method will be called: Check out the official Photo Basics guide for more details. In certain cases, when loading a bitmap with BitmapFactory.decodeFile(file) decoding the Bitmap in memory may actually cause a crash with a OutOfMemoryError: Failed to allocate error. Check out the Loading Bitmaps Efficiently guide and this stackoverflow post for an overview of the solutions. Photos taken with the Camera intent are often quite large and take a very long time to load from disk. After taking a photo, you should strongly consider resizing the Bitmap to a more manageable size and then storing that smaller bitmap to disk. We can then use that resized bitmap before displaying in an ImageView . Resizing a large bitmap and writing to disk can be done with: Then we can write that smaller bitmap back to disk with: Now, we can store the path to that resized image and load that from disk instead for much faster load times. When using the Camera intent to capture a photo, the picture is always taken in the orientation the camera is built into the device. To get your image rotated correctly you’ll have to read the orientation information that is stored into the picture (EXIF meta data) and perform the following transformation using the ExifInterface Support Library: See this guide for the source for this answer. Be aware that on certain devices even the EXIF data isn’t set properly, in which case you should checkout this workaround for a fix. You can read more here about the ExifInterface Support Library. If you need to lookup the image type, there is the guessContentTypeFromStream() in the Java library that allows you to get back the mime type (i.e. image/jpeg ). It will read the first 16 bytes to determine the type of file. In order to use this API call, you must pass in a BufferedInputStream() which supports the mark() and reset() method calls required for the guessContentTypeFromStream() to work. For applying filters to your captured images, check out the following libraries: CameraFilter — Realtime camera filters. Process frames by OpenGL shaders. photofilter — Apply filters to images after they are captured. If you sure to enable access to the external storage to save to the public image, you must add this permission to your AndroidManifest.xml file: Note: The permissions model has changed starting in Marshmallow. If your targetSdkVersion >= 23 and you are running on a Marshmallow (or later) device, you may need to enable runtime permissions. You should also read more about the runtime permissions changes. Instead of using the capture intent to capture photos «the easy way», a custom camera can be used within your app directly leveraging the Camera2 API. This custom camera is much more complicated to implement but sample code can be found here and this CameraView from Google aims to help Android developers easily integrate Camera features. There is also a Google video overview of Camera2 which explains how Camera2 works. There are a number of Camera2 tutorials you can review: There are also a number of third-party libraries available to make custom cameras easier: Leveraging Camera2 or the libraries above, apps can develop a camera that functions in anyway required including custom overlays for depositing checks, taking pictures with a particular form factor, or scanning custom barcodes. Similar to the camera, the media picker implementation depends on the level of customization required: The easy way — launch the Gallery with an intent, and get the media URI in onActivityResult. The hard way — fetch thumbnail and full-size URIs from the MediaStore ContentProvider. Make sure to enable access to the external storage first before using the camera (Note: The permissions model has changed starting in Marshmallow. If your targetSdkVersion >= 23 and you are running on a Marshmallow (or later) device, you may need to enable runtime permissions. You should also read more about the runtime permissions changes): Easy way is to use an intent to launch the gallery: Check out this Stack Overflow post for an alternate approach using mimetypes to restrict content user can select. First, from the above example, we can add the Intent.EXTRA_ALLOW_MULTIPLE flag to the intent: and then inside of onActivityResult , we can access all the photos selected with: Note: that you may need to load the selected bitmaps efficiently or resize them if they are large images to avoid encountering OutOfMemoryError exceptions. Alternatively, we can use a custom gallery selector that is implemented inside of our application to take full control over the gallery picking user experience. Check out this custom gallery source code gist or older libraries wrapping this up for reference. You can also take a look at older tutorials on custom galleries. For allowing users to pick files from their system or online services, check out these helpful filepicker libraries: These allow users to pick files beyond just images and are easy to drop into any app. Источник Mobile Photo Uploads with HTML5 Asynchronous file uploading on the web and especially the mobile web used to be a struggle. Three reasons come to mind: AJAX’s inability to send file data meant Flash and hidden frames became the go-to solutions Mobile browser support for Flash ranged from non-existent to extremely limited Many mobile operating systems — including older versions of iOS, Android, Windows Phone, and BlackBerry — lacked support in their browsers for the HTML input type=file attribute Thankfully, the task of asynchronous file uploading on web and mobile web has been greatly simplified recently. In this post I share some considerations and details that went into the cross-platform, photo uploading app on our mobile web app. Feature Detection vs Browser Detection Many older mobile browsers lack support for HTML file input. Support on current devices is pretty good, but there are a significant number of old devices still in use that cannot handle HTML file input. In order to provide the best possible user experience, we can’t show users a feature their device cannot support — so we need to perform some sort of check to assess if the feature is supported. One way of doing this is to check the browser’s user agent and cross reference that with a list of browsers or devices that are known (either by manual testing or documentation; caniuse is a nice place to start) to support the feature. This is known as browser detection, and is problematic for many reasons. For one, it is difficult to verify all possible device/browser configurations that support the feature of interest. Additionally, it isn’t future-proof: the code you write today may not work tomorrow. For these reasons, it is much better to detect if the feature of interest is available to use in the user’s browser, a practice known as feature detection. This is the goal behind the popular open source JavaScript library Modernizr. The ideal solution would use only feature detection without any browser detection; however, this is not always possible since many browsers will report false positives on certain features. The compromise is to use a mix of the two methods when using only feature detection is not possible. Below is a snippet of code adapted from Modernizr that detects support for HTML file input using a mix of feature and browser detection: Selecting a File Once we know that file input is supported, we can show the HTML input field to the user. When tapped on a mobile device, this input field will prompt the user to either take a new photo with the camera, or to select an existing photo on their device. It’s also possible to allow the user to select multiple photos at once on some devices, by adding the multiple attribute to the input element; however, be aware that on iOS this will remove the option to use the camera as a source. Note that here we use client-side validation to ensure that the selected file is an image, but it is important to validate on the server side as well. In general, validation on the client side provides better feedback to the user, whereas server-side validation is important for security purposes. A look at the file input dialogue on iOS and Android Reading and Processing the File The improvement of camera technology in mobile devices brings with it an increase in the size of photos. Unfortunately, most people don’t have the bandwidth (or the patience) to upload uncompressed 8+ megapixel photos on a regular basis! So what can we do? One solution is to compress and/or downscale photos on the client side before we send the photo over the network. In the past this would not have been a trivial task, but the introduction of HTML5, the FileReader interface, and the Canvas API makes this fairly simple. Let’s break this down into two parts: Using the FileReader interface to read the file Using the Canvas API to downscale and compress the image 1. Reading the File In order to read the file, we first need to listen for changes to the HTML input element described earlier. We can do this with a little jQuery (although the native JavaScript implementation is not much different): In this step it can also be worthwhile to validate that the file is under a given size, as loading a very large image into memory with the Canvas API is expensive, slow, and could cause the browser to crash. When the user selects an image file, the readFile function will be called with the file object. To read the file, we create a new FileReader object and define the success and failure conditions of reading. We must read the file in one of several different formats including array buffer, binary string, data URL, and text. You can refer to the FileReader documentation for details on each of these, but for our purposes reading the file as a data URL is fine as it works quite seamlessly with the Canvas API. 2. Processing the File Once reading the image has completed, we can process it with Canvas. First we create a new image and set its source to the data URL obtained from reading the file. When the image has loaded, we calculate the desired dimensions of the new image. Note that if the size of the new image is smaller than the original, there is no need to process the image (if scaling is our only objective). Next, we create a canvas element which will hold our output image. The canvas getContext method returns an object that provides methods and properties for manipulating the canvas. We use the drawImage method to place the source image on the canvas, resulting in a downscaled version of the original image. The canvas element provides two methods to retrieve image data: toDataURL and toBlob . Both toDataURL and toBlob take as arguments the output image type and the image quality. If the image type is specified as image/jpeg or image/webp , the quality argument (a number between 0 and 1 with a default of 0.92) can be used to further compress the image. This is a fairly simple use case of the Canvas API, though the possibilities extend far beyond scaling. Some examples include client side image editing, cropping, and thumbnail generation. An issue particularly relevant to the mobile web is the problem of lost metadata: most browsers will ignore the EXIF metadata of photos, including the orientation tag, resulting in photos being oriented incorrectly. This is not a problem if we upload the original photo, but since we are generating a new image with Canvas, the EXIF data of the original photo is lost. One solution is to read the EXIF data on the client side and use Canvas to correctly orient the image. Uploading the File In recent years, the technology behind AJAX has evolved to be able to handle file uploads, so we take advantage of this to upload the file asynchronously. There are many benefits to asynchronous file uploading, including the ability to monitor the progress of the upload, and allowing the user to perform additional actions while they wait for the upload to finish. Additionally, if the upload fails for whatever reason, we can provide the user with a hassle-free way of retrying the upload: Tap to retry a failed upload on Hootsuite’s mobile web app To keep things simple, we will use jQuery’s ajax method to perform the request, but if you are familiar with the XMLHttpRequest (XHR) object this task should be no more difficult. We use a FormData object to construct the data payload that we want to send to the server. Using the FormData append method, we can add key/value pairs for files, blobs, and strings to the data payload. When using jQuery and FormData, it is important to set the processData and contentType properties to false. Setting processData to false prevents jQuery from automatically converting the data into a string, while setting contentType to false will prevent jQuery from incorrectly setting the content type to its default of application/x-www-form-urlencoded . Once the file data reaches the server we can handle it with the backend technology of our choice. In PHP, the file data can be accessed in POST if the file data was sent as a data URL, or FILES if the file data was sent as a file or blob. While asynchronous file uploading on the mobile web has long been a headache, the introduction of XMLHttpRequest Level 2 and various HTML5 APIs make this task much much easier. This post only covers the logic behind file processing and uploading, but with a bit of styling and polishing it’s quite easy to provide an awesome user experience. Check out the final product on Hootsuite’s mobile website. Photo sharing via Hootsuite’s mobile web app Thanks to Adam Arsenault, Lars Vedo, Jeff Stautz, Kimli Welsh, and Noel Pullen for their advice and valuable feedback. About the Author Jacob Lee is a co-op student on Hootsuite’s mobile web team, studying computer science at UBC. When he’s not creating web and mobile apps, he enjoys tinkering with digital media, playing hockey and tennis, and jamming on the guitar. Follow him on Twitter @jacobtwlee. Источник
- How do we upload these files to a server? Fortunately, the resulting file reference can be uploaded in the same way as a file retrieved from a normal desktop/web file input element. You will just need to make a POST request that includes multipart/form-data that contains the file(s) you want to upload. For more details on doing that, check out the previous tutorial: Handling File Uploads in Ionic. Summary The standard element provides a surprisingly smooth file selection experience on native iOS and Android platforms, and these files can be easily sent as standard multipart/form-data to your backend server. This will probably be all you need a lot of the time, but for certain specialised circumstances or use cases you might need to look into using native plugins or APIs to fulfil your file selection and transferring needs. If you enjoyed this article, feel free to share it with others! Discussion Need some help with this tutorial? Spotted an error? Got some helpful advice for others? Join the discussion on Twitter If there are no active discussions, start one by including the URL of this post and tag me (@joshuamorony) in a new tweet. I’ll try to help out directly whenever I have the time, but you might also want to include other relevant tags to attract attention from others who might also be able to help. To make it super easy for others to help you out, you might consider setting up an example on Stack Blitz so others can jump right into your code. Источник Accessing the Camera and Stored Media This guide covers how to work with the camera and how to access media stored on the phone. The camera implementation depends on the level of customization required: The easy way — launch the camera with an intent, designating a file path, and handle the onActivityResult. The hard way — use the Camera API to embed the camera preview within your app, adding your own custom controls. You must configure a FileProvider as show in this section. The example below uses com.codepath.fileprovider and should match the authorities XML tag specified. If you see a «INSTALL_FAILED_CONFLICTING_PROVIDER» error when attempting to run the app, change this to something unique, such as com.codepath.fileprovider.YOUR_APP_NAME_HERE , and also update the value in your XML tag to match. In your AndroidManifest.xml, add the following queries block: Easy way works in most cases, using the intent to launch the camera: We need to define the getPhotoFileUri() function: When the camera app finishes, the onActivityResult() method will be called: Check out the official Photo Basics guide for more details. In certain cases, when loading a bitmap with BitmapFactory.decodeFile(file) decoding the Bitmap in memory may actually cause a crash with a OutOfMemoryError: Failed to allocate error. Check out the Loading Bitmaps Efficiently guide and this stackoverflow post for an overview of the solutions. Photos taken with the Camera intent are often quite large and take a very long time to load from disk. After taking a photo, you should strongly consider resizing the Bitmap to a more manageable size and then storing that smaller bitmap to disk. We can then use that resized bitmap before displaying in an ImageView . Resizing a large bitmap and writing to disk can be done with: Then we can write that smaller bitmap back to disk with: Now, we can store the path to that resized image and load that from disk instead for much faster load times. When using the Camera intent to capture a photo, the picture is always taken in the orientation the camera is built into the device. To get your image rotated correctly you’ll have to read the orientation information that is stored into the picture (EXIF meta data) and perform the following transformation using the ExifInterface Support Library: See this guide for the source for this answer. Be aware that on certain devices even the EXIF data isn’t set properly, in which case you should checkout this workaround for a fix. You can read more here about the ExifInterface Support Library. If you need to lookup the image type, there is the guessContentTypeFromStream() in the Java library that allows you to get back the mime type (i.e. image/jpeg ). It will read the first 16 bytes to determine the type of file. In order to use this API call, you must pass in a BufferedInputStream() which supports the mark() and reset() method calls required for the guessContentTypeFromStream() to work. For applying filters to your captured images, check out the following libraries: CameraFilter — Realtime camera filters. Process frames by OpenGL shaders. photofilter — Apply filters to images after they are captured. If you sure to enable access to the external storage to save to the public image, you must add this permission to your AndroidManifest.xml file: Note: The permissions model has changed starting in Marshmallow. If your targetSdkVersion >= 23 and you are running on a Marshmallow (or later) device, you may need to enable runtime permissions. You should also read more about the runtime permissions changes. Instead of using the capture intent to capture photos «the easy way», a custom camera can be used within your app directly leveraging the Camera2 API. This custom camera is much more complicated to implement but sample code can be found here and this CameraView from Google aims to help Android developers easily integrate Camera features. There is also a Google video overview of Camera2 which explains how Camera2 works. There are a number of Camera2 tutorials you can review: There are also a number of third-party libraries available to make custom cameras easier: Leveraging Camera2 or the libraries above, apps can develop a camera that functions in anyway required including custom overlays for depositing checks, taking pictures with a particular form factor, or scanning custom barcodes. Similar to the camera, the media picker implementation depends on the level of customization required: The easy way — launch the Gallery with an intent, and get the media URI in onActivityResult. The hard way — fetch thumbnail and full-size URIs from the MediaStore ContentProvider. Make sure to enable access to the external storage first before using the camera (Note: The permissions model has changed starting in Marshmallow. If your targetSdkVersion >= 23 and you are running on a Marshmallow (or later) device, you may need to enable runtime permissions. You should also read more about the runtime permissions changes): Easy way is to use an intent to launch the gallery: Check out this Stack Overflow post for an alternate approach using mimetypes to restrict content user can select. First, from the above example, we can add the Intent.EXTRA_ALLOW_MULTIPLE flag to the intent: and then inside of onActivityResult , we can access all the photos selected with: Note: that you may need to load the selected bitmaps efficiently or resize them if they are large images to avoid encountering OutOfMemoryError exceptions. Alternatively, we can use a custom gallery selector that is implemented inside of our application to take full control over the gallery picking user experience. Check out this custom gallery source code gist or older libraries wrapping this up for reference. You can also take a look at older tutorials on custom galleries. For allowing users to pick files from their system or online services, check out these helpful filepicker libraries: These allow users to pick files beyond just images and are easy to drop into any app. Источник Mobile Photo Uploads with HTML5 Asynchronous file uploading on the web and especially the mobile web used to be a struggle. Three reasons come to mind: AJAX’s inability to send file data meant Flash and hidden frames became the go-to solutions Mobile browser support for Flash ranged from non-existent to extremely limited Many mobile operating systems — including older versions of iOS, Android, Windows Phone, and BlackBerry — lacked support in their browsers for the HTML input type=file attribute Thankfully, the task of asynchronous file uploading on web and mobile web has been greatly simplified recently. In this post I share some considerations and details that went into the cross-platform, photo uploading app on our mobile web app. Feature Detection vs Browser Detection Many older mobile browsers lack support for HTML file input. Support on current devices is pretty good, but there are a significant number of old devices still in use that cannot handle HTML file input. In order to provide the best possible user experience, we can’t show users a feature their device cannot support — so we need to perform some sort of check to assess if the feature is supported. One way of doing this is to check the browser’s user agent and cross reference that with a list of browsers or devices that are known (either by manual testing or documentation; caniuse is a nice place to start) to support the feature. This is known as browser detection, and is problematic for many reasons. For one, it is difficult to verify all possible device/browser configurations that support the feature of interest. Additionally, it isn’t future-proof: the code you write today may not work tomorrow. For these reasons, it is much better to detect if the feature of interest is available to use in the user’s browser, a practice known as feature detection. This is the goal behind the popular open source JavaScript library Modernizr. The ideal solution would use only feature detection without any browser detection; however, this is not always possible since many browsers will report false positives on certain features. The compromise is to use a mix of the two methods when using only feature detection is not possible. Below is a snippet of code adapted from Modernizr that detects support for HTML file input using a mix of feature and browser detection: Selecting a File Once we know that file input is supported, we can show the HTML input field to the user. When tapped on a mobile device, this input field will prompt the user to either take a new photo with the camera, or to select an existing photo on their device. It’s also possible to allow the user to select multiple photos at once on some devices, by adding the multiple attribute to the input element; however, be aware that on iOS this will remove the option to use the camera as a source. Note that here we use client-side validation to ensure that the selected file is an image, but it is important to validate on the server side as well. In general, validation on the client side provides better feedback to the user, whereas server-side validation is important for security purposes. A look at the file input dialogue on iOS and Android Reading and Processing the File The improvement of camera technology in mobile devices brings with it an increase in the size of photos. Unfortunately, most people don’t have the bandwidth (or the patience) to upload uncompressed 8+ megapixel photos on a regular basis! So what can we do? One solution is to compress and/or downscale photos on the client side before we send the photo over the network. In the past this would not have been a trivial task, but the introduction of HTML5, the FileReader interface, and the Canvas API makes this fairly simple. Let’s break this down into two parts: Using the FileReader interface to read the file Using the Canvas API to downscale and compress the image 1. Reading the File In order to read the file, we first need to listen for changes to the HTML input element described earlier. We can do this with a little jQuery (although the native JavaScript implementation is not much different): In this step it can also be worthwhile to validate that the file is under a given size, as loading a very large image into memory with the Canvas API is expensive, slow, and could cause the browser to crash. When the user selects an image file, the readFile function will be called with the file object. To read the file, we create a new FileReader object and define the success and failure conditions of reading. We must read the file in one of several different formats including array buffer, binary string, data URL, and text. You can refer to the FileReader documentation for details on each of these, but for our purposes reading the file as a data URL is fine as it works quite seamlessly with the Canvas API. 2. Processing the File Once reading the image has completed, we can process it with Canvas. First we create a new image and set its source to the data URL obtained from reading the file. When the image has loaded, we calculate the desired dimensions of the new image. Note that if the size of the new image is smaller than the original, there is no need to process the image (if scaling is our only objective). Next, we create a canvas element which will hold our output image. The canvas getContext method returns an object that provides methods and properties for manipulating the canvas. We use the drawImage method to place the source image on the canvas, resulting in a downscaled version of the original image. The canvas element provides two methods to retrieve image data: toDataURL and toBlob . Both toDataURL and toBlob take as arguments the output image type and the image quality. If the image type is specified as image/jpeg or image/webp , the quality argument (a number between 0 and 1 with a default of 0.92) can be used to further compress the image. This is a fairly simple use case of the Canvas API, though the possibilities extend far beyond scaling. Some examples include client side image editing, cropping, and thumbnail generation. An issue particularly relevant to the mobile web is the problem of lost metadata: most browsers will ignore the EXIF metadata of photos, including the orientation tag, resulting in photos being oriented incorrectly. This is not a problem if we upload the original photo, but since we are generating a new image with Canvas, the EXIF data of the original photo is lost. One solution is to read the EXIF data on the client side and use Canvas to correctly orient the image. Uploading the File In recent years, the technology behind AJAX has evolved to be able to handle file uploads, so we take advantage of this to upload the file asynchronously. There are many benefits to asynchronous file uploading, including the ability to monitor the progress of the upload, and allowing the user to perform additional actions while they wait for the upload to finish. Additionally, if the upload fails for whatever reason, we can provide the user with a hassle-free way of retrying the upload: Tap to retry a failed upload on Hootsuite’s mobile web app To keep things simple, we will use jQuery’s ajax method to perform the request, but if you are familiar with the XMLHttpRequest (XHR) object this task should be no more difficult. We use a FormData object to construct the data payload that we want to send to the server. Using the FormData append method, we can add key/value pairs for files, blobs, and strings to the data payload. When using jQuery and FormData, it is important to set the processData and contentType properties to false. Setting processData to false prevents jQuery from automatically converting the data into a string, while setting contentType to false will prevent jQuery from incorrectly setting the content type to its default of application/x-www-form-urlencoded . Once the file data reaches the server we can handle it with the backend technology of our choice. In PHP, the file data can be accessed in POST if the file data was sent as a data URL, or FILES if the file data was sent as a file or blob. While asynchronous file uploading on the mobile web has long been a headache, the introduction of XMLHttpRequest Level 2 and various HTML5 APIs make this task much much easier. This post only covers the logic behind file processing and uploading, but with a bit of styling and polishing it’s quite easy to provide an awesome user experience. Check out the final product on Hootsuite’s mobile website. Photo sharing via Hootsuite’s mobile web app Thanks to Adam Arsenault, Lars Vedo, Jeff Stautz, Kimli Welsh, and Noel Pullen for their advice and valuable feedback. About the Author Jacob Lee is a co-op student on Hootsuite’s mobile web team, studying computer science at UBC. When he’s not creating web and mobile apps, he enjoys tinkering with digital media, playing hockey and tennis, and jamming on the guitar. Follow him on Twitter @jacobtwlee. Источник
- Summary The standard element provides a surprisingly smooth file selection experience on native iOS and Android platforms, and these files can be easily sent as standard multipart/form-data to your backend server. This will probably be all you need a lot of the time, but for certain specialised circumstances or use cases you might need to look into using native plugins or APIs to fulfil your file selection and transferring needs. If you enjoyed this article, feel free to share it with others! Discussion Need some help with this tutorial? Spotted an error? Got some helpful advice for others? Join the discussion on Twitter If there are no active discussions, start one by including the URL of this post and tag me (@joshuamorony) in a new tweet. I’ll try to help out directly whenever I have the time, but you might also want to include other relevant tags to attract attention from others who might also be able to help. To make it super easy for others to help you out, you might consider setting up an example on Stack Blitz so others can jump right into your code. Источник Accessing the Camera and Stored Media This guide covers how to work with the camera and how to access media stored on the phone. The camera implementation depends on the level of customization required: The easy way — launch the camera with an intent, designating a file path, and handle the onActivityResult. The hard way — use the Camera API to embed the camera preview within your app, adding your own custom controls. You must configure a FileProvider as show in this section. The example below uses com.codepath.fileprovider and should match the authorities XML tag specified. If you see a «INSTALL_FAILED_CONFLICTING_PROVIDER» error when attempting to run the app, change this to something unique, such as com.codepath.fileprovider.YOUR_APP_NAME_HERE , and also update the value in your XML tag to match. In your AndroidManifest.xml, add the following queries block: Easy way works in most cases, using the intent to launch the camera: We need to define the getPhotoFileUri() function: When the camera app finishes, the onActivityResult() method will be called: Check out the official Photo Basics guide for more details. In certain cases, when loading a bitmap with BitmapFactory.decodeFile(file) decoding the Bitmap in memory may actually cause a crash with a OutOfMemoryError: Failed to allocate error. Check out the Loading Bitmaps Efficiently guide and this stackoverflow post for an overview of the solutions. Photos taken with the Camera intent are often quite large and take a very long time to load from disk. After taking a photo, you should strongly consider resizing the Bitmap to a more manageable size and then storing that smaller bitmap to disk. We can then use that resized bitmap before displaying in an ImageView . Resizing a large bitmap and writing to disk can be done with: Then we can write that smaller bitmap back to disk with: Now, we can store the path to that resized image and load that from disk instead for much faster load times. When using the Camera intent to capture a photo, the picture is always taken in the orientation the camera is built into the device. To get your image rotated correctly you’ll have to read the orientation information that is stored into the picture (EXIF meta data) and perform the following transformation using the ExifInterface Support Library: See this guide for the source for this answer. Be aware that on certain devices even the EXIF data isn’t set properly, in which case you should checkout this workaround for a fix. You can read more here about the ExifInterface Support Library. If you need to lookup the image type, there is the guessContentTypeFromStream() in the Java library that allows you to get back the mime type (i.e. image/jpeg ). It will read the first 16 bytes to determine the type of file. In order to use this API call, you must pass in a BufferedInputStream() which supports the mark() and reset() method calls required for the guessContentTypeFromStream() to work. For applying filters to your captured images, check out the following libraries: CameraFilter — Realtime camera filters. Process frames by OpenGL shaders. photofilter — Apply filters to images after they are captured. If you sure to enable access to the external storage to save to the public image, you must add this permission to your AndroidManifest.xml file: Note: The permissions model has changed starting in Marshmallow. If your targetSdkVersion >= 23 and you are running on a Marshmallow (or later) device, you may need to enable runtime permissions. You should also read more about the runtime permissions changes. Instead of using the capture intent to capture photos «the easy way», a custom camera can be used within your app directly leveraging the Camera2 API. This custom camera is much more complicated to implement but sample code can be found here and this CameraView from Google aims to help Android developers easily integrate Camera features. There is also a Google video overview of Camera2 which explains how Camera2 works. There are a number of Camera2 tutorials you can review: There are also a number of third-party libraries available to make custom cameras easier: Leveraging Camera2 or the libraries above, apps can develop a camera that functions in anyway required including custom overlays for depositing checks, taking pictures with a particular form factor, or scanning custom barcodes. Similar to the camera, the media picker implementation depends on the level of customization required: The easy way — launch the Gallery with an intent, and get the media URI in onActivityResult. The hard way — fetch thumbnail and full-size URIs from the MediaStore ContentProvider. Make sure to enable access to the external storage first before using the camera (Note: The permissions model has changed starting in Marshmallow. If your targetSdkVersion >= 23 and you are running on a Marshmallow (or later) device, you may need to enable runtime permissions. You should also read more about the runtime permissions changes): Easy way is to use an intent to launch the gallery: Check out this Stack Overflow post for an alternate approach using mimetypes to restrict content user can select. First, from the above example, we can add the Intent.EXTRA_ALLOW_MULTIPLE flag to the intent: and then inside of onActivityResult , we can access all the photos selected with: Note: that you may need to load the selected bitmaps efficiently or resize them if they are large images to avoid encountering OutOfMemoryError exceptions. Alternatively, we can use a custom gallery selector that is implemented inside of our application to take full control over the gallery picking user experience. Check out this custom gallery source code gist or older libraries wrapping this up for reference. You can also take a look at older tutorials on custom galleries. For allowing users to pick files from their system or online services, check out these helpful filepicker libraries: These allow users to pick files beyond just images and are easy to drop into any app. Источник Mobile Photo Uploads with HTML5 Asynchronous file uploading on the web and especially the mobile web used to be a struggle. Three reasons come to mind: AJAX’s inability to send file data meant Flash and hidden frames became the go-to solutions Mobile browser support for Flash ranged from non-existent to extremely limited Many mobile operating systems — including older versions of iOS, Android, Windows Phone, and BlackBerry — lacked support in their browsers for the HTML input type=file attribute Thankfully, the task of asynchronous file uploading on web and mobile web has been greatly simplified recently. In this post I share some considerations and details that went into the cross-platform, photo uploading app on our mobile web app. Feature Detection vs Browser Detection Many older mobile browsers lack support for HTML file input. Support on current devices is pretty good, but there are a significant number of old devices still in use that cannot handle HTML file input. In order to provide the best possible user experience, we can’t show users a feature their device cannot support — so we need to perform some sort of check to assess if the feature is supported. One way of doing this is to check the browser’s user agent and cross reference that with a list of browsers or devices that are known (either by manual testing or documentation; caniuse is a nice place to start) to support the feature. This is known as browser detection, and is problematic for many reasons. For one, it is difficult to verify all possible device/browser configurations that support the feature of interest. Additionally, it isn’t future-proof: the code you write today may not work tomorrow. For these reasons, it is much better to detect if the feature of interest is available to use in the user’s browser, a practice known as feature detection. This is the goal behind the popular open source JavaScript library Modernizr. The ideal solution would use only feature detection without any browser detection; however, this is not always possible since many browsers will report false positives on certain features. The compromise is to use a mix of the two methods when using only feature detection is not possible. Below is a snippet of code adapted from Modernizr that detects support for HTML file input using a mix of feature and browser detection: Selecting a File Once we know that file input is supported, we can show the HTML input field to the user. When tapped on a mobile device, this input field will prompt the user to either take a new photo with the camera, or to select an existing photo on their device. It’s also possible to allow the user to select multiple photos at once on some devices, by adding the multiple attribute to the input element; however, be aware that on iOS this will remove the option to use the camera as a source. Note that here we use client-side validation to ensure that the selected file is an image, but it is important to validate on the server side as well. In general, validation on the client side provides better feedback to the user, whereas server-side validation is important for security purposes. A look at the file input dialogue on iOS and Android Reading and Processing the File The improvement of camera technology in mobile devices brings with it an increase in the size of photos. Unfortunately, most people don’t have the bandwidth (or the patience) to upload uncompressed 8+ megapixel photos on a regular basis! So what can we do? One solution is to compress and/or downscale photos on the client side before we send the photo over the network. In the past this would not have been a trivial task, but the introduction of HTML5, the FileReader interface, and the Canvas API makes this fairly simple. Let’s break this down into two parts: Using the FileReader interface to read the file Using the Canvas API to downscale and compress the image 1. Reading the File In order to read the file, we first need to listen for changes to the HTML input element described earlier. We can do this with a little jQuery (although the native JavaScript implementation is not much different): In this step it can also be worthwhile to validate that the file is under a given size, as loading a very large image into memory with the Canvas API is expensive, slow, and could cause the browser to crash. When the user selects an image file, the readFile function will be called with the file object. To read the file, we create a new FileReader object and define the success and failure conditions of reading. We must read the file in one of several different formats including array buffer, binary string, data URL, and text. You can refer to the FileReader documentation for details on each of these, but for our purposes reading the file as a data URL is fine as it works quite seamlessly with the Canvas API. 2. Processing the File Once reading the image has completed, we can process it with Canvas. First we create a new image and set its source to the data URL obtained from reading the file. When the image has loaded, we calculate the desired dimensions of the new image. Note that if the size of the new image is smaller than the original, there is no need to process the image (if scaling is our only objective). Next, we create a canvas element which will hold our output image. The canvas getContext method returns an object that provides methods and properties for manipulating the canvas. We use the drawImage method to place the source image on the canvas, resulting in a downscaled version of the original image. The canvas element provides two methods to retrieve image data: toDataURL and toBlob . Both toDataURL and toBlob take as arguments the output image type and the image quality. If the image type is specified as image/jpeg or image/webp , the quality argument (a number between 0 and 1 with a default of 0.92) can be used to further compress the image. This is a fairly simple use case of the Canvas API, though the possibilities extend far beyond scaling. Some examples include client side image editing, cropping, and thumbnail generation. An issue particularly relevant to the mobile web is the problem of lost metadata: most browsers will ignore the EXIF metadata of photos, including the orientation tag, resulting in photos being oriented incorrectly. This is not a problem if we upload the original photo, but since we are generating a new image with Canvas, the EXIF data of the original photo is lost. One solution is to read the EXIF data on the client side and use Canvas to correctly orient the image. Uploading the File In recent years, the technology behind AJAX has evolved to be able to handle file uploads, so we take advantage of this to upload the file asynchronously. There are many benefits to asynchronous file uploading, including the ability to monitor the progress of the upload, and allowing the user to perform additional actions while they wait for the upload to finish. Additionally, if the upload fails for whatever reason, we can provide the user with a hassle-free way of retrying the upload: Tap to retry a failed upload on Hootsuite’s mobile web app To keep things simple, we will use jQuery’s ajax method to perform the request, but if you are familiar with the XMLHttpRequest (XHR) object this task should be no more difficult. We use a FormData object to construct the data payload that we want to send to the server. Using the FormData append method, we can add key/value pairs for files, blobs, and strings to the data payload. When using jQuery and FormData, it is important to set the processData and contentType properties to false. Setting processData to false prevents jQuery from automatically converting the data into a string, while setting contentType to false will prevent jQuery from incorrectly setting the content type to its default of application/x-www-form-urlencoded . Once the file data reaches the server we can handle it with the backend technology of our choice. In PHP, the file data can be accessed in POST if the file data was sent as a data URL, or FILES if the file data was sent as a file or blob. While asynchronous file uploading on the mobile web has long been a headache, the introduction of XMLHttpRequest Level 2 and various HTML5 APIs make this task much much easier. This post only covers the logic behind file processing and uploading, but with a bit of styling and polishing it’s quite easy to provide an awesome user experience. Check out the final product on Hootsuite’s mobile website. Photo sharing via Hootsuite’s mobile web app Thanks to Adam Arsenault, Lars Vedo, Jeff Stautz, Kimli Welsh, and Noel Pullen for their advice and valuable feedback. About the Author Jacob Lee is a co-op student on Hootsuite’s mobile web team, studying computer science at UBC. When he’s not creating web and mobile apps, he enjoys tinkering with digital media, playing hockey and tennis, and jamming on the guitar. Follow him on Twitter @jacobtwlee. Источник
- Discussion
- Accessing the Camera and Stored Media
- Mobile Photo Uploads with HTML5
Using HTML File Input for Uploading Native iOS/Android Files
October 20, 2020
Originally published October 20, 2020
In the last tutorial, we covered how to handle file uploads in Ionic using the element. This included using the file input element to grab a reference to a file and then upload that file to a Node/Express server (there is also an extension to the tutorial available where we build the backend with NestJS instead).
Those tutorials focused on a desktop/web environment, but what do we do to handle file uploads when our applications are deployed natively to iOS or Android? Can we still use ?
The answer to that question is mostly yes, but there are a few things to keep in mind.
Outline Before we get started
If you have not already read (or watched) the previous tutorial, it would be a good idea to complete it before reading this one. The previous tutorial provides a lot of important context around how the HTML elements works when specifying the file type, and also around how those files can be uploaded to a backend server with multipart/form-data and the FormData API.
What is the difference between web and native for file uploads?
When we use the element in a standard desktop/web environment, we can be quite certain of its behaviour. We click the Choose file button and a file explorer window is launched where we can select any file on our computer.
When we try to do this on mobile the behaviour is quite different and exactly how it behaves will depend on the platform. Generally speaking, the process is still more or less the same — the user clicks the button, selects a file, and then we are able to get a reference to that file. However, we don’t have a standard «file explorer» window that pops up and allows the user to select any file on their device. Depending on the context, the camera might be launched directly, or the user might be prompted to choose a file directly from the file system, or the user might be offered a choice between browsing files, taking a photo, taking a video, and so on.
Let’s take a look at different ways to set up the file input.
Differences in file input behaviour between iOS and Android
Although the following is not an exhaustive list of ways to set up the file input element, these are a pretty good set of examples that we could default to.
NOTE: The examples below use Angular event bindings to handle the change event, but otherwise the implementation will be the same with vanilla JavaScript, StencilJS, React, Vue, or whatever else you are using.
Standard File Input
On iOS, this will prompt the user to choose between Take Photo or Video , Photo Library , or Browse in order to return the desired file.
On Android, this will directly launch the native file selection screen to select any file on the device.
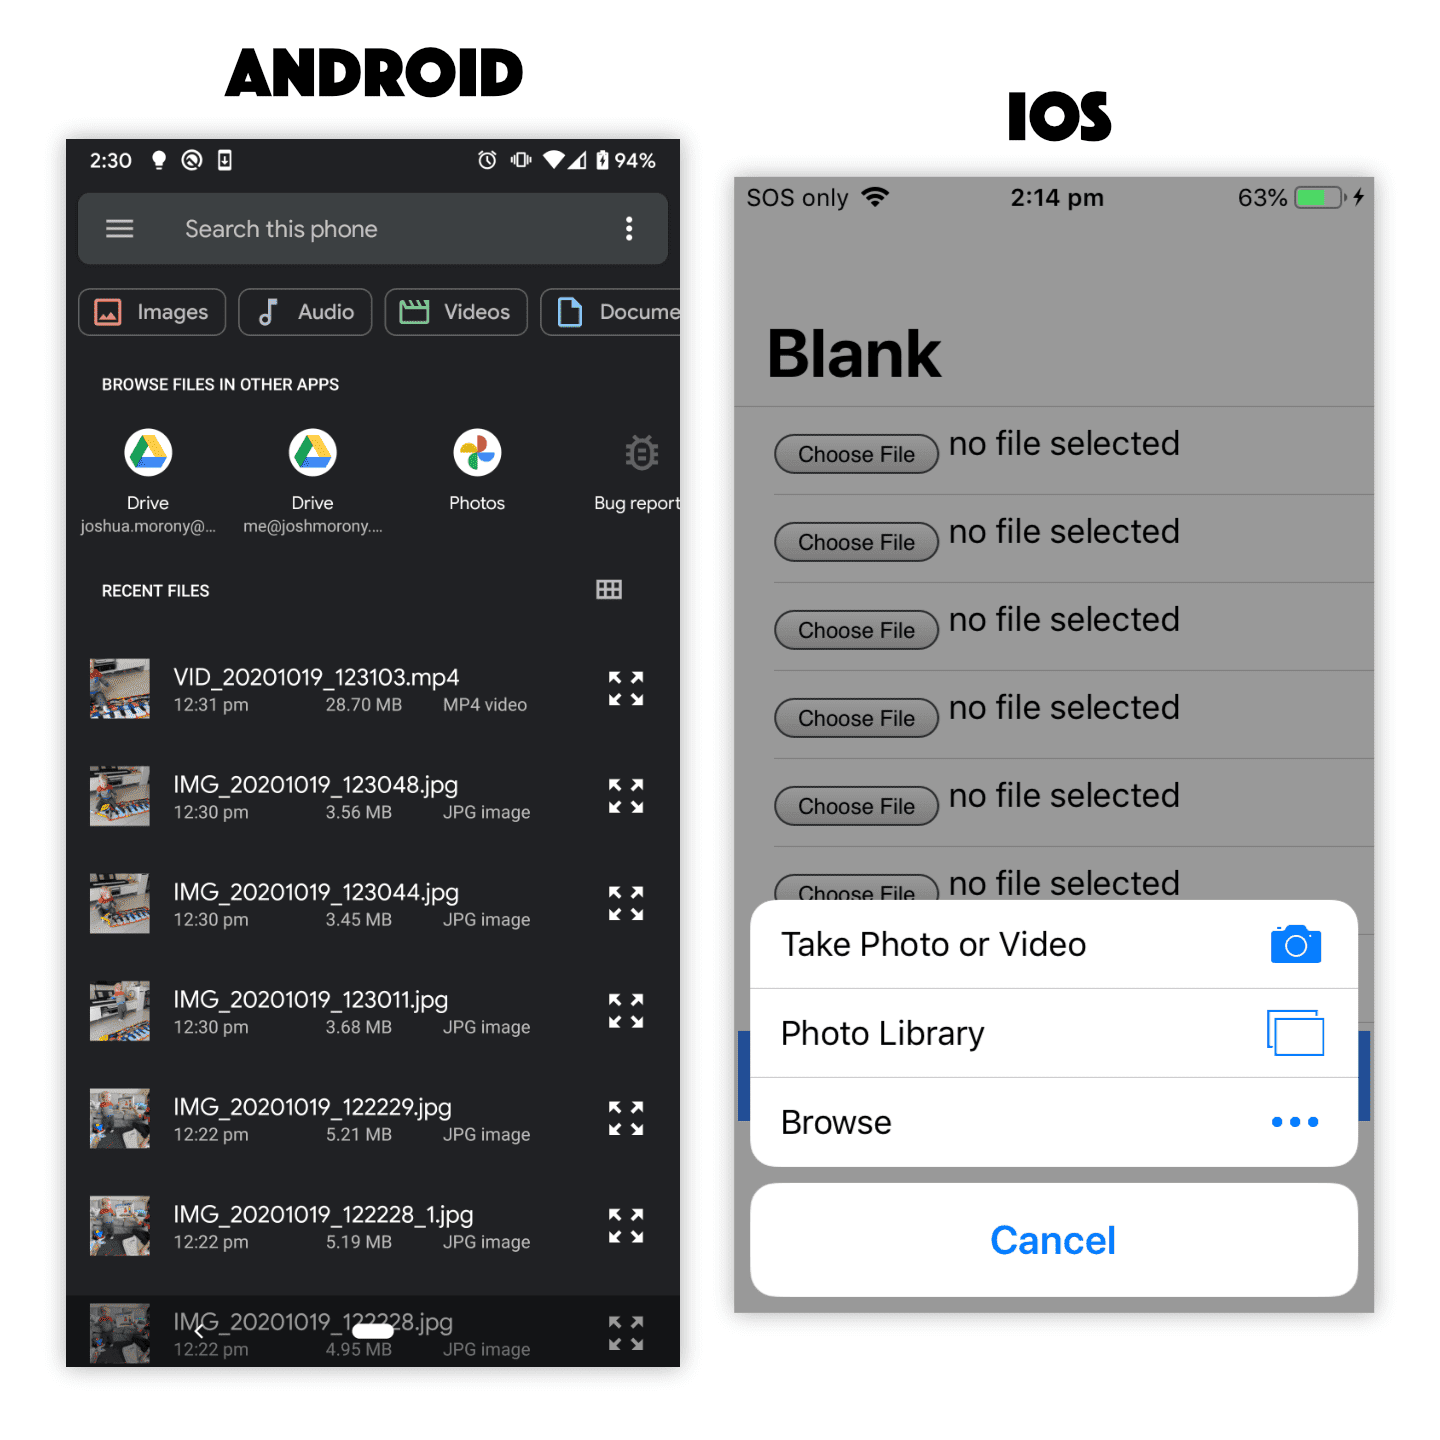
Limiting File Input to Images
On iOS, this will prompt the user to choose between Take Photo , Photo Library , or Browse in order to return the desired file. Note that Video is no longer a choice in the first option and videos (and other files) will also be excluded from being listed if the user chooses to select an existing photo.
On Android, this will launch the same native file selection screen again, but this time it will be filtered to only show images.
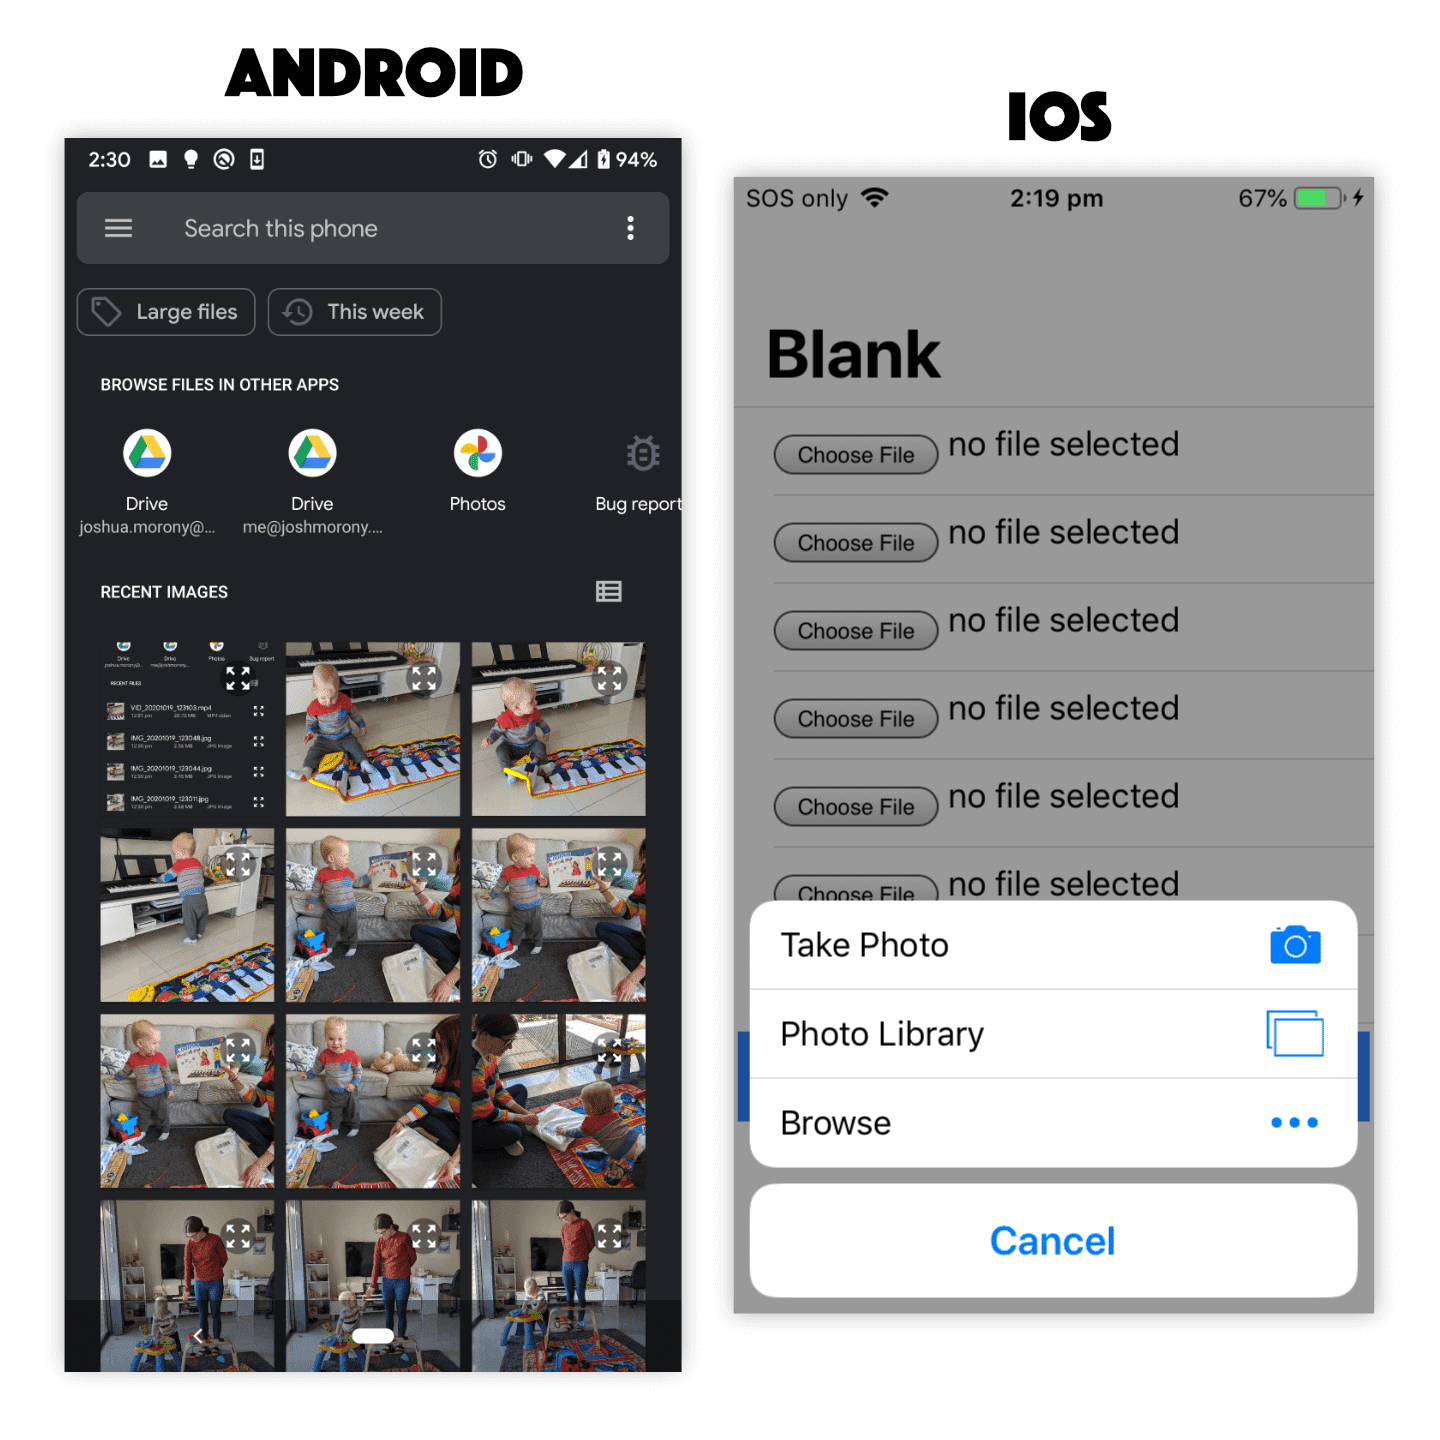
Using Camera for File Input
On iOS, this will directly launch the camera in Photo mode and allow the user to take a photo. Once the user takes a photo they will be able to choose whether to use that photo or if they want to retake the photo. Once the user chooses Use Photo the file will be supplied to the application.
On Android, this will directly launch the camera allowing the user to take a photo (not a video). The user can then accept the taken photo or take another.
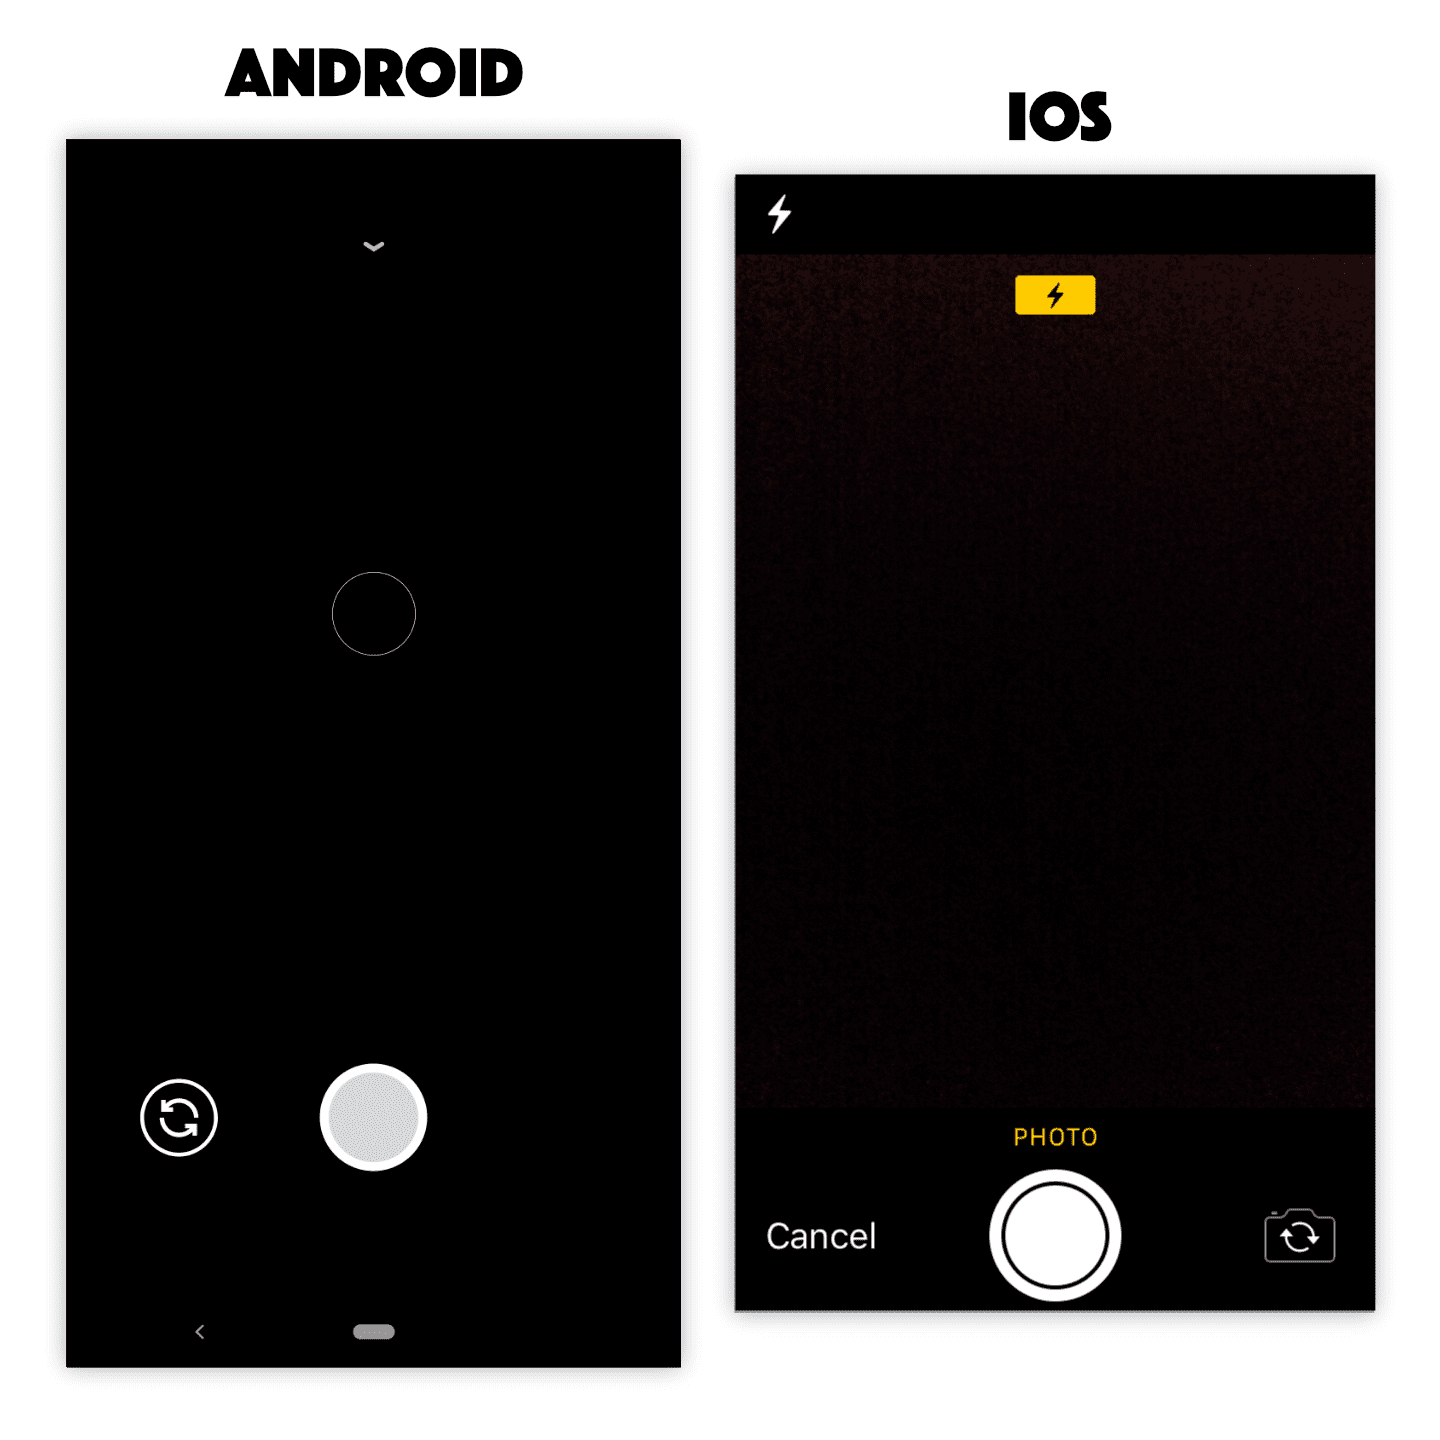
Limiting File Input to Videos
On iOS, this will prompt the user to choose between Take Video , Photo Library , or Browse in order to return the desired file. Note that Photo is no longer a choice in the first option and photos (and other files) will also be excluded from being listed if the user chooses to select an existing video.
On Android, this will launch the native file selection screen again, but this time it will be filtered to only show videos.
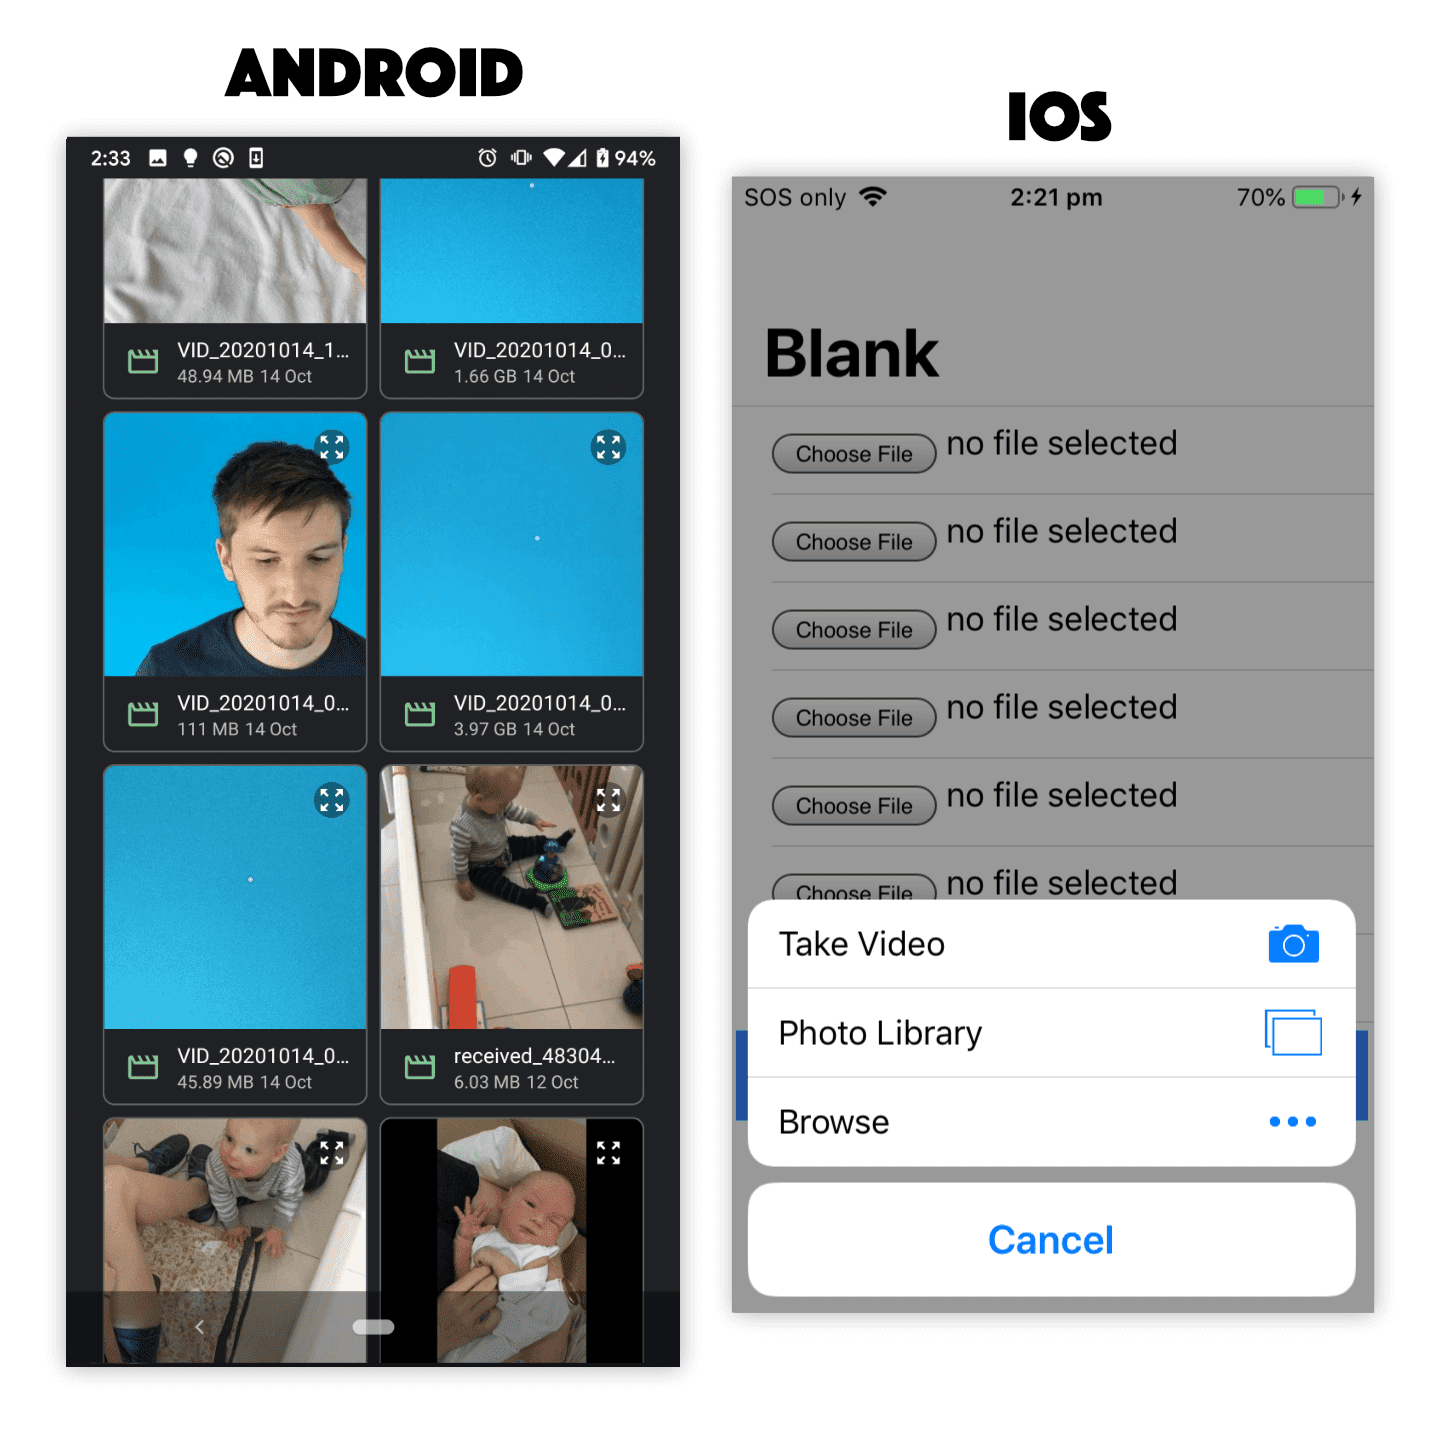
Limiting File Input to Audio
On iOS, this will prompt the user to choose between Take Photo or Video , Photo Library , or Browse in order to return the desired file. Note that there is no restriction to audio files only in this case.
On Android, this will launch the native file selection screen again, but this time it will be filtered to only show audio files.

Keep in mind that the specification for the file input element has changed over the years, so you might find many different examples of ways to set up this element and force certain behaviours. In general, my advice would be not to try to «game the system». Use the simplest options and focus on telling the browser what you want, then let the platform decide how best to fulfill that request. If you try to get too tricky and take over this process to enforce what you want, you will leave yourself vulnerable to different behaviours on different platforms/versions and also your solution will be more prone to breaking in the future.
If you do need more control over this process, in ways that using the file input element does not allow (or at least it does not allow it consistently across platforms), you can look into using native plugins/APIs instead. The Camera API, for example, will give you much greater control over the process of selecting/capturing a photo than the element will.
How do we upload these files to a server?
Fortunately, the resulting file reference can be uploaded in the same way as a file retrieved from a normal desktop/web file input element. You will just need to make a POST request that includes multipart/form-data that contains the file(s) you want to upload. For more details on doing that, check out the previous tutorial: Handling File Uploads in Ionic.
Summary
The standard element provides a surprisingly smooth file selection experience on native iOS and Android platforms, and these files can be easily sent as standard multipart/form-data to your backend server. This will probably be all you need a lot of the time, but for certain specialised circumstances or use cases you might need to look into using native plugins or APIs to fulfil your file selection and transferring needs.
If you enjoyed this article, feel free to share it with others!
Discussion
Need some help with this tutorial? Spotted an error? Got some helpful advice for others? Join the discussion on Twitter
If there are no active discussions, start one by including the URL of this post and tag me (@joshuamorony) in a new tweet.
I’ll try to help out directly whenever I have the time, but you might also want to include other relevant tags to attract attention from others who might also be able to help. To make it super easy for others to help you out, you might consider setting up an example on Stack Blitz so others can jump right into your code.
Источник
Accessing the Camera and Stored Media
This guide covers how to work with the camera and how to access media stored on the phone.
The camera implementation depends on the level of customization required:
- The easy way — launch the camera with an intent, designating a file path, and handle the onActivityResult.
- The hard way — use the Camera API to embed the camera preview within your app, adding your own custom controls.
You must configure a FileProvider as show in this section. The example below uses com.codepath.fileprovider and should match the authorities XML tag specified.
If you see a «INSTALL_FAILED_CONFLICTING_PROVIDER» error when attempting to run the app, change this to something unique, such as com.codepath.fileprovider.YOUR_APP_NAME_HERE , and also update the value in your XML tag to match.
In your AndroidManifest.xml, add the following queries block:
Easy way works in most cases, using the intent to launch the camera:
We need to define the getPhotoFileUri() function:
When the camera app finishes, the onActivityResult() method will be called:
Check out the official Photo Basics guide for more details.
In certain cases, when loading a bitmap with BitmapFactory.decodeFile(file) decoding the Bitmap in memory may actually cause a crash with a OutOfMemoryError: Failed to allocate error. Check out the Loading Bitmaps Efficiently guide and this stackoverflow post for an overview of the solutions.
Photos taken with the Camera intent are often quite large and take a very long time to load from disk. After taking a photo, you should strongly consider resizing the Bitmap to a more manageable size and then storing that smaller bitmap to disk. We can then use that resized bitmap before displaying in an ImageView .
Resizing a large bitmap and writing to disk can be done with:
Then we can write that smaller bitmap back to disk with:
Now, we can store the path to that resized image and load that from disk instead for much faster load times.
When using the Camera intent to capture a photo, the picture is always taken in the orientation the camera is built into the device. To get your image rotated correctly you’ll have to read the orientation information that is stored into the picture (EXIF meta data) and perform the following transformation using the ExifInterface Support Library:
See this guide for the source for this answer. Be aware that on certain devices even the EXIF data isn’t set properly, in which case you should checkout this workaround for a fix. You can read more here about the ExifInterface Support Library.
If you need to lookup the image type, there is the guessContentTypeFromStream() in the Java library that allows you to get back the mime type (i.e. image/jpeg ). It will read the first 16 bytes to determine the type of file. In order to use this API call, you must pass in a BufferedInputStream() which supports the mark() and reset() method calls required for the guessContentTypeFromStream() to work.
For applying filters to your captured images, check out the following libraries:
- CameraFilter — Realtime camera filters. Process frames by OpenGL shaders.
- photofilter — Apply filters to images after they are captured.
If you sure to enable access to the external storage to save to the public image, you must add this permission to your AndroidManifest.xml file:
Note: The permissions model has changed starting in Marshmallow. If your targetSdkVersion >= 23 and you are running on a Marshmallow (or later) device, you may need to enable runtime permissions. You should also read more about the runtime permissions changes.
Instead of using the capture intent to capture photos «the easy way», a custom camera can be used within your app directly leveraging the Camera2 API. This custom camera is much more complicated to implement but sample code can be found here and this CameraView from Google aims to help Android developers easily integrate Camera features. There is also a Google video overview of Camera2 which explains how Camera2 works.
There are a number of Camera2 tutorials you can review:
There are also a number of third-party libraries available to make custom cameras easier:
Leveraging Camera2 or the libraries above, apps can develop a camera that functions in anyway required including custom overlays for depositing checks, taking pictures with a particular form factor, or scanning custom barcodes.
Similar to the camera, the media picker implementation depends on the level of customization required:
- The easy way — launch the Gallery with an intent, and get the media URI in onActivityResult.
- The hard way — fetch thumbnail and full-size URIs from the MediaStore ContentProvider.
Make sure to enable access to the external storage first before using the camera (Note: The permissions model has changed starting in Marshmallow. If your targetSdkVersion >= 23 and you are running on a Marshmallow (or later) device, you may need to enable runtime permissions. You should also read more about the runtime permissions changes):
Easy way is to use an intent to launch the gallery:
Check out this Stack Overflow post for an alternate approach using mimetypes to restrict content user can select.
First, from the above example, we can add the Intent.EXTRA_ALLOW_MULTIPLE flag to the intent:
and then inside of onActivityResult , we can access all the photos selected with:
Note: that you may need to load the selected bitmaps efficiently or resize them if they are large images to avoid encountering OutOfMemoryError exceptions.
Alternatively, we can use a custom gallery selector that is implemented inside of our application to take full control over the gallery picking user experience. Check out this custom gallery source code gist or older libraries wrapping this up for reference. You can also take a look at older tutorials on custom galleries.
For allowing users to pick files from their system or online services, check out these helpful filepicker libraries:
These allow users to pick files beyond just images and are easy to drop into any app.
Источник
Mobile Photo Uploads with HTML5

Asynchronous file uploading on the web and especially the mobile web used to be a struggle. Three reasons come to mind:
- AJAX’s inability to send file data meant Flash and hidden frames became the go-to solutions
- Mobile browser support for Flash ranged from non-existent to extremely limited
- Many mobile operating systems — including older versions of iOS, Android, Windows Phone, and BlackBerry — lacked support in their browsers for the HTML input type=file attribute
Thankfully, the task of asynchronous file uploading on web and mobile web has been greatly simplified recently. In this post I share some considerations and details that went into the cross-platform, photo uploading app on our mobile web app.

Feature Detection vs Browser Detection
Many older mobile browsers lack support for HTML file input. Support on current devices is pretty good, but there are a significant number of old devices still in use that cannot handle HTML file input. In order to provide the best possible user experience, we can’t show users a feature their device cannot support — so we need to perform some sort of check to assess if the feature is supported.
One way of doing this is to check the browser’s user agent and cross reference that with a list of browsers or devices that are known (either by manual testing or documentation; caniuse is a nice place to start) to support the feature. This is known as browser detection, and is problematic for many reasons. For one, it is difficult to verify all possible device/browser configurations that support the feature of interest. Additionally, it isn’t future-proof: the code you write today may not work tomorrow.
For these reasons, it is much better to detect if the feature of interest is available to use in the user’s browser, a practice known as feature detection. This is the goal behind the popular open source JavaScript library Modernizr. The ideal solution would use only feature detection without any browser detection; however, this is not always possible since many browsers will report false positives on certain features.
The compromise is to use a mix of the two methods when using only feature detection is not possible.
Below is a snippet of code adapted from Modernizr that detects support for HTML file input using a mix of feature and browser detection:
Selecting a File
Once we know that file input is supported, we can show the HTML input field to the user. When tapped on a mobile device, this input field will prompt the user to either take a new photo with the camera, or to select an existing photo on their device. It’s also possible to allow the user to select multiple photos at once on some devices, by adding the multiple attribute to the input element; however, be aware that on iOS this will remove the option to use the camera as a source.
Note that here we use client-side validation to ensure that the selected file is an image, but it is important to validate on the server side as well. In general, validation on the client side provides better feedback to the user, whereas server-side validation is important for security purposes.

Reading and Processing the File
The improvement of camera technology in mobile devices brings with it an increase in the size of photos. Unfortunately, most people don’t have the bandwidth (or the patience) to upload uncompressed 8+ megapixel photos on a regular basis!
So what can we do? One solution is to compress and/or downscale photos on the client side before we send the photo over the network. In the past this would not have been a trivial task, but the introduction of HTML5, the FileReader interface, and the Canvas API makes this fairly simple. Let’s break this down into two parts:
- Using the FileReader interface to read the file
- Using the Canvas API to downscale and compress the image
1. Reading the File
In order to read the file, we first need to listen for changes to the HTML input element described earlier. We can do this with a little jQuery (although the native JavaScript implementation is not much different):
In this step it can also be worthwhile to validate that the file is under a given size, as loading a very large image into memory with the Canvas API is expensive, slow, and could cause the browser to crash. When the user selects an image file, the readFile function will be called with the file object. To read the file, we create a new FileReader object and define the success and failure conditions of reading. We must read the file in one of several different formats including array buffer, binary string, data URL, and text. You can refer to the FileReader documentation for details on each of these, but for our purposes reading the file as a data URL is fine as it works quite seamlessly with the Canvas API.
2. Processing the File
Once reading the image has completed, we can process it with Canvas. First we create a new image and set its source to the data URL obtained from reading the file. When the image has loaded, we calculate the desired dimensions of the new image. Note that if the size of the new image is smaller than the original, there is no need to process the image (if scaling is our only objective).
Next, we create a canvas element which will hold our output image. The canvas getContext method returns an object that provides methods and properties for manipulating the canvas. We use the drawImage method to place the source image on the canvas, resulting in a downscaled version of the original image.
The canvas element provides two methods to retrieve image data: toDataURL and toBlob . Both toDataURL and toBlob take as arguments the output image type and the image quality. If the image type is specified as image/jpeg or image/webp , the quality argument (a number between 0 and 1 with a default of 0.92) can be used to further compress the image.
This is a fairly simple use case of the Canvas API, though the possibilities extend far beyond scaling. Some examples include client side image editing, cropping, and thumbnail generation. An issue particularly relevant to the mobile web is the problem of lost metadata: most browsers will ignore the EXIF metadata of photos, including the orientation tag, resulting in photos being oriented incorrectly. This is not a problem if we upload the original photo, but since we are generating a new image with Canvas, the EXIF data of the original photo is lost. One solution is to read the EXIF data on the client side and use Canvas to correctly orient the image.
Uploading the File
In recent years, the technology behind AJAX has evolved to be able to handle file uploads, so we take advantage of this to upload the file asynchronously. There are many benefits to asynchronous file uploading, including the ability to monitor the progress of the upload, and allowing the user to perform additional actions while they wait for the upload to finish. Additionally, if the upload fails for whatever reason, we can provide the user with a hassle-free way of retrying the upload:
To keep things simple, we will use jQuery’s ajax method to perform the request, but if you are familiar with the XMLHttpRequest (XHR) object this task should be no more difficult.
We use a FormData object to construct the data payload that we want to send to the server. Using the FormData append method, we can add key/value pairs for files, blobs, and strings to the data payload. When using jQuery and FormData, it is important to set the processData and contentType properties to false. Setting processData to false prevents jQuery from automatically converting the data into a string, while setting contentType to false will prevent jQuery from incorrectly setting the content type to its default of application/x-www-form-urlencoded .
Once the file data reaches the server we can handle it with the backend technology of our choice. In PHP, the file data can be accessed in POST if the file data was sent as a data URL, or FILES if the file data was sent as a file or blob.
While asynchronous file uploading on the mobile web has long been a headache, the introduction of XMLHttpRequest Level 2 and various HTML5 APIs make this task much much easier. This post only covers the logic behind file processing and uploading, but with a bit of styling and polishing it’s quite easy to provide an awesome user experience. Check out the final product on Hootsuite’s mobile website.

Thanks to Adam Arsenault, Lars Vedo, Jeff Stautz, Kimli Welsh, and Noel Pullen for their advice and valuable feedback.
About the Author

Jacob Lee is a co-op student on Hootsuite’s mobile web team, studying computer science at UBC. When he’s not creating web and mobile apps, he enjoys tinkering with digital media, playing hockey and tennis, and jamming on the guitar. Follow him on Twitter @jacobtwlee.
Источник


