- Android environment setup
- 1. Install Android Build Support and the Android SDK & NDK tools
- 2. Enable USB debugging on your device
- ADB debugging for Chrome OS devices
- Connecting to your Chrome OS device
- Customizing the Android SDK & NDK Tools and OpenJDK installation
- Change the OpenJDK path
- Change the Android SDK Tools path
- Change the Android NDK path
- Updating the Android SDK Target API
- Android file manager unity
- About
Android environment setup
To build and run for Android, you must install the Unity Android Build Support platform module. You also need to install the Android Software Development Kit (SDK) and the Native Development Kit (NDK) to build and run any code on your Android device. By default, Unity installs a Java Development Kit based on OpenJDK.
Note: Unity supports Android 4.4 “KitKat” and above. See AndroidSdkVersions for details.
1. Install Android Build Support and the Android SDK & NDK tools
Use the Unity Hub to install Android Build Support and the required dependencies
See in Glossary : Android SDK & NDK tools, and OpenJDK.
 Add Android modules
You can install Android Build Support, the Android SDK & NDK tools and OpenJDK when you install the Unity Editor, or add them at a later time.
For information on adding the Android modules:
If you are using a 2018 version of Unity, see the Unity 2018.4 documentation for information on manually installing these dependencies.
2. Enable USB debugging on your device
To enable USB debugging, you must enable Developer options on your device. To do this, find the build number in your device’s Settings menu. The location of the build number varies between devices; for stock Android, it’s usually Settings > About phone > Build number. For specific information on your device and Android version, refer to your hardware manufacturer.
After you navigate to the build number using the instructions above, tap on the build number seven times. A pop-up notification saying “You are now X steps away from being a developer” appears, with “X” being a number that counts down with every additional tap. On the seventh tap, Developer options are unlocked.
Note: On Android versions prior to 4.2 (Jelly Bean), the Developer options are enabled by default.
Go to Settings > Developer options (or, if this does not work, on some devices the path is Settings > System > Developer options), and check the USB debugging checkbox. Android now enters debug mode when it is connected to a computer via USB.
Connect your device to your computer using a USB cable. If you are developing on a Windows computer, you might need to install a device-specific USB driver. See the manufacturer website for your device for additional information.
The setup process differs for Windows and macOS and is explained in detail on the Android developer website. For more information on connecting your Android device to the SDK, refer to the Run Your App section of the Android Developer documentation.
ADB debugging for Chrome OS devices
For information on how to set up your development environment for Chrome OS devices, and enable ADB An Android Debug Bridge (ADB). You can use an ADB to deploy an Android package (APK) manually after building. More info
See in Glossary debugging, see Google’s documentation on Chrome OS Developer Environments.
Connecting to your Chrome OS device
Before you can deploy to your device you need to manually connect with ADB via the device’s IP address.
To begin you need the IP address. Open up the Settings app and choose Network in the sidebar. Next click on the active network interface.
If the interface is wireless then next choose the SSID that you are connected to. In the details you will see your IP address. Make a note of it.
If you are using a wired connection your IP address will be shown on the first details page.
Now we are ready to connect. For the sake of this example let’s say that the device’s IP is 192.168.0.100. In a shell or terminal run the following command
adb connect 192.168.0.100
If the connection was successful you will see a message such as connected to 192.168.0.65:5555 . And adb devices should verify that the device is connected. List of devices attached 192.168.0.65:5555 device
From now on you may run ADB commands to target the device just as you would over a USB connection.
Note: If your device or host machine goes to sleep or loses network connectivity you may need to reconnect.
Customizing the Android SDK & NDK Tools and OpenJDK installation
Unity recommends that you use the Unity Hub to install Android SDK & NDK tools, to ensure that you receive the correct versions and configuration. Unity installs Android SDK & NDK Tools and OpenJDK respectively in the SDK, NDK and OpenJDK folders under /Unity/Hub/Editor/[EditorVersion]/Editor/Data/PlaybackEngines/AndroidPlayer/.
If you have multiple versions of Unity with the same required dependencies (be sure to check System requirements for the latest) and you want to avoid duplicating the installation of Android SDK & NDK Tools and OpenJDK, you can specify a shared location in the Unity Preferences window. To do this, go to Preferences > External tools and enter the directory paths in the SDK and NDK fields:
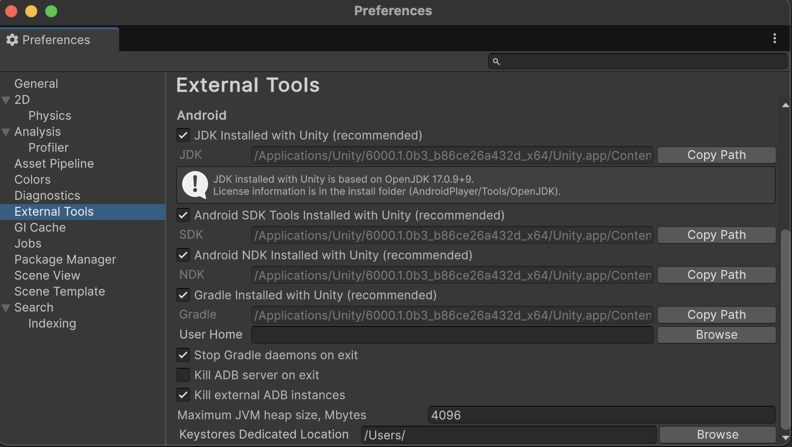 Preferences window showing external tools settings for Android
Warning: Unity does not officially support versions of the OpenJDK, SDK, or NDK other than the ones it supplies.
To change the OpenJDK, SDK Tools, or NDK that Unity uses to build Android apps:
- Open the Project.
- Open the Preferences window (Windows and Linux: Edit >Preferences; macOS: Unity >Preferences).
- In the left navigation column, select External Tools.
Change the OpenJDK path
- Uncheck JDK Installed with Unity (recommended).
- In the JDK field, enter the path to the JDK installation folder, or use the Browse button to locate it.
Change the Android SDK Tools path
- Uncheck Android SDK Tools Installed with Unity (recommended).
- In the SDK field, enter the path to the SDK installation folder, or use the Browse button to locate it.
Unity works with the most recent version of the Android SDK available at the time of the Unity version release.
Change the Android NDK path
- Uncheck Android NDK Installed with Unity (recommended).
- In the NDK field, enter the path to the NDK installation folder, or use the Browse button to locate it.
Each version of Unity requires a specific version of the Android NDK to be installed:
| Unity version | NDK version |
|---|---|
| 2018.4 LTS | r16b |
| 2019.4 LTS | r19 |
| 2020.3 LTS | r19 |
See the System requirements page for a complete list of requirements.
Updating the Android SDK Target API
Unity Hub installs the latest version of the Android SDK Target API required by Google Play.
If you need to use a more recent version, you can change the Target API from the Target API Level field in the Player Settings window (menu: Edit > Project Settings > Player, then select the Android platform). You can find the Target API Level option in the Other Settings > Identification section.
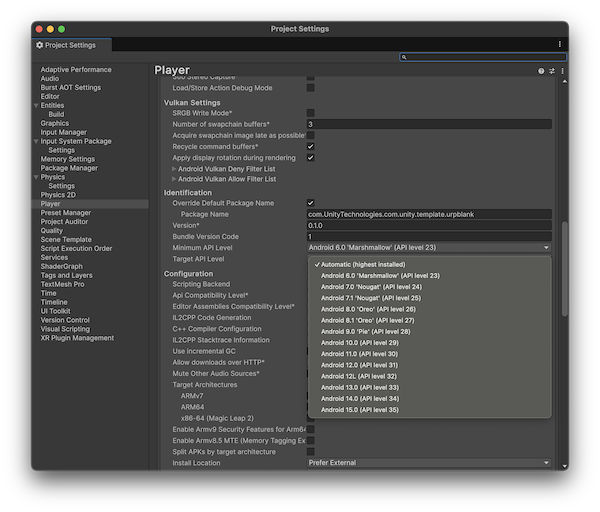 Selecting a target API for the Android SDK
After you select an option other than the default, Unity prompts you to update the Android SDK API. You can choose to either:
- Update the Android SDK
- Continue to use the highest installed version of the Android SDK
Note: If you select an older version of the Target API, the Unity Android SDK Updater will not be able to perform the update and will give you this message:
Android SDK does not include your Target SDK of (version). Please use the Android SDK Manager to install your target SDK version. Restart Unity after SDK installation for the changes to take effect.
In this case, to update the Android SDK Target API, you must use the Android sdkmanager from either Android Studio or the command line tool. Regardless of the method you chose, make sure to select the correct Android SDK folder for Unity in the Edit > Preferences > External Tools window.
On Windows, if the Unity Editor is installed in the default folder ( /Program Files/ ), you must run the sdkmanager with elevated privilege (Run as Administrator) to perform the update.
Источник
Android file manager unity
Unity Simple File Browser

- Behaves similar to Windows file chooser
- Ability to search by name or filter by type
- Quick links
- Simple user interface
- Draggable and resizable
- Ability to choose folders instead of files
- Supports selecting multiple files/folders
- Can easily be reskinned
- Supports runtime permissions on Android M+ and Storage Access Framework on Android Q+
- Optimized using a recycled list view (makes Instantiate calls sparingly)
NOTE: Universal Windows Platform (UWP) and WebGL platforms aren’t supported!
There are 5 ways to install this plugin:
- import SimpleFileBrowser.unitypackage via Assets-Import Package
- clone/download this repository and move the Plugins folder to your Unity project’s Assets folder
- import it from Asset Store
- (via Package Manager) add the following line to Packages/manifest.json:
- «com.yasirkula.simplefilebrowser»: «https://github.com/yasirkula/UnitySimpleFileBrowser.git»,
- (via OpenUPM) after installing openupm-cli, run the following command:
- openupm add com.yasirkula.simplefilebrowser
NEW INPUT SYSTEM SUPPORT
This plugin supports Unity’s new Input System but it requires some manual modifications (if both the legacy and the new input systems are active at the same time, no changes are needed):
- the plugin mustn’t be installed as a package, i.e. it must reside inside the Assets folder and not the Packages folder (it can reside inside a subfolder of Assets like Assets/Plugins)
- if Unity 2019.2.5 or earlier is used, add ENABLE_INPUT_SYSTEM compiler directive to Player Settings/Scripting Define Symbols (these symbols are platform specific, so if you change the active platform later, you’ll have to add the compiler directive again)
- add Unity.InputSystem assembly to SimpleFileBrowser.Runtime Assembly Definition File’s Assembly Definition References list
- open SimpleFileBrowserCanvas prefab, select EventSystem child object and replace StandaloneInputModule component with InputSystemUIInputModule component (or, if your scene(s) already have EventSystem objects, you can delete SimpleFileBrowserCanvas prefab’s EventSystem child object)
- Android build fails, it says «error: attribute android:requestLegacyExternalStorage not found» in Console
android:requestLegacyExternalStorage attribute in AndroidManifest.xml grants full access to device’s storage on Android 10 but requires you to update your Android SDK to at least SDK 29. If this isn’t possible for you, you should open SimpleFileBrowser.aar with WinRAR or 7-Zip and then remove the tag from AndroidManifest.xml.
- Can’t show the file browser on Android, it says «java.lang.ClassNotFoundException: com.yasirkula.unity.FileBrowserPermissionReceiver» in Logcat
If you are sure that your plugin is up-to-date, then enable Custom Proguard File option from Player Settings and add the following line to that file: -keep class com.yasirkula.unity.*
- File browser doesn’t show any files on Android 10+
File browser uses Storage Access Framework on these Android versions and users must first click the Browse. button in the quick links section
- RequestPermission returns Permission.Denied on Android
Declare the WRITE_EXTERNAL_STORAGE permission manually in your Plugins/Android/AndroidManifest.xml file with the tools:node=»replace» attribute as follows: (you’ll need to add the xmlns:tools=»http://schemas.android.com/tools» attribute to the element).
NOTE: On Android Q (10) or later, it is impossible to work with File APIs. On these devices, SimpleFileBrowser uses Storage Access Framework (SAF) to browse the files. However, paths returned by SAF are not File API compatible. To simulate the behaviour of the File API on all devices (including SAF), you can check out the FileBrowserHelpers functions. For reference, here is an example SAF path: content://com.android.externalstorage.documents/tree/primary%3A/document/primary%3APictures
First, add using SimpleFileBrowser; to your script.
The file browser can be shown either as a save dialog or a load dialog. In load mode, the returned path(s) always lead to existing files or folders. In save mode, the returned path(s) can point to non-existing files, as well. You can use the following functions to show the file browser:
There can only be one dialog active at a time. These functions will return true if the dialog is shown successfully (if no other dialog is active), false otherwise. You can query the FileBrowser.IsOpen property to see if there is an active dialog at the moment.
If user presses the Cancel button, onCancel callback is called. Otherwise, onSuccess callback is called with the paths of the selected files/folders as parameter. pickMode can be Files, Folders or FilesAndFolders. Setting allowMultiSelection to true will allow picking multiple files/folders.
There are also coroutine variants of these functions that will yield while the dialog is active:
After the dialog is closed, you can check the FileBrowser.Success property to see whether the user has selected some files/folders or cancelled the operation and if FileBrowser.Success is set to true, you can use the FileBrowser.Result property to get the paths of the selected files/folders.
You can force close an open dialog using the following function:
If there is an open dialog and the invokeCancelCallback parameter is set to true, the onCancel callback of the dialog will be invoked. This function can also be used to initialize the file browser ahead of time, which in turn will reduce the lag when you first open a dialog.
To add a quick link to the browser, you can use the following function:
When icon parameter is left as null, the quick link will have a folder icon.
By default, the file browser doesn’t show files with .lnk or .tmp extensions. You can extend this list or remove this restriction altogether using the following function:
Lastly, you can use the following functions to set the file filters (filters should include the period, e.g. «.jpg» instead of «jpg«):
When showAllFilesFilter is set to true, a filter by the name «All Files (.*)» will appear that will show all the files when selected. To select a default filter, use the following function:
You can set whether or not hidden files should be shown in the file browser via FileBrowser.ShowHiddenFiles (has no effect when Storage Access Framework is used on Android 10+). This value can also be changed from the «Show hidden files» toggle in the user interface. To change the visibility of that toggle, you can use FileBrowser.DisplayHiddenFilesToggle. Note that this toggle is always hidden on Android 10+ when Storage Access Framework is used or on mobile devices when device is held in portrait orientation.
To open files or directories in the file browser with a single click (instead of double clicking), you can set FileBrowser.SingleClickMode to true.
File browser refreshes the list of drives at a regular interval to detect the insertion/removal of USB drives. This interval can be changed via FileBrowser.DrivesRefreshInterval. If its value is less than 0, list of drives won’t be refreshed. By default, this value is 5 seconds on standalone platforms and -1 on mobile platforms.
File browser comes bundled with two premade skins in the Skins directory: LightSkin and DarkSkin. New UISkins can be created via Assets-Create-yasirkula-SimpleFileBrowser-UI Skin . A UISkin can be assigned to the file browser in two ways:
- By changing SimpleFileBrowserCanvas prefab’s Skin field
- By changing the value of FileBrowser.Skin property from a C# script
On Android, file browser requires external storage access to function properly. You can use the following function to check if we have runtime permission to access the external storage:
FileBrowser.Permission is an enum that can take 3 values:
- Granted: we have the permission to access the external storage
- ShouldAsk: we don’t have permission yet, but we can ask the user for permission via RequestPermission function (see below). As long as the user doesn’t select «Don’t ask again» while denying the permission, ShouldAsk is returned
- Denied: we don’t have permission and we can’t ask the user for permission. In this case, user has to give the permission from Settings. This happens when user selects «Don’t ask again» while denying the permission or when user is not allowed to give that permission (parental controls etc.)
To request permission to access the external storage, use the following function:
Note that FileBrowser automatically calls RequestPermission before opening a dialog. If you want, you can turn this feature off by setting FileBrowser.AskPermissions to false.
The following file manipulation functions work on all platforms (including Storage Access Framework (SAF) on Android 10+). These functions should be called with the paths returned by the FileBrowser functions only:
About
A uGUI based runtime file browser for Unity 3D (draggable and resizable)
Источник


