- Полный список
- Как Android запускает MainActivity
- Что происходит при запуске приложения
- 1 Схема запуска приложения
- 2. Класс ActivityThread
- 2.1 Подготовка main looper (Process 2–3)
- 2.2 Вызов Handler’a (Process 4-5)
- 2.3 Вызов метод loop() у Looper’а (Process 6–7)
- 3. Бесконечный loop() в Looper’е (Process 7,8,9)
- 4. Запуск MainActivity (Process 10 to 15)
- Evolution of Finding Views by ID in Android
- The findViewById() vs Butterknife vs Kotlin Synthetics vs DataBinding vs ViewBindings
- The findViewById() method
- Analysis
- Butterknife
- Analysis
- Kotlin Synthetics
- Analysis
- Data Binding
- Analysis
- View Binding
- Analysis
- Time to Make a Decision
- Defending Your In-Background App When Android OS Kills It
- March 19, 2020
- How to Display Dependency Tree of Your Android Project with Gradle?
- March 9, 2020
Полный список
В этом уроке мы:
— научимся обращаться из кода к View-элементам на экране и менять их свойства
Project name: P0081_ViewById
Build Target: Android 2.3.3
Application name: ViewById
Package name: ru.startandroid.develop.viewbyid
Create Activity: MainActivity
Чтобы обратиться к элементу экрана из кода, нам нужен его ID. Он прописывается либо в Properties, либо в layout-файлах, как вам удобнее. Для ID существует четкий формат — @+id/name, где + означает, что это новый ресурс и он должен добавиться в R.java класс, если он там еще не существует.
Давайте откроем main.xml, для TextView укажем и сохраним
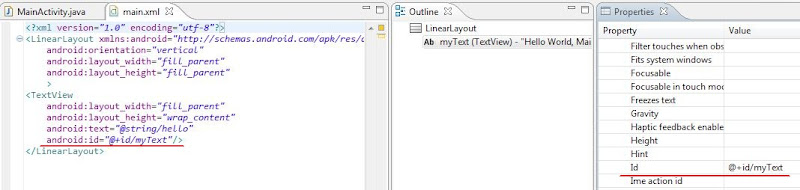
Теперь откроем R.java и видим, что для класса id появилась константа myText. Т.е. чтобы к ней обратиться, надо написать R.id.myText.
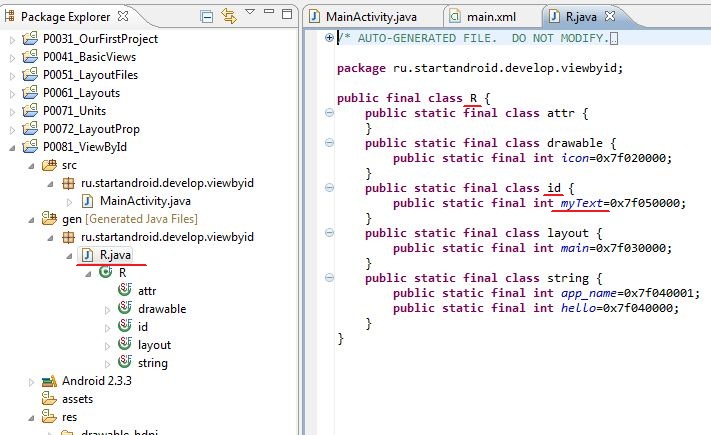
Она связана с элементом TextView и мы можем ее использовать, чтобы обратиться к элементу программно. Для этого нам понадобится метод findViewById. Он по ID возвращает View. Давайте напишем вызов этого метода. Напомню, что пока мы пишем наш код в методе onCreate. Это метод, который вызывается при создании Activity. Если вдруг непонятно, куда писать, можно подсмотреть в конец урока, там я выложил код.
Откроем MainActivity.java и после строки с вызовом метода setContentView напишем:
Если View подчеркнуто красным, то скорей всего этот класс не добавлен в секцию import. Нажмите CTRL+SHIFT+O для автоматического обновления импорта.
Теперь myTextView (типа View) – это наш TextView на экране. Но тип View – это предок для TextView (и остальных View-элементов). И он нам не подходит, если мы хотим проделывать операции соответствующие TextView. Поэтому нам необходимо преобразование View в TextView. Изменим наш код на следующий:
Теперь myTextView имеет тип TextView, а результат метода findViewById мы преобразуем из View в TextView. Теперь мы можем применять к myTextView методы класса TextView. Для примера возьмем метод setText. Сейчас отображаемый текст = Hello World, MainActivity!. Мы его программно поменяем на New text in TextView
Сохраняем, запускаем (CTRL+F11) и видим, что текст изменился

Добавим на экран кнопку (Button), текст оставим по умолчанию. Сохраняем — CTRL+SHIFT+S (если не сохранить, то в R.java не появится ID).
Обратите внимание, что у меня совпадает имя объекта и ID

Они друг другу не мешают и так делать даже логичнее. Это остается на ваше усмотрение. Так, кнопку мы нашли, теперь давайте изменим ее текст:
Запустим приложение. Текст на кнопке поменялся, на кнопку можно понажимать, но ничего происходить не будет. Т.к. мы нигде не указывали, что надо делать при нажатии. Этим займемся на следующем уроке. А пока давайте сделаем кнопку неактивной.
Мы поменяли параметр Enabled. Теперь на кнопку нельзя нажать. Сохраним, запустим и убедимся.
Добавим CheckBox, По умолчанию галочка не стоит. Давайте поставим ее программно, для этого используется метод setChecked, который меняет параметр Checked.
Запустив приложение видим, что код сработал.
Как видите – все несложно. Используем метод findViewById, чтобы по ID получить объект соответствующий какому-либо View-элементу (Button, TextView, CheckBox) и далее вызываем необходимые методы объектов (setText, setEnabled, setChecked).
В итоге должен получиться такой код:
На следующем уроке:
— научимся обрабатывать нажатие кнопки
Присоединяйтесь к нам в Telegram:
— в канале StartAndroid публикуются ссылки на новые статьи с сайта startandroid.ru и интересные материалы с хабра, medium.com и т.п.
— в чатах решаем возникающие вопросы и проблемы по различным темам: Android, Kotlin, RxJava, Dagger, Тестирование
— ну и если просто хочется поговорить с коллегами по разработке, то есть чат Флудильня
— новый чат Performance для обсуждения проблем производительности и для ваших пожеланий по содержанию курса по этой теме
Источник
Как Android запускает MainActivity
Недавно я провел исследование о main() методе в Java и то, как он служит точкой входа для любого приложения Java. Это заставило меня задуматься, а как насчет Android-приложений? Есть ли у них основной метод? Как они загружаются? Что происходит за кулисами до выполнения onCreate()? Майкл Бэйли очень подробно рассказал о том, как работает Main Thread, так что это быстрый обзор его доклада плюс дополнительная информация из Android Open Source Project (AOSP).
В этой статье мы рассмотрим:
- Что происходит от нажатия на иконку приложения до запуска MainActivity
- Найдем основной метод приложения и узнаем, как основной поток (он же UI, он же Main Thread) получает свое назначение.
- Рассмотрим роль, которую играют Looper & Handler в передаче сообщений, которые в конечном итоге приводят к созданию вашей Activity.
Что происходит при запуске приложения
1 Схема запуска приложения
Между вызовом метода main() и onCreate() в нашем MainActivity примерно 15 шагов, и в этой статье мы пройдем по ним. На рисунке 1 изображена общая схема запуска приложения, показывающая различные классы взаимодействия сверху и соответствующую цепочку методов. Шаги пронумерованы, и когда я обращаюсь к ним, я буду использовать следующие обозначения Process3 или Process14

Рисунок 1: Схема запуска приложения по шагам от вызова main() до onCreate() в MainActivity
2. Класс ActivityThread
В классе ActivityThread чуть более 6500 строк. Для краткости я определил самые важные для нас части. Давайте рассмотрим, что делает этот класс и связанный с ним основной метод, чтобы запустить нашу Activity
Рисунок 2: Метод main() в ActivityThread, который служит точкой входа для запуска вашего приложения.
Как видно в коде: метод main() выполняет три важных дела:
1. Подготавливает основной Looper (MainLooper) (Process 2)
2. Настройка Handler’a (Process 4)
3. Вызов метода Looper.loop() в главном потоке (MainThread) (Process 6)
2.1 Подготовка main looper (Process 2–3)
Основной Looper задается вызовом Looper.prepareMainLooper() (см. Строку 8 в коде). Это отмечает текущий случайный поток, который выполняет всю работу по вызову метода main() в качестве основного потока приложений. Именно так и именно здесь определяется знаменитый главный поток для приложения в Android!
2.2 Вызов Handler’a (Process 4-5)
Внутри класса ActivityThread существует приватный внутренний класс H, да-да, все верно, просто H, который наследуется от класса Handler (см. рис. 4 и 7). В 12й строке экземпляр H-обработчика устанавливается как главный Handler потока. Что очень интересно знать о классе H, как вы сами увидите позже, это то, что он содержит более 50 определений состояния/событий, в которых может находиться ваше приложение, например LAUNCH_ACTIVITY, PAUSE_ACTIVITY, BIND_SERVICE и т.д.
2.3 Вызов метод loop() у Looper’а (Process 6–7)
После назначения главного потока в этом же главном потоке, для того чтоб мы могли в нем что-то выполнять, вызывается метод Looper.loop() (см. Строку 20). Это начинает выполнение сообщений в очереди сообщений Loopers. Теперь главный поток запущен и может начать обработку задач из очереди.
Обратите внимание, что в строке 18, если выполнение кода пойдет дальше чем Looper.loop() в 17 строке вдруг и приложение выйдет из цикла, то будет брошено исключение RuntimeException. Это говорит о том, что метод loop() в идеале никогда преждевременно не заканчивается. Мы увидим как это в следущем разделе.
3. Бесконечный loop() в Looper’е (Process 7,8,9)
Рисунок 3: Код внутри метода loop() в классе Looper’e
Как мы видим в коде, в методе Looper.loop() есть очередь сообщений (строка 10) и внутри цикла вызывается queue.next(). MessageQueue заполняется Handler-‘ом, о котором мы говорили в предыдущем разделе (см. Process 8). Обратите внимание на интересное описание условия в цикле for — здесь нет аргументов, только две точки с запятой говорят что это бесконечный цикл. Поэтому Looper в идеале никогда не заканчивается, если данное сообщение не null.
Итак, теперь мы определили главный поток, выполняемый благодаря Looper, мы также видели, что Handler добавляет сообщения в цикл Looper.loops() и обрабатывает сообщения. Давайте посмотрим, как они вместе вызывают нашу Activity.
4. Запуск MainActivity (Process 10 to 15)
Важно помнить, что этот бесконечный цикл и обработка сообщений выполнялись в main() методе класса ActivityThread, потому что именно там они были вызваны (см. в коде строки с 12 по 17). Мы поверхностно просмотрели Loopers, MessageQueues и Handlers, чтобы вникнуть в контекст. Итак, давайте вернемся к классу ActivityThread, в частности, к внутреннему классу H, о котором мы говорили ранее, который действует как основной Handler главного потока.
Итак, у нас есть Looper, передающий сообщения нашему Handler’у, давайте узнаем, как эти сообщения обрабатываются. Это делается внутри класса H. Этот класс содержит метод handleMessage(Message msg). Помните, что все классы, которые наследуются от Handler, должны переопределить этот метод.
Рисунок 4: Приватный внутренний класс H и его handleMessage() метод
Как видно в коде, в 8й строке есть оператор switch, в котором определяется обработка входящего сообщения по его содержимому.
Один из случаев (cases) включает в себя запуск активности (строка 11), что интересно, так это то, что этот метод предназначен для обработки около 50 случаев, которые варьируются от возобновления, приостановки, запуска Activity, привязки Service’ов, обработки Receiver’ов, предоставления предупреждений lowMemory или trimMemory, когда память устройства заполняется и т. д.
В case LAUNCH_ACTIVITY вызывается метод handleLaunchActivity(), как показано в строке 13, см Process11 на схеме. Затем этот метод вызывает другой метод, называемый performLaunchActivity(), который возвращает объект Activity (см. Рис. 5, строка 7).
Рисунок 5: Метод handleLaunchActivity() в котором создается Activity
Метод performLaunchActivity() добавляет в Activity важную информацию, такую как Instrumentation, Context, Component, а также Intent; а также задает Application. Затем этот метод вызывает Instrumentation.callActivityOnCreate() (Process 13), который является последним этапом перед вызовом метода onCreate() в Activity (Process 14-15, см. Рисунок 5 (код), строки 8-10).
Рисунок 6: Класс Instrumentation наконец запускает Activity
На данный момент ваша Activity загружена c множеством полезных переменных и методов, которые можно использовать для создания вашего нового удивительного приложения для Android! Все это благодаря ActivityThread, умной работе Handler’a и Looper’a, и огромному классу Activity в 7600 строк кода, который позволяет аттачить фрагменты, получить контекст и легко управлять View’s — и много еще чего.
Источник
Evolution of Finding Views by ID in Android
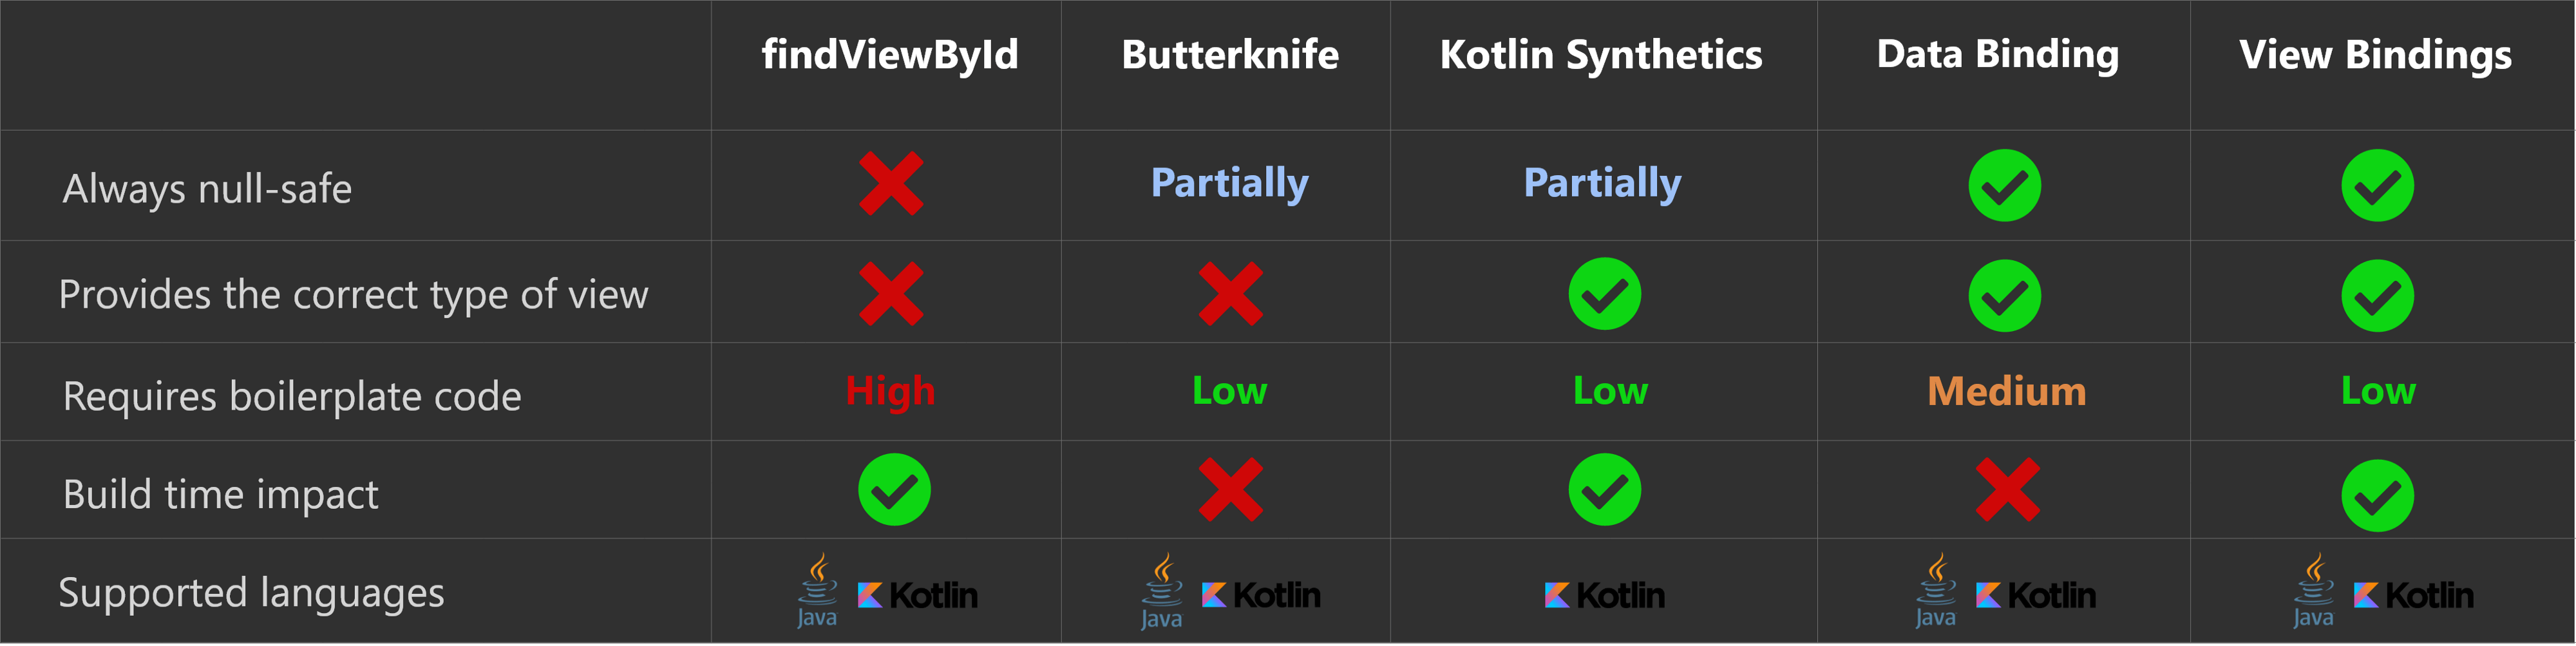
The findViewById() vs Butterknife vs Kotlin Synthetics vs DataBinding vs ViewBindings
For more than a decade, Android developers have struggled with a simple but annoying issue. Getting the view reference from XML layouts to their view classes such as Activity or Fragments in entirely separate language — Java or Kotlin.
As a beginner in Android, I used to get confused a lot. The Android SDK provided a method: findViewById() . Functionality-wise, this method performs a singular task — it will give you the reference to the view in XML layouts by searching its ID. And if nothing is found, it will give you the good old NULL , which is said to be the 1-billion dollar mistake by its creator.
In this article, I am going to discuss on how the findViewById() evolved over time and what’s the best approach in “modern Android development” to get the view reference from XML layouts.
The findViewById() method
Obviously, the first one is the findViewById() method. Introduced in the API level 1, this requires an ID and returns a View object.

There are some problems with this approach.
If there is view with this ID in this layout, you won’t get any compile time errors. Rather you will get NullPointerException at runtime when Android fails to locate the view in Activity , Fragment or ViewGroup .
If the view is TextView in XML layout and you are type-casting it as Button , you won’t get any compile time errors. Instead you will get ClassCastException as a TextView cannot be converted to Button .
This method was used extensively and is being used as well throughout whole evolution of Android SDK. In the API level 26 of compileSdk , the definition of this method was slightly changed to remove the casting issue.
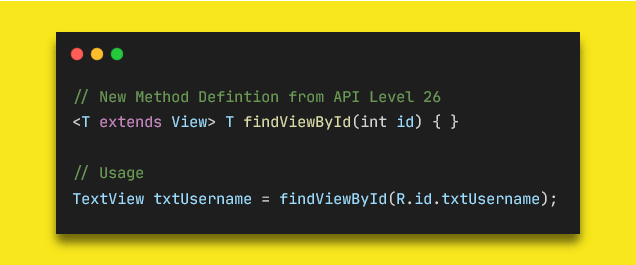
Now, developers don’t need to cast their views manually in the code. If you are referencing a Button with a TextView ID, then Android SDK will try to find the Button with the provided ID and it will return NULL because it won’t be able to find it.
But in Kotlin, you would still need to provide the type like findViewById
(R.id.txtUsername) . This may give you NullPointerException if you are not checking your views for null-safety, but this method will not throw ClassCastException like it used to.
Analysis
Type-safe: Before API 26, there was no type-safety.
Null-safe: No null-safety. You will have to check views before accessing for null values.
Boilerplate Code: A lot. You have to declare a separate variable for all the views you need from XML layouts.
Build-time: No difference in build time.
Languages: Supports both Java and Kotlin.
Butterknife
Many different libraries have tried to simplify the findViewById() usage with different methods. Particularly, the Butterknife library created by Jake Wharton has become super famous and has got huge interest by developers around the world. It has become to sort-of standard way to avoid the findViewById usage.
The library uses annotation-processing and fetches the views from XML layouts using the findViewById method under the hood through code generation. It’s very easy to use, and helps in reducing the boilerplate code for developers.
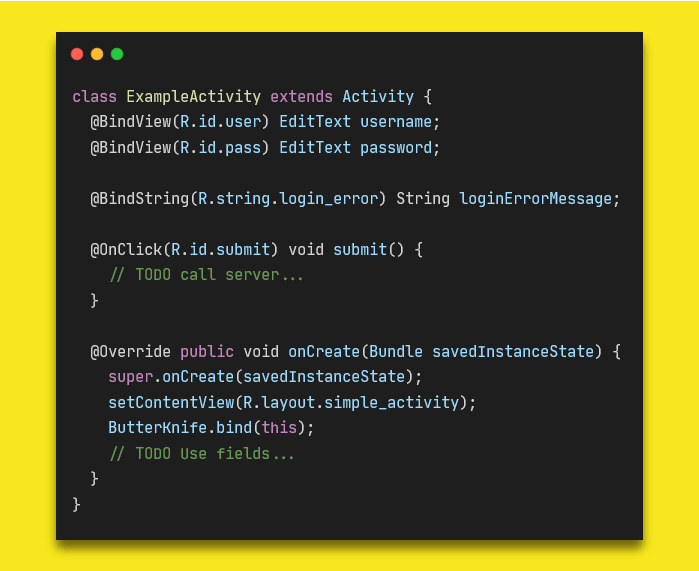
It has almost similar issues as findViewById . However, it adds a null-safety check at runtime to avoid the NullPointerException .
Attention: This tool is now deprecated. Please switch to view binding. Existing versions will continue to work, obviously, but only critical bug fixes for integration with AGP will be considered. Feature development and general bug fixes have stopped. —** Source: Butterknife Github repository**
Analysis
Type-safe: No type-safety as it uses findViewById .
Null-safe: The library checks the views for null-ability at runtime before accessing.
Boilerplate Code: Reduces the boilerplate as annotation processors auto generate code for you.
Build-time: Build time is affected because of annotation processing.
Languages: Supports both Java and Kotlin.
Kotlin Synthetics
Android SDK is now the Kotlin-first officially. That means that Android SDK will implement APIs from the Kotlin language perspective first and later these will be added for Java.
One of the biggest features Kotlin introduced is Kotlin Extension Methods. And with the help of it, Kotlin Synthetics came into existence. Kotlin Synthetics provides developers direct access to their views from XML layout through the auto-generated Kotlin extension methods.
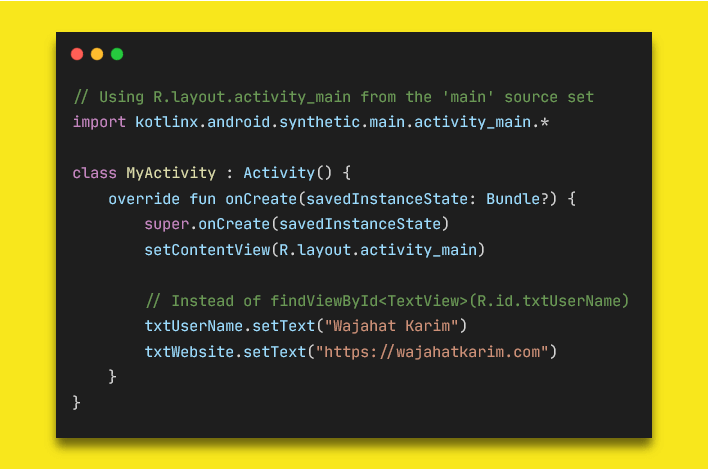
Kotlin Synthetics calls findViewById method once and then caches the view instances in a HashMap by default. This cache configuration can be changed to SparseArray or no cache via the Gradle settings.
Overall, Kotlin Synthetics is a good option as it is type-safe and requires null check through Kotlin’s ? operator if the view is present only in some layout configurations. It requires no extra code from the developers. But this is only supported for Kotlin projects.
But there’s a slight problem which lots of developers have faced with using Kotlin Synthetics. For example, if you set your content view to a layout, then type an ID that only exists in a different layout, the IDE lets you autocomplete and add the new import statement. Unless the developer specifically checks to make sure their import statements only import the correct views, there is no safe way to verify that this won’t cause a runtime issue.
Analysis
Type-safe: Absolutely
Null-safe: Normally its null safe. But if view ID is also present / missing in other layouts, then it requires developer to explicitly either use safe call operator ? or check the variable before use. Developers can use view from other layout leading to NullPointerException .
Boilerplate Code: No boilerplate code as extension methods are generated. It only requires to apply android-kotlin-extension plugin in the build.gradle one time.
Build-time: No difference.
Languages: Supports only Kotlin.
Data Binding
Data Binding Library is a support library that enables you to bind UI elements in your layouts to data sources in your app using a declarative style rather than programmatically.
The Data Binding is much superior in terms of functionality from other approaches as it not only gives you the type-safe AND null-safe view references but also allows you to map your data with views directly inside the XML layouts.
You will have to manually convert layouts to support data binding by nesting in tag.
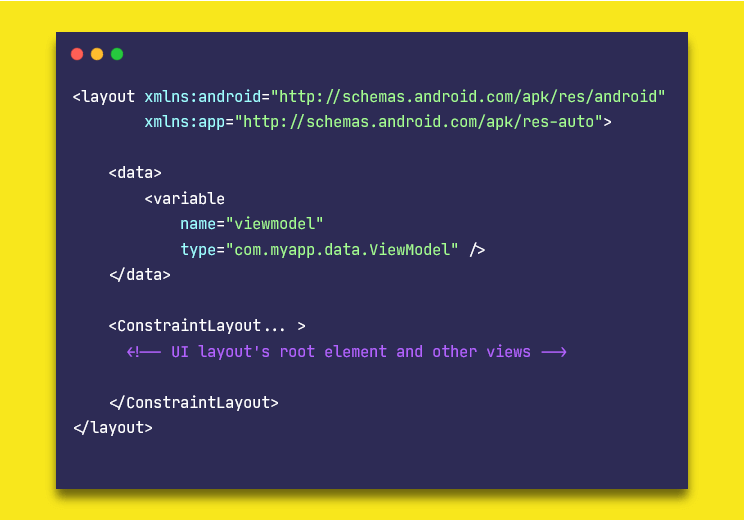
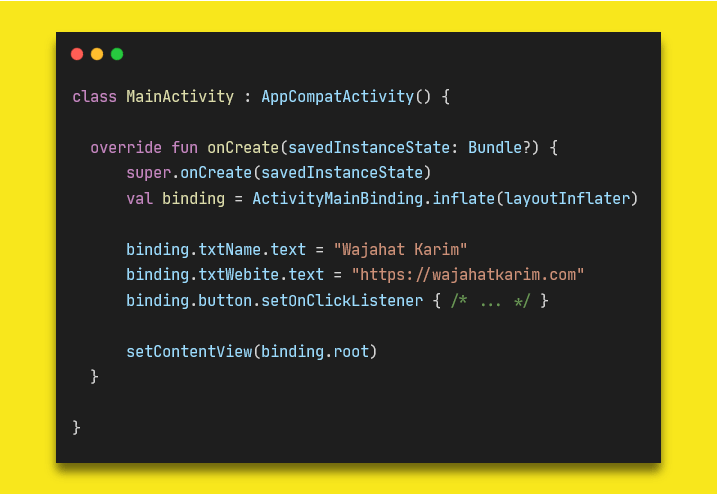
Now, Android Studio will generate classes for your layouts. For example, if your layout file name is activity_main.xml , then Android will generate a class ActivityMainBinding either in Java or Kotlin as per your preferences. You can use that to access the views without any NullPointerException or ClassCastException .
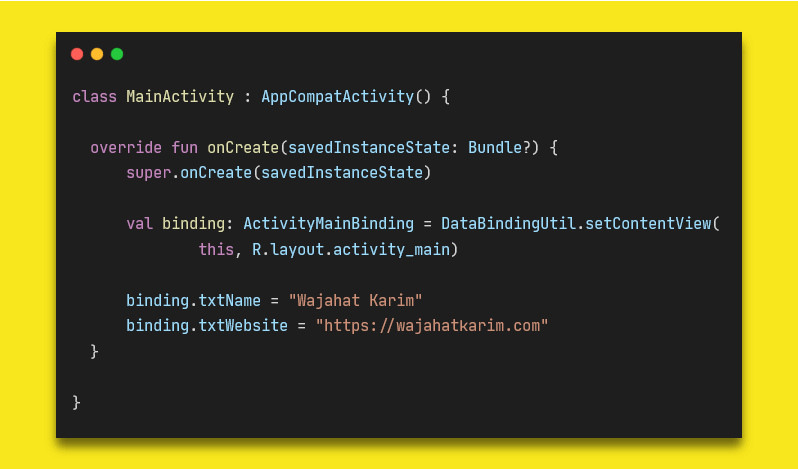
The best advantage of using Data Binding is that it allows developers to map data with the views in XML without even accessing those in the Java/Kotlin files. You can also use two-way binding to update your XML or data value without any listeners or callbacks.
Analysis
Type-safe: Absolutely
Null-safe: Absolutely
Boilerplate Code: Requires each layout file to be nested inside tag. And also you will have to create instance of auto generated binding class and inflate it to your Activity or Fragment .
Build-time: Increases build time as it generates class files of layouts. Often time, it’s slow because you will have to manually press “Make” button to update / generate new classes for your layouts.
Languages: Supports both Java and Kotlin.
View Binding
The ViewBinding introduced in Android Studio 3.6 recently is sort-of subset of the Data Binding library. It improves build times because no annotation processing is required. It doesn’t require any extra attention to layout files by nesting those in tags. It simply works on all layout files by default.
The only difference with data binding of this is that this is only used for view references. It doesn’t do any data mapping or two-way data binding.
You can use ViewBinding in place of other options if you are simply looking for a good approach to get views from layout files.
This only works on Android Studio 3.6 or later versions. You can enable it by adding this in your app’s build.gradle file.
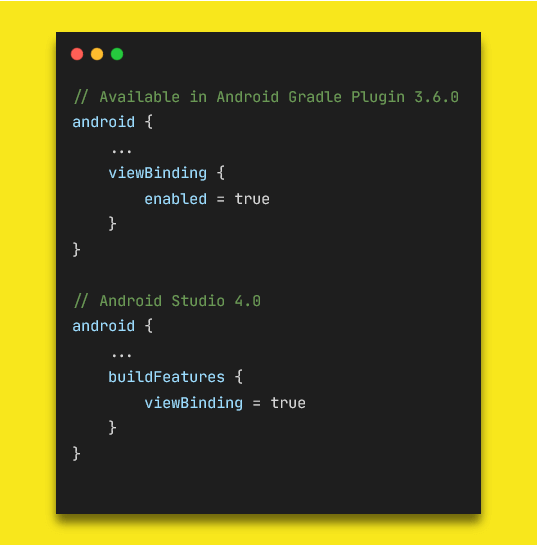
Then Android Studio will generate View Binding classes for all your layout files. You can use those classes to inflate in the Activity or Fragments just like you would do in Data Binding.
If you want some layout file to be skipped for view binding class, you can do so by adding tools:viewBindingIgnore=»true» in your layout files.
Analysis
Type-safe: Absolutely
Null-safe: Absolutely
Boilerplate Code: No boilerplate code as View Binding classes are generated automatically. It only requires enable the View Binding in the build.gradle one time.
Build-time: No impact on build speed. View Binding* is designed to solve the performance issue connected to using Data Binding *so it doesn’t have a negative impact on the build speed.
Languages: Supports both Java and Kotlin.
Time to Make a Decision
Looking at all the options and their analysis, View Binding is the best option at this time to use.
At the end, please Subscribe to my newsletter DroidUp to get more tutorials and tips on Android development directly in your inbox.
If you liked this article, you can read my new articles below:
Defending Your In-Background App When Android OS Kills It
Android OS will kill your app in background to reclaim the resources and memory. Learn how to handle it as a developer. It all started from a crash reported in Firebase Crashlytics console.
March 19, 2020
How to Display Dependency Tree of Your Android Project with Gradle?
For Starters, simply run the command “gradlew :app:dependencies” in your terminal Gradle Dependency Tree Printed in Console Recently, in one of my projects, we were stuck at a very annoying exception IllegalStateException: WorkManager is already initialized .
March 9, 2020


7 years experience. 💻 Creator of various Open Source libraries on Android . 📝 Author of two technical books and 100+ articles on Android. 🎤 A passionate Public Speaker giving talks all over the world.
Источник


