- Remove unused Android resources to reduce APK size
- The problem
- Solution and Usage
- KeepSafe/android-resource-remover
- android-resource-remover — A simple utility to remove unused resources in your Android app to lower the size of the APK…
- How does it work?
- Android find unused resources
- About
- Shrink, obfuscate, and optimize your app
- Enable shrinking, obfuscation, and optimization
- Groovy
- Kotlin
- R8 configuration files
- Include additional configurations
- Groovy
- Kotlin
- Shrink your code
- Customize which code to keep
- Strip native libraries
- Native crash support
- Android Gradle plugin version 4.1 or later
- Android Gradle plugin version 4.0 or earlier (and other build systems)
- Shrink your resources
- Groovy
- Kotlin
- Customize which resources to keep
- Enable strict reference checks
- Kotlin
- Remove unused alternative resources
- Groovy
- Kotlin
- Merge duplicate resources
- Obfuscate your code
- Decode an obfuscated stack trace
- Code optimization
- Enable more aggressive optimizations
- Troubleshoot with R8
- Generate a report of removed (or kept) code
- Troubleshoot resource shrinking
Remove unused Android resources to reduce APK size

I’ ve been programming Android applications for 2.5 years. I mainly work on the KeepSafe Hide pictures app but I also built our Hide SMS app and some other small private projects.
Over time, one problem I keep running into over and over again is dealing with resource bloat — which happens when you keep adding new resources but there’s no good way to remove the ones that are no longer in use. In a typical web project, resource bloat doesn’t really affect performance because the browser will only load what’s needed. On mobile, however, it’s a real problem because space is much more of a commodity, and all of your unused resources will end up getting shipped to the user.
To fix this, I wrote a small tool called android-resource-remover that pinpoints unused resources and removes them from your codebase.
The problem
In Android, resources are everything. Your layout XML files define your views, images, strings, colors, dimensions, animations, and so on. Different screen densities across different devices make you store every image in 4–5 different resolutions with the same name in different folders. In cases with graphical buttons, you need to provide a different image for different button states and then wire it all up in an additional XML in your drawable folder. This makes it easy to have one button in 11 different files. The same goes for strings; e.g. our app is translated into 10 different languages. Adding a new string to the app will introduce a new tag in 10 different XML files.
If I want to stop using a button, I have to find out what image resources my drawable XML is using and then delete everything. In the case of the string that I just defined, I have to delete the string in those 10 different files and remove them inline.
Because there’s so much overhead and manual work, I pretty much never did resource cleanup.
Solution and Usage

Today, the Android Developer Tools come with a tool called Lint that gives you great output on what is unused in your codebase. However, you still have to remove everything yourself. For this reason we wrote a small tool called android-resource-remover that will remove all of your unused resources based on Lint’s output.
Usage is pretty easy too. You just run
in your Android project directory. android-resource-remover expects that you have lint in your classpath. In case you don’t, you can specify the location of your lint tool with \ — lint
You can find more information about how to use it and the source under https://github.com/KeepSafe/android-resource-remover. In case you built your Android project with gradle, tale a look at the tools README for instructions.
One thing to note is that you might have to run android-resource-remover twice because of dependencies. In other words, new unused resources will likely emerge after you run it for the first time. For instance, an unused layout in your code will be removed on the first run. Then, when you run it again, it will point out all the strings and graphics that have been used by this layout, as there is no reference to them anymore.
KeepSafe/android-resource-remover
android-resource-remover — A simple utility to remove unused resources in your Android app to lower the size of the APK…
One thing to note is that you might have to run android-resource-remover twice because of dependencies. In other words, new unused resources will likely emerge after you run it for the first time. For instance, an unused layout in your code will be removed on the first run. Then, when you run it again, it will point out all the strings and graphics that have been used by this layout, as there is no reference to them anymore.
What is the difference in APK size after running android-resource-remove on our hide pictures app? I branched off from our develop branch to build a different APK after removing all unused resources to compare file size. The result is quite fascinating. Even with our rather large app (due to native code and other libs), I can reduce the APK size by 10% by shaving off
1MB. Here is a ls -la output of that dir.
How does it work?
android-resource-remover is based off the result XML from the Android Lint tool. There are other tools out there that tell you about unused resources, but we feel strongly about using the output of the most supported tool over time. In this case, Lint from the Android project itself seemed like a solid approach; it allowed us to focus on removing the actual resources from disk and from within the other XML resource files.
Lint tool gives you a lot of things you can use to improve in your app. For this project, we’re only looking at improvements that are tagged with UnusedResources. So we’re parsing the entire output XML for
The slightly tricky part is that Lint output is not currently made for tools like this, so there is no clear indication if a resource is an entire file or just a single element in a resource.xml file (e.g. string.xml). Our current approach is to look at the location value of the unused resource from Lint’s output. If it contains line or column, we expect the resource to be within a file and not the entire file.
From here on it’s pretty easy: resources that are an entire file just get deleted. For resources that we identified as an element within a XML file, we first parse the resource XML and then remove that element. All this happens in the android_clean_app.py either in remove_resource_file() or in remove_resource_value().
While writing this, I’m contemplating whether we should just commit a patch to the Android Lint tool that gives us a more clear output about a resource being a value within a XML file or an entire file.
I hope this will help as many Android developers over time as possible. I’m very happy to hear your comments, suggestions, experiences and how you think we can improve android-resource-remover. Feel free to submit bugs or open pull requests for improvements.
Источник
Android find unused resources

android-resource-remover
android-resource-remover is utility that removes unused resources reported by Android Lint from your project. The goal is to reduce your APK size and keep the app clean from unused stuff.
Open the directory where your app is located and run
Android resources have dependencies to each other. This means that after running resource-remover the first time, it will clean up unused resources file that hold a reference to other resources. You can run this resource remover multiple times until there is no more unused resources to be removed. We’ve been running it up to 4 times in a row.
Use with gradle
android-resource-remover is build on top of android lint. If you have a gradle project you have to run lint within your gradle build scripts and then use the lint-result.xml as the input file for android-resource-remover
Prints help message.
Full path to the lint tool like: d:\Dev\Android SDK\tools\lint
This will be executed as the lint command. If not provided it assumes the lint command in available and runs: lint
Full path to the android app like: d:\Dev\My_Android_App
If not provided it assumes the current directory is the app’s root directory.
Use existing lint result. If provided lint won’t be run.
Ignore layout directory
Resource ID in code not found
If you have references to elements in an old layout that you’re not using anymore, you will get a compile error that the ID ( R.id. ) can not be found. The reason is that the resource file that contained R.id. has been removed as it was not used any more. Time to clean up your code.
Q: installing dependency lxml failed with clang: error: unknown argument: ‘-mno-fused-madd’ [-Wunused-command-line-argument-hard-error-in-future]
A: http://stackoverflow.com/a/22322645
Q: installing dependency lxml failed with fatal error: ‘libxml/xmlversion.h’ file not found
A: There are several ways to fix this listed on stackoverflow http://stackoverflow.com/questions/19548011/cannot-install-lxml-on-mac-os-x-10-9
When opening an issue please include as much info as possible. pip.log, python varsion/info, os version/info might all be help us understanding what’s the problem.
In PR please keep the formatting.
Apache version 2.0
About
A simple utility to remove unused resources in your Android app to lower the size of the APK. It’s based on the Android lint tool output.
Источник
Shrink, obfuscate, and optimize your app
To make your app as small as possible, you should enable shrinking in your release build to remove unused code and resources. When enabling shrinking, you also benefit from obfuscation, which shortens the names of your app’s classes and members, and optimization, which applies more aggressive strategies to further reduce the size of your app. This page describes how R8 performs these compile-time tasks for your project and how you can customize them.
When you build your project using Android Gradle plugin 3.4.0 or higher, the plugin no longer uses ProGuard to perform compile-time code optimization. Instead, the plugin works with the R8 compiler to handle the following compile-time tasks:
- Code shrinking (or tree-shaking): detects and safely removes unused classes, fields, methods, and attributes from your app and its library dependencies (making it a valuable tool for working around the 64k reference limit). For example, if you use only a few APIs of a library dependency, shrinking can identify library code that your app is not using and remove only that code from your app. To learn more, go to the section about how to shrink your code.
- Resource shrinking: removes unused resources from your packaged app, including unused resources in your app’s library dependencies. It works in conjunction with code shrinking such that once unused code has been removed, any resources no longer referenced can be safely removed as well. To learn more, go to the section about how to shrink your resources.
- Obfuscation: shortens the name of classes and members, which results in reduced DEX file sizes. To learn more, go to the section about how to obfuscate your code.
- Optimization: inspects and rewrites your code to further reduce the size of your app’s DEX files. For example, if R8 detects that the else <> branch for a given if/else statement is never taken, R8 removes the code for the else <> branch. To learn more, go to the section about code optimization.
When building the release version of your app, by default, R8 automatically performs the compile-time tasks described above for you. However, you can disable certain tasks or customize R8’s behavior through ProGuard rules files. In fact, R8 works with all of your existing ProGuard rules files, so updating the Android Gradle plugin to use R8 should not require you to change your existing rules.
Enable shrinking, obfuscation, and optimization
When you use Android Studio 3.4 or Android Gradle plugin 3.4.0 and higher, R8 is the default compiler that converts your project’s Java bytecode into the DEX format that runs on the Android platform. However, when you create a new project using Android Studio, shrinking, obfuscation, and code optimization is not enabled by default. That’s because these compile-time optimizations increase the build time of your project and might introduce bugs if you do not sufficiently customize which code to keep.
So, it’s best to enable these compile-time tasks when building the final version of your app that you test prior to publishing. To enable shrinking, obfuscation, and optimization, include the following in your project-level build.gradle file.
Groovy
Kotlin
R8 configuration files
R8 uses ProGuard rules files to modify its default behavior and better understand your app’s structure, such as the classes that serve as entry points into your app’s code. Although you can modify some of these rules files, some rules may be generated automatically by compile-time tools, such as AAPT2, or inherited from your app’s library dependencies. The table below describes the sources of ProGuard rules files that R8 uses.
| Source | Location | Description |
| Android Studio | /proguard-rules.pro | When you create a new module using Android Studio, the IDE creates a proguard-rules.pro file in the root directory of that module. By default, this file does not apply any rules. So, include your own ProGuard rules here, such as your custom keep rules. |
| Android Gradle plugin | Generated by the Android Gradle plugin at compile time. | The Android Gradle plugin generates proguard-android-optimize.txt , which includes rules that are useful to most Android projects and enables @Keep* annotations. By default, when creating a new module using Android Studio, the module-level build.gradle file includes this rules file in your release build for you. Note: The Android Gradle plugin includes additional predefined ProGuard rules files, but it is recommended that you use proguard-android-optimize.txt . |
| Library dependencies | AAR libraries: /proguard.txt JAR libraries: | If an AAR library is published with its own ProGuard rules file, and you include that AAR as a compile-time dependency, R8 automatically applies its rules when compiling your project. Using rules files that are packaged with AAR libraries is useful if certain keep rules are required for the library to function properly—that is, the library developer has performed the troubleshooting steps for you. However, you should be aware that, because ProGuard rules are additive, certain rules that an AAR library dependency includes cannot be removed and might impact the compilation of other parts of your app. For example, if a library includes a rule to disable code optimizations, that rule disables optimizations for your entire project. |
| Android Asset Package Tool 2 (AAPT2) | After building your project with minifyEnabled true : /build/intermediates/proguard-rules/debug/aapt_rules.txt | AAPT2 generates keep rules based on references to classes in your app’s manifest, layouts, and other app resources. For example, AAPT2 includes a keep rule for each Activity that you register in your app’s manifest as an entry point. |
| Custom configuration files | By default, when you create a new module using Android Studio, the IDE creates /proguard-rules.pro for you to add your own rules. | You can include additional configurations, and R8 applies them at compile-time. |
When you set the minifyEnabled property to true , R8 combines rules from all the available sources listed above. This is important to remember when you troubleshoot with R8, because other compile-time dependencies, such as library dependencies, may introduce changes to the R8 behavior that you do not know about.
To output a full report of all the rules that R8 applies when building your project, include the following in your module’s proguard-rules.pro file:
Include additional configurations
When you create a new project or module using Android Studio, the IDE creates a /proguard-rules.pro file for you to include your own rules. You can also include additional rules from other files by adding them to the proguardFiles property in your module’s build.gradle file.
For example, you can add rules that are specific to each build variant by adding another proguardFiles property in the corresponding productFlavor block. The following Gradle file adds flavor2-rules.pro to the flavor2 product flavor. Now, flavor2 uses all three ProGuard rules because those from the release block are also applied.
Groovy
Kotlin
Shrink your code
Code shrinking with R8 is enabled by default when you set the minifyEnabled property to true .
Code shrinking (also known as tree shaking), is the process of removing code that R8 determines is not required at runtime. This process can greatly reduce your app’s size if, for example, your app includes many library dependencies but utilizes only a small part of their functionality.
To shrink your app’s code, R8 first determines all entry points into your app’s code based on the combined set of configuration files. These entry points include all classes that the Android platform may use to open your app’s Activities or services. Starting from each entry point, R8 inspects your app’s code to build a graph of all methods, member variables, and other classes that your app might access at runtime. Code that is not connected to that graph is considered unreachable and may be removed from the app.
Figure 1 shows an app with a runtime library dependency. While inspecting the app’s code, R8 determines that methods foo() , faz() , and bar() are reachable from the MainActivity.class entry point. However, class OkayApi.class or its method baz() is never used by your app at runtime, and R8 removes that code when shrinking your app.
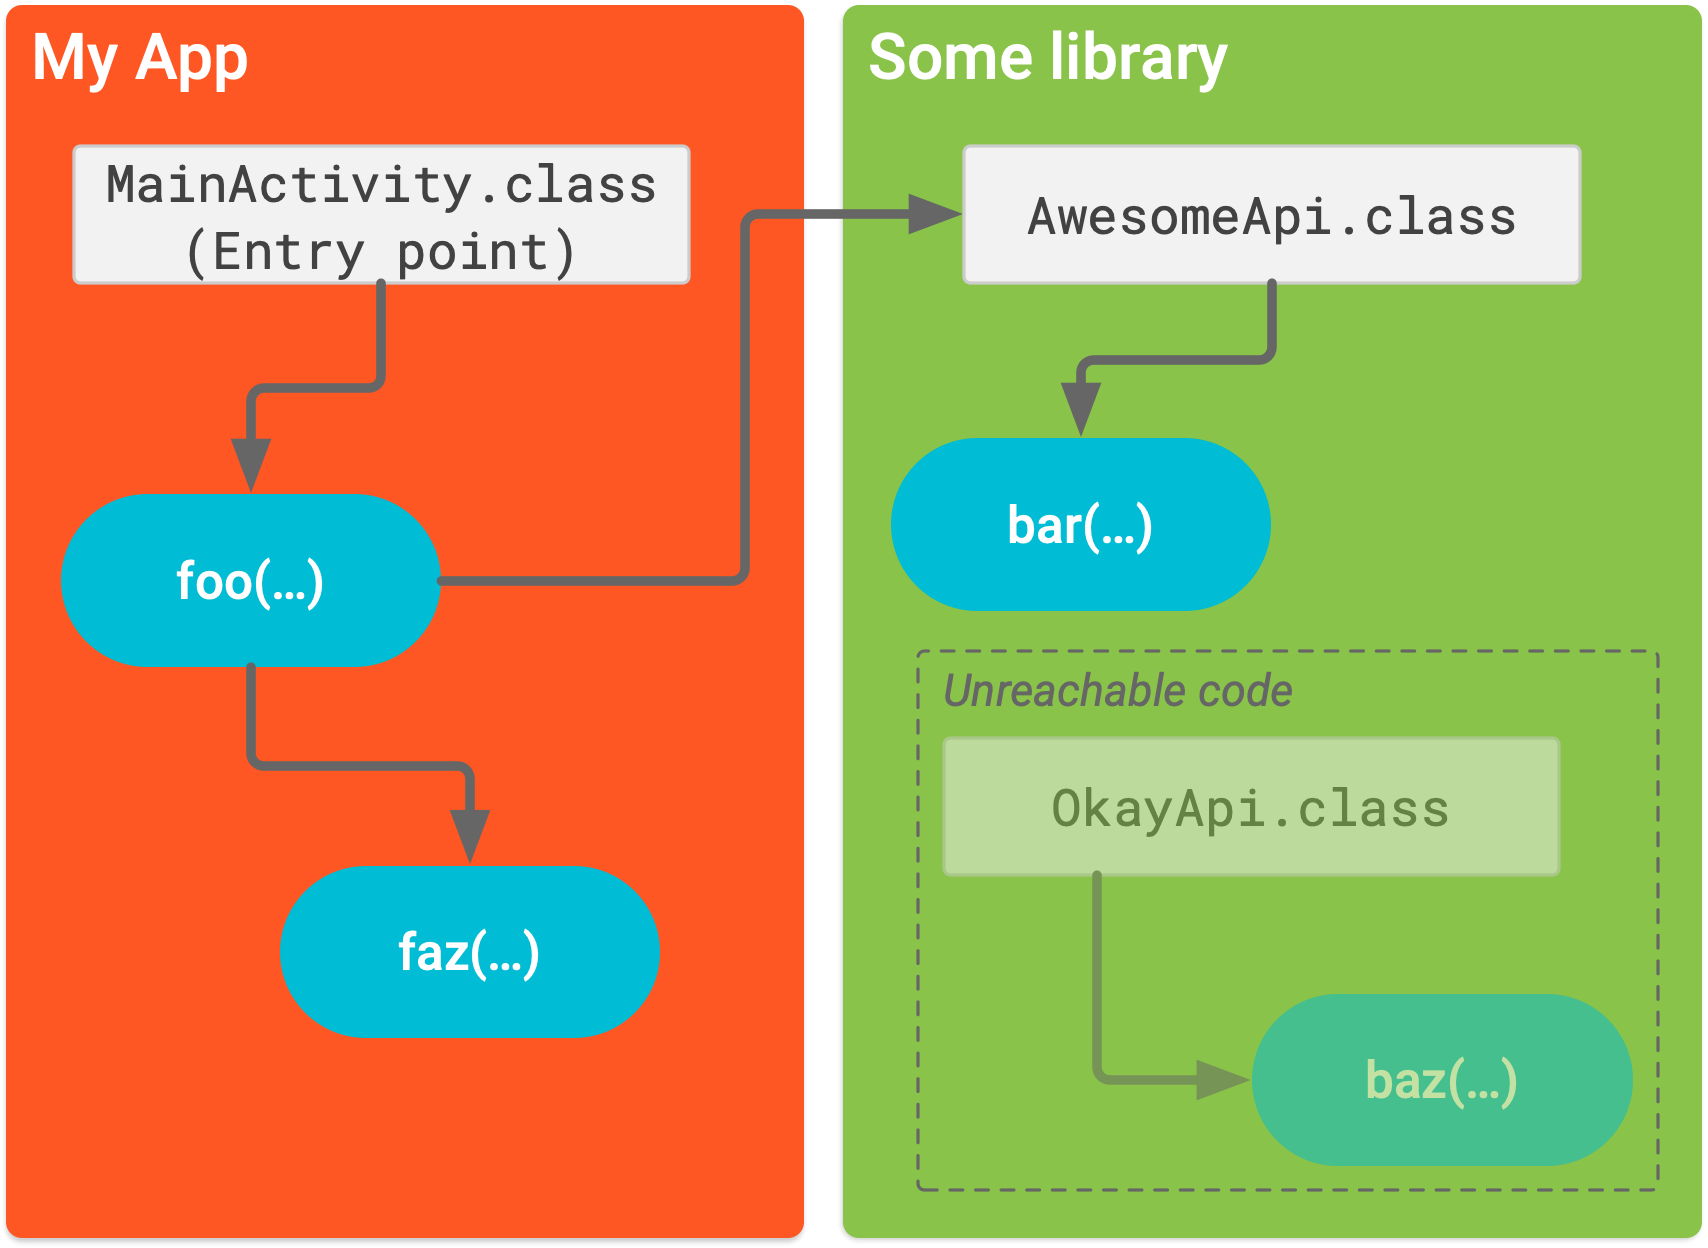
Figure 1. At compile-time, R8 builds a graph based on your project’s combined keep rules to determine unreachable code.
R8 determines entry points through -keep rules in the project’s R8 configuration files. That is, keep rules specify classes that R8 should not discard when shrinking your app, and R8 considers those classes as possible entry points into your app. The Android Gradle plugin and AAPT2 automatically generate keep rules that are required by most app projects for you, such as your app’s activities, views, and services. However, if you need to customize this default behavior with additional keep rules, read the section about how to customize which code to keep.
If instead you are interested only in reducing the size of your app’s resources, skip to the section about how to shrink your resources.
Customize which code to keep
For most situations, the default ProGuard rules file ( proguard-android- optimize.txt ) is sufficient for R8 to remove only the unused code. However, some situations are difficult for R8 to analyze correctly and it might remove code your app actually needs. Some examples of when it might incorrectly remove code include:
- When your app calls a method from the Java Native Interface (JNI)
- When your app looks up code at runtime (such as with reflection)
Testing your app should reveal any errors caused by inappropriately removed code, but you can also inspect what code was removed by generating a report of removed code.
To fix errors and force R8 to keep certain code, add a -keep line in the ProGuard rules file. For example:
Alternatively, you can add the @Keep annotation to the code you want to keep. Adding @Keep on a class keeps the entire class as-is. Adding it on a method or field will keep the method/field (and its name) as well as the class name intact. Note that this annotation is available only when using the AndroidX Annotations Library and when you include the ProGuard rules file that is packaged with the Android Gradle plugin, as described in the section about how to enable shrinking.
There are many considerations you should make when using the -keep option; for more information about customizing your rules file, read the ProGuard Manual. The Troubleshooting section outlines other common problems you might encounter when your code gets stripped away.
Strip native libraries
By default, native code libraries are stripped in release builds of your app. This stripping consists of removing the symbol table and debugging information contained in any native libraries used by your app. Stripping native code libraries results in significant size savings; however, it’s impossible to diagnose crashes on the Google Play Console due to the missing information (such as class and function names).
Native crash support
The Google Play Console reports native crashes under Android vitals. With a few steps, you can generate and upload a native debug symbols file for your app. This file enables symbolicated native crash stack traces (that include class and function names) in Android vitals to help you debug your app in production. These steps vary depending on the version of the Android Gradle plugin used in your project and the build output of your project.
Android Gradle plugin version 4.1 or later
If your project builds an Android App Bundle, you can automatically include the native debug symbols file in it. To include this file in release builds, add the following to your app’s build.gradle file:
Select the debug symbol level from the following:
- Use SYMBOL_TABLE to get function names in the Play Console’s symbolicated stack traces. This level supports tombstones.
- Use FULL to get function names, files, and line numbers in the Play Console’s symbolicated stack traces.
Note: There is a 300 MB limit for the native debug symbols file. If your debug symbols footprint is too large, use SYMBOL_TABLE instead of FULL to decrease the file size.
If your project builds an APK, use the build.gradle build setting shown earlier to generate the native debug symbols file separately. Manually upload the native debug symbols file to the Google Play Console. As part of the build process, the Android Gradle plugin outputs this file in the following project location:
app/build/outputs/native-debug-symbols/ variant-name /native-debug-symbols.zip
Android Gradle plugin version 4.0 or earlier (and other build systems)
As part of the build process, the Android Gradle plugin keeps a copy of the unstripped libraries in a project directory. This directory structure is similar to the following:
Zip up the contents of this directory:
Manually upload the symbols.zip file to the Google Play Console.
Shrink your resources
Resource shrinking works only in conjunction with code shrinking. After the code shrinker removes all unused code, the resource shrinker can identify which resources the app still uses. This is especially true when you add code libraries that include resources—you must remove unused library code so the library resources become unreferenced and, thus, removable by the resource shrinker.
To enable resource shrinking, set the shrinkResources property to true in your build.gradle file (alongside minifyEnabled for code shrinking). For example:
Groovy
Kotlin
If you haven’t already built your app using minifyEnabled for code shrinking, then try that before enabling shrinkResources , because you might need to edit your proguard-rules.pro file to keep classes or methods that are created or invoked dynamically before you start removing resources.
Customize which resources to keep
If there are specific resources you wish to keep or discard, create an XML file in your project with a tag and specify each resource to keep in the tools:keep attribute and each resource to discard in the tools:discard attribute. Both attributes accept a comma-separated list of resource names. You can use the asterisk character as a wild card.
Save this file in your project resources, for example, at res/raw/keep.xml . The build does not package this file into your app.
Specifying which resources to discard might seem silly when you could instead delete them, but this can be useful when using build variants. For example, you might put all your resources into the common project directory, then create a different keep.xml file for each build variant when you know that a given resource appears to be used in code (and therefore not removed by the shrinker) but you know it actually won’t be used for the given build variant. It’s also possible that the build tools incorrectly identified a resource as needed, which is possible because the compiler adds the resource IDs inline and then the resource analyzer might not know the difference between a genuinely referenced resource and an integer value in the code that happens to have the same value.
Enable strict reference checks
Normally, the resource shrinker can accurately determine whether a resource is used. However, if your code makes a call to Resources.getIdentifier() (or if any of your libraries do that—the AppCompat library does), that means your code is looking up resource names based on dynamically-generated strings. When you do this, the resource shrinker behaves defensively by default and marks all resources with a matching name format as potentially used and unavailable for removal.
For example, the following code causes all resources with the img_ prefix to be marked as used.
Kotlin
The resource shrinker also looks through all the string constants in your code, as well as various res/raw/ resources, looking for resource URLs in a format similar to file:///android_res/drawable//ic_plus_anim_016.png . If it finds strings like this or others that look like they could be used to construct URLs like this, it doesn’t remove them.
These are examples of the safe shrinking mode that is enabled by default. You can, however, turn off this «better safe than sorry» handling, and specify that the resource shrinker keep only resources that it’s certain are used. To do this, set shrinkMode to strict in the keep.xml file, as follows:
If you do enable strict shrinking mode and your code also references resources with dynamically-generated strings, as shown above, then you must manually keep those resources using the tools:keep attribute.
Remove unused alternative resources
The Gradle resource shrinker removes only resources that are not referenced by your app code, which means it will not remove alternative resources for different device configurations. If necessary, you can use the Android Gradle plugin’s resConfigs property to remove alternative resource files that your app does not need.
For example, if you are using a library that includes language resources (such as AppCompat or Google Play Services), then your app includes all translated language strings for the messages in those libraries whether the rest of your app is translated to the same languages or not. If you’d like to keep only the languages that your app officially supports, you can specify those languages using the resConfig property. Any resources for languages not specified are removed.
The following snippet shows how to limit your language resources to just English and French:
Groovy
Kotlin
When releasing an app using the Android App Bundle format, by default only languages configured on a user’s device are downloaded when installing the app. Similarly, only resources matching the device’s screen density, and native libraries matching the device’s ABI are included in the download. For more information refer to the Android App Bundle configuration.
For legacy apps releasing with APKs (created before August 2021), you can customize which screen density or ABI resources to include in your APK by building multiple APKs that each target a different device configuration.
Merge duplicate resources
By default, Gradle also merges identically named resources, such as drawables with the same name that might be in different resource folders. This behavior is not controlled by the shrinkResources property and cannot be disabled, because it is necessary to avoid errors when multiple resources match the name your code is looking up.
Resource merging occurs only when two or more files share an identical resource name, type, and qualifier. Gradle selects which file it considers to be the best choice among the duplicates (based on a priority order described below) and passes only that one resource to the AAPT for distribution in the final artifact.
Gradle looks for duplicate resources in the following locations:
- The main resources, associated with the main source set, generally located in src/main/res/ .
- The variant overlays, from the build type and build flavors.
- The library project dependencies.
Gradle merges duplicate resources in the following cascading priority order:
Dependencies → Main → Build flavor → Build type
For example, if a duplicate resource appears in both your main resources and a build flavor, Gradle selects the one in the build flavor.
If identical resources appear in the same source set, Gradle cannot merge them and emits a resource merge error. This can happen if you define multiple source sets in the sourceSet property of your build.gradle file—for example if both src/main/res/ and src/main/res2/ contain identical resources.
Obfuscate your code
The purpose of obfuscation is to reduce your app size by shortening the names of your app’s classes, methods, and fields. The following is an example of obfuscation using R8:
While obfuscation does not remove code from your app, significant size savings can be seen in apps with DEX files that index many classes, methods, and fields. However, as obfuscation renames different parts of your code, certain tasks, such as inspecting stack traces, require additional tools. To understand your stacktrace after obfuscation, read the next section about how to decode an obfuscated stack trace.
Additionally, if your code relies on predictable naming for your app’s methods and classes—when using reflection, for example, you should treat those signatures as entry points and specify keep rules for them, as described in the section about how to customize which code to keep. Those keep rules tell R8 to not only keep that code in your app’s final DEX but also retain its original naming.
Decode an obfuscated stack trace
After R8 obfuscates your code, understanding a stack trace is difficult (if not impossible) because names of classes and methods might have been changed. Besides renaming, R8 can also change the line numbers present in the stack traces to achieve additional size savings when writing the DEX files. Fortunately, R8 creates a mapping.txt file each time it runs, which contains the obfuscated class, method, and field names mapped to the original names. This mapping file also contains information to map the line numbers back to the original source file line numbers. R8 saves the file in the /build/outputs/mapping/ / directory.
To ensure that retracing stack traces is unambiguous, the following rules should be added to your module’s proguard-rules.pro file:
The LineNumberTable attribute is needed for disambiguating between optimized positions inside methods. The SourceFile attribute is necessary for getting line numbers printed in a stack trace on a virtual machine or device. -renamesourcefileattribute will set the source file in stack traces to just SourceFile . The actual original source file name is not required when retracing as the mapping file contains the original source file.
When publishing your app on Google Play, you can upload the mapping.txt file for each version of your app. When publishing using Android App Bundles this file is included automatically as part of the app bundle content. Then Google Play will deobfuscate incoming stack traces from user-reported issues so you can review them in the Play Console. For more information, see the Help Center article about how to deobfuscate crash stack traces.
To decode an obfuscated stack trace yourself, use the retrace command-line tool, which is bundled with the command-line tools package.
Code optimization
In order to shrink your app even further, R8 inspects your code at a deeper level to remove more unused code or, where possible, rewrite your code to make it less verbose. The following are a few examples of such optimizations:
- If your code never takes the else <> branch for a given if/else statement, R8 might remove the code for the else <> branch.
- If your code calls a method in only one place, R8 might remove the method and inline it at the single call site.
- If R8 determines that a class has only one unique subclass, and the class itself is not instantiated (for example, an abstract base class only used by one concrete implementation class), then R8 can combine the two classes and remove a class from the app.
- To learn more, read the R8 optimization blog posts by Jake Wharton.
R8 does not allow you to disable or enable discrete optimizations, or modify the behavior of an optimization. In fact, R8 ignores any ProGuard rules that attempt to modify default optimizations, such as -optimizations and — optimizationpasses . This restriction is important because, as R8 continues to improve, maintaining a standard behavior for optimizations helps the Android Studio team easily troubleshoot and resolve any issues that you might encounter.
Enable more aggressive optimizations
R8 includes a set of additional optimizations that are not enabled by default. You can enable these additional optimizations by including the following in your project’s gradle.properties file:
Because the additional optimizations make R8 behave differently from ProGuard, they may require you to include additional ProGuard rules to avoid runtime issues. For example, say that your code references a class through the Java Reflection API. By default, R8 assumes that you intend to examine and manipulate objects of that class at runtime—even if your code actually does not—and it automatically keeps the class and its static initializer.
However, when using “full mode”, R8 does not make this assumption and, if R8 asserts that your code otherwise never uses the class at runtime, it removes the class from your app’s final DEX. That is, if you want to keep the class and its static initializer, you need to include a keep rule in your rules file to do that.
If you encounter any issues while using R8’s “full mode”, refer to the R8 FAQ page for a possible solution. If you are unable to resolve the issue, please report a bug.
Troubleshoot with R8
This section describes some strategies for troubleshooting issues when enabling shrinking, obfuscation, and optimization using R8. If you do not find a solution to your issue below, also read the R8 FAQ page and ProGuard’s troubleshooting guide.
Generate a report of removed (or kept) code
To help you troubleshoot certain R8 issues, it may be useful to see a report of all the code that R8 removed from your app. For each module for which you want to generate this report, add -printusage /usage.txt to your custom rules file. When you enable R8 and build your app, R8 outputs a report with the path and file name you specified. The report of removed code looks similar to the following:
If instead you want to see a report of the entry points that R8 determines from your project’s keep rules , include -printseeds /seeds.txt in your custom rules file. When you enable R8 and build your app, R8 outputs a report with the path and file name you specified. The report of kept entry points looks similar to the following:
Troubleshoot resource shrinking
When you shrink resources, the Build window shows a summary of the resources that are removed from the app. (You need to first click Toggle view on the left side of the window to display detailed text output from Gradle.) For example:
Gradle also creates a diagnostic file named resources.txt in /build/outputs/mapping/release/ (the same folder as ProGuard’s output files). This file includes details such as which resources reference other resources and which resources are used or removed.
For example, to find out why @drawable/ic_plus_anim_016 is still in your app, open the resources.txt file and search for that file name. You might find that it’s referenced from another resource, as follows:
You now need to know why @drawable/add_schedule_fab_icon_anim is reachable—and if you search upwards you’ll find that resource is listed under «The root reachable resources are:». This means there is a code reference to add_schedule_fab_icon_anim (that is, its R.drawable ID was found in the reachable code).
If you are not using strict checking, resource IDs can be marked as reachable if there are string constants that look like they might be used to construct resource names for dynamically loaded resources. In that case, if you search the build output for the resource name, you might find a message like this:
If you see one of these strings and you are certain that the string is not being used to load the given resource dynamically, you can use the tools:discard attribute to inform the build system to remove it, as described in the section about how to customize which resources to keep.
Content and code samples on this page are subject to the licenses described in the Content License. Java is a registered trademark of Oracle and/or its affiliates.
Источник


