- Free Physical Keyboard
- Скачать Free Physical Keyboard APK для Android — бесплатно — Последняя версия
- Последняя версия
- приложение Free Physical Keyboard
- Как настроить переключение раскладок на внешней клавиатуре в Android
- Переключение раскладок внешней клавиатуры средствами самого Android
- Переключение раскладок внешней клавиатуры через программу Russian Keyboard
- 73 комментария на «Как настроить переключение раскладок на внешней клавиатуре в Android»
- Как переключать язык на беспроводной и USB клавиатуре в Android
- Решение — Free Physical Keyboard
- Physical Keyboard for any Android phone
- Become a Hackaday.io member
- Just one more thing
- Team ( 1 )
- Description
- Details
- Components
- Project Logs Troubleshooting (please help) As of now, I’m stuck troubleshooting the whole thing. If anyone knows about USB C, please help out with your suggestions. When I plug the device into the phone, keyboard always lights up (ie the chip is powered), the phone either detects it as a keyboard, or as a device charging off the phone. More often than not, the latter one is what it is detected as and therefore the keyboard does not work at all. I have no idea at all what is going wrong at this point. As I said, there is power going to the chip (and the chip itself consumes very little). I’ve checked the data lines and they’re fine as well (no resistance other than 22 Ohm for each line as suggested by the manufacturer). This problem repeated itself with both chips (one in the test rig and the other one in the prototype slider) and the chip works fine when I plug it into a regular computer. I feel like there must be some technical detail (regarding USB in General and USB C in particular) that I’m missing out on. And the fact that the fault is intermittent, makes the fault that harder to trace! Prototype slider First of all, thanks to all those showing interest in this project lately. Spoiler alert: I’m a bit stuck on troubleshooting at the moment and if anyone knows anything about USB, I’ll be grateful for your suggestions. Here’s what’s happened so far: I have modified the sliding chassis to accomodate the Q10 Keyboard and a couple of LED’s (FN and Caps) on the lower part. The lower part also accomodates the encoder chip as well as anything else it needs to work (pictured). The rest of the phone (except for the battery) will be mounted on the top part and therefore I tried using the provided ribbon cable, which turned out unsuitable to transfer power and data to the chip and keyboard, so in the end I passed my own wires and hope for the best. The position of the slider is determined by a small sensor switch on the side (pictured below next to the keyboard). The switch is N.C. and when the slider is closed, it interrupts the power line from USB. The device also needs to be able to charge the phone without having to disconnect it every time, so I added a USB C port (but only connected Power, ground, D+ and D- ). Another NC sensor switch senses when a charger is connected and disconnects the 5.1KOhm resistor on the Configuration Channel. Without charger, the Switch closes and signals to the phone (thanks to the resistor) that the device is an OTG device. When the charger is connected, the config channel is instead connected to the charging cable which signals that there’s a charger available. Suggestions? Please let me know! Before I finalise the test phase. I had a few ideas I would like to include in the final project which make a lot of sense and provide much much more functionality. 1) The SK5126 chip provides 2 pinouts for a PS/2 mouse (1 clock, 1 data) which means that I can simultaneously, without changing the chip, have a small mouse/trackpad allowing for more precise control without having to reach up for the touchscreen. Blackberry’s trackpads automatically spring to mind, but upon reading the pinouts online, I don’t understand how I can interface this as PS/2 data. If anyone has any information or ideas on how to achieve this, please let me know. 2) As the keyboard occupies the only USB port on the entire phone, I am also thinking of adding a USB hub chip with power support. This will allow me to charge the phone and plug in all sorts of OTG devices without having to unplug the keyboard every time. I think this is relatively easy to achieve and there are many chips out there which facilitate this. Let me know if you have any other relevant ideas I might try to incorporate into this project. Scope of testing and known issues In its current test-phase, the complete phone and keyboard assy are rather bulky (more precisely it’s just too long to fit in any reasonable pocket). Also, the weight on the phone means the whole thing is a bit top heavy and makes typing on it a bit less comfortable. This has been forseen which is why in the final build (the slider) I intend to pull the battery out of the phone and stick the battery right behind the keyboard and then attach a flexible extension cable to the motherboard which allows power to be delivered via the slider mechanism together with D+ and D- cables from the SK5126 chip. The battery connector seems to be a Hirose BM25, which I cannot find from the same shop I bought the BM 14B connector. This is my next task as it is a showstopper until I’m able to provide power to the phone of course. Another annoying issue comes from the BM14B connector which adapts the keyboard’s I/O. due to the extremely small pitch of 0.4mm between each solder, the SK5126 sometimes detects a small amount of voltage between 2 adjacent pins and registers this as a keypress. This problem has been largely mitigated by putting resistors in line with the rows, this also resolves any capacitative effect happening between these extremely close pins. Nonetheless it still manifests itself from time to time and I intend to keep a close eye on it during this test phase. Practical test phase At this point in time, I have installed the keyboard and both PCBs on a sheet of PVC which I used to make a special cover for the phone. This allows me to test out the complete system in a practical manner without having to modify the phone at all. A switch on the side cuts off the power to the chip and will be connected to the slider in the final build to switch on the keyboard only when it is extended. The red and green LED’s are indicators for ALT and Caps Lock respectively (they are driven directly by the SK5126 encoder which is another great reason to use that chip). Источник
- Troubleshooting (please help)
- Prototype slider
- Suggestions? Please let me know!
- Scope of testing and known issues
- Practical test phase
Free Physical Keyboard
Скачать Free Physical Keyboard APK для Android — бесплатно — Последняя версия

Последняя версия
| Имя | Free Physical Keyboard APK |
| Версия | 2.0 (3) |
| Обновлено | 28 окт. 2018 г. |
| Разработчик | A.O.Trusov |
| ID | ru.rus_project.freephysicalkeyboard |
| Количество установок | 10 000+ |
| Категория | Приложения, Инструменты |
приложение Free Physical Keyboard
Универсальный драйвер для любой физической клавиатуры
Free Physical Keyboard — это простой и универсальный драйвер, который подойдет любой физической клавиатуре, подключаемой к устройствам под управлением операционной системы Android.
— Используйте любую проводную или беспроводную (к примеру, bluetooth) физическую клавиатуру как средство ввода для вашего android устройства
— Пишите одновременно и на английском и на русском с возможностью быстрого переключения между английской (ENG) и русской раскладкой (RUS) с помощью привычного сочетания клавиш alt+shift
— Ничего лишнего на экране: минималистический, приятный глазу дизайн c выводом только необходимой информации
Источник
Как настроить переключение раскладок на внешней клавиатуре в Android
При использовании внешней клавиатуры для Android может возникнуть проблема с переключением раскладок. Решить эту проблему и настроить переключение раскладок можно двумя простыми способами — как средствами самого Android, так и через небольшую бесплатную программу Russian Keyboard.
Переключение раскладок внешней клавиатуры средствами самого Android
Для начала при подключенной клавиатуре нужно зайти в настройки устройства и найти там пункт «Язык и ввод». Там найти раздел «Физическая клавиатура» (если клавиатура отключена, он в настройках не появится), а в нем пункт «Выбор раскладки клавиатуры».
Скорее всего там будет активен пункт «По умолчанию», что означает что клавиатура будет задействовать язык устройства без возможности переключения раскладок.
Выбираем пункт «Настроить раскладки клавиатуры» — и если отображается длинное меню возможных раскладок, значит нам повезло. Нужно отметить русскую и английскую (США) раскладки, после чего настройку можно считать законченной.
Переключать раскладки на физической клавиатуре можно будет по нажатию клавиш Ctrl+Пробел.
Переключение раскладок внешней клавиатуры через программу Russian Keyboard
Но может оказаться так, что меню «Настроить раскладки клавиатуры» пустое. Не из чего выбирать. Либо же вас не устраивает вариант с переключением раскладок клавишами Ctrl+Пробел и хочется поменять комбинацию на привычную Alt+Shift.
В таком случае придется установить из Google Play бесплатное приложение Russian Keyboard, которое добавляет в систему новую клавиатуру с таким же названием — Russian Keyboard.
Виртуальная клавиатура Russian Keyboard выглядит очень убого и вряд ли способна кого-то привлечь, но ее фишка в том, что она позволяет нормально работать с внешней клавиатурой и нормально переключать на ней раскладки.
Для начала заходим в появившееся в системе при установке Russian Keyboard приложение «Настройки клавиатуры», выбираем в нем пункт «Аппаратная клавиатура», а в нем «Выбор раскладки». По умолчанию там стоит «Translit», его нужно сменить на «External Keyboard (RU)».
В этом же меню можно настроить комбинацию клавиш для переключения раскладок. Предлагается 3 варианта: Alt+Shift, Alt+Space, Shift+Space. Лично я выбираю первый вариант, как наиболее привычный.
На этом почти все закончено. Осталось только не забыть переключить используемую в системе клавиатуру на Russian Keyboard. Сделать это можно, поставив курсор в поле для ввода текста и выбрал пункт «Выберите способ ввода», появившийся в панели уведомлений.
73 комментария на «Как настроить переключение раскладок на внешней клавиатуре в Android»
Добрый день, Дмитрий! Нашла в необъятных недрах интернета ваш блог и решила обратиться к вам за помощью, потому что мне не смогли помочь даже в М-видео , где я покупала свой планшет HP, а поиски нужной на форумах не дали результата. Дело в том, что у меня физическая клавиатура перестала переключаться на русский язык. Сочетание клавиш Сtrl+пробел формально переключает клавиатуру, во всяком случае на экране высвечивается подсказка о том, что язык ввода русский, но несмотря на это, печатается английским. Пробовала воспользоваться вашим советом, изложенным в блоге, но не нашла в настройках планшета где можно настроить сочетание клавиш для переключения раскладки клавиатуры. Может, вы мне поможете в этом. Если вас это не затруднит, и вы согласитесь мне помочь, могу сообщить вам модель моего планшета или выслать скрины с нужных разделов настройки. В любом случае благодарю за внимание. Тамара
Так по умолчанию сочетание клавиш Ctrl+Пробел и не меняется. Установите программу Russian Keyboard из Google Play:
https://play.google.com/store/apps/details?id=ru.androidteam.rukeyboard&hl=ru
После этого в настройках планшета появится новая клавиатура, к которой и применимо все вышеописанное на этой странице.
Если это не поможет, НО изначально проблем с переключением раскладки не было, то наверное проблема решается сбросом до заводских настроек планшета:
http://support.hp.com/ru-ru/document/c04264671
Мне так и сказали в М-видео, что надо сбросить до заводских настроек . но я не хотела бы этого делать, потому что все мои закладки, личные аккаунты и пр. потеряются 🙁 А во-вторых это может и не помочь. а я не такой продвинутый пользователь, чтобы все нужное восстановить. Раньше этой проблемы не было, больше года пользовалась планшетом нормально, сбой случился около месяца назад. В любом случае спасибо за совет, попробую воспользоваться.
Дмитрий, проделала все как вы написали, но не помогло. Если вернуться к заводским настройкам, то сотрется все что было накачано-нафотографировано, все аккаунты?
Хороший совет))),- на уровне пятиклассника.
Да уж сразу прошить тогда, че мелочиться то )))
НЕТ этой проги в Google Play.
Да, действительно нет. Что делать. Старая прога была снесена……
Поищите на 4пда там она есть
Дмитрий, не получилось к сожалению. А если вернуться к заводским настройкам то все аккаунты удалятся?
Удалятся программы и все, что было во внутренней памяти. Что было на microSD-карточке останется без изменений. Аккаунты и т.д. не удалятся, просто надо будет заново ввести логины и пароли.
Если все синхронизируется с Google у вас, то просто пароль введете и все восстановите(пароли к мессенжерам,тел книга,смс итд). А файлы (фото например), скиньте на SD (флешка) если нет таковой, копируйте в облако (drive.google.com). Но сААмый лучший вариант, -это «Titanium Backup»,-
Бекап и восстановление приложений, системных приложений, сервисов и настроек в 1 клик (без системных запросов), обзор бекапов и приложений, заморозка приложений (временное удаление из списка приложений на Андроиде), ускоренный бекап с помощью функции HyperShell, запись информации о приложениях в Маркет (Market Doctor — который правит ссылки на установленные приложения, делая тем самым их видимыми через Маркет в разделе «загрузки») и напоследок — бекап по расписанию!
Скачать TB можно тут- https://trashbox.ru/link/titanium-backup-android
Хороший совет на уровне пятикласника, Titanium Backup синхронизирует все, в том числе и проблему, из за которой не переключается язык.
Ты уровень компетенции вопрошающего по вопросу вообще оценить не можешь?
У меня hp slatebook x2. На нем тоже перестала переключаться клавиатура на русский язык больше месяца назад. Я откатил его до заводских настоек и проблема пропала… пока он не начал качать обновления. После обновлений все по новой — только английский язык.
C uma moGno cvihnutca. :
«1 Заходим в настройки андроида. 2 Выбираем пункт язык и ввод. 3 Выбираем клавиатуру в раскладку которой надо добавить язык ввода. 4 В свойствах клавиатуры выбираем пункт Языки ввода. 5 Если внутри видим только язык системы и остальные языки не активны то убираем галочку с пункта Язык системы. 6 После этого остальные языки станут активными и их можно будет выбрать. 7 Выбираем нужные языки(отмечаем галочками)» A korotce kak?
Ladonnik 2m1 udobnee / tam ne nado etix zamorotcek
Источник
Как переключать язык на беспроводной и USB клавиатуре в Android
Как переключать язык на USB-клавиатуре в Android
Недавно я купил ТВ-приставку на ОС Android и беспроводную клавиатуру с тачпадом. Приставка норм, клава тоже, вот только не мог переключить раскладку с английской на русскую или обратно. Открывать на пол-экрана нарисованную клавиатуру и тачпадом елозить по ней не хотелось, ведь на этом гаджете были русские буквы.
Был месяцом ранее опыт подключения родной клавиатуры к планшету Huawei M5 (точно модель не помню, пародия на нетбук), там получилось организовать с помощью программы Russian Keyboard прямо в Google Play. К сожалению эту программу оттуда удалили, пришлось качать с 4pda. Переключение заработало, но неправильно: русские буквы набирались, но вместо «йцукен» печаталось «ьшщыла» и подобное. Пришлось искать дальше.
Решение — Free Physical Keyboard
По совету в том же треде на 4пда нашёл и поставил Free Physical Keyboard. После этого
переключение языков происходит через одновременное зажатие Ctrl+Shift почти также, как на компьютере. В общем, всем советую.

С ней вы сможете легко переключать раскладку. Просто нажимаете Ctrl + Shift и можете печатать на русском или английском языке. В очередной раз спасибо 4пда!
П.С. да, программа частенько вылетала у меня, может сейчас исправили. Кстати, приставка у меня сдохла, перепрошивка не помогает)
Источник
Physical Keyboard for any Android phone
This is my attempt at having an android phone of my choice coupled to a portrait Physical QWERTY keyboard off an old blackberry.
Become a Hackaday.io member
Not a member? You should Sign up.
Already have an account? Log in.
Just one more thing
To make the experience fit your profile, pick a username and tell us what interests you.


We found and based on your interests.
- Description
- Details
- Files 0
- Components 7
- View all
- Logs 5
- View all
- Instructions 0
- Discussion 6
Team ( 1 )
This project was created on 11/10/2019 and last updated 2 years ago.
Description
Details
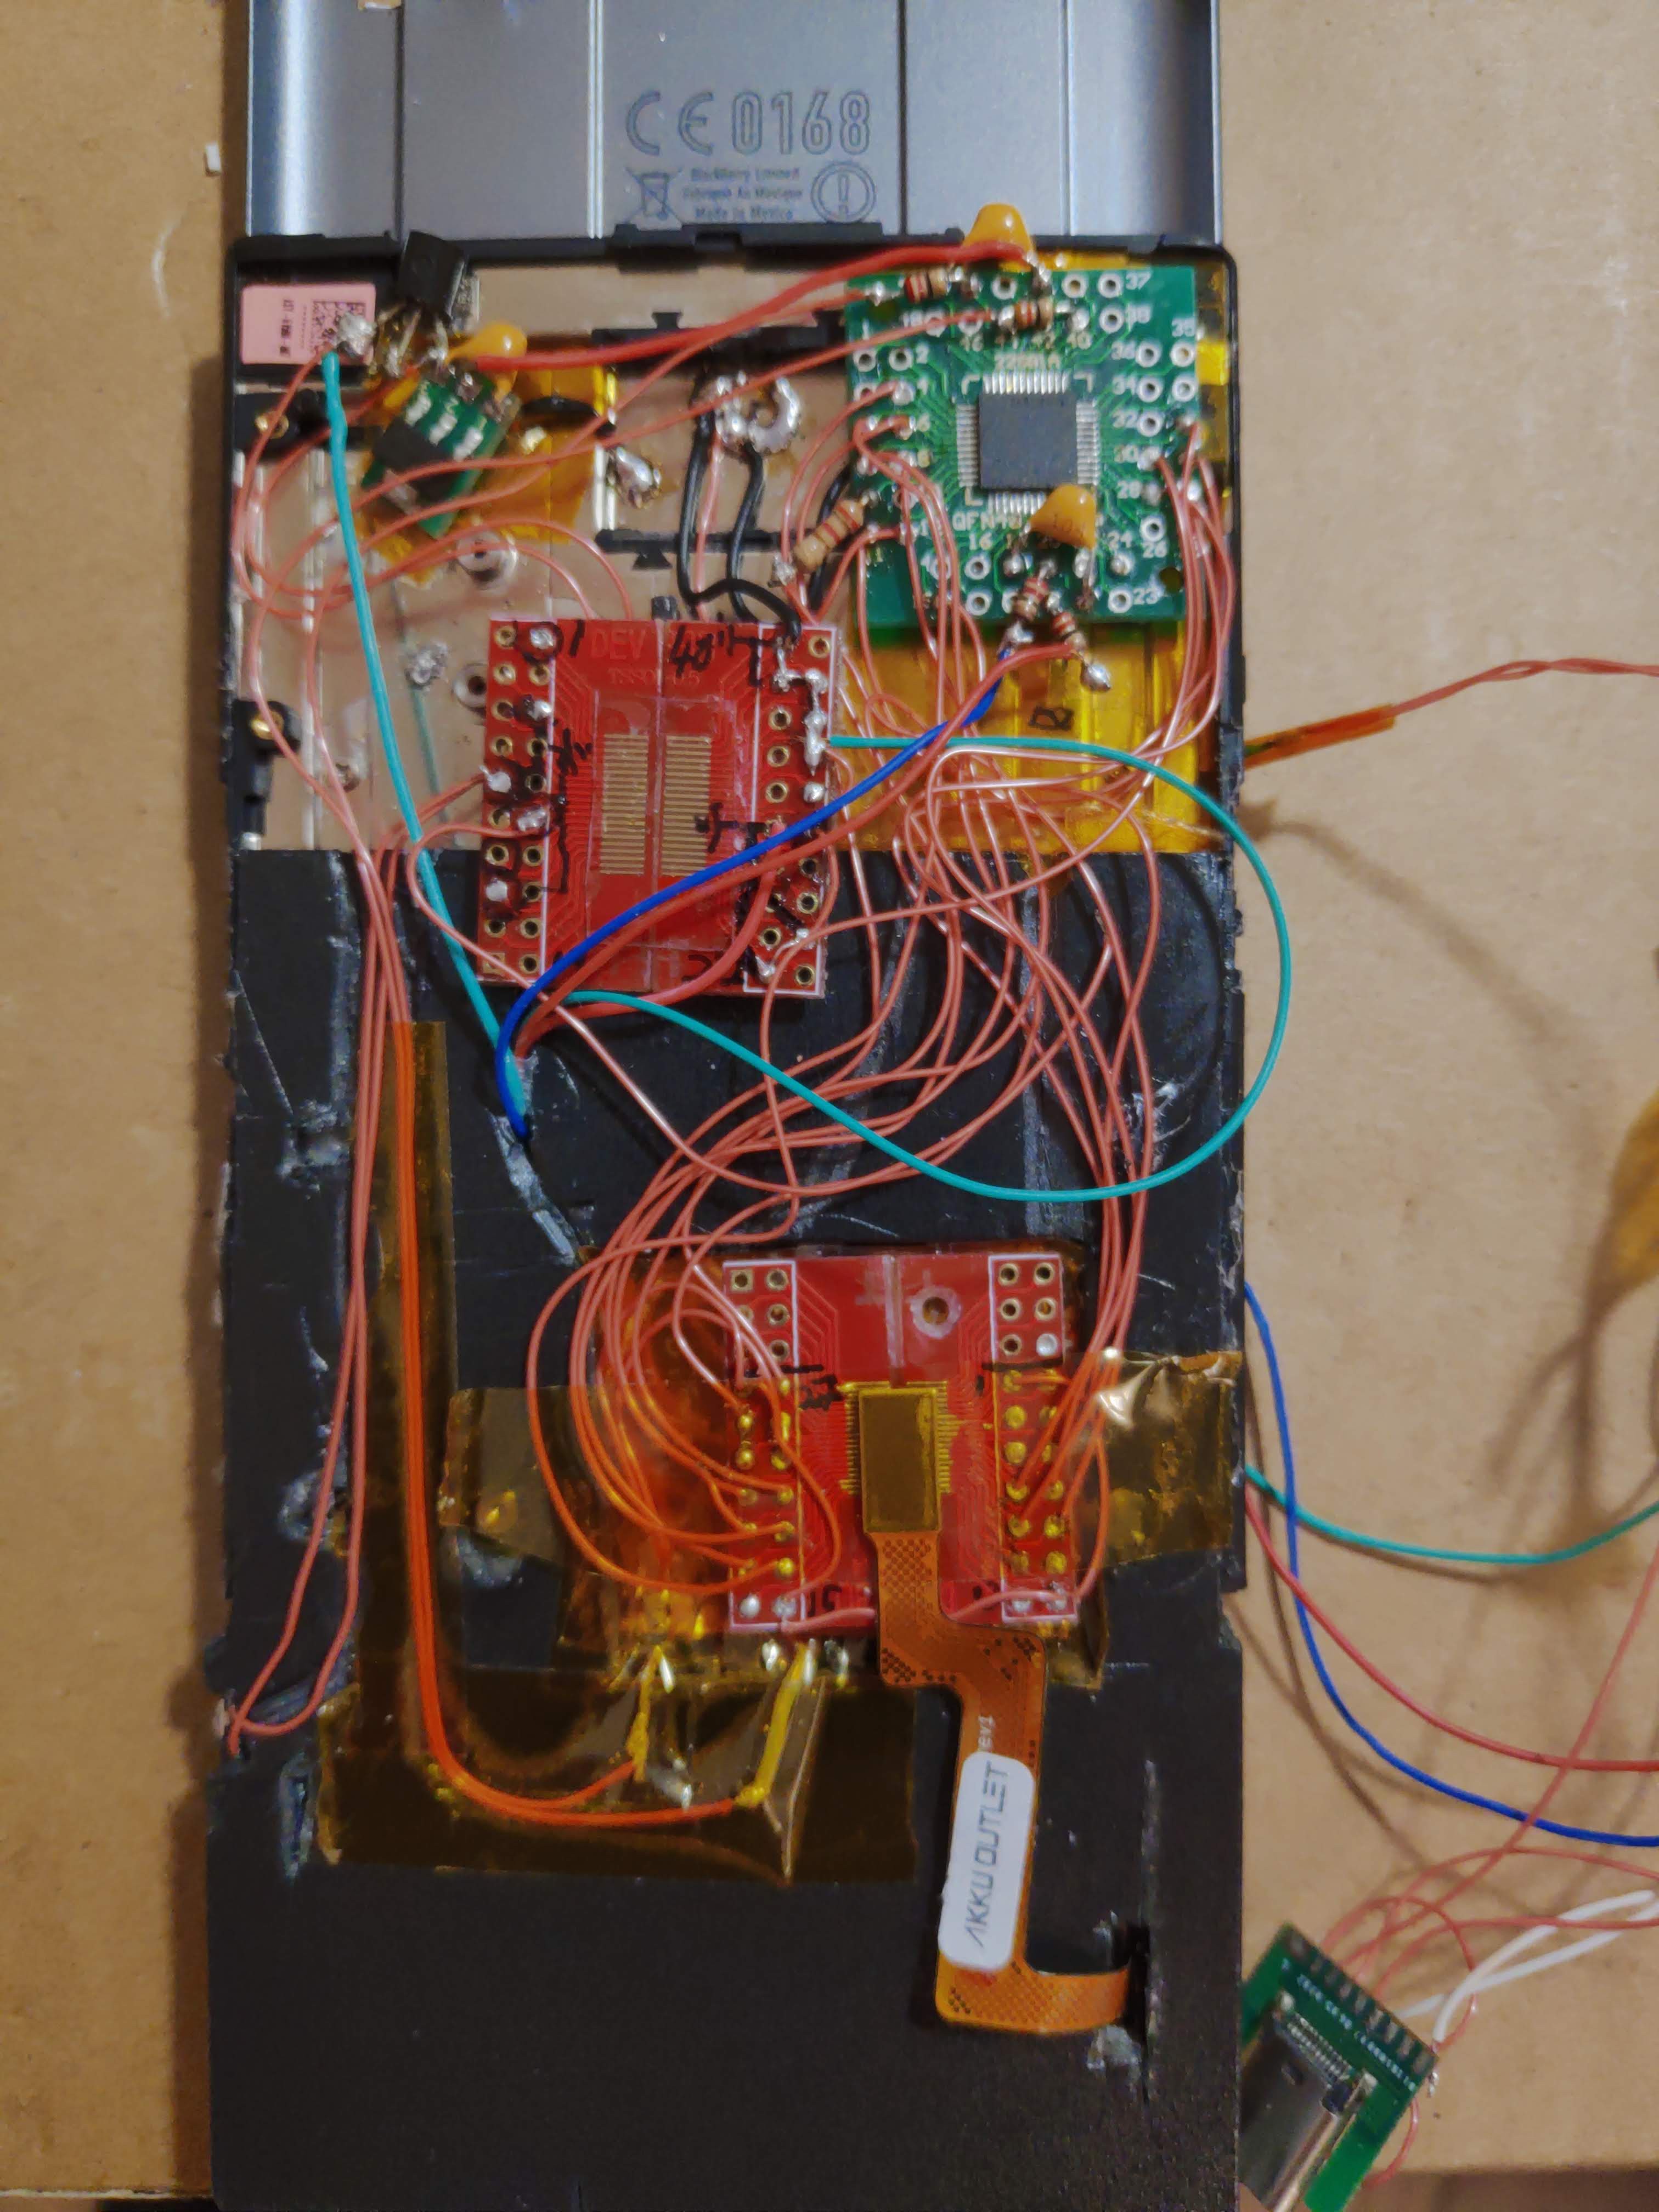
After failing to map the pinouts to the Priv’s combined keyboard/trackpad, I decided to use a keyboard off a Q10, due to the decent amount of information available. Using a Hirose BM14B connector soldered onto a PCB (and this, ladies and gentlemen, turned out to be the hardest part of the whole project) I then could solder wires and map it out on a Sprintek SK5126 chip. This chip is the best one I’ve seen around in terms of keyboard encoders as it comes with free and easy to use software to program it, it is also designed for mobile devices and therefore inherently low-power. It can be powered directly with a 5V source (such as a phone in this case) or one can power it with a 3.3V supply.
Initially I put all components on the bare metal chassis of an old Priv, the idea was to see how all the other components would fit around it, which turned out to be unnecessarily complicated. Using a regular USB 2.0 cable, I could program the SK5126 and test out the layouts as well as hunt for shorts caused by the BM14B connector.
The donor phone of my choice turned out to be a Xiaomi Mi 8 SE due to its relatively high specs for its cheap price and a variety of available custom ROMs. I bought mine second-hand off ebay but for this purpose, any phone which supports OTG will do fine as Android automatically supports physical input devices OTG.
This meant I had to buy a male USB C connector and use only the Power, Ground and D+/D- lines as well as ground the Configuration channel pin through a 5.1Kohm resistor (which indicates to the phone that it is an OTG device).
Components
- 1 × Hirose BM14B connector Actually more than 1 were needed as soldering these connectors onto the PCB is a real headache and most of them ended up molten from the heat.
- 1 × Sprintek SK5126 Reprogrammable keyboard encoder chip from a company in California which converts a keyboard matrix into a USB output. Same USB is also used for programming the keyboard matrix and other parameters.
- 2 × PCB one PCB to branch out from the Hirose connector, the other one is to solder the SK5126 chip. Joining both PCB with wires determines the layout of the matrices.
- 1 × Any android phone one might want to use. In my case it’s a Xiaomi because of how easy it is to mess around with and how cheap it is.
- 2 × N.C. micro sensor switch One switch used to detect the slider’s position, the other to detect when a charging cable is connected.
Project Logs Troubleshooting (please help)
As of now, I’m stuck troubleshooting the whole thing. If anyone knows about USB C, please help out with your suggestions.
When I plug the device into the phone, keyboard always lights up (ie the chip is powered), the phone either detects it as a keyboard, or as a device charging off the phone. More often than not, the latter one is what it is detected as and therefore the keyboard does not work at all. I have no idea at all what is going wrong at this point. As I said, there is power going to the chip (and the chip itself consumes very little). I’ve checked the data lines and they’re fine as well (no resistance other than 22 Ohm for each line as suggested by the manufacturer). This problem repeated itself with both chips (one in the test rig and the other one in the prototype slider) and the chip works fine when I plug it into a regular computer.
I feel like there must be some technical detail (regarding USB in General and USB C in particular) that I’m missing out on. And the fact that the fault is intermittent, makes the fault that harder to trace!
Prototype slider
First of all, thanks to all those showing interest in this project lately. Spoiler alert: I’m a bit stuck on troubleshooting at the moment and if anyone knows anything about USB, I’ll be grateful for your suggestions. Here’s what’s happened so far:
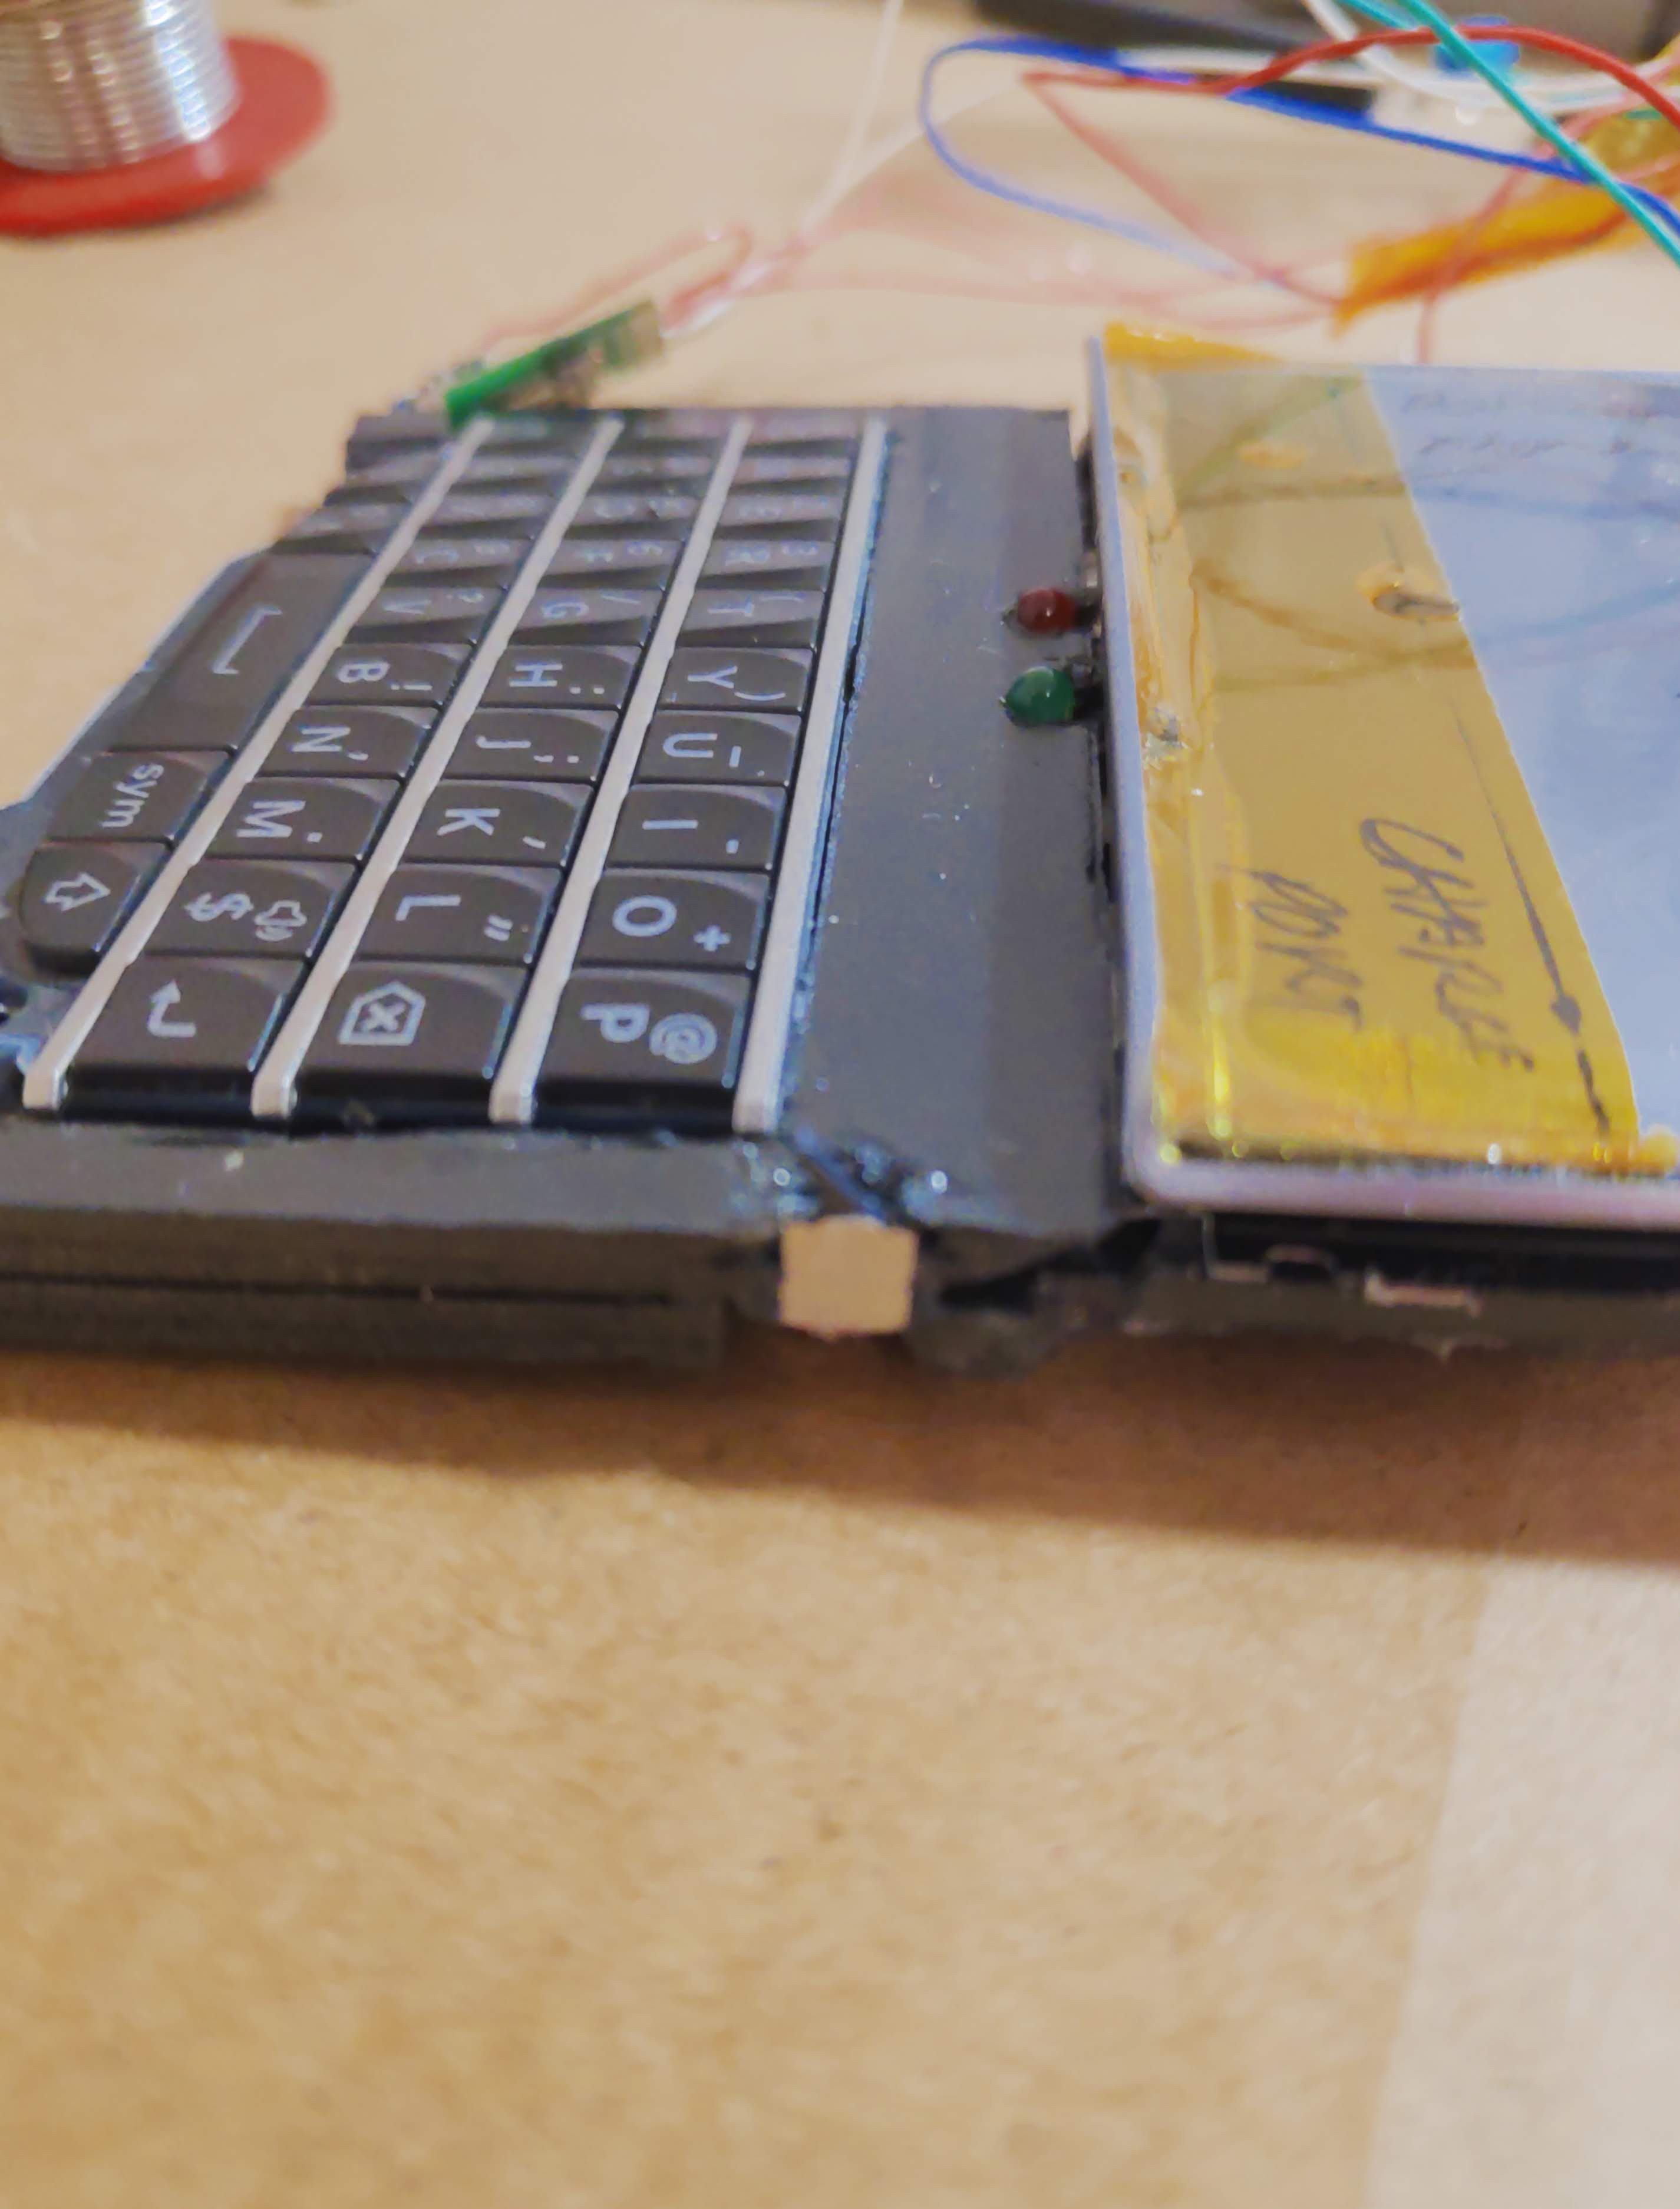
I have modified the sliding chassis to accomodate the Q10 Keyboard and a couple of LED’s (FN and Caps) on the lower part. The lower part also accomodates the encoder chip as well as anything else it needs to work (pictured). The rest of the phone (except for the battery) will be mounted on the top part and therefore I tried using the provided ribbon cable, which turned out unsuitable to transfer power and data to the chip and keyboard, so in the end I passed my own wires and hope for the best.
The position of the slider is determined by a small sensor switch on the side (pictured below next to the keyboard). The switch is N.C. and when the slider is closed, it interrupts the power line from USB.
The device also needs to be able to charge the phone without having to disconnect it every time, so I added a USB C port (but only connected Power, ground, D+ and D- ). Another NC sensor switch senses when a charger is connected and disconnects the 5.1KOhm resistor on the Configuration Channel. Without charger, the Switch closes and signals to the phone (thanks to the resistor) that the device is an OTG device. When the charger is connected, the config channel is instead connected to the charging cable which signals that there’s a charger available.
Suggestions? Please let me know!
Before I finalise the test phase. I had a few ideas I would like to include in the final project which make a lot of sense and provide much much more functionality.
1) The SK5126 chip provides 2 pinouts for a PS/2 mouse (1 clock, 1 data) which means that I can simultaneously, without changing the chip, have a small mouse/trackpad allowing for more precise control without having to reach up for the touchscreen. Blackberry’s trackpads automatically spring to mind, but upon reading the pinouts online, I don’t understand how I can interface this as PS/2 data. If anyone has any information or ideas on how to achieve this, please let me know.
2) As the keyboard occupies the only USB port on the entire phone, I am also thinking of adding a USB hub chip with power support. This will allow me to charge the phone and plug in all sorts of OTG devices without having to unplug the keyboard every time. I think this is relatively easy to achieve and there are many chips out there which facilitate this.
Let me know if you have any other relevant ideas I might try to incorporate into this project.
Scope of testing and known issues
In its current test-phase, the complete phone and keyboard assy are rather bulky (more precisely it’s just too long to fit in any reasonable pocket). Also, the weight on the phone means the whole thing is a bit top heavy and makes typing on it a bit less comfortable. This has been forseen which is why in the final build (the slider) I intend to pull the battery out of the phone and stick the battery right behind the keyboard and then attach a flexible extension cable to the motherboard which allows power to be delivered via the slider mechanism together with D+ and D- cables from the SK5126 chip. The battery connector seems to be a Hirose BM25, which I cannot find from the same shop I bought the BM 14B connector. This is my next task as it is a showstopper until I’m able to provide power to the phone of course.
Another annoying issue comes from the BM14B connector which adapts the keyboard’s I/O. due to the extremely small pitch of 0.4mm between each solder, the SK5126 sometimes detects a small amount of voltage between 2 adjacent pins and registers this as a keypress. This problem has been largely mitigated by putting resistors in line with the rows, this also resolves any capacitative effect happening between these extremely close pins. Nonetheless it still manifests itself from time to time and I intend to keep a close eye on it during this test phase.
Practical test phase
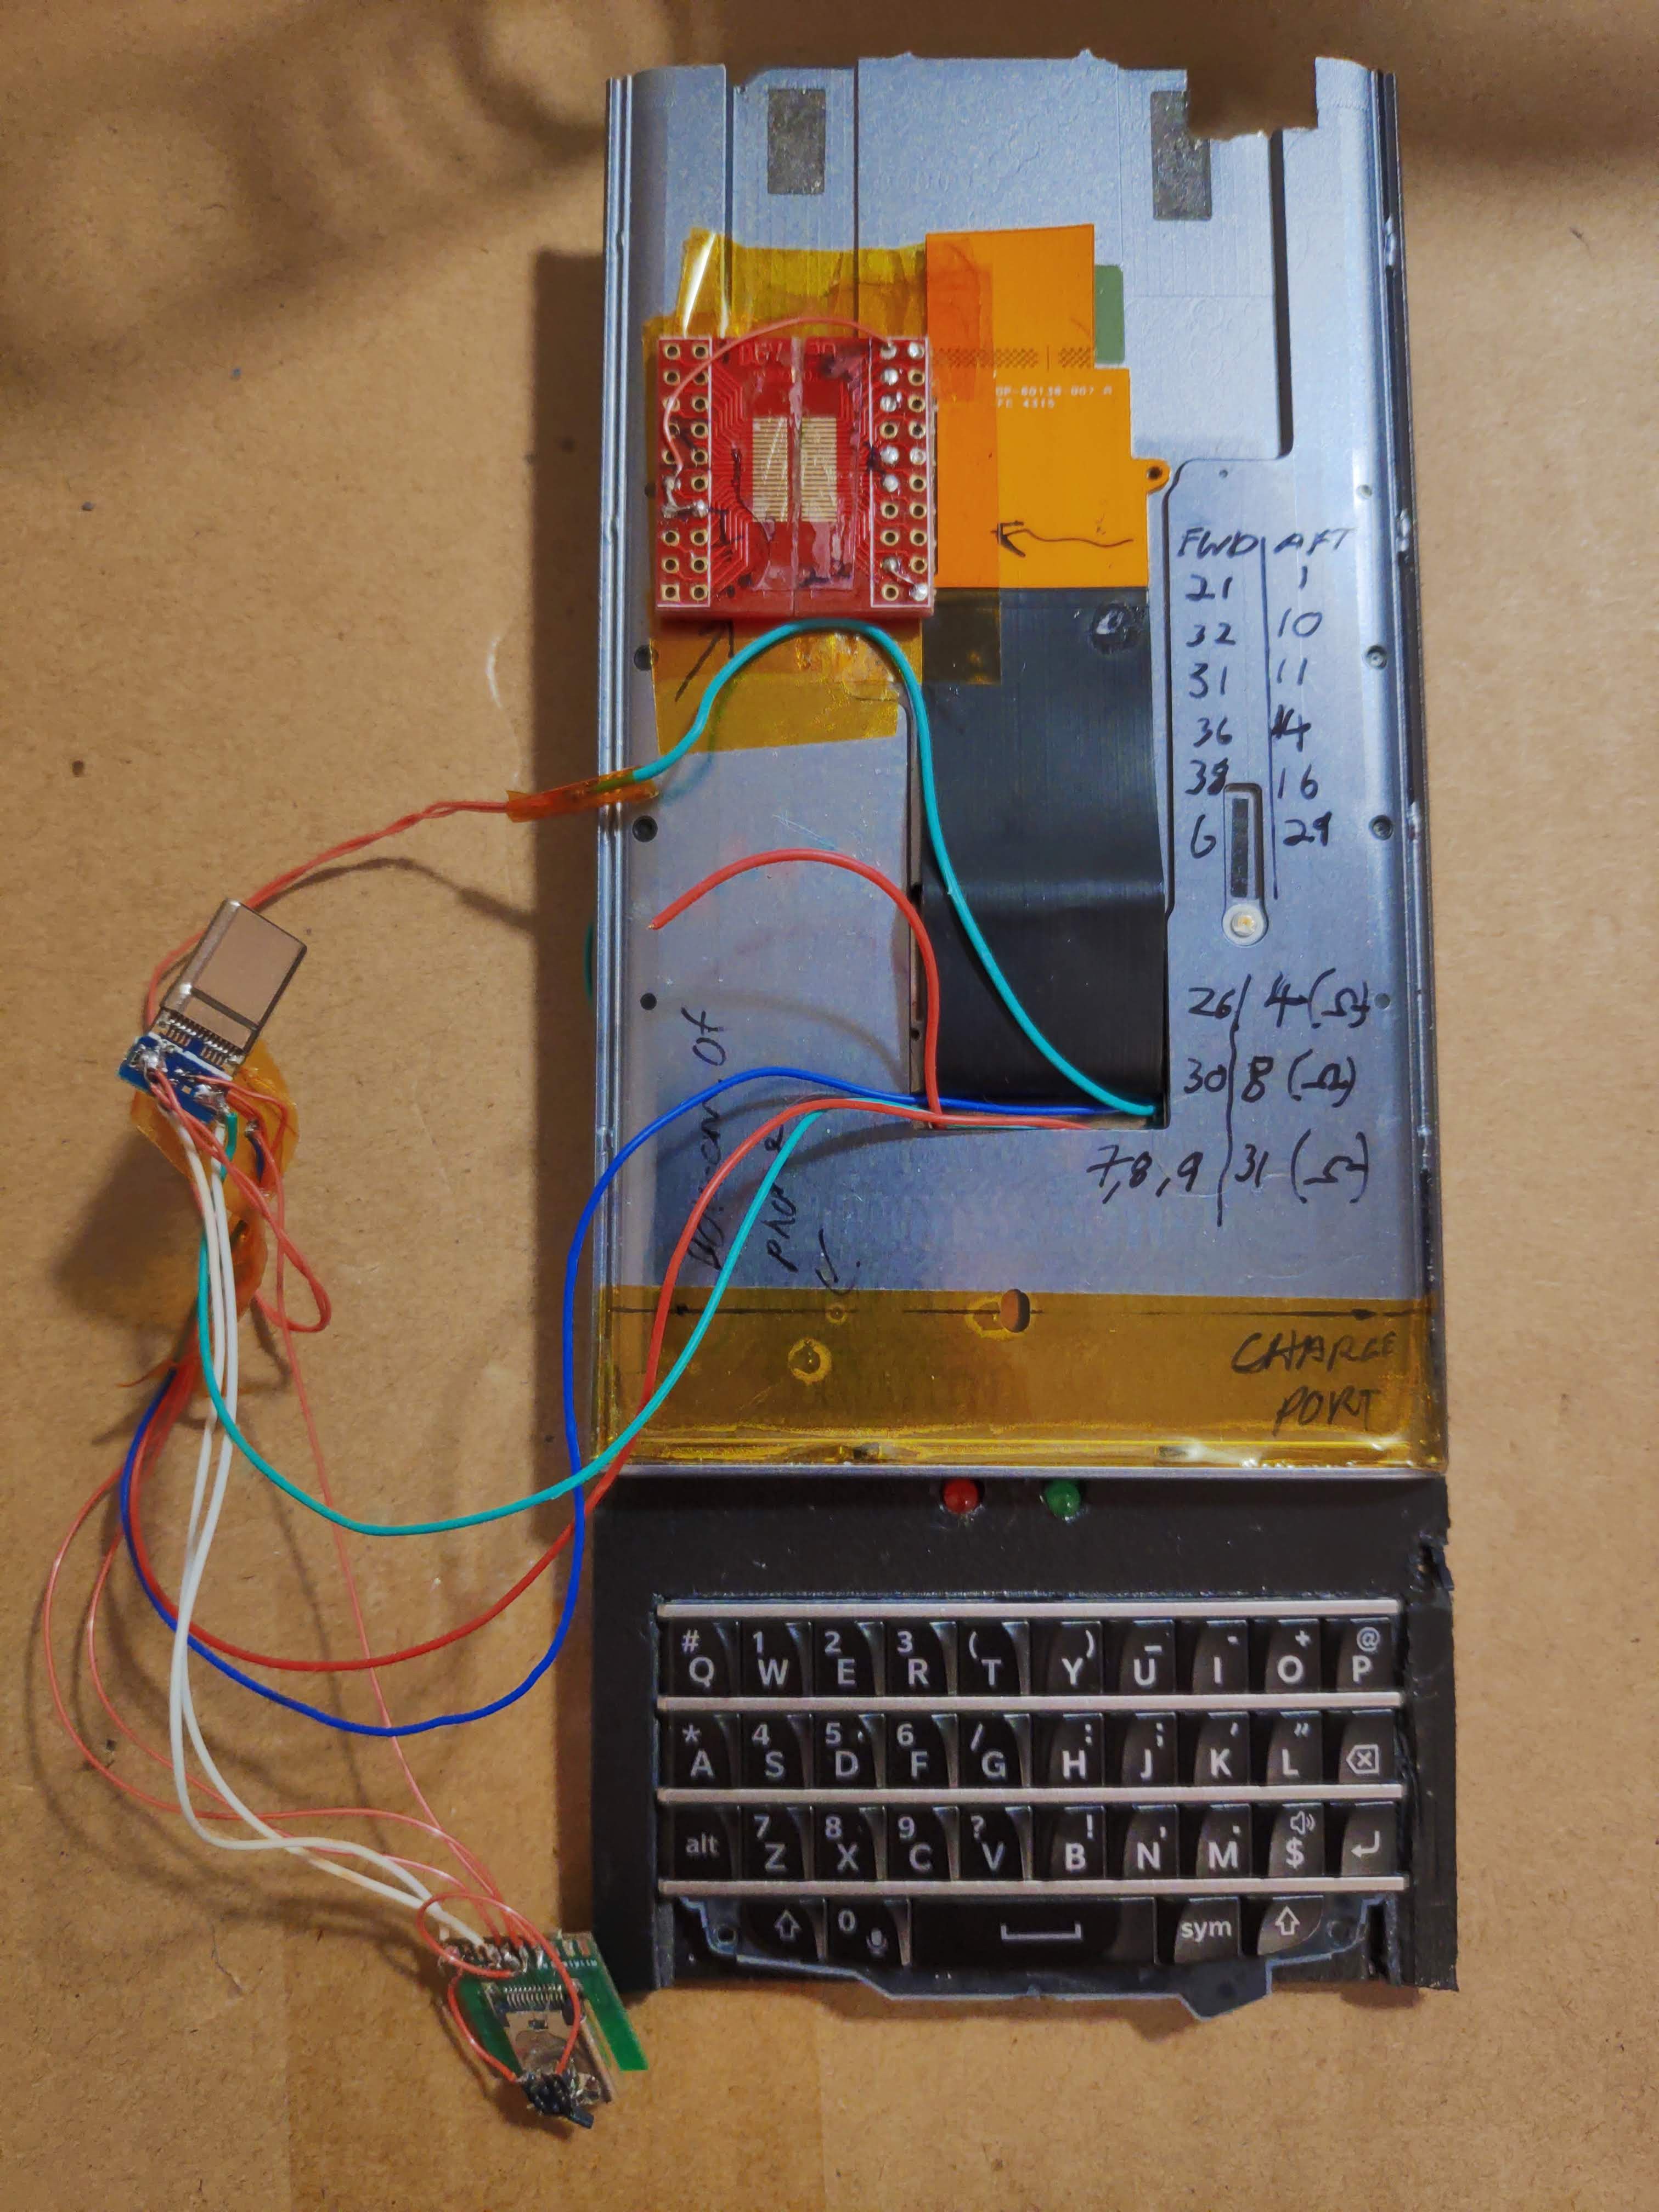
At this point in time, I have installed the keyboard and both PCBs on a sheet of PVC which I used to make a special cover for the phone. This allows me to test out the complete system in a practical manner without having to modify the phone at all. A switch on the side cuts off the power to the chip and will be connected to the slider in the final build to switch on the keyboard only when it is extended. The red and green LED’s are indicators for ALT and Caps Lock respectively (they are driven directly by the SK5126 encoder which is another great reason to use that chip).
Источник


