- A Full Guide to Use a Flash Drive on Android Phone [Partition Magic]
- Summary :
- Quick Navigation :
- How to Use a Flash Drive on Android
- How to Use a Flash Drive on Android
- Check Your Android USB Port
- Check If Your Android Supports USB On-The-Go (OTG)
- Prepare a USB OTG Cable
- Prepare a Flash Drive Formatted as FAT32
- How to Connect a USB Flash Drive to Android
- How to Safely Disconnect an Android Flash Drive
- Bottom Line
- How to Flash Android Phone using PC Software
- Part 1. Reasons & Risks of Flashing Android Phone
- Part 2. Preparation Before Flashing Android Phone using PC Software
- Prerequisite 1: Installing USB Drivers
- Prerequisite 2: Unlocking the Bootloader
- Part 3. How to Flash Android Phone using PC Software
- Method 1: Flashing via iMyFone Fixppo (Easiest + Fastest)
- Method 2: Flashing via SP Flash Tool (MediaTek Devices) (Difficult)
- Method 3: Flashing via Odin (Samsung Devices) (Difficult)
A Full Guide to Use a Flash Drive on Android Phone [Partition Magic]
By Irene | Follow | Last Updated January 29, 2021
Summary :
Do you know how to connect a USB flash drive to your Android phone? If you don’t know, this article from MiniTool will show you some tips about how to use a USB flash drive on an Android phone.
Quick Navigation :
Sometimes, you may need to connect a flash drive to your Android. As we all know, the USB port on your Android does not match that of a flash drive. How can you make it? Well, this article will give you some instructions on how to use such a drive with Android.
How to Use a Flash Drive on Android
- Check your Android USB port
- Check if your Android supports USB On-The-Go (OTG)
- Prepare a USB OTG cable
- It should be formatted as FAT32
- Connect it to Android
- Tab the pop-up file manager on Android to browse the files on the USB
How to Use a Flash Drive on Android
You can connect a USB drive to an Android so that you can use it on Android and transfer files at ease. The question is: how to connect the USB drive to an Android? Well, the way to connect the flash drive to your Android may depend on what types of USB port your Android has.
Check Your Android USB Port
If you have an Android with a USB Type-C port and you have USB drive with both a USB-C interface and a USB-A interface, you can use the USB drive on Android without the need for an adapter. If you are using the traditional USB-A flash drive, you will need an adapter such as the USB On-The-Go (OTG) cable.
However, currently, most Android use Micro USB interface (USB Micro-B) for data migration and charging. Although USB type-C port appears on some android nowadays with the maturity of technology, Micro USB interface is still widely used in various mobile portable devices including Android.
So, generally speaking, when people asking how to connect a flash drive to an Android, the USB interface of the Android refers to the Micro USB interface. For these Android users, they have to resort to a USB OTG cable.
In conclusion, if you have an Android with a USB-C port, you can buy a new flash drive with both a USB-C interface and an A interface or adopt the USB OTG cable if you are using the traditional USB-A drive. If your Android has the traditional Micro USB port, you have no choice but to use the adapter USB OTG cable to make the connection.
No matter what, a USB OTG cable is vital, but what’s more important is that your Android should support USB OTG.
Check If Your Android Supports USB On-The-Go (OTG)
USB On-The-Go enables your Android to act as a USB host, allowing your Android to connect additional hardware such as flash drive, keyboard and so on.
However, not all Android support USB On-The-Go. So before applying this method, you should check if your Android supports USB OTG first. There are many USB OTG Checker apps, which can quickly scan your Android to check it supports USB OTG. You can download one via the Google Play store.
You can also visit your Android’s manufacturer’s website. If you see USB OTG listed in the specifications, it means the device supports USB OTG. If your Android is not compatible, you are unable to use the USB OTG cable to connect your USB drive to Android.
Prepare a USB OTG Cable
The USB OTG cable has a male Micro USB connector on one side and female USB-A jack on the other, which enables you to connect the USB drive to the Android.
You can plug your USB drive into the USB A jack, and then plug the other end of the USB OTG cable into your Android. In this case, the USB drive can be connected to your Android, which is very convenient.
If your Android supports USB OTG, you can connect your drive to your Android via USB OTG cable. However, most Android don’t come with a USB OTG cable. If you do not have one, you can buy a USB OTG cable from Amazon.
Prepare a Flash Drive Formatted as FAT32
Prepare a USB drive to be used on your Android. If the USB drive is formatted as NTFS, you need to format it to FAT32, as NTFS doesn’t work properly with Android.
If you don’t know how to format USB drive to FAT32 file system, you can keep reading.
Format your Android Flash Drive to FAT32
To make sure the flash drive can be read on your Android, a proper file system is vital. If you want to use it with Android, the file system for the USB drive should be FAT32.
If you need to format Android flash drive to FAT32, MiniTool Partition Wizard Free Edition is recommended.
MiniTool Partition Wizard Free Edition is an all-in-one partition manager. It can help you move/resize partition, extend partition, format partition, convert FAT to NTFS, convert MBR to GPT disk, migrate OS to SSD/HD, backup partition and so on.
With its simple procedures, powerful features and user-friendly interface, it has become the most popular partition manager for Windows users. So if you want to format USB drive to FAT32, MiniTool Partition Wizard Free Edition is your best choice.
Before you format USB drive to FAT32, you need to connect the Android flash drive that you need to format to your computer. Then you can follow the detailed guide below.
Step 1. Download MiniTool Partition Wizard Free Edition by clicking the following button. Install it on your computer and launch it to get the main interface.
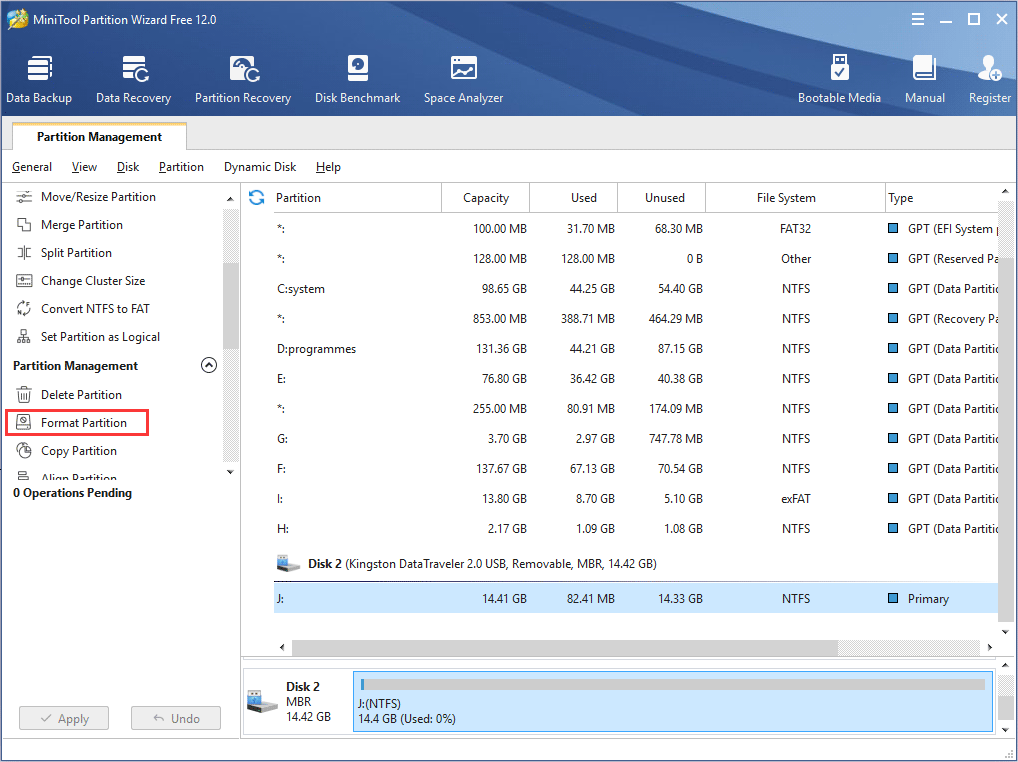
Step 2. Select the target partition, and then choose Format from the left action pane.
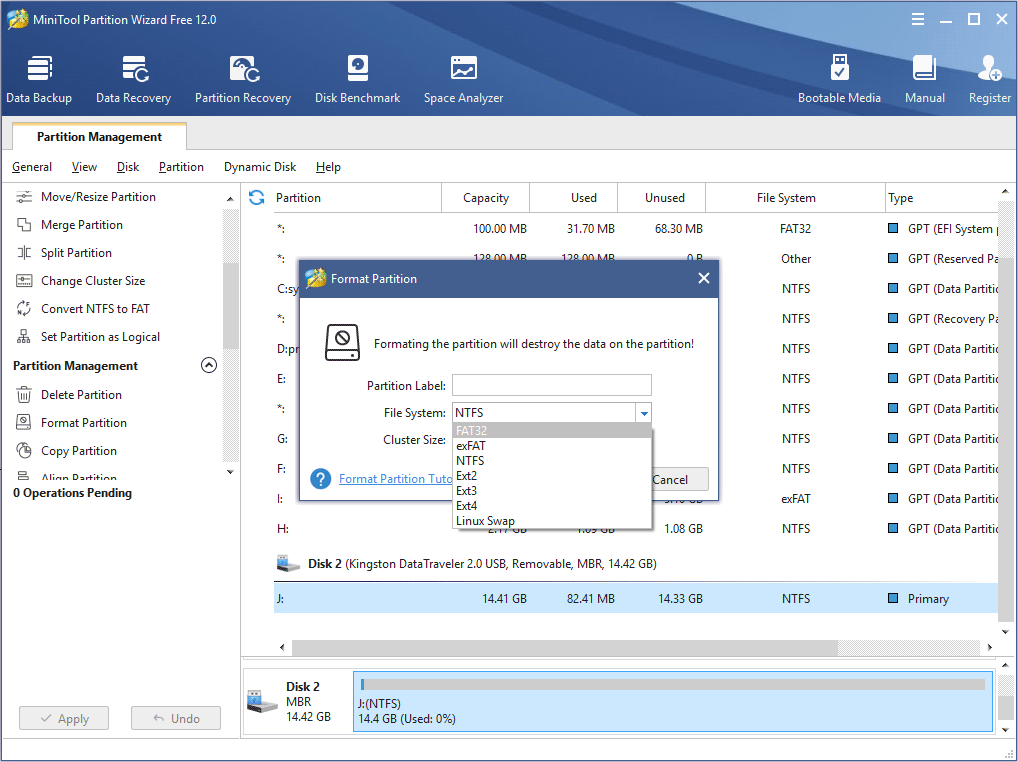
Step 3. On the Format partition page, choose FAT32 file system and click OK button.
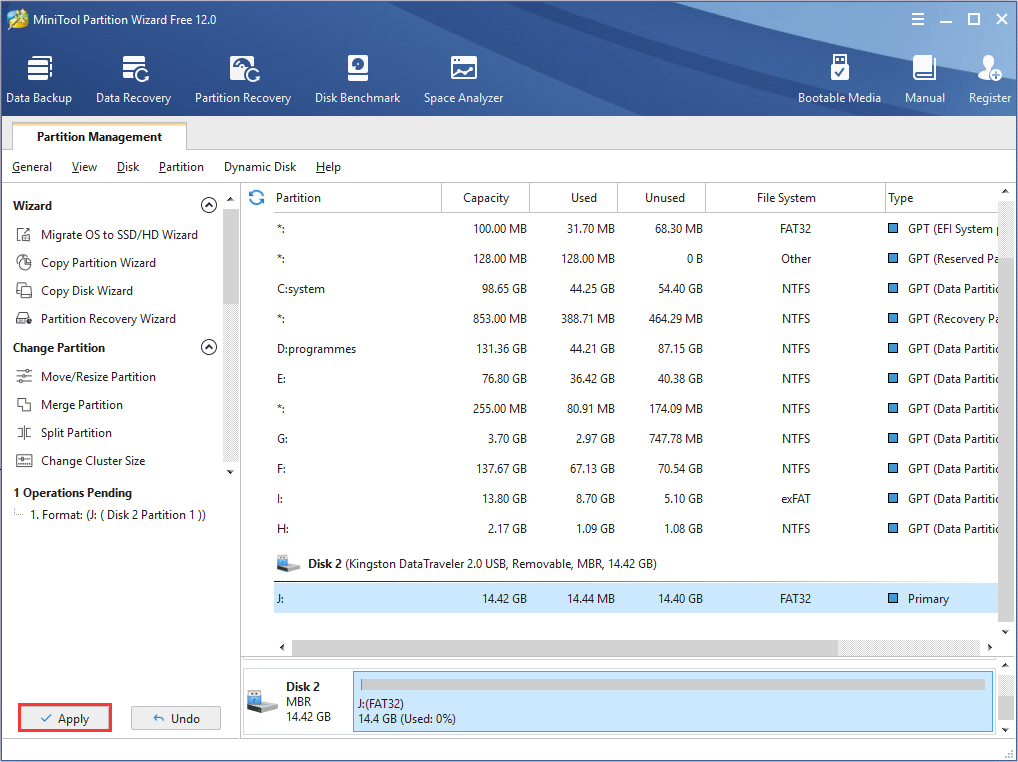
Step 4. At last, click Apply button on the top left corner to allow the change.
If there is no important file on the Android flash drive, you can format it to FAT32 using the following method. However, if there are important files stored on your USB drive, such as loads of movies that you want to play after connecting the USB drive to your Android device, what should you?
You can move them to another drive and restore them after formatting, but it consumes much time. If your Android flash drive is formatted as NTFS, here is another method for you: convert NTFS to FAT32 without data loss.
Convert Android Flash Drive from NTFS to FAT32
In most cases, a USB drive will be formatted to NTFS by default. If it is NTFS, you can convert the USB drive to FAT32 with MiniTool Partition Wizard Pro Edition.
Like the above steps, you just need to get MiniTool Partition Wizard Pro Edition by clicking the button. After installing the partition manager, select the USB drive and choose Convert NTFS to FAT32. At last, follow the prompts to apply the pending operation.
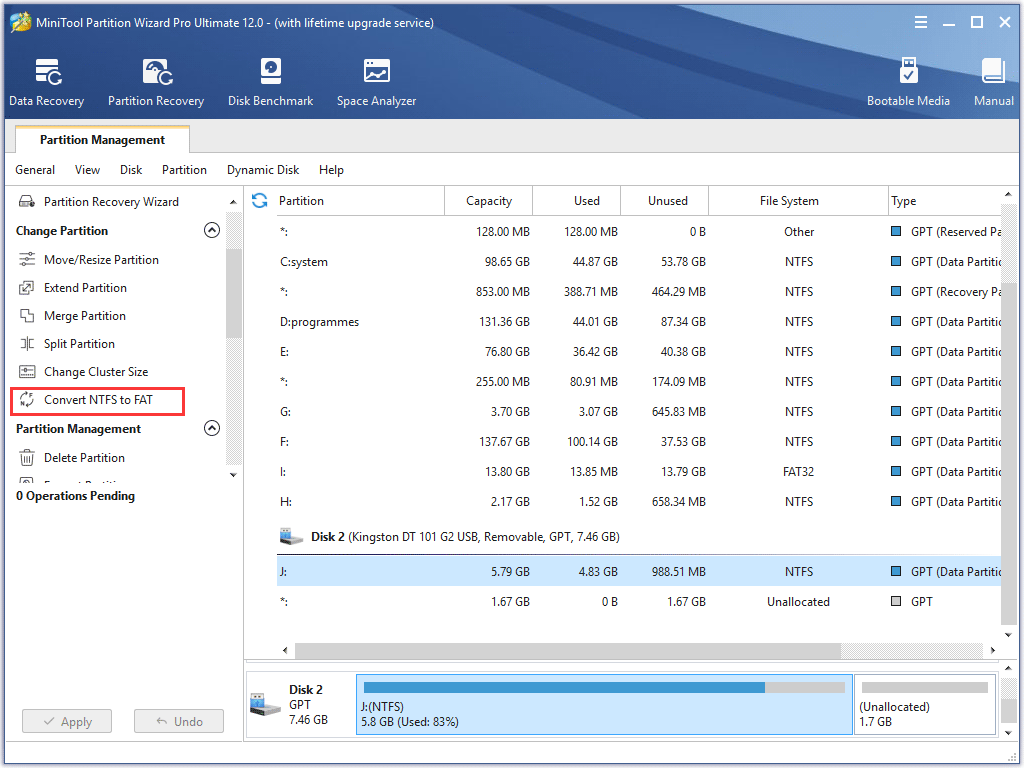
So if formatting is not a good idea for you, you can convert NTFS to FAT32 without data loss with MiniTool Partition Wizard Pro.
How to Connect a USB Flash Drive to Android
After having a USB OTG cable and formatting or converting the USB drive to FAT32, you can connect the drive to your Android. If you don’t know how to make the connection, this guide is helpful.
Step 1. Plug your cable into your Android.
Step 2. Plug your USB drive into the female connector of the cable.
Step 3. Then the file explorer on your Android should automatically pop up after detecting the USB drive.
Step 4. If the USB drive is not properly formatted, it will require you to erase and format your drive. If your USB drive is properly formatted with MiniTool Partition Wizard, you are able to tab the notification and open the file explorer to view the contents of the drive as if they were originally stored on your Android.
Then you are able to transfer files from android to this removable drive and play media files from the USB drive. Remember that do not remove the storage device while using it, as this will cause unexpected data loss on the USB drive.
If you need to copy and paste certain files from the flash drive to your Android device, you can long-press on the items you want to move and perform the proper operation. If you want to remove the Android USB drive, to avoid data loss, you should safely disconnect the Android flash drive.
How to Safely Disconnect an Android Flash Drive
When you don’t need the Android USB drive, you can follow this instruction below to safely disconnect the USB drive.
Step 1. Swipe down from the top of the screen.
Step 2. Tap the USB mass storage connected. Then you can now safely disconnect your flash storage device.
Now you should know how to safely disconnect the Android flash drive. It is not a difficult thing to connect and disconnect a flash drive to your Android.
After knowing how to connect a flash drive to an Android, you can use the USB drive on Android at ease no matter if you want to transfer files or play media files stored on the USB drive.
Bottom Line
After reading this post, you should know how to connect and use a USB drive on Android.
If you have any question about how to format Android flash drive or how to use such a drive on Android, you can leave a message in the following comment zone and we will reply as soon as possible. If you need any help when using MiniTool software, you may contact us via [email protected] .
Источник
How to Flash Android Phone using PC Software
home_icon Created with Sketch.
Home > Android Tips > How to Flash Android Phone using PC Software
![]()
August 1, 2019 (Updated: September 9, 2021)
One beauty of Android is that it allows endless possibilities in terms of customization. This is what makes it so popular; you could have two Android phones from the same company that both look the same from the outside but are opposite in terms of how the UI (User Interface) looks.
One way of changing how your phone feels is by flashing the device. It may sound technical and a daunting task however, in reality, it is quite simple to flash your device. What exactly does it mean to «flash» your device? Put simply, you will install a custom ROM on your device. Essentially, you will be changing your current version of Android to a modified version; this could be from your device’s manufacturer (Samsung, Google, LG, etc) or one made by the android community.
Part 1. Reasons & Risks of Flashing Android Phone
Before you jump straight into flashing your device, you should be aware of the reasons as to why someone would like to flash their device but also the risks that come with flashing your phone.
- Bloatware: One main reason to flash your device is to remove any bloatware that comes with the device. As you are installing a custom ROM, you will be able to remove the bloatware.
- Customization: A new ROM may allow you to customize your device to the most precise detail you want. It will also give your phone a different feel.
- Performance: Normally, you would not be able to change how your CPU and GPU behave. However, a custom ROM may allow you to overclock your CPU and GPU to optimize the performance of these components for activities such as gaming. Battery life can also be increased as background activity can be reduced when the device is not being used.
- Updates: Most Android devices will stop receiving updates after a few years of release but if you install a community made custom ROM, you will be receiving updates more often and for longer.
All of this does come with some risks that you should carefully consider before flashing your device.
- Malfunctions: Some device features, such as some preinstalled applications may not be compatible with the custom ROM so they will not be able to function.
- Warranty: Flashing your phone will almost always void your warranty. The manufacturer will not repair an issue with the device even if it is not related to the installation of a custom ROM.
- Compatibility: Especially for less popular devices, not all custom ROMs may be compatible with your device.
Note: You WILL lose all data on your device when flashing the device. Make sure you create a backup of all the data on your device separately.
If you want to know how to flash the android phone with a computer, this article will show you how to flash your android device using iMyFone Fixppo, SP Flash Tool, and Odin. The Fixppo software is the easiest and fastest method for any user to repair a dead device and flashing firmware onto it. It automatically downloads the firmware, which means you are not at risk of downloading malicious software. It also completes the difficult steps required when using software such as Odin (see further below) so that you can repair your device as soon as possible.
Part 2. Preparation Before Flashing Android Phone using PC Software
Check the requirements below before you start to flash your phone.
- The device you want to flash
- PC
- USB Cable for your device
- Unlocked Bootloader
- Flashing software
- Android USB Drivers
- Custom ROM downloaded
If you use iMyFone Fixppo for Android, then no need to install Android USB drivers and download ROM.
Before following any of these methods, make sure your bootloader is unlocked and you have Android USB drivers installed for your device. Make sure that your device’s battery is above 50% before doing this.
Prerequisite 1: Installing USB Drivers
Samsung devices:
- Download the Samsung USB drivers from the Samsung developer’s website.
- Extract the zip file by right-clicking it (on windows), choosing «extract all» and then clicking extract.
- Open the extracted folder and run the «.exe» file.
- Click next, choose your language and click install. Wait for the installation to complete and click finish.
В MTK Devices:
- Download the Android CDC driver file from online and extract it (right-click, choose to extract all and extract).
- Opendevice manager by searching for it in Windows or by searching for «device manager» in Control Panel.
- In the device manager, click on your Computer’s name, click on the action button and «Add legacy hardware».
- Click on the «Next» button, choose the «Install the hardware that I manually select from a list (Advanced)» and click next.
- Choose the «have disk» option, click on «browse», locate the extracted driver folder and click on the «Android Gadget CDC Driver» file.
- Click on «OK«, «next«, wait for the driver to install and click «finish«.
If you get a Windows security box, click on «Install this driver software anyway».
Prerequisite 2: Unlocking the Bootloader
Samsung devices come with an unlocked bootloader, so you do not need to follow these steps. Here is a general guide.
- Download and install Android SDK tools.
- Download the drivers for your device (these can be found from your manufacturer’s website).
- Enable developer’s options and then enable USB Debugging in the developer’s options menu on your device.
- Get the unlock key for your device from your manufacturer’s website.
- Use command prompt to unlock the bootloader via fastboot commands.
Searching Google for your device’s bootloader unlocking method will give you a more in-depth method that you can follow.

Part 3. How to Flash Android Phone using PC Software
We will introduce 3 PC software here. A complete guide will be offered for each method. You can check the chart below to know the differences between them and choose a method you like.
Method 1: Flashing via iMyFone Fixppo (Easiest + Fastest)
This is the easiest and fastest method for flashing Android firmware onto your device. iMyFone Fixppo for Android will work with android phones that are completely dead and requires no expert knowledge in Android. It is an Android system repair tool, but also an android flash tool.
- Download Fixppo for Android on your Windows PC.
- Launch Fixppo and click start on the software to continue.
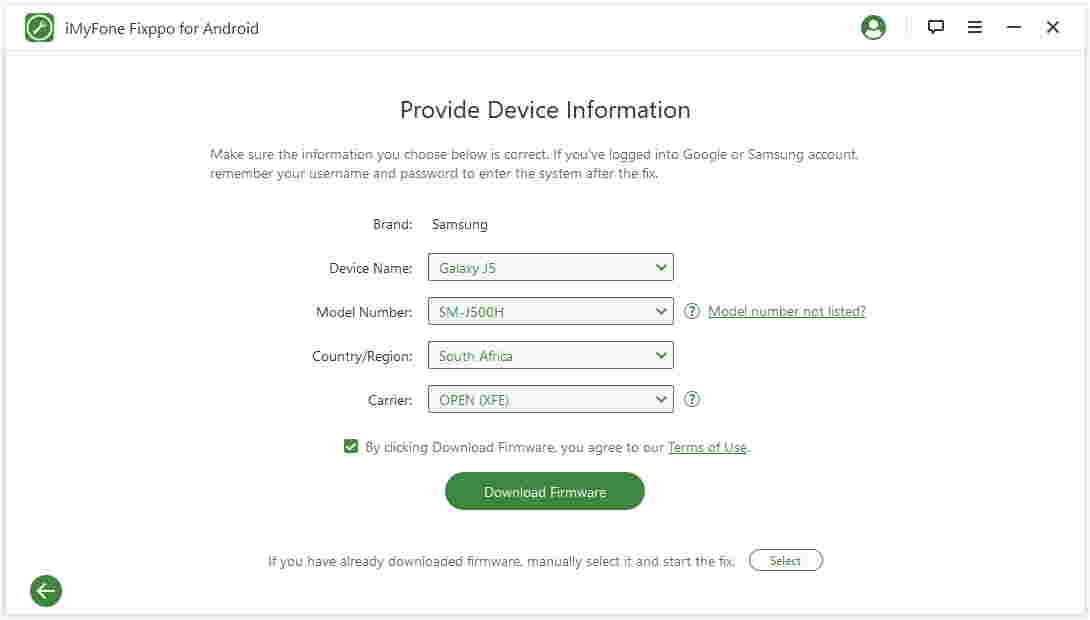
- Fill in the details regarding your Android device on the software and click «Download Firmware». This will download and extract the firmware for your phone automatically without you having to do anything else.
- Confirm the information once the firmware has been downloaded and press start.
- Put your device is in Download mode (follow on-screen instructions).
- Connect your device to your PC to begin the flashing process.
- The process will start. The Fixppo software will automatically flash your phone and complete the whole process. Leave your phone until it reboots, as this happens when problems have been repaired on your device.
- Disconnect your device from the PC and use it as normal.
That is all you need to do using Fixppo. This is the easiest and best method for repairing your android device (phone or tablet) and to repair it so that you can continue to use it as previously.
Besides, iMyFone Fixppo for Android has been trusted by many individuals and websites. Thousands of people have already tried Fixppo for Android and can solve various complex Android system issues.
Method 2: Flashing via SP Flash Tool (MediaTek Devices) (Difficult)
- Power off your android device completely and remove the battery if it is removable.
- Download the ROM you want to flash your phone with (make sure the ROM is compatible) and extract the files.
ROM files from websites such as XDA developers are usually reliable.
- Download the SmartPhone(SP) Flash Tool on your computer.
- Extract the zip file by right-clicking on the .zip file and choose «extract all».
- Open the folder that has been extracted, find «flash_tool.exe» in the folder and run the file.
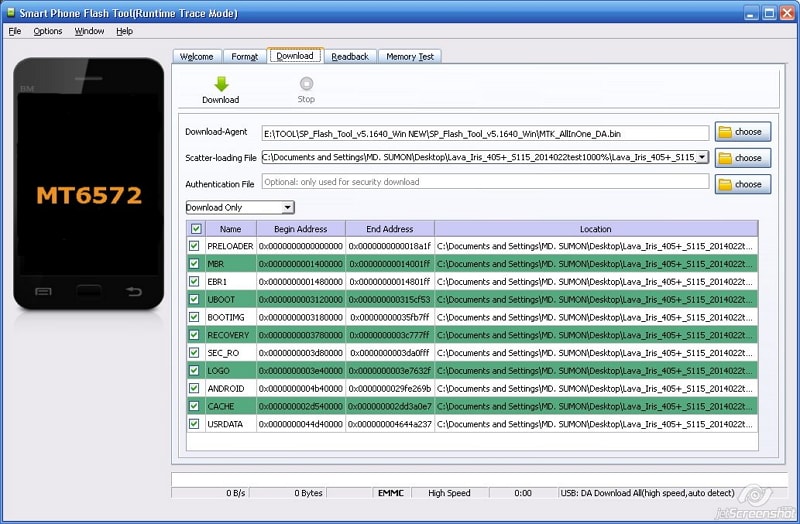
- When the tool has been executed, click on the «Download» tab if it hasn’t already been selected.
- When you are in the download tab, click on the «Choose» button on the line which says «Scatter-loading File».
- Locate your extracted ROM, go into the «Firmware» folder and select the «.txt» file that contains the word «Scatter».
- Once the file has been processed, click on the «Download» button.
- Connect your phone (make sure the power is turned off and the battery is removed if possible) and a volume key to make sure your phone has been recognized by the PC.
- Once completed, exit the SP flash tool and disconnect your phone.
Your phone has now been flashed to your desired ROM. Reboot your phone and you can now use your device normally.
Method 3: Flashing via Odin (Samsung Devices) (Difficult)
- Download the ROM you would like to install and extract it on your PC.
You can download the ROM from a range of websites, such as Sammobile. Make sure the ROM is compatible with your device.
Note: Do not downgrade your version of Android. Always upgrade the version as it will cause issues with your device.
- Download, extract and install Samsung USB Drivers on your PC.
- Download and extract the latest version of Odin on your PC.
- Put your phone in Download mode
- For devices with a physical home button: Power off your device. Hold down the volume down and home button keys simultaneously. When you get a screen with a warning, press the volume up key to put your device in download mode.
- If your device does not have a physical home button: Power off your device. I will be using the S8 as an example. Press and hold the Bixby and volume up buttons. Then press the power button until the power turns off. Release the buttons once a blue screen appears. Press the volume up key to boot into download mode.
- If these methods do not work on your device, a quick search online will confirm how to boot into download mode.
Search: Phone model + download mode
- Connect your phone to the PC via a USB cable.
- Launch the Odin software (it will be in the folder that you have extracted). You will see your device under the «ID: COM» label if connected.
- Once Odin is launched, click on the «AP» button. Browse into your extracted ROM folder through the Odin popup browser and click on the file located inside the ROM folder.
- Wait for the file to be added to Odin.
- Click on the Start button at the bottom of Odin and wait for the ROM to be flashed.
- Your phone will reboot and finalize the installation of the software.
- When your phone has completed the installation, disconnect your phone.

In short, using the Fixppo software is the quickest and easiest way for you to flash firmware onto your device. The other methods require you to download the firmware in advance and require more skill when flashing. This can lead to more errors and you potentially risk bricking your device.
Источник


