- Android Get Address with Street Name, City for Location with Geocoding
- Download the Example Android Application
- Geocoding
- Android Reverse Geocoding Example to find Address
- Step1: Define Permissions
- Step 2: Accessing the Geo Location for Lat and Long
- Step 3: Reverse Geocoding to get Location Address
- Step 4: Android UI
- Key Points to Note for Geocoding
- Example Geo coordinates Latitude and Longitude with respective location address:
- Download the Example Android Application
- Popular Articles
- Comments on «Android Get Address with Street Name, City for Location with Geocoding»
- How to get Location address in an Android app
- Preparation
- App Layout
- Fetching the Address
- Using the IntentService
- Conclusion
Android Get Address with Street Name, City for Location with Geocoding
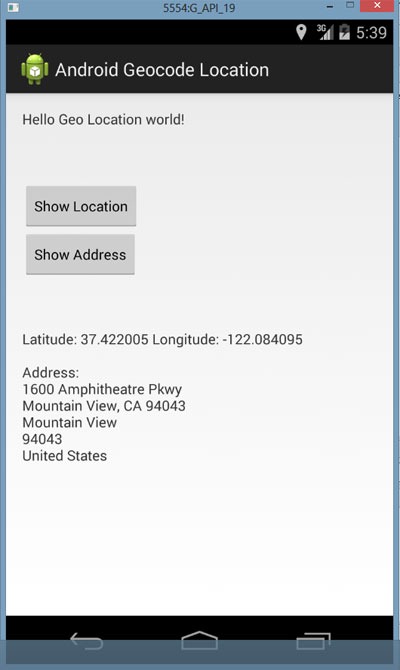
In this Android tutorial, I will walk you through how to find the address based on the mobile location. We have got GPS or network provider in the Android device and we can use that to get the current location in terms of latitude and longitude. Using the latitude and longitude we can get the address by Google Geocoding API.
Download the Example Android Application
Geocoding
Geocoding is the process of converting the addresses (postal address) into geo coordinates as latitude and longitude. Reverse geocoding is converting a geo coordinate latitude and longitude to an address. In this tutorial we will be doing reverse geo coding and get the addresses of the passed coordinates.
Android Reverse Geocoding Example to find Address
Step1: Define Permissions
We need location access permission to find the latitude and longitude of the Android device. Following two lines are the key to give permission to access the location.
So the complete manifest file will be as below:
Step 2: Accessing the Geo Location for Lat and Long
Following class is the key element in accessing the latitude and longitude of the Android device. It implements the LocationListener and gets the location coordinate updates. We have designed our requirement not to be a continous update for location. On demand we will get the location coordinates.
AppLocationService.java
Step 3: Reverse Geocoding to get Location Address
Following class is the key element for reverse geocoding to get the address for the passed latitude and longitude coordinates. We access the Geocoder Google API for reverse geocoding and get every line of address like street, city, pin / zip code and etc.
LocationAddress.java
Step 4: Android UI
How these pieces fit together is with the following Android activity.
MyActivity.java
Android UI layout file to show the address and location
Key Points to Note for Geocoding
- Need Google API access and so remember to run in an emulator that is configured for Google API.
- Remember to have the right permissions defined in the Mainfest.xml
- To test via an Android Emulator, we can use the DDMS and pass the latitude and longitude using the ‘Emulator Control’.
Example Geo coordinates Latitude and Longitude with respective location address:
Download the Example Android Application


Popular Articles
Comments on «Android Get Address with Street Name, City for Location with Geocoding»
Awesome demo Sir Ji…
Sir, My one Suggestion,
if you don’t mind,
try using findViewById(R.id.btnGPSShowLocation).setOnClickListener(new View.OnClickListener() <
@Override
public void onClick(View arg0) <
//if you want to manage only onClick no other use in java file
>
>
OR
in layout xml, put OnClick property in atlest one post. so that people can get another way also if they might like.
[…] how to find latitude/longitude for a give address location. In a previous tutorial we learnt about reverse geocoding to find address for a latitude/longitude. This tutorial is a reverse of […]
the code have fatal exception
The app is continously asking me to enable location provider, but i have enabled my gps and wifi, and i am trying it on a real device
i have the same problem as hasan has the app when tried on real device says enable location provider inspite of gps n wifi being enabled.. can u please solve our query …
Thenkyu sir,i use this tutorial
it does not show city name why?
Thank you very much sir….. Simple n Effective.. Gr8 Work
Settings.ACTION_LOCATION_SOURCE_SETTINGS
i got error ;
what i will do
hello sir
i am getting settings Dialogs while my Location Provided is already Enabled.
I am also getting same issue as it is opening settings and even enabled the GPS i am not getting the location.
Can anyone help to solve this issue.
My friend’s device can get the address, but mine can’t. Is it the API level of the device problem? Cause my friend’s device API level is 19, but mine is API 18. Can someone help me?
sir,
i am too getting the same problem what they mentioned above as open setting even it is ON.
I am getting the same issue as the dialogue box keep prompting although I have already switched on the GPS and Wi-fi on my mobile. Any ideas?
For those, who are not getting lattitude, longitude values and address too, try using NETWORK_PROVIDER instead of GPS_PROVIDER in your codings. Comment the else part in codings that call the settings. Turn Wi-Fi on in your mobile and try, it will work. I did so and it worked. Thank you!
Thank you so much for this tutorial.
Why u are extending service? You did not start service at all in above program.
Use this for perfect work…
and same for address button click
btnGPSShowLocation.setOnClickListener(new View.OnClickListener() <
@Override
public void onClick(View arg0) <
Location gpsLocation = appLocationService
.getLocation(LocationManager.GPS_PROVIDER);
Location networkLocation = appLocationService
.getLocation(LocationManager.NETWORK_PROVIDER);
if (gpsLocation != null) <
double latitude = gpsLocation.getLatitude();
double longitude = gpsLocation.getLongitude();
String result = “Latitude: ” + gpsLocation.getLatitude()
+ ” Longitude: ” + gpsLocation.getLongitude();
tvAddress.setText(result);
> else if (networkLocation != null) <
double latitude = networkLocation.getLatitude();
double longitude = networkLocation.getLongitude();
String result = “Latitude: ”
+ networkLocation.getLatitude() + ” Longitude: ”
+ networkLocation.getLongitude();
tvAddress.setText(result);
> else <
showSettingsAlert();
>
>
>);
this solution solve all the errror
gps = new GPSTracker(MainActivity.this);
if(gps.canGetLocation())<
double latitude = gps.getLatitude();
double longitude = gps.getLongitude();
String result = “Latitude: ” + latitude +
” Longitude: ” + longitude;
tvAddress.setText(result);
Use this Class insted of AppLocationService.java this class
public class GPSTracker extends Service implements LocationListener <
private final Context mContext;
boolean isGPSEnabled = false;
boolean isNetworkEnabled = false;
boolean canGetLocation = false;
Location location; // location
double latitude; // latitude
double longitude; // longitude
private static final long MIN_DISTANCE_CHANGE_FOR_UPDATES = 10; // 10 meters
private static final long MIN_TIME_BW_UPDATES = 1000 * 60 * 1; // 1 minute
protected LocationManager locationManager;
public GPSTracker(Context context) <
this.mContext = context;
getLocation();
>
public Location getLocation() <
try <
locationManager = (LocationManager) mContext
.getSystemService(LOCATION_SERVICE);
isGPSEnabled = locationManager
.isProviderEnabled(LocationManager.GPS_PROVIDER);
isNetworkEnabled = locationManager
.isProviderEnabled(LocationManager.NETWORK_PROVIDER);
if (!isGPSEnabled && !isNetworkEnabled) <
> else <
this.canGetLocation = true;
if (isNetworkEnabled) <
locationManager.requestLocationUpdates(
LocationManager.NETWORK_PROVIDER,
MIN_TIME_BW_UPDATES,
MIN_DISTANCE_CHANGE_FOR_UPDATES, this);
Log.d(“Network”, “Network”);
if (locationManager != null) <
location = locationManager
.getLastKnownLocation(LocationManager.NETWORK_PROVIDER);
if (location != null) <
latitude = location.getLatitude();
longitude = location.getLongitude();
>
>
>
if (isGPSEnabled) <
if (location == null) <
locationManager.requestLocationUpdates(
LocationManager.GPS_PROVIDER,
MIN_TIME_BW_UPDATES,
MIN_DISTANCE_CHANGE_FOR_UPDATES, this);
Log.d(“GPS Enabled”, “GPS Enabled”);
if (locationManager != null) <
location = locationManager
.getLastKnownLocation(LocationManager.GPS_PROVIDER);
if (location != null) <
latitude = location.getLatitude();
longitude = location.getLongitude();
>
>
>
>
>
> catch (Exception e) <
e.printStackTrace();
>
public void stopUsingGPS() <
if(locationManager != null) <
locationManager.removeUpdates(GPSTracker.this);
>
>
public double getLatitude() <
if(location != null) <
latitude = location.getLatitude();
>
public double getLongitude() <
if(location != null) <
longitude = location.getLongitude();
>
public boolean canGetLocation() <
return this.canGetLocation;
>
public void showSettingsAlert() <
AlertDialog.Builder alertDialog = new AlertDialog.Builder(mContext);
// Setting Dialog Title
alertDialog.setTitle(“GPS is settings”);
// Setting Dialog Message
alertDialog.setMessage(“GPS is not enabled. Do you want to go to settings menu?”);
// On pressing Settings button
alertDialog.setPositiveButton(“Settings”, new DialogInterface.OnClickListener() <
public void onClick(DialogInterface dialog,int which) <
Intent intent = new Intent(Settings.ACTION_LOCATION_SOURCE_SETTINGS);
mContext.startActivity(intent);
>
>);
// on pressing cancel button
alertDialog.setNegativeButton(“Cancel”, new DialogInterface.OnClickListener() <
public void onClick(DialogInterface dialog, int which) <
dialog.cancel();
>
>);
// Showing Alert Message
alertDialog.show();
>
@Override
public void onLocationChanged(Location location) <
>
@Override
public void onProviderDisabled(String provider) <
>
@Override
public void onProviderEnabled(String provider) <
>
@Override
public void onStatusChanged(String provider, int status, Bundle extras) <
>
@Override
public IBinder onBind(Intent arg0) <
return null;
>
WTF it only keep asking to enable location provider and never show location..
It doesn’t work. it asks me to enable location provider.please fix it.
In addition to changing your settings in emulator, go to DDMS and set latitude and longitude in emulator control and click on send. This code works then.
Hi,
It worked like a miracle. I just followed your steps.
But It is taking little bit of time (2sec, In my case) to get address. Is it the normal latency or it its happening in my case? Please provide if there is any faster way / new alternative.
Hi,
for all whose getting a Setting Dialog when using this code, why don’t you try using LocationManager.Network_Provider?
in this code, the MainActivity is using GPS_Provider.
because GPS is often taking a long time to get our location
I can sit here in my office and waiting all day for gps to get my location, and still nothing
try to change it to Network_Provider and it’ll work
Thank You so much 🙂 It helped me lot 🙂 🙂
Hi,
can we find the longitude and latitude of a current location with no internet connectivity.
if yes,can you provide me the code.
thanks in advance
Comments are closed for «Android Get Address with Street Name, City for Location with Geocoding».
Источник
How to get Location address in an Android app
In previous tutorials, we have discussed how to get location data, as well as using location data to implement a simple device location tracking system using the ThingSpeak API. For this tutorial, we are going to use the Geocoder class to translate a given address into its latitude and longitude values (geocoding), and also translate a latitude and longitude value into an address (reverse geocoding).
Preparation
From Wikipedia, Geocoding uses a description of a location, such as a postal address or place name, to find geographic coordinates. Reverse geocoding, on the other hand, uses geographic coordinates to find a description of the location.
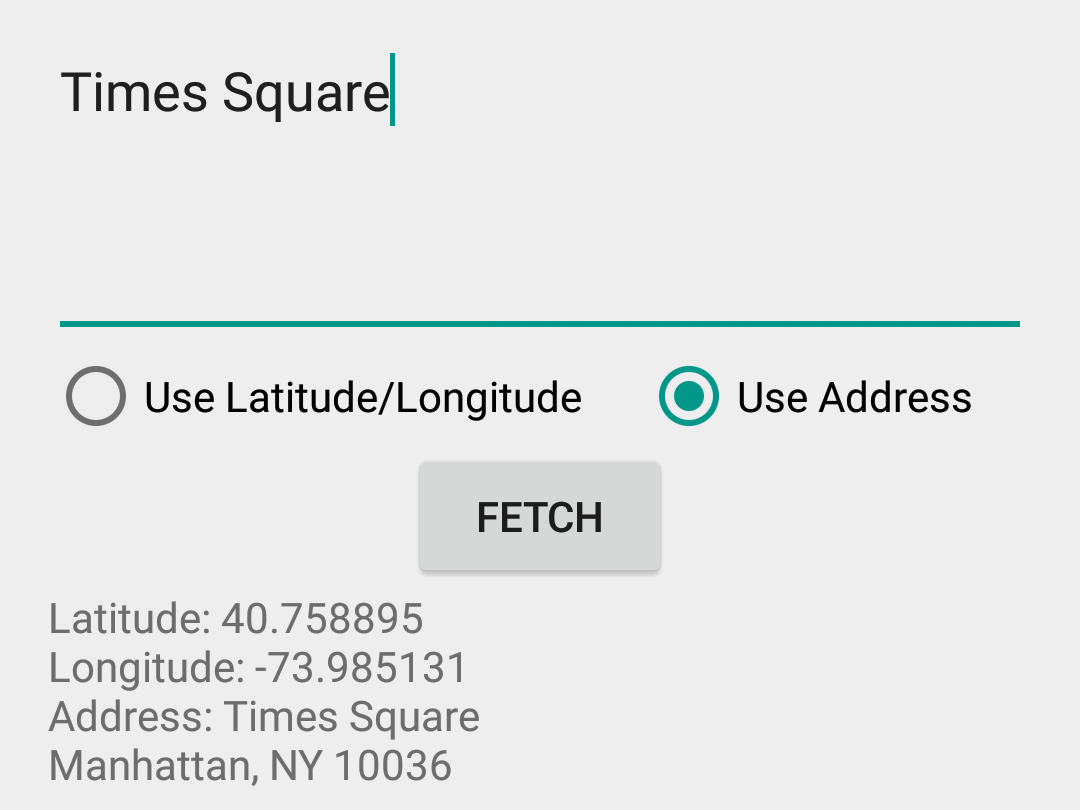
A geocoder is either a piece of software or a service that implements a geocoding process. The Android API contains a Geocoder class that can use either a location name or a location’s latitude and longitude values to get further details about an address (it can perform both forward and reverse geocoding). The returned address details include address name, country name, country code, postal code and more.
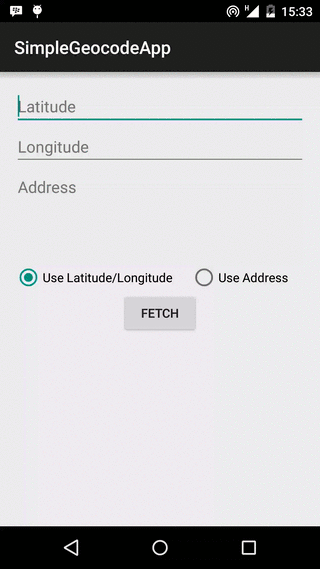
App Layout
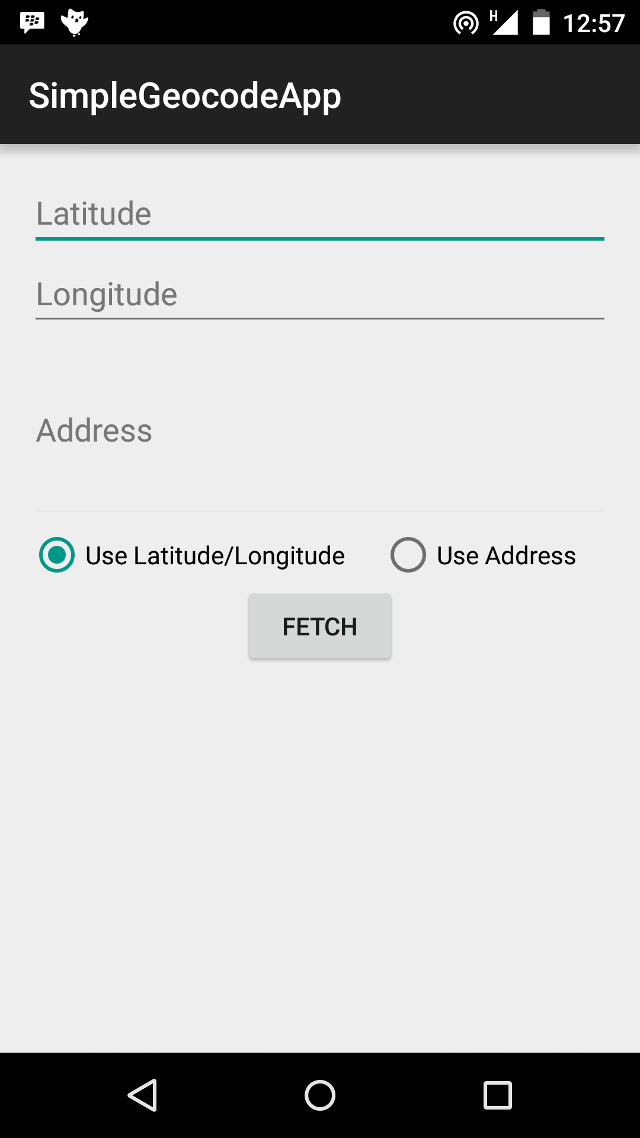
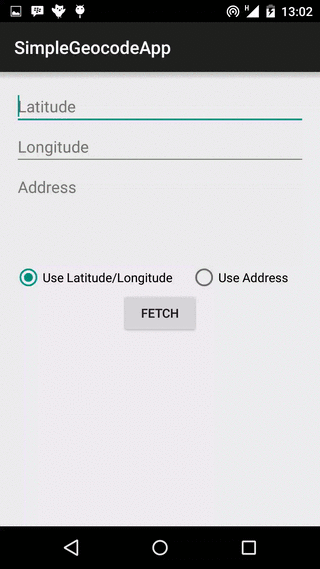
Our app is going to use both forward and reverse geocoding to get location address, and the app layout reflects this. The layout contains two EditTexts for Latitude and Longitude respectively, and an EditText for address name input. Beneath these, we have two RadioButtons, to select if we are fetching an address using the location’s latitude/longitude values, or using the address name. There is a Button, that begins the geocoding lookup when clicked, a ProgressBar, to show the user that the lookup task is running in the background, and a TextView to show the result received.
Fetching the Address
Geocoder has two methods for fetching an Address, getFromLocation(), which uses latitude and longitude, and getFromLocationName(), which uses the location’s name. Both methods return a list of Address objects. An Address contains information like address name, country, latitude and longitude, whereas Location contains latitude, longitude, bearing and altitude among others. Remember that the Geocoder methods above block the thread they are executed in, and should never be called from the app’s UI thread.
To perform a long running task in the background, we can use an AsyncTask. However, the AsyncTask is not recommended for operations like the Geocoder lookup, because it can take a potentially long time to return. AsyncTask’s should be used for comparatively shorter operations. While we can (and did) use the AsyncTask, as per the Android developer recommendations and best practices, we would use an IntentService. An IntentService extends Service, and operations run in it can take as long as necessary. An IntentService holds no reference to the Activity it was started from, and so, the activity can be rebuilt (like when the device is rotated), without affecting the IntentService’s tasks, unlike the AsyncTask. (NB: We actually used an AsyncTask, and it worked just as well. As a bonus, the activity, using an AsyncTask is available in the github project as MainActivityWithAsyncTask)
Using the IntentService
We extend IntentService and define GeocodeAddressIntentService. An IntentService is started much like an Activity. We build an Intent, and start the service by calling Context.startService() method.
Before defining the class, we include our GeocodeAddressIntentService in the AppManifest. Don’t forget to also include the INTERNET permission. In my case, while developing/testing on a Nexus 5 Lollipop device, the network calls just silently failed prior to including the INTERNET permission. So, if you do not get any response, first confirm that you have requested the INTERNET permission.
To use our IntentService, we must implement the onHandleIntent(Intent) method. This is the entry point for IntentService’s, much like the onCreate() is the entry point for Activity’s. In the code snippet below, take notice of the ResultReceiver object. When your IntentService has completed it’s task, it should have a way to send the results back to the invoking Activity. That is where the ResultReceiver comes in, and we’ll discuss it’s implementation in a bit.
The code snippet below contains the actual forward or reverse geocoding lookup calls. We determine if the search uses location name, or location latitude/longitude values, and call the appropriate method. If using location name, we call the Geocoder.getFromLocationName() method, and if using latitude/longitude, we call Geocoder.getFromLocation() method. You can specify a maximum number of addresses to be returned. In our sample, we request for a maximum of one (1) address. Note that an address name can refer to more than one location, spread across multiple countries. In a production app, you might want to fetch more than one, and have an algorithm determine which is the most likely required address.
deliverResultToReceiver is a simple method, that handles returning the results of the operation to the invoking Activity, through the ResultReceiver.
We implemented the ResultReceiver as an inner class in the MainActivity.
Starting the IntentService is pretty similar to starting a new Activity. We build an Intent, put in the necessary Extras, and call Context.startService(Intent). The Extras we bundle in the Intent is dependent on if we are performing a forward or reverse lookup.
Conclusion
While it is all well and good tracking a user’s location, for your app to truly amaze, showing users an address name for a given location will almost always be more useful than the corresponding latitude and longitude values.
The complete source code is available on GitHub, and can be forked, downloaded, copied and used as desired.
If you followed our previous tutorials on using the ThingSpeak API to track a device’s location, and how to get and use an Android device’s location, try to integrate geocoding and get location address in both apps. Have fun coding, and share your challenges and successes in the comments below.
Источник


