- Mind The Robot
- Android™ Dev Insight
- Android Hacks: Scan Android classpath
- Action plan
- Code example
- Android Application Class
- Android Activity Lifecycle
- Android activity lifecycle is first thing to be known as android developer. Here I’m sharing with you some facts and…
- Understanding the Android Application Class
- How To Create New Java Class In Android Studio
- 1.How To Create New Java Class In Android Studio.
- 2. Java Class SMSBean Usage Example.
- Styles and Themes
- Themes versus Styles
- Create and apply a style
- Extend and customize a style
- Apply a style as a theme
- Style hierarchy
- TextAppearance
- Customize the default theme
- Add version-specific styles
- Customize widget styles
- Additional resources
- Blog posts
Mind The Robot
Android™ Dev Insight
Android Hacks: Scan Android classpath
Why scan the classpath? There are various patterns that are often used in enterprise Java applications that require scanning of classpath and getting the list of all classes that are present in the application.
For example, if you want to discover all classes with a certain annotation (such as @Component in Spring Framework) to process them in a special way, you need a way to go over all classes in your application and select some of them based on which annotations they have.
However, neither Java SE nor Android have built-in facilities to safely get the list of all classes in your application in runtime. The reason for that is the theory behind classloaders in Java – the ability to go over all classes is neither needed in classic OOP nor feasible for all theoretically possible classloader implementations. However, in practice, scanning classpath and discovering the classes you need is quite possible in most cases, both in your web app and on Android. This is always going to be more or less a hack, but if it has been useful in web applications, it can also be useful in Android apps – with some caution, of course.
Thus, in this article I will show and explain a piece of code that does exactly that – scans your classpath and gives you the ability to go over all classes in your app.
Action plan
So here’s how we could approach the problem of going over the set of application classes in runtime:
- We assume that Android PathClassLoader is used for classloading in your app.
- As you can see in the source above, the list of DEX files (typically one but theoretically more) that contain your app classes, is kept in the private field called mDexs. We can use invasive reflection to get the field value and thus the list of DEXs.
- Once we get the list of DEXs, we can use the API of the DexFile class to get the list of its entries (which are class names) and there you go.
As I said above, this plan is 90% hacking so we should take whatever assumptions we make with a grain of salt, and do as much error handling and checking as possible, if we actually choose to use this approach in a production app.
Now let’s write some code.
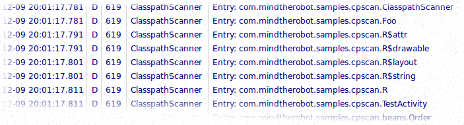
Code example
Say we have an annotation called Foo and few classes decorated with it:
Источник
Android Application Class

W hile Starting App development, we tend to miss out simple basic stuffs either by ignorance or by curiosity to build million dollar app. But, Hey! Why so serious !. Building a App is bit of Art ,bit of Engineering and frequently both.

Activity Life Cycle is stages of activity in run time, knowing these would save you from headaches while you dive deeper in development.
I have written a post that will help you to understand activity lifecycle in a practical approach. Check it out
Android Activity Lifecycle
Android activity lifecycle is first thing to be known as android developer. Here I’m sharing with you some facts and…
Application class is a base class of Android app containing components like Activities and Services. Application or its sub classes are instantiated before all the activities or any other application objects have been created in Android app.
You Don’t have to import or extend application class, they are predefined. We cannot change application class but we could give additional instruction to it by extending it. Refer here for more info.
Create a java class named SubApplication and Application as Superclass

By extending Application class you could get boilerplate code like this
Check in AndroidManifest.xml and set Application name to SubApplication that you created
Lets take a situation where we should know which activity is currently running and we have to use register network receiver in all our activities. To this we used to write same code in all the activities or write a base class and extend that class instead of extending AppCompactActivity.
We have Activity Life cycle in one hand and Application class in another, what sense they make? Well actually they do? Let’s look into it.
- In application class create static Activity variable it is accessible from whole project.
2. Register Activity Life Cycle callback in onCreate method in application class. By this step we can get currently running activity in our app from mActivity.
3.Moving on to next, Create a Broadcast Receiver and write a method to check the internet connection. you can get the code here .
4. Register your broadcast receiver in Manifest File
But for SDK Above Nougat we need to register receiver and unregister in every activity we use programmatically or We can just register and unregister Commonly in Application class.
5. Create a Object for Broadcast Receiver in application class and Register it in onResume method and Unregister in onPause method.
Bit confused! Don’t Worry, Here is the Link to the files.
Thanks for reading out the article. Let me know if I have missed out something interesting so that I can be added. Be sure to clap/recommend as much as you can and also share with your friends.
Источник
Understanding the Android Application Class
The Application class in Android is the base class within an Android app that contains all other components such as activities and services. The Application class, or any subclass of the Application class, is instantiated before any other class when the process for your application/package is created.

This class is primarily used for initialization of global state before the first Activity is displayed. Note that custom Application objects should be used carefully and are often not needed at all.
In many apps, there’s no need to work with an application class directly. However, there are a few acceptable uses of a custom application class:
- Specialized tasks that need to run before the creation of your first activity
- Global initialization that needs to be shared across all components (crash reporting, persistence)
- Static methods for easy access to static immutable data such as a shared network client object
Note that you should never store mutable shared data inside the Application object since that data might disappear or become invalid at any time. Instead, store any mutable shared data using persistence strategies such as files, SharedPreferences or SQLite .
If we do want a custom application class, we start by creating a new class which extends android.app.Application as follows:
And specify the android:name property in the the node in AndroidManifest.xml :
That’s all you should need to get started with your custom application.
There is always data and information that is needed in many places within your app. This might be a session token, the result of an expensive computation, etc. It might be tempting to use the application instance in order to avoid the overhead of passing objects between activities or keeping those in persistent storage.
However, you should never store mutable instance data inside the Application object because if you assume that your data will stay there, your application will inevitably crash at some point with a NullPointerException . The application object is not guaranteed to stay in memory forever, it will get killed. Contrary to popular belief, the app won’t be restarted from scratch. Android will create a new Application object and start the activity where the user was before to give the illusion that the application was never killed in the first place.
So how should we store shared application data? We should store shared data in one of the following ways:
- Explicitly pass the data to the Activity through the intent.
- Use one of the many ways to persist the data to disk.
Bottom Line: Storing data in the Application object is error-prone and can crash your app. Prefer storing your global data on disk if it is really needed later or explicitly pass to your activity in the intent’s extras.
Источник
How To Create New Java Class In Android Studio
In android development, the java class is commonly used to implement business logic processes such as database access, send emails, send short messages etc. We always use one java class to encapsulate some related functions.
So we can think java class as the Model role in the MVC pattern. This example will show you how to create a new java class in android studio, and we will create a SMSBean java class that will implement short message send and receives functions.
1.How To Create New Java Class In Android Studio.
- Launch Android Studio, create a new project. You can read the article How To Create New Android Studio Project to learn more.
- After that right-click the default package in the android studio Project View’s Android subview, then click the New —> Java Class menu item.
- You can also click the New —> Package menu item to create a new package or sub-package under exist package. In this example, we create a sub-package model under the existing com.dev2qa.example package.
- Then there will popup a dialog that will let you input java class-related information. Input class name SMSBean in the Name input text box, select Class in the Kind drop-down list, do not input any superclass, do not implement any interface. Input package name value such as com.dev2qa.example.model. Click the OK button.
- After clicking the OK button, the java class SMSBean has been created successfully. We will add two methods in it, one is sendSMS(), the other is receiveSMS(), please see code comments for detail.
2. Java Class SMSBean Usage Example.
This example will use SMSBean as a short messages manager object, it has two methods sendSMS() and receiveSMS().
The user interface of this example is not complex, there will have two buttons on the screen one is used to send short messages, the other is used to receive short messages. When you click any of the two buttons, an AlertDialog will pop up showing some messages.
If you can not watch the above video, you can see it on the youtube URL https://youtu.be/VhM3qIQkuD8
So if you want to run this example, you should create a new activity and layout XML files to implement the user interface. You can read the below articles if you do not know how to create activity and use event listener.
Источник
Styles and Themes
Styles and themes on Android allow you to separate the details of your app design from the UI structure and behavior, similar to stylesheets in web design.
A style is a collection of attributes that specify the appearance for a single View . A style can specify attributes such as font color, font size, background color, and much more.
A theme is a collection of attributes that’s applied to an entire app, activity, or view hierarchy—not just an individual view. When you apply a theme, every view in the app or activity applies each of the theme’s attributes that it supports. Themes can also apply styles to non-view elements, such as the status bar and window background.
Styles and themes are declared in a style resource file in res/values/ , usually named styles.xml .

Figure 1. Two themes applied to the same activity: Theme.AppCompat (left) and Theme.AppCompat.Light (right)
Themes versus Styles
Themes and styles have many similarities, but they are used for different purposes. Themes and styles have the same basic structure—a key-value pair which maps attributes to resources.
A specifies attributes for a particular type of view. For example, one style might specify a button’s attributes. Every attribute you specify in a style is an attribute you could set in the layout file. By extracting all the attributes to a style, it’s easy to use and maintain them across multiple widgets.
A defines a collection of named resources which can be referenced by styles, layouts, widgets, and so on. Themes assign semantic names, like colorPrimary , to Android resources.
Styles and themes are meant to work together. For example, you might have a style that specifies that one part of a button should be colorPrimary , and another part should be colorSecondary . The actual definitions of those colors is provided in the theme. When the device goes into night mode, your app can switch from its «light» theme to its «dark» theme, changing the values for all those resource names. You don’t need to change the styles, since the styles are using the semantic names and not specific color definitions.
For more information about how themes and styles work together, see the blog post Android Styling: Themes vs Styles.
Create and apply a style
To create a new style or theme, open your project’s res/values/styles.xml file. For each style you want to create, follow these steps:
You can apply the style to a view as follows:
Each attribute specified in the style is applied to that view if the view accepts it. The view simply ignores any attributes that it does not accept.
Note: Only the element to which you add the style attribute receives those style attributes—any child views do not apply the styles. If you want child views to inherit styles, instead apply the style with the android:theme attribute.
However, instead of applying a style to individual views, you’ll usually apply styles as a theme for your entire app, activity, or collection of views.
Extend and customize a style
When creating your own styles, you should always extend an existing style from the framework or support library so that you maintain compatibility with platform UI styles. To extend a style, specify the style you want to extend with the parent attribute. You can then override the inherited style attributes and add new ones.
For example, you can inherit the Android platform’s default text appearance and modify it as follows:
However, you should always inherit your core app styles from the Android Support Library. The styles in the support library provide compatibility with Android 4.0 (API level 14) and higher by optimizing each style for the UI attributes available in each version. The support library styles often have a name similar to the style from the platform, but with AppCompat included.
To inherit styles from a library or your own project, declare the parent style name without the @android:style/ part shown above. For example, the following example inherits text appearance styles from the support library:
You can also inherit styles (except those from the platform) by extending a style’s name with a dot notation, instead of using the parent attribute. That is, prefix the name of your style with the name of the style you want to inherit, separated by a period. You should usually do this only when extending your own styles, not styles from other libraries. For example, the following style inherits all styles from the GreenText style above and then increases the text size:
You can continue inheriting styles like this as many times as you’d like by chaining on more names.
Note: If you use the dot notation to extend a style, and you also include the parent attribute, then the parent styles override any styles inheritted through the dot notation.
To find which attributes you can declare with an tag, refer to the «XML attributes» table in the various class references. All views support XML attributes from the base View class, and many views add their own special attributes. For example, the TextView XML attributes includes the android:inputType attribute that you can apply to a text view that receives input, such as an EditText widget.
Apply a style as a theme
You can create a theme the same way you create styles. The difference is how you apply it: instead of applying a style with the style attribute on a view, you apply a theme with the android:theme attribute on either the tag or an tag in the AndroidManifest.xml file.
For example, here’s how to apply the Android Support Library’s material design «dark» theme to the whole app:
And here’s how to apply the «light» theme to just one activity:
Now every view in the app or activity applies the styles defined in the given theme. If a view supports only some of the attributes declared in the style, then it applies only those attributes and ignores the ones it does not support.
Beginning with Android 5.0 (API level 21) and Android Support Library v22.1, you can also specify the android:theme attribute to a view in your layout file. This modifies the theme for that view and any child views, which is useful for altering theme color palettes in a specific portion of your interface.
The previous examples show how to apply a theme such as Theme.AppCompat that’s supplied by the Android Support Library. But you’ll usually want to customize the theme to fit your app’s brand. The best way to do so is to extend these styles from the support library and override some of the attributes, as described in the next section.
Style hierarchy
Android provides a variety of ways to set attributes throughout your Android app. For example, you can set attributes directly in a layout, you can apply a style to a view, you can apply a theme to a layout, and you can even set attributes programmatically.
When choosing how to style your app, be mindful of Android’s style hierarchy. In general, you should use themes and styles as much as possible for consistency. If you’ve specified the same attributes in multiple places, the list below determines which attributes are ultimately applied. The list is ordered from highest precedence to lowest:
- Applying character- or paragraph-level styling via text spans to TextView -derived classes
- Applying attributes programmatically
- Applying individual attributes directly to a View
- Applying a style to a View
- Default styling
- Applying a theme to a collection of Views, an activity, or your entire app
- Applying certain View-specific styling, such as setting a TextAppearance on a TextView
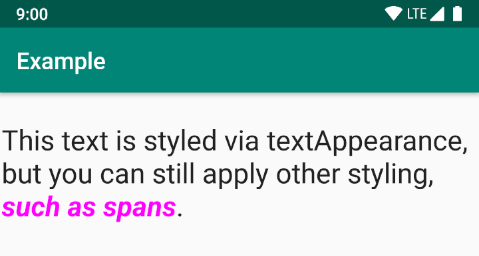
Figure 2. Styling from a span overrides styling from a textAppearance .
If you’re trying to style your app and not seeing the results you expect, it’s likely that other styling is overriding your changes. For example, if you apply a theme to your app, along with a style to an individual View , the style attributes would override any matching theme attributes for that View . Note, however, that any theme attributes that aren’t overridden by the style are still used.
TextAppearance
One limitation with styles is that you can apply only one style to a View . In a TextView , however, you can also specify a TextAppearance attribute which functions similarly to a style, as shown in the following example:
TextAppearance allows you to define text-specific styling while leaving a View ’s style available for other uses. Note, however, that if you define any text attributes directly on the View or in a style, those values would override the TextAppearance values.
TextAppearance supports a subset of styling attributes that TextView offers. For the full attribute list, see TextAppearance .
Some common TextView attributes not included are lineHeight[Multiplier|Extra] , lines , breakStrategy , and hyphenationFrequency . TextAppearance works at the character level and not the paragraph level, so attributes that affect the entire layout are not supported.
Customize the default theme
When you create a project with Android Studio, it applies a material design theme to your app by default, as defined in your project’s styles.xml file. This AppTheme style extends a theme from the support library and includes overrides for color attributes that are used by key UI elements, such as the app bar and the floating action button (if used). So you can quickly customize your app’s color design by updating the provided colors.
For example, your styles.xml file should look similar to this:
Notice that the style values are actually references to other color resources, defined in the project’s res/values/colors.xml file. So that’s the file you should edit to change the colors. But before you start changing these colors, preview your colors with the Material Color Tool. This tool helps you pick colors from the material palette and preview how they’ll look in an app.
Once you know your colors, update the values in res/values/colors.xml :
And then you can override whatever other styles you want. For example, you can change the activity background color as follows:
For a list of attributes you can use in your theme, see the table of attributes at R.styleable.Theme . And when adding styles for the views in your layout, you can also find attributes by looking at the «XML attributes» table in the view class references. For example, all views support XML attributes from the base View class.
Most attributes are applied to specific types of views, and some apply to all views. However, some theme attributes listed at R.styleable.Theme apply to the activity window, not the views in the layout. For example, windowBackground changes the window background and windowEnterTransition defines a transition animation to use when the activity starts (for details, see Start an Activity with an Animation).
The Android Support Library also provides other attributes you can use to customize your theme extended from Theme.AppCompat (such as the colorPrimary attribute shown above). These are best viewed in the library’s attrs.xml file
Note: Attribute names from the support library do not use the android: prefix. That’s used only for attributes from the Android framework.
There are also different themes available from the support library that you might want to extend instead of the ones shown above. The best place to see the available themes is the library’s themes.xml file.
Add version-specific styles
If a new version of Android adds theme attributes that you want to use, you can add them to your theme while still being compatible with old versions. All you need is another styles.xml file saved in a values directory that includes the resource version qualifier. For example:
Because the styles in the values/styles.xml file are available for all versions, your themes in values-v21/styles.xml can inherit them. As such, you can avoid duplicating styles by beginning with a «base» theme and then extending it in your version-specific styles.
For example, to declare window transitions for Android 5.0 (API level 21) and higher, you need to use some new attributes. So your base theme in res/values/styles.xml could look like this:
Now you can apply AppTheme in your manifest file and the system selects the styles available for each system version.
For more information about using alternative resources for different devices, read Providing Resources.
Customize widget styles
Every widget in the framework and support library has a default style. For example, when you style your app using a theme from the support library, an instance of Button is styled using the Widget.AppCompat.Button style. If you’d like to apply a different widget style to a button, then you can do so with the style attribute in your layout file. For example, the following applies the library’s borderless button style:
And if you want to apply this style to all buttons, you can declare it in your theme’s buttonStyle as follows:
You can also extend widget styles, just like extending any other style, and then apply your custom widget style in your layout or in your theme.
Additional resources
To learn more about themes and styles, see the following additional resources:
Blog posts
Content and code samples on this page are subject to the licenses described in the Content License. Java is a registered trademark of Oracle and/or its affiliates.
Источник


