- Android get all countries
- About
- Android get all countries
- About
- Android Locale – Get Locale Name And Country Code
- Get All Details from Contacts in ANDROID.
- More Similar Posts
- 30 thoughts on “ Get All Details from Contacts in ANDROID. ”
- How To : Easily Change Your Play Store Country to Download Region-Locked Apps & Games
- Before You Begin
- Step 1: Clear Data on the Google Play Store App
- Step 2: Change Your Phone’s IP with Your VPN App
- Step 3: Change Play Store Country
- Payment Info Workaround: Add a New Account
Android get all countries
World Country Data, flags, currency and more — an open source android library for getting country flags and other country attributes


![]()
An Android library that contains ‘all’ the flags of the countries of the world This is to be used for android projects where the developer is interested in getting the flag of a particular country for any reason.
- A flag is obtained as a drawable resource (int).
- A flag can be set to an ImageView using XML
- There is possibility to get all the countries and their flags by invoking just two methods.
- Android minSDKversion = 15
- Android targetSDKversion = 30
- Add JitPack in your repository build file build.gradle (Project appname)
2.1 Add the dependency in your build.gradle (Module: app)
Replace $version with vXXX for the most stable version you want to use see releases
2.2 Add this in your proguard-rules.pro
2.3 In your build.gradle (Module: app)
Build your project (and make sure gradle has successfully synced) Buid >> Clean Project, Build >> Rebuild Project
Load all the flags of the world by calling. Do this once in the application context.
This inititializes the data. All countries are read, and their flags loaded
- Get the flag of a country(dynamically)
- You can get the flag of a country by using the two iso alpha2 or alpha3 or the country name or the numeric code.
- You can hard-code the country flag if you know the alpha2 code of the country. Eg. to set the flag of Sweden, you could do
- In java code, you could statically do same as
- Get a Country with attributes like «id»:4,»name»:»Afghanistan»,»alpha2″:»af»,»alpha3″:»afg», flag:imageResource»
- Get a list of all the countries with their identifiers
- Get list of countries from a continent
All the steps above are demonstrated in this project —> world country flag demo
 |
|---|
| Live retrieval of Country data |
Get this sample app in the playstore 
Data sources for the project
All country flags
Most of the flags came from flagpedia.net. This site does not contain all the countries in the world so some where downloaded from wikipedia after quering the country name
Countries and their iso alpha values
All country names were download from Geonames using a Python project written by Bernard Longho aka @blongho. Check it out Countries data by blongho
Getting different dimensions of the flags
Some guys from Egypt made some awesome App icon generator which generates android drawables as well as iOS images(if you want) in different dimensions. It is super fast and can do batch processing of images.
Please feel free to add more flags or modify any thing that would make this library more useful. The various ways of contribution are specified in CONTRIBUTING.md
Feel free to contact me to discuss anything related to development in particular and life in general.
About
Android library for country flag, currency, and other country information
Источник
Android get all countries
Provides country codes in accordance with ISO-3166-1 and localized names for each country
- Create a new library project from this repository and reference it in your project
Custom country preference in your PreferenceActivity
Add the following code to your XML for the preferences. The class CountryPreference extends ListPreference and has the same appearance. It ignores the attributes android:entries , android:entryValues , android:defaultValue and android:summary because it comes with its own implementation for those.
Be sure to set android:key to the preference key that you want to store the country code in. For android:title , provide a value from your string resources, for example, which will be used as the preference’s caption.
Retrieving a list of all supported short codes
Retrieving a list of all supported full names
Getting a country’s full name by its short code
Adding new countries
- Create a new entry at the end of the string array countries_list_machine in res/values/short_codes.xml
- Add the full name of the country (at least for English) to our platform for managed translations
- Create a new entry at the end of the string array countries_list_human in res/values/full_names.xml , referencing the new country_xxx resource that has just been submitted in the step before
Translating country names
If you want to translate existing country names, please do so on our platform for managed translations.
About
Provides country codes in accordance with ISO-3166-1 and localized names for each country
Источник
Android Locale – Get Locale Name And Country Code
Hi and welcome to another tutorial from Codingdemos, today you will learn about Android locale API and how you can use it inside your app to get default locale and country code.
By the end of this tutorial, you will have an app that looks like this. (Large preview)
In this tutorial we will be using the following:
- – Android studio version 3.0.1
– Android emulator Nexus 5X with API 26
– Minimum SDK API 16
1- Open up Android Studio and open any project that you have in your computer.
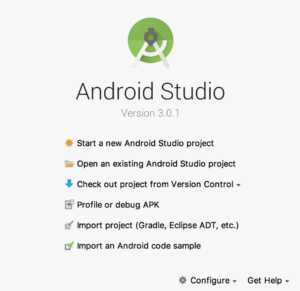
Create new Android Studio project or open existing project. (Large preview)
2- Open up activity_main.xml file, inside this file you will add 2 Android TextView to show language name and code and make sure to set the text size for these 2 TextView to 30sp.
3- The full code for activity_main.xml file will look like this:
4- Next open up MainActivity.java file, here you need to reference those 2 Android TextView which you have added them inside activity_main.xml file.
5- Now you will get to work with Android Locale API, add the following code below Android TextView code.
Here you use ConfigurationCompat which is a helper class to be able to have access to the configuration in backward compatibility, then you get the list of Android locale by using getLocales and finally you will use Resources to be able to access the system configuration of the Android device.
6- After initializing Locale, you will now be able to get the language name and code from Android device. Add the following code below Locale initialization.
Here you have initialized languageName textview with Locale properties.
You will use locale.getDisplayName() to get the language name that is currently being used in your Android device.
7- Build and run the app to see the output.
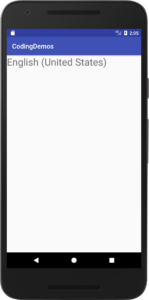
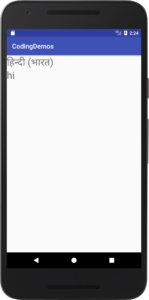
Using Android Locale to get language name. (Large preview)
8- Now initialize languageCode with Android Locale properties, so add the following code below languageName.
Here you use locale.getLanguage() to get the Android Locale country code of the language that is currently being used in your Android device.
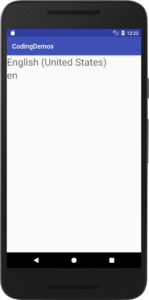
9- Build and run the app to see the progress.
Getting Android Locale country code. (Large preview)
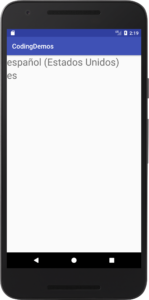
10- When you change the language of your Android device it will apply to the app as well, for example if you change your device language to Spanish you will get the following output.
11- The full code for MainActivity.java file will look like this.
12- I hope you find this tutorial helpful and if you have any question please post them in the comment below.
Источник
Get All Details from Contacts in ANDROID.
In today’s post I will show you how to get all information from the ANDROID Contacts programatically.
Just copy and paste this code to your mail java file and check the Logcat for output.
Note : Make sure you add this permission to the AndroidManifest File.
Download the complete android java source code from the link below.
How to add and delete contacts programatically. keep visiting coderzheaven….
Some of the posts you want to see are located here
Please leave your valuable comments on this post.
More Similar Posts
30 thoughts on “ Get All Details from Contacts in ANDROID. ”
The ONLY resource that worked. I’ve been Googling this problem for days. Most useful and accurate “tutorial”, if you will.
thanks a lot man works like a charm….
and easy to understand the coding……
🙂
Facing difficulty while i was copying this code for testing. Can you please post the downloadable example.
Hi paresh, I have added the source code below. please check.
Thanks a lot sir. Its a very detailed and accurate tutorial
hi,I am using your code to get contacts of android.i am taking the contact no.and name but it works very slow on real device.the screen turns black and then shows the contact after a while.
what is the problem.please help me
how to get images from contact list.
please tell me…..
OK Manish I will check that and reply.
But with this code u program run very slowly i had run 1 contacts with 348 contact not full details, this code take > 1m. How to improve effective? I need idea! thanks.
oahdshai Thanks for the information.
how do you get the contact number?
Hi Lance :-
Check this line
String phone = pCur.getString( pCur.getColumnIndex(ContactsContract.CommonDataKinds.Phone.NUMBER));
System.out.println(“phone” + phone); // printing the phone number-> check Logcat
great tutorial dude .
great tutorial…..
I am getting all contact from the phone, after that i display only number to textview, first time i pick the contact and can display to the textview.then getting another contact, but it cannot be change the previous selected one. always show the first selected contact.
Plz help me, Thanks in advance……….
But how to show all contacts with all details in List ??
You could just create an adapter for the listview with the widgets you want and assign values using the adapter.
hi myself praveen
i lost my mobile last week i need the all contacts # when i was using WIFI the contacts will synchronization to mail. There is any way is there to get my contacts through mail id
Its really awesome…
Thanks Man, For great tutorial. Could you guide me to Get and Add Relationship From and to contacts ?
hi.
my language is not English.
I want to learn android program.
I need cods that send contacts to email.
can you help me?
thank you.
Hi James
I am not able to get the list. The app is running smooth but not displaying any contacts.
What to do?
Thanks
Namaskar ,
Nice code works well
thanks
Nandish Patil
Hmm it seems like your blog ate my first comment
(it was super long) so I guess I’ll just sum it up what I
had written and say, I’m thoroughly enjoying your blog.
I too am an aspiring blog writer but I’m still new to everything.
Do you have any points for newbie blog writers? I’d definitely appreciate it.
hello i really liked your tutorial, you almost provide everything from contact but i need one more thing i.e event like birth day and website.
Thanks in advance. liked
Источник
How To : Easily Change Your Play Store Country to Download Region-Locked Apps & Games
What you see when you open the Play Store is completely dependent on your country settings. Search results and top charts are specific to each region and there are lots of popular apps and games that simply won’t show up unless your Play Store country matches up.
Until recently, changing these settings was an exercise in frustration. As someone who has had to move back and forth between the US and Europe, I can attest to that. Thankfully, the process is far easier today, as the Play Store has been updated to include country and profiles options that will appear once your IP address changes.
There are a few caveats, however, as Google is now limiting the number of times you can change country to once per year and, technically, you’ll have to visit another country in order to trigger a change of IP address. That’s all well and good if you’ve actually moved abroad, but if you’re still at home, you’ll have to use some creative tricks to get around these restrictions. Firstly, by changing your phone’s IP address with a VPN service.
Before You Begin
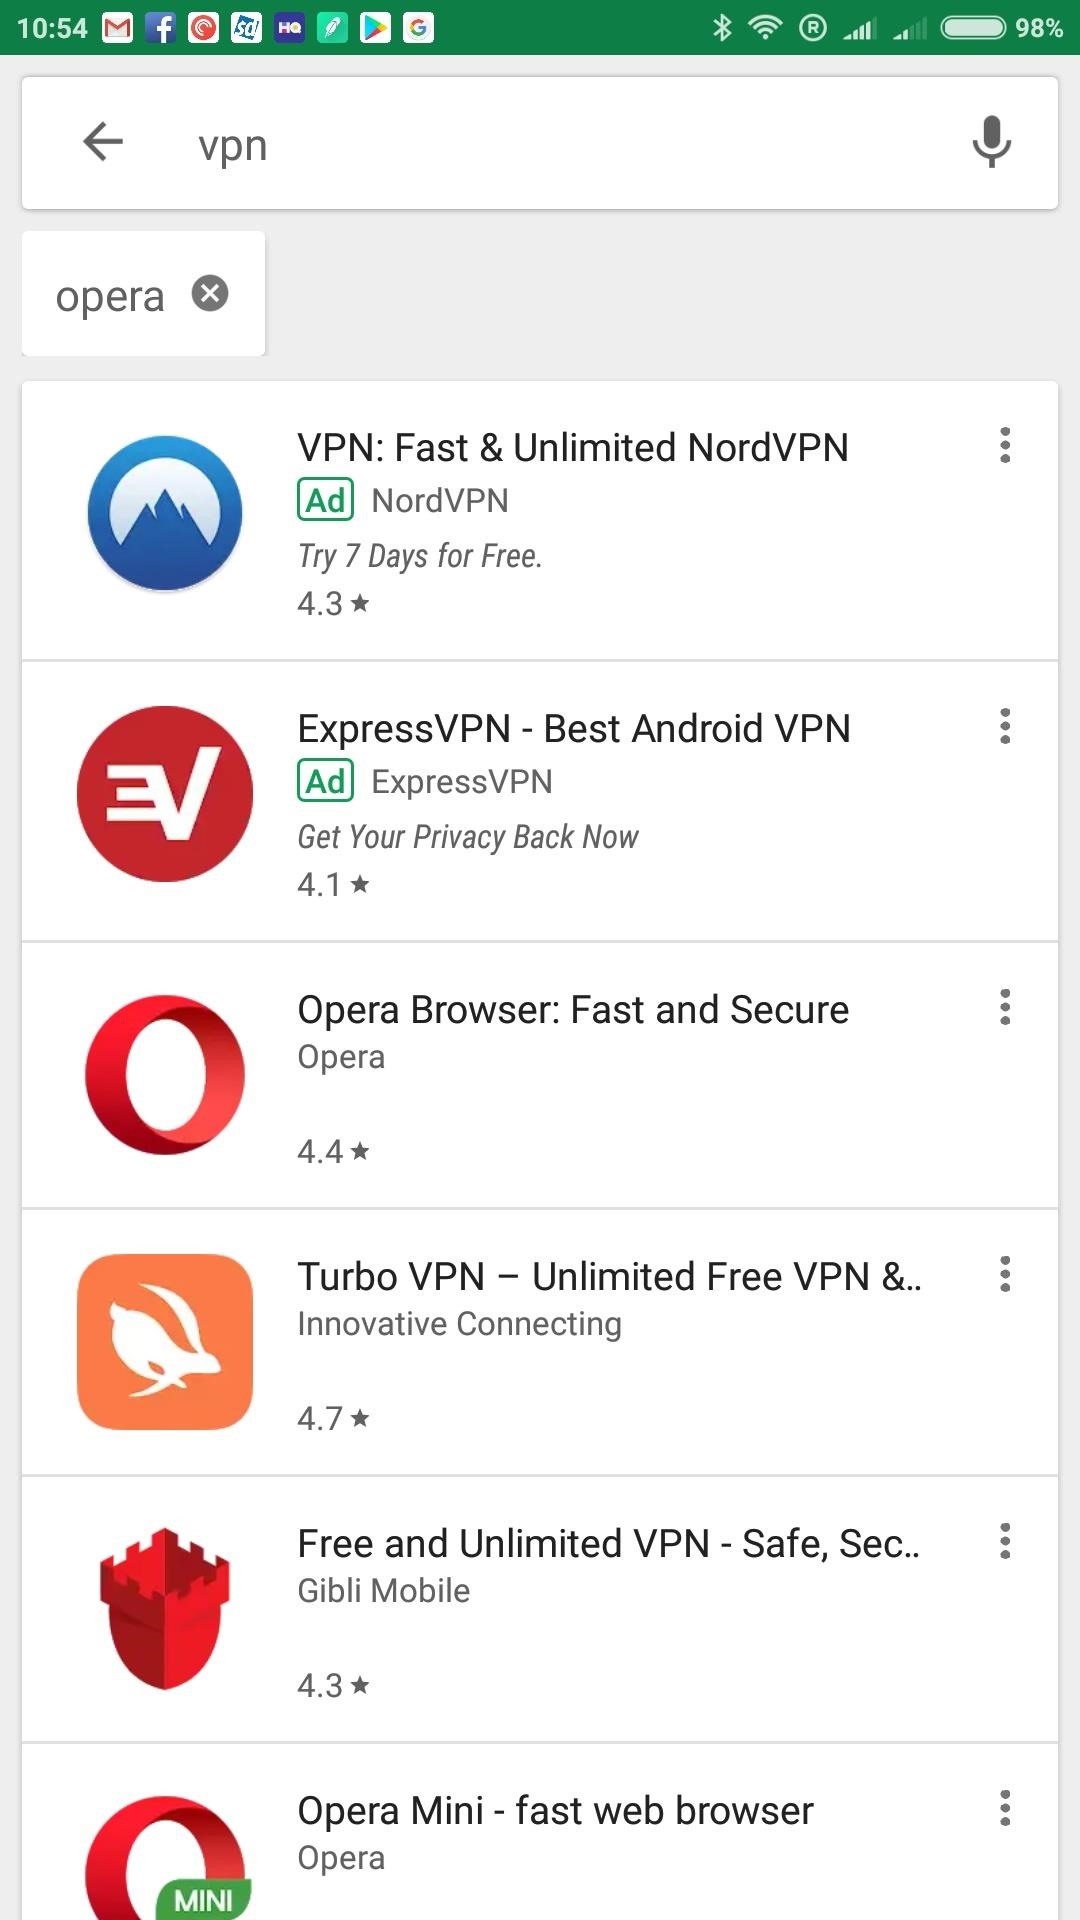
If you are already in the country you wish to set as your Play Store location, lucky you! You can jump all the way to Step 3. Otherwise, you’ll need to download a VPN application. There are hundreds of great options for Android, but I opted for the VPN Melon app, which can be downloaded for free via the link below.

Step 1: Clear Data on the Google Play Store App
Open your Settings app and select «Apps.» The menu name may be different depending on your phone’s Android version, so if you don’t see «Apps,» look for something similar like «Apps & notifications» or «Applications.» From there, tap the drop-down menu at the top of the screen and choose «All apps» to show system apps as well.
With all apps now visible, scroll until you find the Play Store app (which may also go by Google Play Store), then select it. Tap «Force stop» at the top of the next page, then press the «Clear Data» button to clear the cache and data.

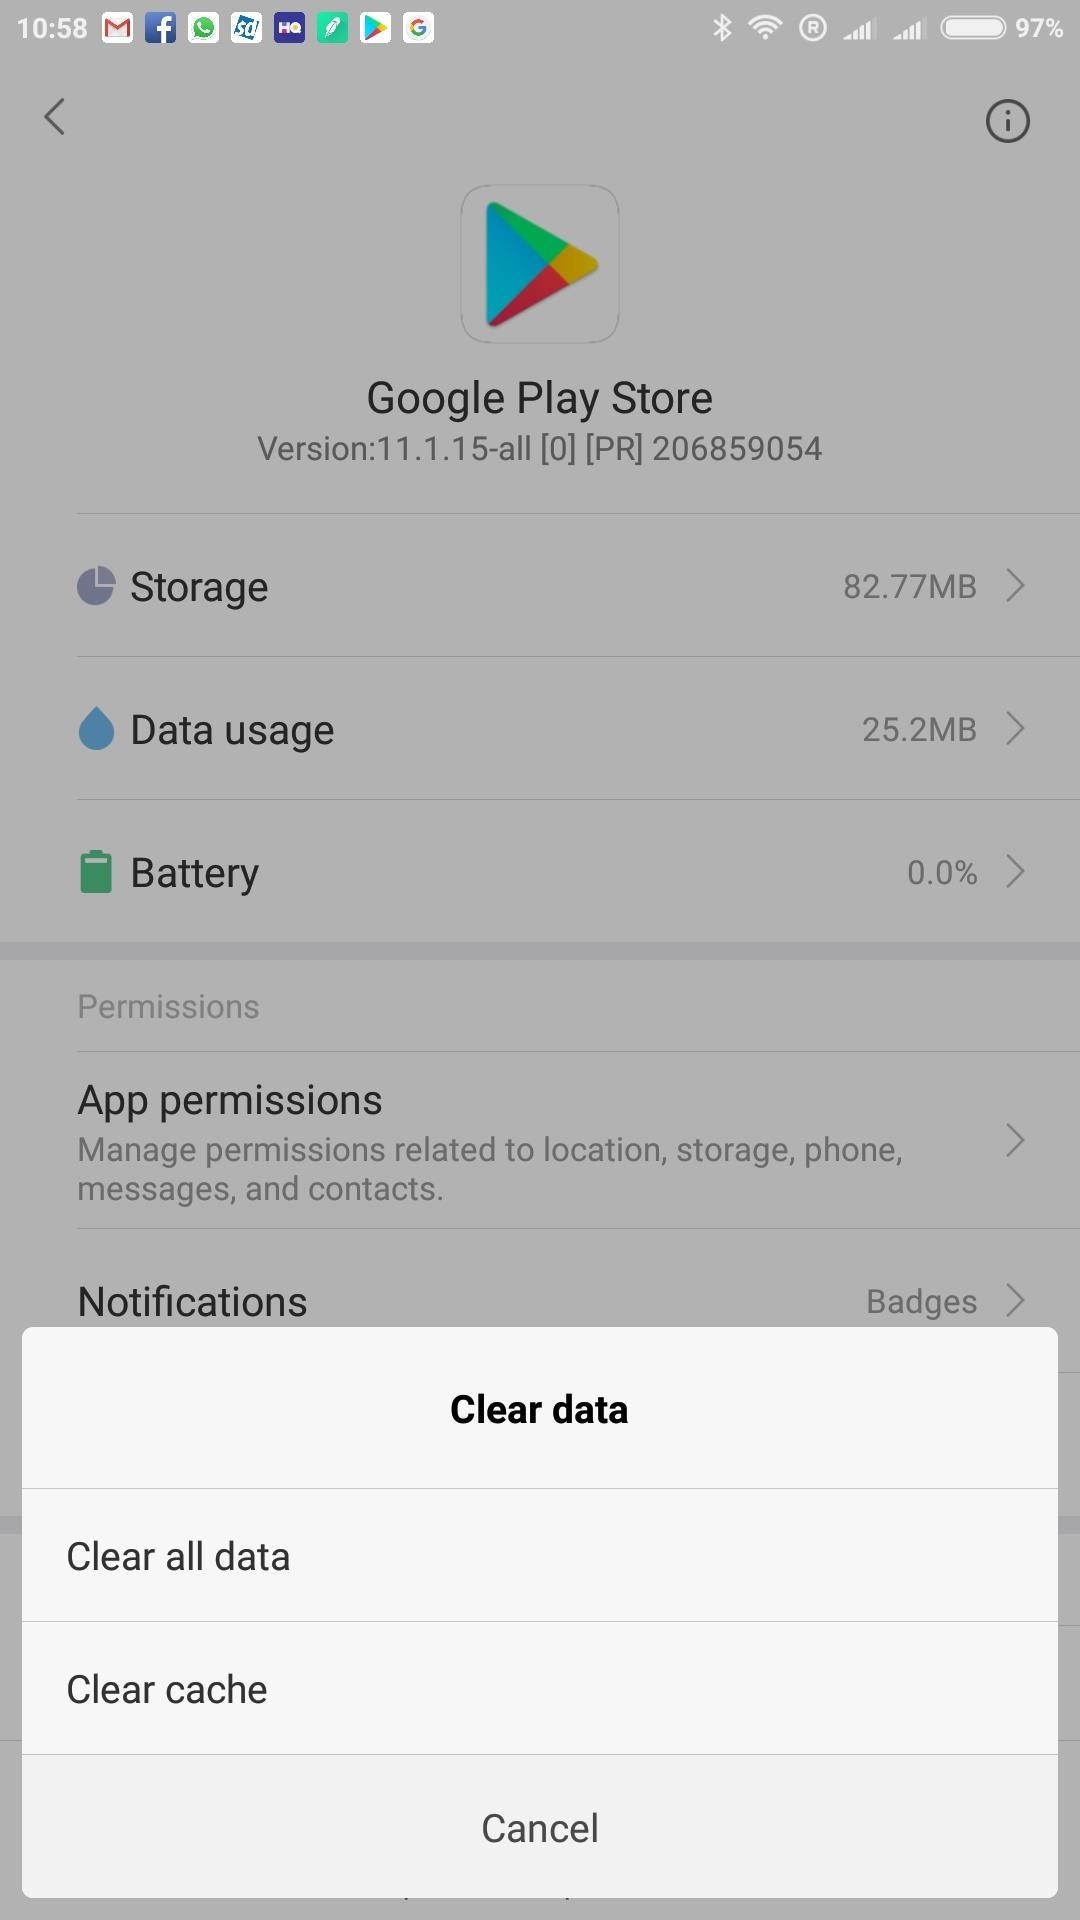
We aren’t actually deleting anything here, don’t worry! This process simply resets the application so that it will update your country the next time it’s opened.
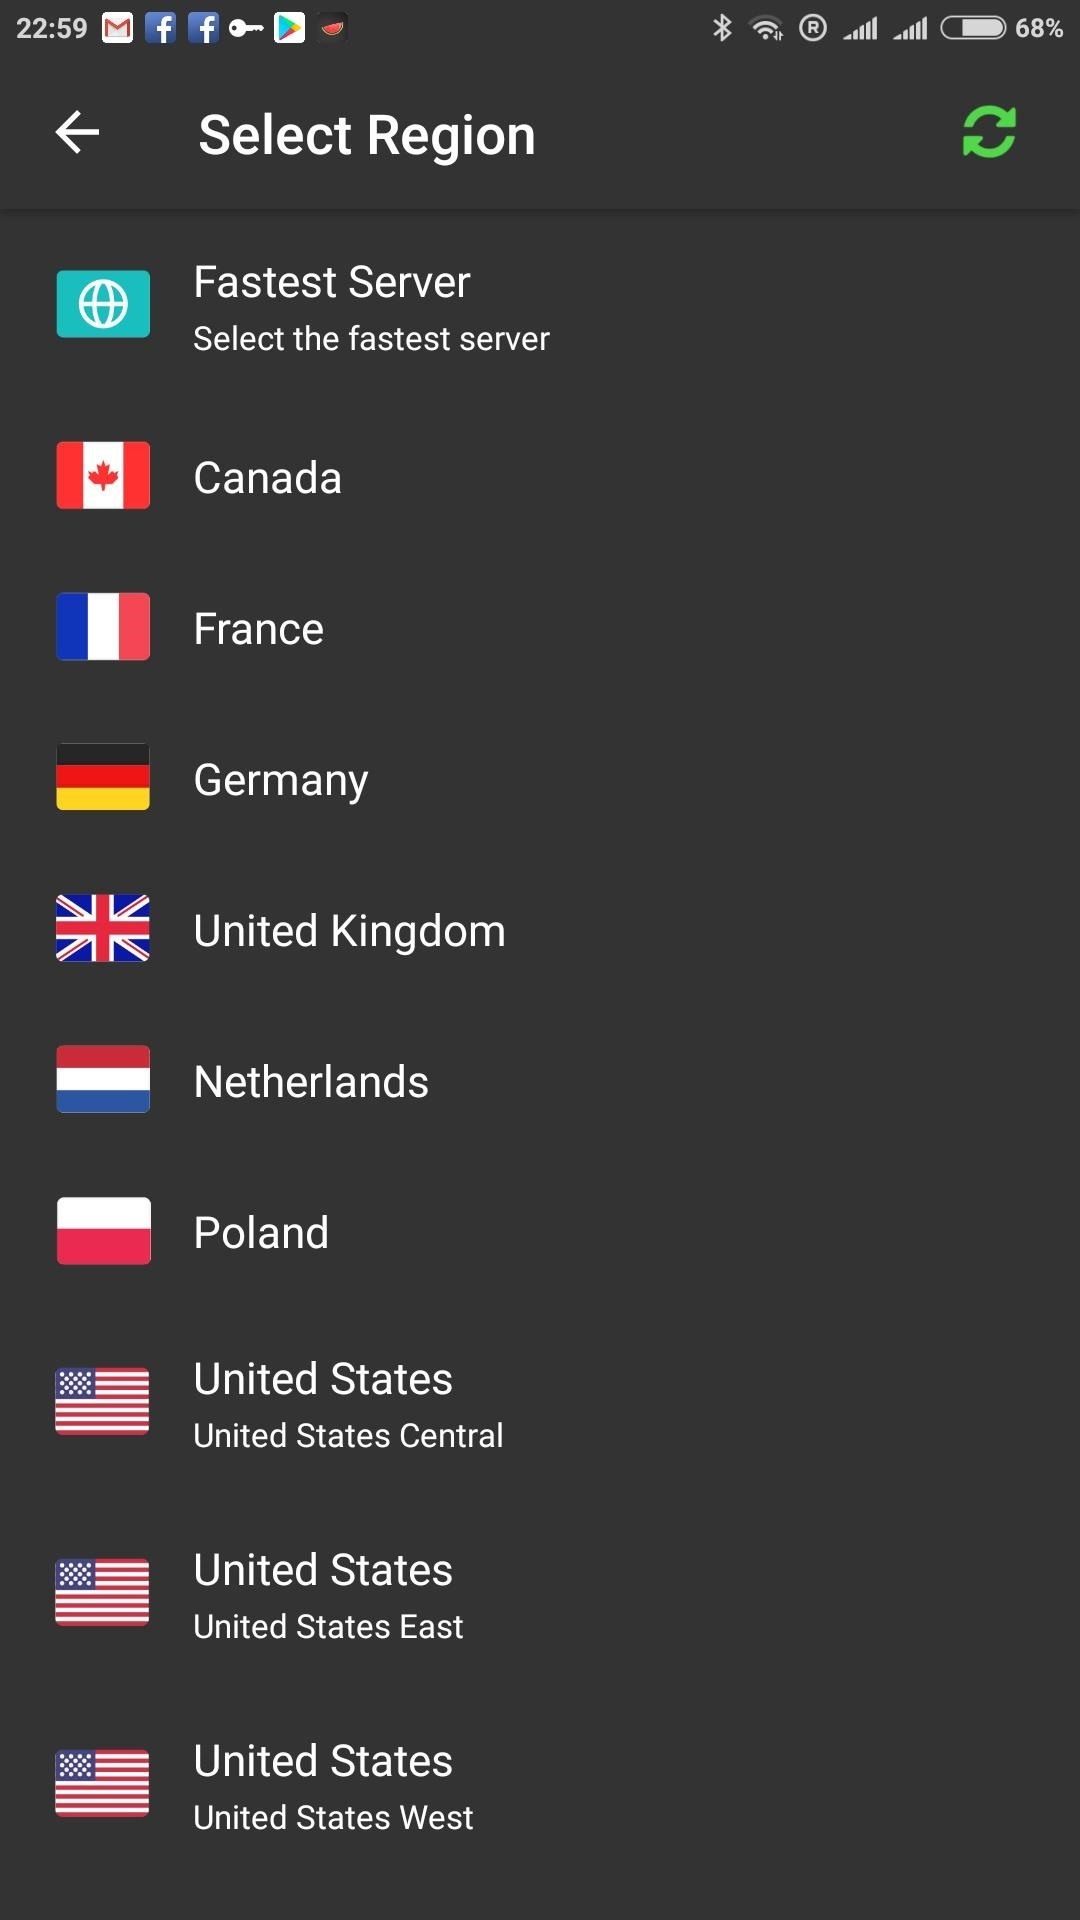
Step 2: Change Your Phone’s IP with Your VPN App
Open your preferred VPN application. In my case, that’s Melon VPN. As you’ll see in the image below, Melon VPN keeps things simple, as it opens with a list of servers that have been labelled according to country name and respective flag.
Select the country you wish to set as your new Play Store location, and once connected, you’re ready to move on.
Step 3: Change Play Store Country
When you open the Play Store application, you’ll be able to tell if your country settings have already changed by searching for a region-specific app, or by checking the price of a paid application. If the app shows up, or you’re now seeing prices listed in a foreign currency, that’s it! Your change of country has been successful.
If no changes appear to have been made, however, you may need to update things manually. To do so, swipe in from the left edge of your screen, tap «Account,» and select «Country and Profiles.» You should now see both your default country and the new country you have either moved to or selected via your VPN service. Tap it and you’ll be prompted to enter a local payment to confirm the change.
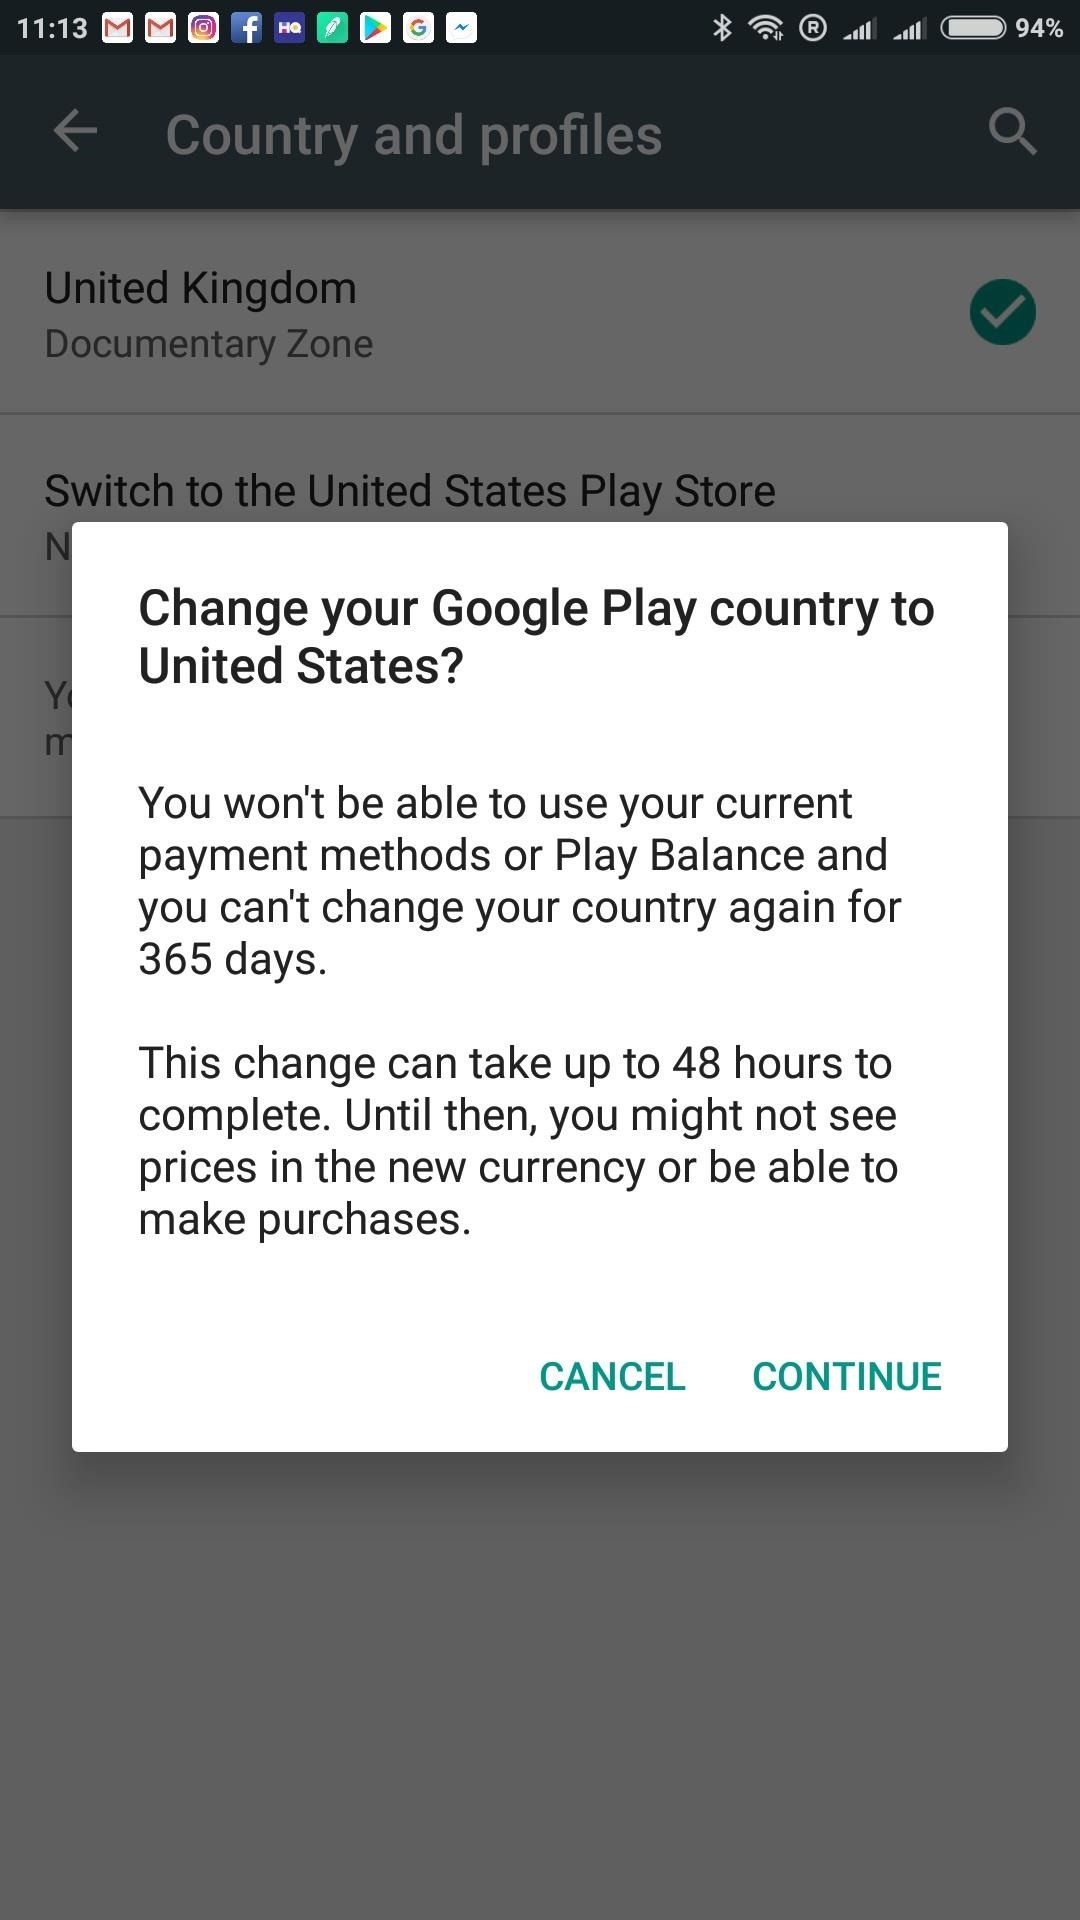
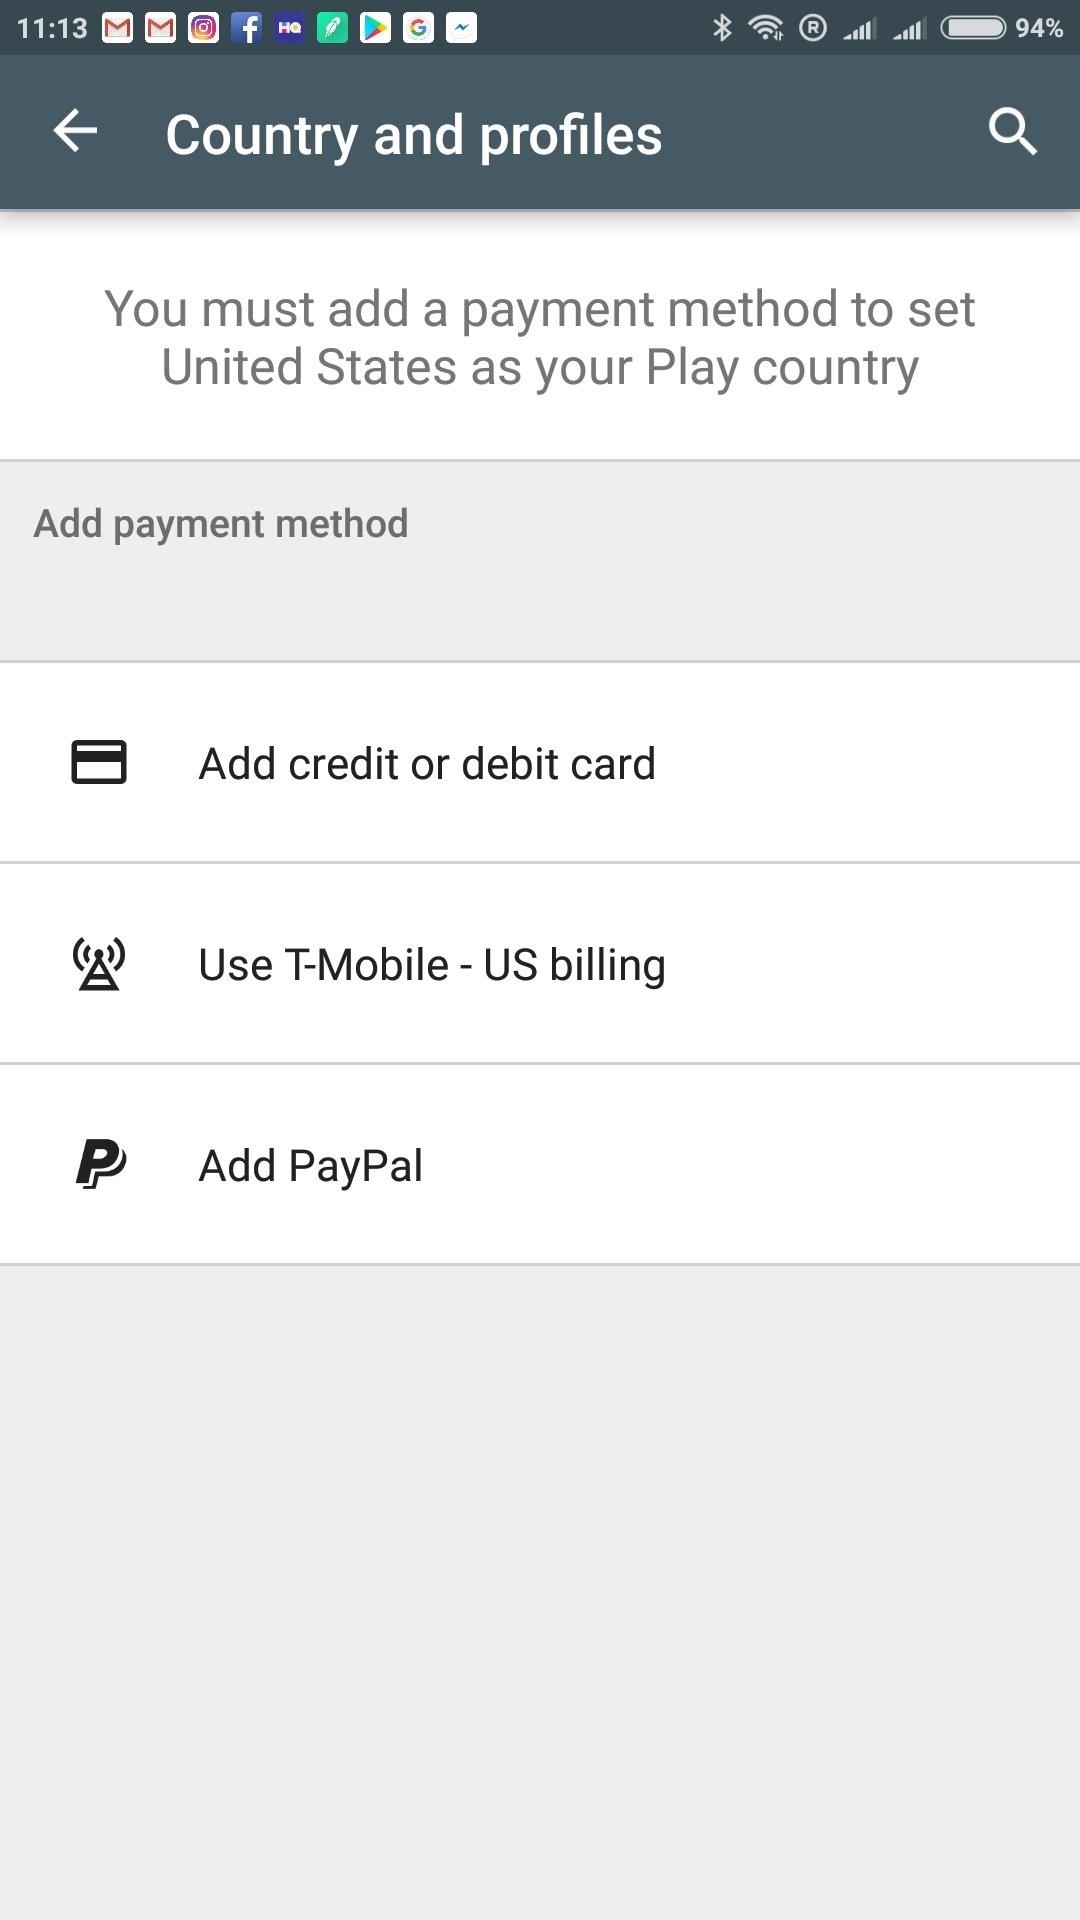
If you are unable to provide a new payment method, you can get around this restriction by following the steps outlined below.
Payment Info Workaround: Add a New Account
You’ll only be asked to provide a local payment method for your selected country if your account has been set up with an existing payment profile. You can take advantage of this by either creating a new Google account, or by adding an additional account that has no payment method on file.
Once you’ve added the account, swipe from the left edge of the screen while in the Play Store app and select the new account from the drop-down menu at the top, then repeat steps one and two of this guide. When you launch the Play Store again, you should find that country has now been changed.
There’s an added benefit to using multiple accounts, as you can keep each one on your device and switch back and forth between different Play Store countries, without having to worry about the limit Google imposes on changing your main account’s country settings.
On my own device, for example, I have one account set to use the Irish store, another for the US store, and a third for the UK store. Switching between them is easy, and once an app has been downloaded, it can be used by any account, regardless of its country settings.
Keep Your Connection Secure Without a Monthly Bill. Get a lifetime subscription to VPN Unlimited for all your devices with a one-time purchase from the new Gadget Hacks Shop, and watch Hulu or Netflix without regional restrictions, increase security when browsing on public networks, and more.
Источник


