- Using local.properties file to avoid API Keys check-in into Version Control System
- Android get all properties
- About
- Understanding the Android Application Class
- Build Your First Android App in Java
- 1. Welcome!
- What you must know already
- What you’ll learn
- Use Android Studio and Java to write Android apps
- Note: This version of the codelab requires Android Studio 3.6 or higher.
- 2. Install Android Studio
- Note: This version of the codelab requires Android Studio 3.6 or higher.
- 3. Task: Create your first project
- What you’ll learn
- Step 1: Create a new project
- Step 2: Get your screen set up
- Step 3: Explore the project structure and layout
- Step 4: Create a virtual device (emulator)
- Step 5: Run your app on your new emulator
Using local.properties file to avoid API Keys check-in into Version Control System
One of the best benefits of being an Android Developer is that we can create and contribute to open source projects! We can share our code with millions of developers around the globe. Thanks to code hosting platforms like GitHub!
Now, when we make our code available as public repositories, we should ensure we take care of some things such as the sharing of private API keys, restricted URLs, etc., How can we achieve this by using the “local.properties” file in our root project? Let’s find out in this article.
Welcome to our MindOrks blog on Using local.properties file to avoid API Keys check-in into Version Control System.
Every time, we create a new project in Android Studio, we see a file created with the name “local.properties” containing the following content:
So local.properties is a file that is generated by Android Studio and it is recommended not to include this in the version control system.
So, if we take a look at our gitignore files in general, we have:
We can see that local.properties file is excluded in the version control system.
Tip: Updating the gitignore files with the relevant extensions and file folders is really important for creating an open-source project. Since the “local.properties” file is not shared in the version control system, we can use this for declaring our local user-specific variables or private variables such as API keys or restricted base URLs, etc.,
Let’s take a use case. Let’s consider our recently released open-source project on GitHub:
This project helps to build a ride-sharing Android Taxi Clone App like Uber, Lyft. You can fork it and learn many awesome functionalities. Please go through the Readme file for details of the project.
Now, since our use case is a ride-sharing application, we will be using google maps in it. To use Google Maps, the developer should have an associated API Key. Let’s see how we can achieve this by using “local.properties” file.
First of all, let’s append a parameter in the local.properties file:
Now, let’s extract this value and use it in our app-level Gradle file through a variable.
In order to access our API key, we can use:
There are some files that get generated during build time such as gradleResValues.xml, BuildConfig.java, etc. Let’s make the use of these files to store the value of our API key. How can we add values to files that are generated during the build process? We shall use our buildTypes section in our app-level build.gradle file
Now once we add this in our build.gradle file, we rebuild our project and we can see a file named gradleResValues.xml is generated in the res(generated) folder.
In order to use this value inside the application, we can try extracting the values like follows:
If we wish to store the value in the BuildConfig.java file, we can replace the resValue with buildConfigField in the app-level build.gradle file as follows:
After changing the build.gradle file, let’s rebuild the project and take a look at our BuildConfig.java file:
Now, we can access this parameter anywhere in the code like
Источник
Android get all properties
Android @Properties
![]()

This lib provides a simple way to read a .properties from assets folder.
You just have to extends from AssetsProperties and use @Property annotation to invoke the automatic property mapping.
It’s very simple with gradle 😉
Add mavenCentral as repository source:
And finnaly add this line inside dependencies < >section:
The + symbol indicates to gradle to get the latest version.
- See the sample if there are any doubts.
Super simple usage 😉
Android Properties can parse String , int , float , double and boolean values from file .properties .
Create a class that represents your file properties and extend from AssetsProperties class.
assets/config.properties
Config.java
You must use @Property annotation to map field as property field from file. Pass the name of property if it’s different from the field name in class.
Read another file properties
The default file for properties is called config.properties but if you need to read another file properties, just pass the name of file in the constructor:
Map property name
The @Property annotation uses the name of field as name of property field in file. So if the field name is diferent of the name in file, just pass the name of property by @Property(«property_name») .
Useful public methods
If you do not want to use @Property annotation or need only a reader property class you can use some public methods from AssetsProperties :
If the AssetsProperties can’t read the key then the defaultValue will be returned.
There are a simple test for the rating dialog. If you want to contribute check the tests too.
You must open an emulator before.
Licensed under the Apache License, Version 2.0 (the «License»); you may not use this file except in compliance with the License. You may obtain a copy of the License at
Unless required by applicable law or agreed to in writing, software distributed under the License is distributed on an «AS IS» BASIS, WITHOUT WARRANTIES OR CONDITIONS OF ANY KIND, either express or implied. See the License for the specific language governing permissions and limitations under the License.
About
Android Library for reading properties file stored in assets folder
Источник
Understanding the Android Application Class
The Application class in Android is the base class within an Android app that contains all other components such as activities and services. The Application class, or any subclass of the Application class, is instantiated before any other class when the process for your application/package is created.

This class is primarily used for initialization of global state before the first Activity is displayed. Note that custom Application objects should be used carefully and are often not needed at all.
In many apps, there’s no need to work with an application class directly. However, there are a few acceptable uses of a custom application class:
- Specialized tasks that need to run before the creation of your first activity
- Global initialization that needs to be shared across all components (crash reporting, persistence)
- Static methods for easy access to static immutable data such as a shared network client object
Note that you should never store mutable shared data inside the Application object since that data might disappear or become invalid at any time. Instead, store any mutable shared data using persistence strategies such as files, SharedPreferences or SQLite .
If we do want a custom application class, we start by creating a new class which extends android.app.Application as follows:
And specify the android:name property in the the node in AndroidManifest.xml :
That’s all you should need to get started with your custom application.
There is always data and information that is needed in many places within your app. This might be a session token, the result of an expensive computation, etc. It might be tempting to use the application instance in order to avoid the overhead of passing objects between activities or keeping those in persistent storage.
However, you should never store mutable instance data inside the Application object because if you assume that your data will stay there, your application will inevitably crash at some point with a NullPointerException . The application object is not guaranteed to stay in memory forever, it will get killed. Contrary to popular belief, the app won’t be restarted from scratch. Android will create a new Application object and start the activity where the user was before to give the illusion that the application was never killed in the first place.
So how should we store shared application data? We should store shared data in one of the following ways:
- Explicitly pass the data to the Activity through the intent.
- Use one of the many ways to persist the data to disk.
Bottom Line: Storing data in the Application object is error-prone and can crash your app. Prefer storing your global data on disk if it is really needed later or explicitly pass to your activity in the intent’s extras.
Источник
Build Your First Android App in Java
1. Welcome!
In this codelab, you’ll learn how to build and run your first Android app in the Java programming language. (If you’re looking for the Kotlin version of this codelab, you can go here.)
What you must know already
This codelab is written for programmers and assumes that you know either the Java or Kotlin programming language. If you are an experienced programmer and adept at reading code, you will likely be able to follow this codelab, even if you don’t have much experience with Java.
What you’ll learn
- How to use Android Studio to build your app.
- How to run your app on a device or in the emulator.
- How to add interactive buttons.
- How to display a second screen when a button is pressed.
Use Android Studio and Java to write Android apps
You write Android apps in the Java programming language using an IDE called Android Studio. Based on JetBrains’ IntelliJ IDEA software, Android Studio is an IDE designed specifically for Android development.
Note: This version of the codelab requires Android Studio 3.6 or higher.
To work through this codelab, you will need a computer that can run Android Studio 3.6 or higher (or already has Android Studio 3.6 or higher installed).
2. Install Android Studio
Note: This version of the codelab requires Android Studio 3.6 or higher.
You can download Android Studio 3.6 from the Android Studio page.
Android Studio provides a complete IDE, including an advanced code editor and app templates. It also contains tools for development, debugging, testing, and performance that make it faster and easier to develop apps. You can use Android Studio to test your apps with a large range of preconfigured emulators, or on your own mobile device. You can also build production apps and publish apps on the Google Play store.
Note: Android Studio is continually being improved. For the latest information on system requirements and installation instructions, see the Android Studio download page.
Android Studio is available for computers running Windows or Linux, and for Macs running macOS. The OpenJDK (Java Development Kit) is bundled with Android Studio.
The installation is similar for all platforms. Any differences are noted below.
- Navigate to the Android Studio download page and follow the instructions to download and install Android Studio.
- Accept the default configurations for all steps, and ensure that all components are selected for installation.
- After the install is complete, the setup wizard downloads and installs additional components, including the Android SDK. Be patient, because this process might take some time, depending on your internet speed.
- When the installation completes, Android Studio starts, and you are ready to create your first project.
Troubleshooting: If you run into problems with your installation, see the Android Studio release notes or Troubleshoot Android Studio.
3. Task: Create your first project
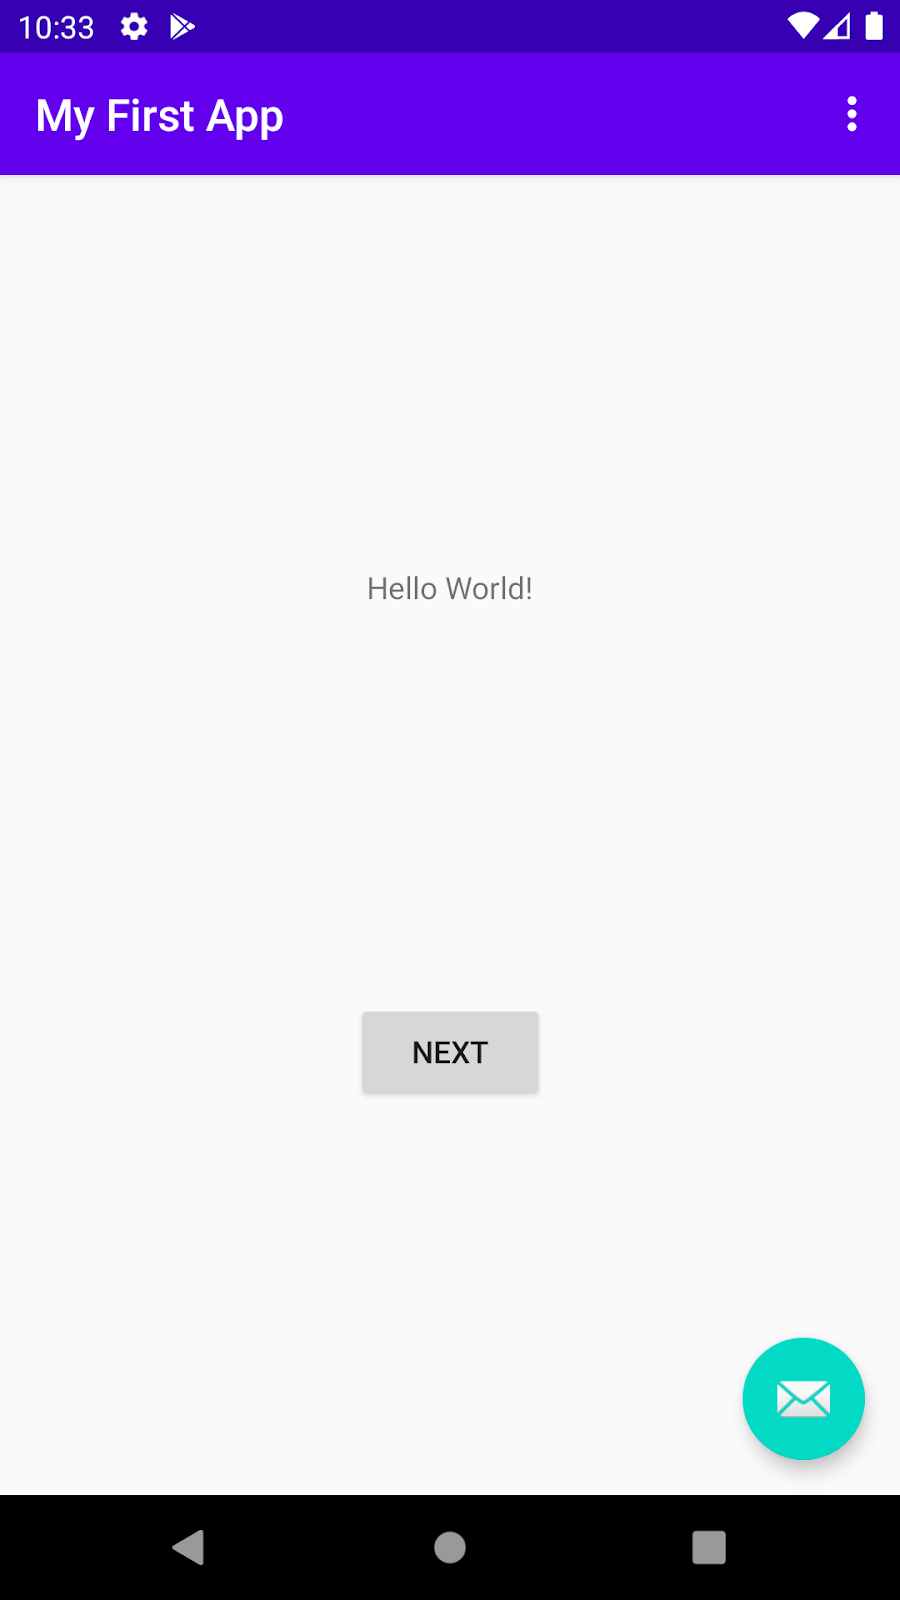
In this step, you will create a new Android project for your first app. This simple app displays the string «Hello World» on the screen of an Android virtual or physical device.
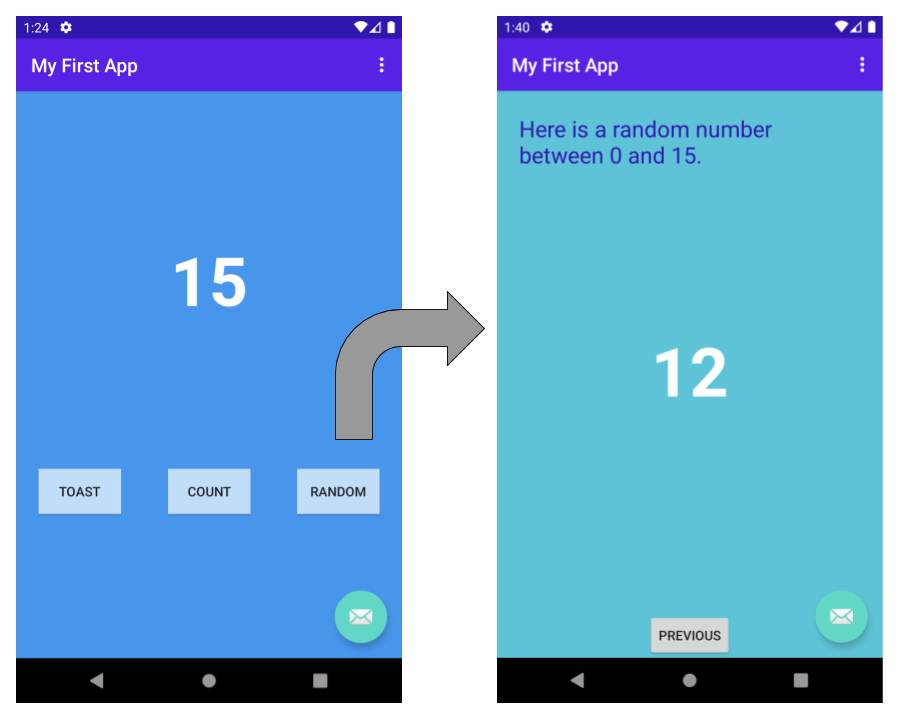
Here’s what the finished app will look like:
What you’ll learn
- How to create a project in Android Studio.
- How to create an emulated Android device.
- How to run your app on the emulator.
- How to run your app on your own physical device, if you have one.
Step 1: Create a new project
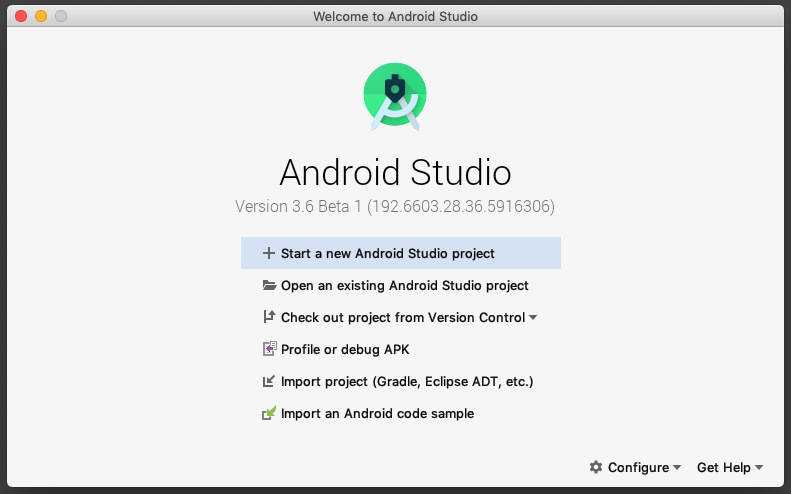
- Open Android Studio.
- In the Welcome to Android Studio dialog, click Start a new Android Studio project.

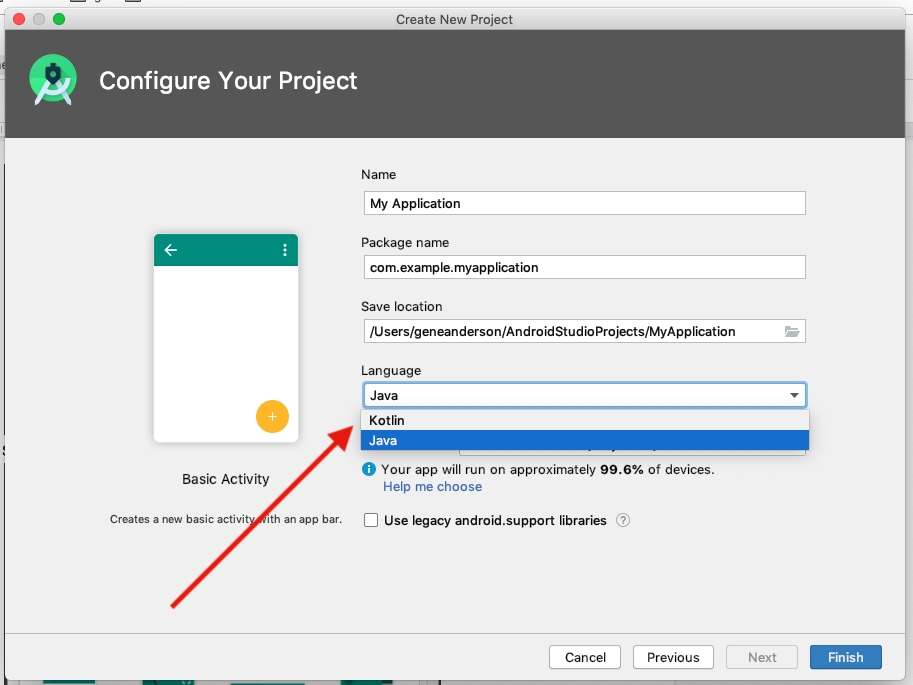
- Select Basic Activity (not the default). Click Next.
- Give your application a name such as My First App.
- Make sure the Language is set to Java.
- Leave the defaults for the other fields.
- Click Finish.

After these steps, Android Studio:
- Creates a folder for your Android Studio project called MyFirstApp. This is usually in a folder called AndroidStudioProjects below your home directory.
- Builds your project (this may take a few moments). Android Studio uses Gradle as its build system. You can follow the build progress at the bottom of the Android Studio window.
- Opens the code editor showing your project.
Step 2: Get your screen set up
When your project first opens in Android Studio, there may be a lot of windows and panes open. To make it easier to get to know Android Studio, here are some suggestions on how to customize the layout.
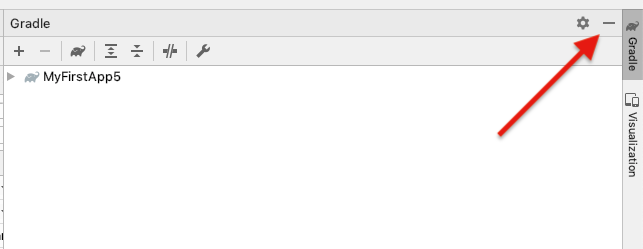
- If there’s a Gradle window open on the right side, click on the minimize button (—) in the upper right corner to hide it.
- Depending on the size of your screen, consider resizing the pane on the left showing the project folders to take up less space.
At this point, your screen should look a bit less cluttered, similar to the screenshot shown below.

Step 3: Explore the project structure and layout
The upper left of the Android Studio window should look similar to the following diagram: 
Based on you selecting the Basic Activity template for your project, Android Studio has set up a number of files for you. You can look at the hierarchy of the files for your app in multiple ways, one is in Project view. Project view shows your files and folders structured in a way that is convenient for working with an Android project. (This does not always match the file hierarchy! To see the file hierarchy, choose the Project files view by clicking (3).)
- Double-click the app (1) folder to expand the hierarchy of app files. (See (1) in the screenshot.)
- If you click Project (2), you can hide or show the Project view. You might need to select View > Tool Windows to see this option.
- The current Project view selection (3) is Project > Android.
In the Project > Android view you see three or four top-level folders below your app folder: manifests, java, java (generated) and res. You may not see java (generated) right away.
- Expand the manifests folder.
This folder contains AndroidManifest.xml . This file describes all the components of your Android app and is read by the Android runtime system when your app is executed. 2. Expand the java folder. All your Java language files are organized here. The java folder contains three subfolders:
com.example.myfirstapp: This folder contains the Java source code files for your app.
com.example.myfirstapp (androidTest): This folder is where you would put your instrumented tests, which are tests that run on an Android device. It starts out with a skeleton test file.
com.example.myfirstapp (test): This folder is where you would put your unit tests. Unit tests don’t need an Android device to run. It starts out with a skeleton unit test file. 3. Expand the res folder. This folder contains all the resources for your app, including images, layout files, strings, icons, and styling. It includes these subfolders:
drawable: All your app’s images will be stored in this folder.
layout: This folder contains the UI layout files for your activities. Currently, your app has one activity that has a layout file called activity_main.xml . It also contains content_main.xml , fragment_first.xml , and fragment_second.xml .
menu: This folder contains XML files describing any menus in your app.
mipmap: This folder contains the launcher icons for your app.
navigation: This folder contains the navigation graph, which tells Android Studio how to navigate between different parts of your application.
values: This folder contains resources, such as strings and colors, used in your app.
Step 4: Create a virtual device (emulator)
In this task, you will use the Android Virtual Device (AVD) manager to create a virtual device (or emulator) that simulates the configuration for a particular type of Android device.
The first step is to create a configuration that describes the virtual device.
- In Android Studio, select Tools >AVD Manager, or click the AVD Manager icon in the toolbar.
- Click +Create Virtual Device. (If you have created a virtual device before, the window shows all of your existing devices and the +Create Virtual Device button is at the bottom.) The Select Hardware window shows a list of pre-configured hardware device definitions.
- Choose a device definition, such as Pixel 2, and click Next. (For this codelab, it really doesn’t matter which device definition you pick).
- In the System Image dialog, from the Recommended tab, choose the latest release. (This does matter.)
- If a Download link is visible next to a latest release, it is not installed yet, and you need to download it first. If necessary, click the link to start the download, and click Next when it’s done. This may take a while depending on your connection speed.

Note: System images can take up a large amount of disk space, so just download what you need.
- In the next dialog box, accept the defaults, and click Finish.
The AVD Manager now shows the virtual device you added.
- If the Your Virtual Devices AVD Manager window is still open, go ahead and close it.
Step 5: Run your app on your new emulator
- In Android Studio, select Run > Run ‘app’ or click the Run icon in the toolbar. The icon will change when your app is already running.
 The icon will change when your app is already running.
If you get a dialog box stating «Instant Run requires that the platform corresponding to your target device (Android N. ) is installed» go ahead and click Install and continue.
- In Run > Select Device, under Available devices, select the virtual device that you just configured. This menu also appears in the toolbar.
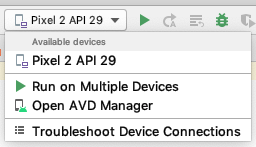
The emulator starts and boots just like a physical device. Depending on the speed of your computer, this may take a while. You can look in the small horizontal status bar at the very bottom of Android Studio for messages to see the progress.
Messages that might appear briefly in the status bar
Gradle build running

Waiting for target device to come on line
Источник


