- How to Receive and Handle SMS on Android
- Making an app the default SMS handler
- Developing the Android app manifest file
- Editing the ViewModel
- Encrypting and decrypting SMS messages
- Handling received SMS messages
- Reading and decrypting SMS messages
- Conclusion
- 2.2: Part 2 — Sending and Receiving SMS Messages
- Task 3. Receive SMS messages with a broadcast receiver
- 3.1 Add permission and create a broadcast receiver
- 3.2 Register the broadcast receiver
- 3.3 Implement the onReceive() method
- 3.4 Run the app and send a message
- Solution Code
- Coding challenge
How to Receive and Handle SMS on Android
Despite the popularity of social media networks and messengers, texting is still the most common way to communicate via smartphones. According to the 2020 State of Texting report by Zipwhip, 77% of people use their texting app more frequently than other messengers.
But default SMS applications aren’t always comfortable for receiving SMS on Android, so users start looking for third-party apps. Additionally, non-messenger Android applications may still need SMS handling functionality (for example to confirm SMS authentication codes). In this article, we share our experience in developing SMS (and other service) handlers. In particular, we describe how to:
- Make your application the default SMS handler
- Develop an Android SMS receiver
- Encrypt and decrypt SMS messages
- Add texts to the SMS table in a device database
This text will be useful for developers who need to add SMS handling functionality to their app or create a new SMS messaging app.

Device Programming Team
Contents:
Making an app the default SMS handler
It’s important to make your application the default for handling SMS messages because only such app can record data to the SMS database. Your app should request permission to become the default SMS app before requesting any other permissions. This is also a requirement of the Google Play Store: if an app requests SMS, MMS, or CALL LOG permissions and isn’t a default SMS or Contact app, it will be rejected by Google.
In order to become the default messaging app, your app needs to:
- Register a receiver to handle incoming SMS messages
- Register a receiver to handle incoming MMS messages
- Create an activity that allows users to send new SMS or MMS messages in the Android application
- Create a service that sends out quick response messages
In our example, we’ll focus on how to receive SMS and send new SMS and MMS messages on Android. All of this functionality must be implemented in order to make our app the default handler.
We can use this code to ask a user to make our app the default for receiving SMS messages on Android:
In the code above, REQUEST_DEFAULT_APP is the request code to store the user’s choice. If the user allows the app to be the default, implementing this choice looks as follows:
Now we can proceed to the app manifest file and app permissions.
Developing the Android app manifest file
The app manifest file is a very important part of an Android application. It contains information on the app’s:
- Package name
- Components (activities, content providers, services, broadcast receivers)
- Required permissions
- Required software and hardware features
Let’s focus on the permissions for our application.
In Android 6, Google introduced runtime permissions. They protect the privacy of user data, tell users what information will be used by the app, and make sure users understand what an app can do with their data.
The runtime permissions system defines two permission levels:
- Normal — Permissions to access data or resources that pose little to no risk to the user’s personal information (e.g. device time zone). These permissions don’t require the user’s approval.
Dangerous — Permissions to handle a user’s sensitive data (e.g. texts, messages, photos, notes, etc.). These require the user’s approval.

When an application requests permission, a system dialog appears. It contains a list of the permissions the app requires and Allow and Deny buttons.
If the user denies a permission, when the app requests it the next time, the dialog box will contain a Do not ask me again checkbox.
When developing an app, you should take into account the scenario when a user denies permissions. All logic that relies on the denied permissions should not cause the app to fail.
In our example, the app’s manifest file declares permissions to read, send, and get all SMS in Android programmatically, as well as receive MMS messages, and receive push notifications:
After the declaration, the app should get the following permissions:
And handle the result of its requests in this way:
All of these permissions are in the same group, so they’re granted all together. If you request permissions from different permission groups, you’ll need to check the grantedResults array so you don’t miss any denied permissions.
To simplify the process of acquiring permissions, you can use a library like Quick Permissions.
Now it’s time to start a standard activity. In our example, this is part of an application that decrypts an SMS and shows it to the user. But in a real messaging app, there should also be an activity that provides functionality to create and send new SMS and MMS messages.
The part of our Manifest.xml file that describes our main activity looks like this:
Now we need to create an SMS receiver:
We also need to create an MMS receiver:
Finally, we should add a service that allows the user to respond to texts:
By this stage, our app can receive, display, and respond to texts. Let’s take a look at its ViewModel file.
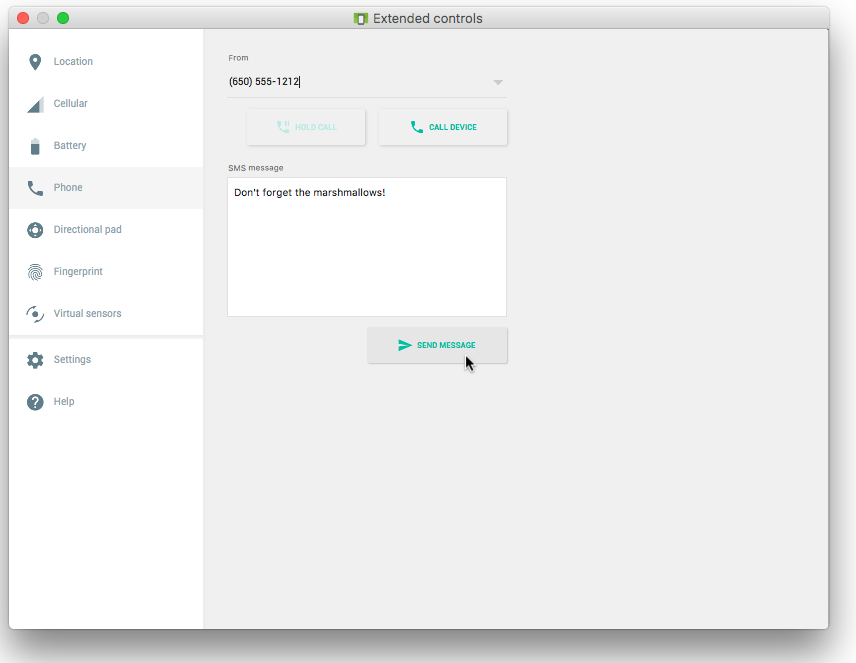
Editing the ViewModel
At this stage, our project contains only one Extensible Markup Language (XML) layout. There’s one button and one list. The button is used for getting SMS messages from the system inbox; the list is used for showing messages.
Here’s the XML layout code:
And here’s a screenshot of our simple user interface:

As you can see, this XML doesn’t contain any listeners. We’ll add them later. Next, we need to introduce encryption and decryption algorithms.
Encrypting and decrypting SMS messages
All texts that our app receives will be encrypted. To handle them, we need to add a class that provides encryption and decryption.
In our application, encryption is done by executing the fun encrypt(data: String): String function. It encrypts a string with a key generated using the Password-Based Key Derivation Function (PBKDF2) algorithm. The returned value is an encrypted Base64 string.
Here’s what happens when we execute this function:
After that, we need to decrypt the SMS. To do that, we use the fun decrypt(encryptedData: String): String function. It decrypts the Base64 string with a PBKDF2 algorithm.
The decryption process looks like this:
To encrypt and decrypt the given ByteArray, we can use the fun cryptoOperation(cipherMode: Int, data: ByteArray): ByteArray function. We can execute it using the following code:
Encryption algorithms such as AES, Rivest–Shamir–Adleman, MD5, etc. require a secret key in the form of a ByteArray. We can generate a secret key that uses salt with the fun generateKey(): ByteArray function. Here’s an example of how to generate a key:
After executing these functions, our app can encrypt and decrypt texts. Now we can add an SMS handler.
Handling received SMS messages
The main class that receives SMS messages is SmsReceiver. It extends the BroadcastReceiver class. Any child class of BroadcastReceiver must contain the onReceive method, which receives Context and Intent parameters.
The BroadcastReceiver class is well-described in the official documentation, which is why we won’t focus on its properties.
When we get an event upon receiving a text, we need to go to the onReceive method. First, let’s confirm that all of the received content is valid:
The next step is to check that we’ve received the SMS data by checking the action value:
Now we’re ready to receive the SMS content with the val smsMessages = Telephony.Sms.Intents.getMessagesFromIntent(intent) method. It will provide us an array of smsMessages. Here’s an example:
When the SMS list gets into Intent, then the SMS should be parsed. For this purpose, we call the getMessagesFromIntent method from the Telephony.Sms.Intents class.
Then SmsReceiver gets the SMS and can do anything with it. In our example, SMS messages are encrypted and recorded in the SMS table of the device database. We need to do this to allow the default Android SMS viewer to view encrypted SMS messages.
When our app receives an SMS, it’s displayed using the Toast class.
Reading and decrypting SMS messages
After we’ve created encryption procedures, it’s time to add functionality for reading and decrypting SMS messages. Let’s list the click listener for the button on the main screen. All texts from the inbox are read, and then the sender information and SMS text are put into the list using this code:
The SMS is obtained from the list, decrypted, and then displayed to the user. The item listener list is as follows:
After that, our application is ready to handle SMS messages!
Conclusion
An application for handling text messages is must on any device. Lots of users aren’t satisfied with their default SMS app and are looking for a more comfortable solution. But there are several tricks to making an SMS app in Android Studio. It has to:
- be the default application for SMS messages
- ask for all necessary permissions (and not crash it a user denies them)
- receive, display, and allow the user to respond to texts
- be secure
- add received texts to the device’s SMS database
In this article, we’ve shown you how to build an Android app with this functionality. Creating such applications is only the tip of the iceberg in terms of our experience in mobile app development. If you have a complex Android-related project, challenge us with it!
Источник
2.2: Part 2 — Sending and Receiving SMS Messages
Contents:
Task 3. Receive SMS messages with a broadcast receiver
To receive SMS messages, use the onReceive() method of the BroadcastReceiver class. The Android framework sends out system broadcasts of events such as receiving an SMS message, containing intents that are meant to be received using a BroadcastReceiver. You need to add the RECEIVE_SMS permission to your app’s AndroidManifest.xml file.
3.1 Add permission and create a broadcast receiver
To add RECEIVE_SMS permission and create a broadcast receiver, follow these steps:
Open the AndroidManifest.xml file and add the android.permission.RECEIVE_SMS permission below the other permission for SMS use:
Receiving an SMS message is permission-protected. Your app can’t receive SMS messages without the RECEIVE_SMS permission line in AndroidManifest.xml.
Name the class «MySmsReceiver» and make sure «Exported» and «Enabled» are checked.
The «Exported» option allows your app to respond to outside broadcasts, while «Enabled» allows it to be instantiated by the system.
3.2 Register the broadcast receiver
In order to receive any broadcasts, you must register for specific broadcast intents. In the Intent documentation, under «Standard Broadcast Actions», you can find some of the common broadcast intents sent by the system. In this app, you use the android.provider.Telephony.SMS_RECEIVED intent.
Add the following inside the tags to register your receiver:
3.3 Implement the onReceive() method
Once the BroadcastReceiver intercepts a broadcast for which it is registered ( SMS_RECEIVED ), the intent is delivered to the receiver’s onReceive() method, along with the context in which the receiver is running.
- Open MySmsReceiver and add under the class declaration a string constant TAG for log messages and a string constant pdu_type for identifying PDUs in a bundle:
- Delete the default implementation inside the supplied onReceive() method.
In the blank onReceive() method:
Add the @TargetAPI annotation for the method, because it performs a different action depending on the build version.
Retrieve a map of extended data from the intent to a bundle .
Define the msgs array and strMessage string.
Get the format for the message from the bundle .
As you enter SmsMessage[] , Android Studio automatically imports android.telephony.SmsMessage .
Initialize the msgs array, and use its length in the for loop:
Use createFromPdu(byte[] pdu, String format) to fill the msgs array for Android version 6.0 (Marshmallow) and newer versions. For earlier versions of Android, use the deprecated signature createFromPdu(byte[] pdu).
Build the strMessage to show in a toast message:
Get the originating address using the getOriginatingAddress() method.
Get the message body using the getMessageBody() method.
Add an ending character for an end-of-line.
The complete onReceive() method is shown below:
3.4 Run the app and send a message
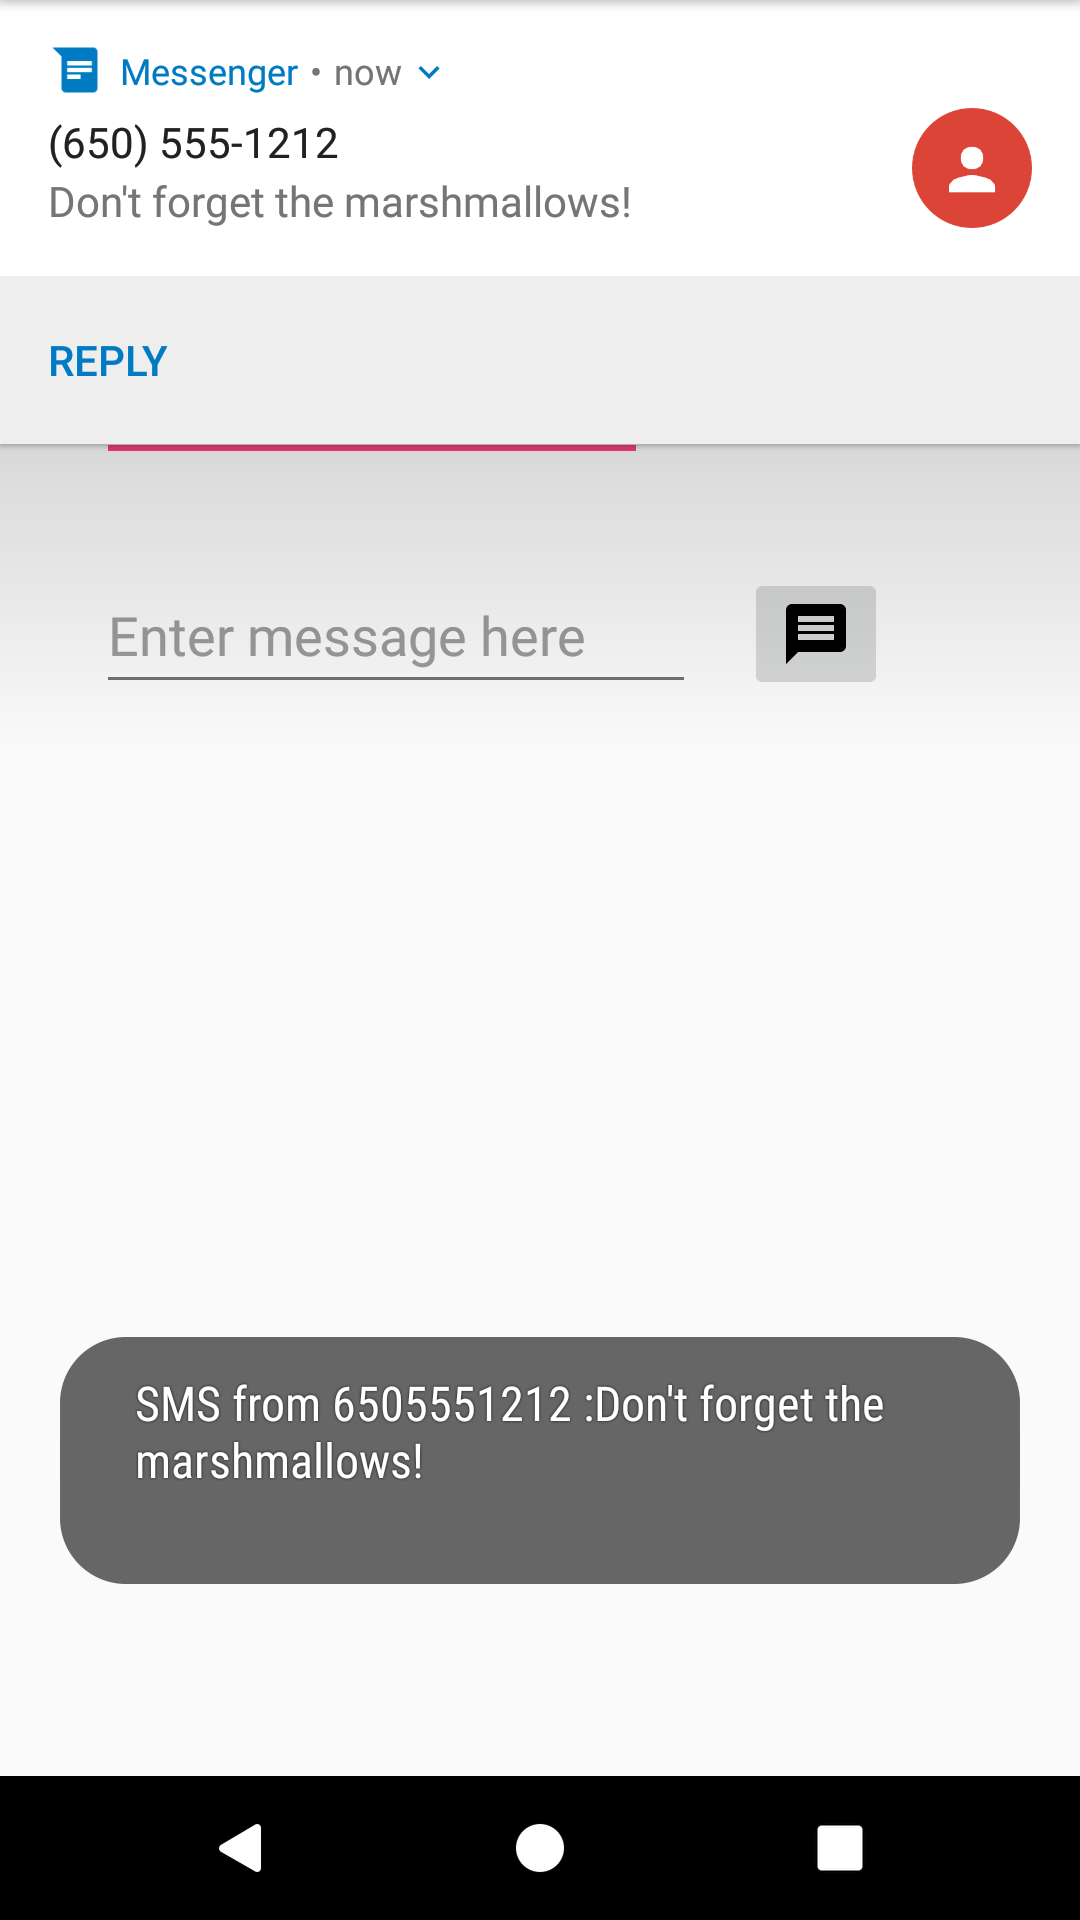
Run the app on a device. If possible, have someone send you an SMS message from a different device.
You can also receive an SMS text message when testing on an emulator. Follow these steps:
- Run the app on an emulator.
Click the … (More) icon at the bottom of the emulator’s toolbar on the right side, as shown in the figure below:

Solution Code
Android Studio project: SmsMessaging
Coding challenge
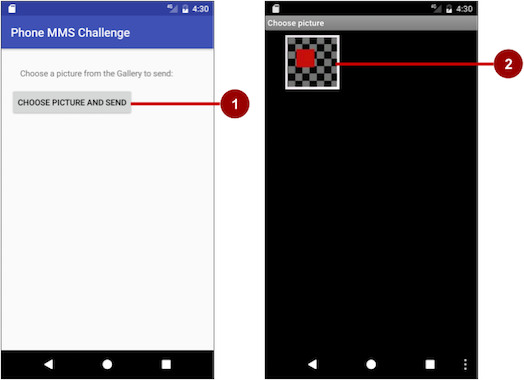
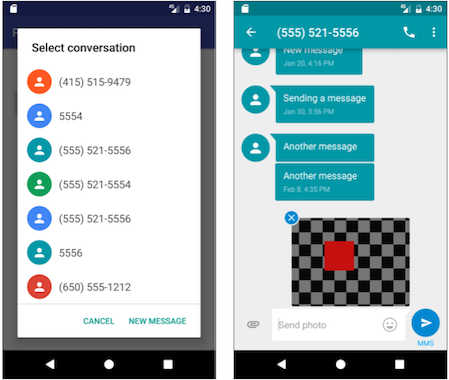
Challenge: Create a simple app with one button, Choose Picture and Send, that enables the user to select an image from the Gallery and send it as a Multimedia Messaging Service (MMS) message. After tapping the button, a choice of apps may appear, including the Messenger app. The user can select the Messenger app, and select an existing conversation or create a new conversation, and then send the image as a message.
The following are hints:
- To access and share an image from the Gallery, you need the following permission in the AndroidManifest.xml file:
- To enable the above permission, follow the model shown previously in this chapter to check for the READ_EXTERNAL_STORAGE permission, and request permission if necessary.
- Use the following intent for picking an image:
- Override the onActivityResult method to retrieve the intent result, and use getData() to get the Uri of the image in the result:
- Set the image’s Uri, and use an intent with ACTION_SEND , putExtra() , and setType() :
- Android Studio emulators can’t pass MMS messages to and from each other. You must test this app on real Android devices.
- For more information about sending multimedia messages, see Sending MMS with Android.
Android Studio project: MMSChallenge
Источник


