- AccountManager
- Integrating Google Sign-In into Your Android App
- Before you begin
- Configure Google Sign-in and the GoogleSignInClient object
- Check for an existing signed-in user
- Add the Google Sign-in button to your app
- Start the sign-in flow
- Try Sign-In for Android
- Get the project
- Configure a Google API project
- Run the sample
- How it works
- Next steps
- Авторизация через Google в Android и проверка токена на сервере
- Небольшая подготовка
- Добавляем действие на кнопку
- Необходимые области доступа
- Регистрация нашего приложения.
- Код получения токена
- Проверяем токен на сервере. (PHP)
- Top 5 Ways to Add Google Account in Android Without Syncing
- Mehvish
- What’s the Problem with Google Sync
- 1. Quickly Disable Sync
- 2. Disable Apps
AccountManager
Иногда разработчик хочет отслеживать пользователя. Первый вариант, который приходит в голову — попросить его ввести какие-то данные о себе и сохранить их где-нибудь. Но просить пользователя повторять эту процедуру при покупке нового устройства не самая лучшая идея. Кроме того, вы не можете гарантировать уникальность данных. Второй вариант — запомнить идентификатор телефона. Но пользователи иногда пользуются двумя телефонами, планшетами и т.д. и тут одним идентификатором не обойдёшься. Опять проблема.
Третий вариант – использовать класс AccountManager. С разрешения пользователя, вы можете использовать AccountManager для извлечения имён учетных записей, которые пользователь хранит на устройстве. Имея полученную информацию, вы можете, например, автоматически заполнить форму с адресом электронной почты.
Само устройство может хранить несколько аккаунтов от разных сервисов. Вы можете отфильтровать результат по типам аккаунтов. Например, у Гугла аккаунт имеет тип «com.google», Twitter использует тип «com.twitter.android.auth.login».
Для извлечения информации требуется разрешение:
В приложении вы сначала получаете экземпляр AccountManager через метод get(), а затем можете вызвать список аккаунтов определённого типа через getAccountsByType().
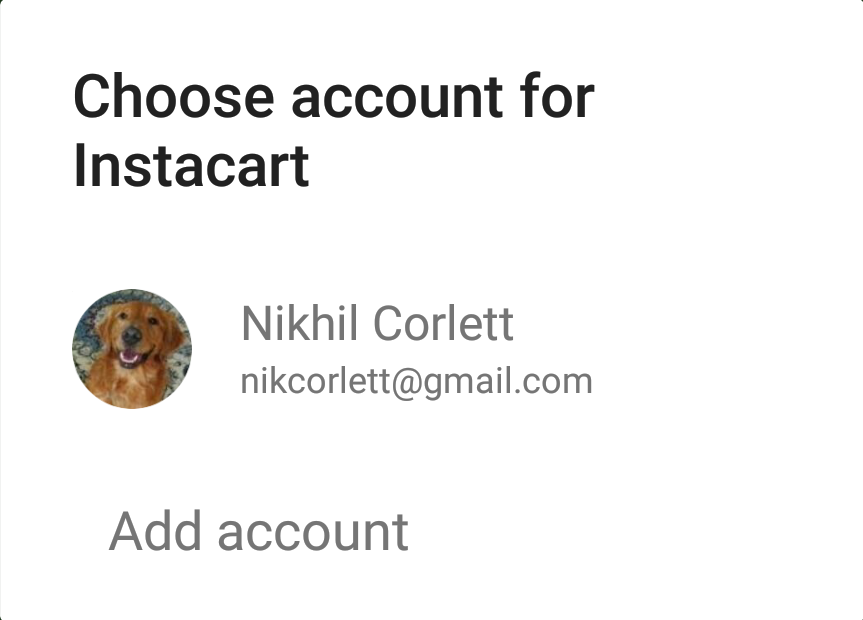
Метод getAccountsByType() возвращает массив учётных записей. Если в массиве более одной учётной записи, то покажите пользователю диалоговое окно с запросом для выбора одного аккаунта.
Объект Account содержит имя учетной записи, для учетных записей Google – это адрес электронной почты, который вы можете использовать для автоматического заполнения полей или в качестве ключа в базе данных и т.д.
В других учётных записях в имени не обязательно может содержаться электронный адрес. Например, это может быть часть электронного адреса или просто имя пользователя.
На эмуляторе скорее всего нет никаких аккаунтов, поэтому лучше проверять на устройстве. В большинстве случаев на телефоне есть аккаунт для Гугла. В логах я проверил количество аккаунтов, а в текстовом поле вывел имя аккаунта, который оказался моим электронным адресом.
Метод getAccounts() выводит все учётные записи, которые есть на устройстве.
На моём устройстве оказалось три учётные записи. Чтобы понять, кому они принадлежат, я заменил account.name на account.toString() и получил следующий результат.
Теперь стало понятно.
Мы рассмотрели только базовый пример работы с AccountManager. На самом деле, у класса много других возможностей. Например, вы можете добавить новую учётную запись и управлять ею.
Источник
Integrating Google Sign-In into Your Android App
To integrate Google Sign-In into your Android app, configure Google Sign-In and add a button to your app’s layout that starts the sign-in flow.
Before you begin
Configure Google Sign-in and the GoogleSignInClient object
In your sign-in activity’s onCreate method, configure Google Sign-In to request the user data required by your app. For example, to configure Google Sign-In to request users’ ID and basic profile information, create a GoogleSignInOptions object with the DEFAULT_SIGN_IN parameter. To request users’ email addresses as well, create the GoogleSignInOptions object with the requestEmail option.
If you need to request additional scopes to access Google APIs, specify them with requestScopes . For the best user experience, on sign-in, only request the scopes that are required for your app to minimally function. Request any additional scopes only when you need them, so that your users see the consent screen in the context of an action they performed. See Requesting Additional Scopes.
Then, also in your sign-in activity’s onCreate method, create a GoogleSignInClient object with the options you specified.
Check for an existing signed-in user
In your activity’s onStart method, check if a user has already signed in to your app with Google.
If GoogleSignIn.getLastSignedInAccount returns a GoogleSignInAccount object (rather than null ), the user has already signed in to your app with Google. Update your UI accordingly—that is, hide the sign-in button, launch your main activity, or whatever is appropriate for your app.
If GoogleSignIn.getLastSignedInAccount returns null , the user has not yet signed in to your app with Google. Update your UI to display the Google Sign-in button.
Add the Google Sign-in button to your app
 Add the SignInButton in your application’s layout:
Optional: If you are using the default sign-in button graphic instead of providing your own sign-in button assets, you can customize the button’s size with the setSize method.
In the Android activity (for example, in the onCreate method), register your button’s OnClickListener to sign in the user when clicked:
Start the sign-in flow
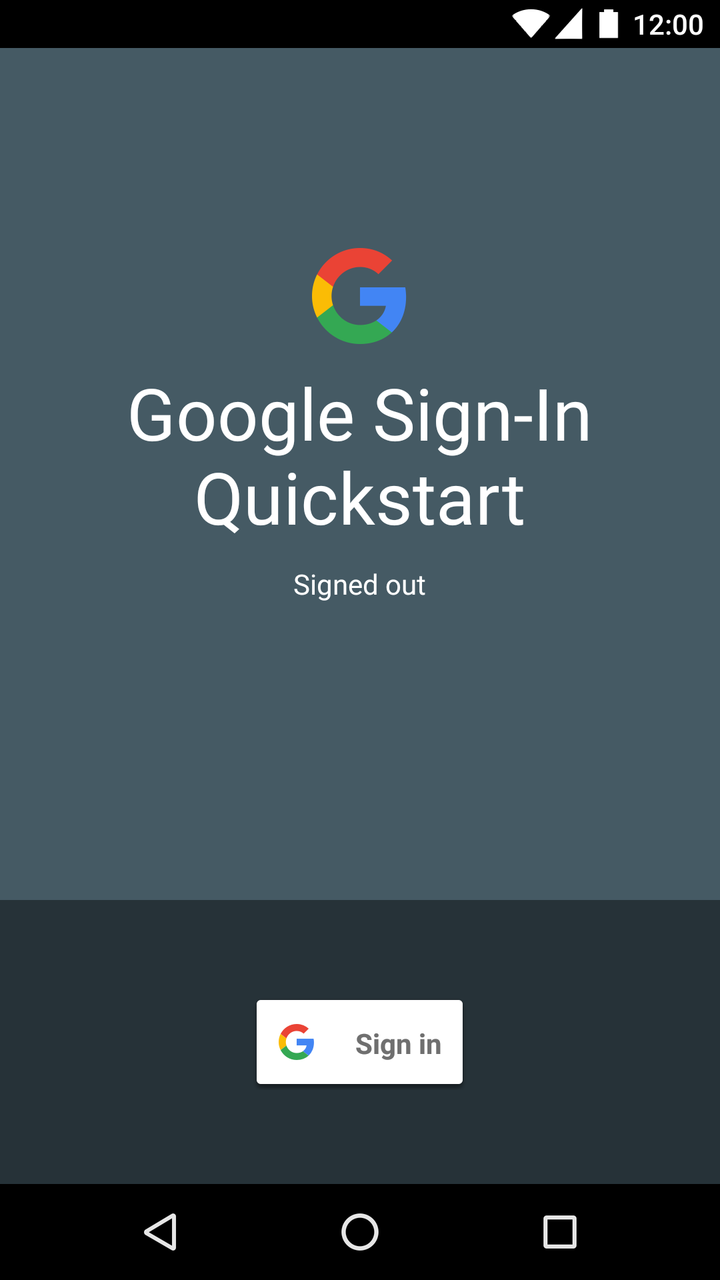
 In the activity’s onClick method, handle sign-in button taps by creating a sign-in intent with the getSignInIntent method, and starting the intent with startActivityForResult .
Starting the intent prompts the user to select a Google account to sign in with. If you requested scopes beyond profile , email , and openid , the user is also prompted to grant access to the requested resources.
After the user signs in, you can get a GoogleSignInAccount object for the user in the activity’s onActivityResult method.
The GoogleSignInAccount object contains information about the signed-in user, such as the user’s name.
You can also get the user’s email address with getEmail , the user’s Google ID (for client-side use) with getId , and an ID token for the user with getIdToken . If you need to pass the currently signed-in user to a backend server, send the ID token to your backend server and validate the token on the server.
Except as otherwise noted, the content of this page is licensed under the Creative Commons Attribution 4.0 License, and code samples are licensed under the Apache 2.0 License. For details, see the Google Developers Site Policies. Java is a registered trademark of Oracle and/or its affiliates.
Источник
Try Sign-In for Android
Use our Android sample app to see how Sign-In works, or add Sign-In to your existing app.
Get the project
If this is your first time using a Google services sample, check out the google-services repository.
Open Android Studio.
Select File > Open, browse to where you cloned the google-services repository, and open google-services/android/signin .
Configure a Google API project
To use the sample, you need to provide some additional information to finish setting up your project. Click the button below, and specify the package name com .google .samples .quickstart .signin when prompted. You will also need to provide the SHA-1 hash of your signing certificate. See Authenticating Your Client for information.
The sample’s IdTokenActivity and ServerAuthCodeActivity examples require you to specify an OAuth 2.0 web client ID. In a real app, this client ID would represent your app’s backend server. A client ID for this purpose was created when you configured the project above.
Find this value by opening the Google API Console:
Your web server client ID is displayed next to Web client (Auto-created for Google Sign-in). Copy and paste the client ID into your project’s strings.xml file:
Run the sample
Now you’re ready to build the sample and run it from Android Studio.
Build the sample and click the run button and select a connected device or emulator with the latest version of Google Play services.
How it works
The application builds a GoogleSignInClient , specifying the sign-in options it needs. Then, when the sign-in button is clicked, the application starts the sign-in intent, which prompts the user to sign in with a Google account.
Next steps
If you want to see how you can implement Google Sign-In in your own app, take a look at our implementation guide.
Did you have a good experience? Run into trouble? Let us know!
Except as otherwise noted, the content of this page is licensed under the Creative Commons Attribution 4.0 License, and code samples are licensed under the Apache 2.0 License. For details, see the Google Developers Site Policies. Java is a registered trademark of Oracle and/or its affiliates.
Источник
Авторизация через Google в Android и проверка токена на сервере
Недавно мне захотелось создать личный проект на андроиде, и основной вопрос был такой: как однозначно идентифицировать пользователя заставляя его делать как можно меньше телодвижений? Конечно же это аккаунт Google. Я пытался пробовать множество примеров в сети — однако API несколько раз обновилось за время своего существования, многие методы не работали, мои вопросы в Google+ по этому поводу либо были вообще никак не восприняты окружением, либо были вроде «Никогда такое не делал».
В этой статье я постараюсь как можно более просто для новичков (вроде меня) описать мой метод авторизации в Google на андроид, получения токена и проверке этого самого токена на сервере.
Небольшая подготовка
Для начала — у вас должны быть установлены Google Play Services в SDK. После их установки можно будет импортировать все необходимые библиотеки. Статья пишется с расчетом на Android Studio — он сам подсказывает, что необходимо импортировать.
У вас должно быть создано активити с кнопкой.
Чтобы было привычнее пользователю можете создать стандартную кнопку Google+ Sing-In
Выглядеть она будет вот так: 
Просто добавьте в ваш Layout:
Добавляем действие на кнопку
Пишем в нашем активити:
Собственно присвоим кнопке действие — вызов интенда выбора аккаунта. Если вы работаете в Android Studio он сам вам подскажет, какие библиотеки нужно импортировать, так что это подробно тут я расписывать не буду.
startActivityForResult(intent, 123); — задает код с которым произойдет возврат. 123 это код возврата, он может быть каким угодно. Это необходимо, когда вы делаете несколько интендов, и вам надо обработать их по разному.
Необходимые области доступа
Обьявите эти переменные в классе. Это необходимые нам области доступа. Первый написано в google: «Позволяет определить аутентифицированного пользователя. Для этого при вызове API необходимо указать me вместо идентификатора пользователя Google+. » Второе разрешение нам необходимо для получения личных данных пользователя (Имя, Фамилия, адрес G+ страницы, аватар), и последнее для получения E-mail. Я посчитал это важным, ведь это вполне неизменный идентификатор для записи в бд.
Регистрация нашего приложения.
Изначально забыл этот пункт — исправляюсь.
Нам необходимо зайти на code.google.com/apis/console создать там проект, зайти в Credentials и создать новый Client ID для OAuth выбрав пункт Installed Application -> Android. Там нам необходимо ввести название нашего пакета и SHA1 сумму нашего ключа.
С этим у меня на самом деле было много проблем решил достаточно костыльным способом.
Нашел debug.keystore в %USERPROFILE%\.android\debug.keystore поместил в папку с проектом и прописал в build.grandle:
После чего нам нужно выполнить команду:
keytool -exportcert -alias androiddebugkey -keystore
/.android/debug.keystore -v -list
Сам keytool можно найти в SDK. Из вывода копируем SHA1 в нужное поле.
Как я понимаю метод временный, и для нормальной работы надо создать нормальный ключ. Но для тестирования этого достаточно.
Код получения токена
Где 123 — ваш код, который вы указали ранее, где AcrivityName — название вашего актитивити. Грубо говоря — мы скармливаем функции получения токена необходимые разрешения и имя аккаунта. И заметьте — это все происходит в фоновом режиме, после чего полученный токен передается в написанную мною функцию reg. Она уже отправляет токен и все необходимые данные на сервер.
Так как разрабатываю недавно, с исключениями пока что беда, если есть предложение — напишите в личку или в комментарии.
Проверяем токен на сервере. (PHP)
Хочу обратить внимание, полученный нами токен имеет тип Online. И действует он лишь 10 минут. Для получения offline токена (чтобы дольше работать с ним с сервера) обратитесь к этой инструкции developers.google.com/accounts/docs/CrossClientAuth
Собственно скармливаем токен в googleapis и забираем полученный JSON ответ.
Источник
Top 5 Ways to Add Google Account in Android Without Syncing
Mehvish
21 Dec 2019
Did you notice that your contacts are appearing on another Android phone? That might be highly confusing at first. The answer to that question is simple. If you had logged into another Android phone using your Google account, then all contacts from that account will appear on that phone. In this post, we shall tell you how to add a Google account without syncing data.

Even when you add someone else’s account in your Android phone, their contacts will start showing up on your phone. The problem is — even though Google lets you stop syncing the contacts, the option appears after the contacts sync takes place. That makes the process useless. In short, you cannot choose what you want to sync from your Google account.
However, here we will tell you various ways to avoid syncing data on Android while adding a Google account. Before that, let’s understand the issue properly first.
What’s the Problem with Google Sync
When you add a Google account on your Android phone — be it a primary or secondary, it starts syncing everything related to that account. For instance, emails, contacts, images in Google Photos, Calendar, Drive, and more. Google doesn’t give you a choice. Now, most users use different Google accounts to keep things separate. Syncing everything to the Android phone defeats the purpose.

There could be many reasons for people to stop syncing their Google data to an Android phone. For instance, I don’t want contacts from all of my Google accounts to show up on my Android phone.
Similarly, when some people buy paid apps from their account, they want to share that with someone else, especially their kids. They do that by adding the Google account on the second device. But by doing so, all their personal data such as emails, contacts, and more show up on the kids’ device. Now that’s bad, in terms of both privacy and safety.
To avoid that, one needs to add a Google account without syncing everything. Let’s check how to do that.
Also on Guiding Tech
![]()
5 Best Apps to Transfer Music Between Android Phones
1. Quickly Disable Sync
As mentioned above, Google doesn’t let you choose what you want to sync and what you don’t when you add a Google account. You can disable it after the content has synced. That’s quite stupid.
To avoid syncing things from Google such as contacts before adding a Google account, you need to disable sync quickly.
Here’s how to go about it.
Step 1: Start the process of adding a Google account from Android settings as you would normally do. However, when you reach the last step after entering your password, quickly enable Airplane mode on your phone from quick settings. I recommend that you should do it within seconds.

Step 2: Once enabled, return to the newly added Google Accounts page — Settings > Accounts.

Step 3: Tap on your Google account. Then, tap on Account sync or Sync account.


Step 4: Turn off the toggle or uncheck the box next to the items that you don’t want to sync to your phone. For instance, if you only want to sync Gmail, keep it enabled and turn off the rest.

Step 5: Then, turn off Airplane mode from quick settings. Doing that will bring back the internet services on your phone and resume sync but only for the options that you selected.
2. Disable Apps
The problem with Google data is that even if you disable the sync in the settings, as shown above, the apps still have access to your Google account. Take the case of Gmail.
If you turn off sync for Gmail, the only thing that will stop are the notifications. Meaning, you won’t be notified about new mails. But if the person opens the Gmail app, then they can still see your Google account there. And the new emails will automatically populate by opening the app.
If you don’t want the app to have access to your personal data, you can disable it. Disabling the app will stop it from showing up on your home screen or in the app drawer. Of course, that would mean parting away with other Google accounts too. If you are okay with that, you can disable it in the following way.
Step 1: Open Settings on your Android phone and go to Apps & notifications or Apps.

Step 2: Under All apps, tap on Gmail or any other app that you want to disable.
Источник


