- Android get process name
- Есть ли способ получить имя текущего процесса в Android
- ОТВЕТЫ
- Ответ 1
- Ответ 2
- Ответ 3
- Ответ 4
- Ответ 5
- Ответ 6
- Ответ 7
- Ответ 8
- Ответ 9
- Ответ 10
- Сервисы
- Введение в сервисы Android
- Android Application Launch explained: from Zygote to your Activity.onCreate()
- When does Android process start?
- Zygote : Spawning new life, new process
- When a user clicks an app icon in Launcher …
- There are three distinct phases of process launch :
- Thanks for reading through 🙌🏼. If you found this post useful, please applaud using the 👏 button and share it through your circles.
Android get process name
A small Android library to get the current running processes
![]()

![]()
![]()

PLEASE NOTE, THIS PROJECT IS NO LONGER BEING MAINTAINED
Google has significantly restricted access to /proc in Android Nougat. This library will not work on Android 7.0. Please star this issue.
More details can be found at:
What is this library for?
This small library can get a list of running apps and does not require any permissions.
Why would I need this?
Android 5.0+ killed getRunningTasks(int) and getRunningAppProcesses() . Both of these methods are now deprecated and only return the caller’s application process.
Android 5.0 introduced UsageStatsManager which provides access to device usage history and statistics. This API requires the permission android.permission.PACKAGE_USAGE_STATS , which is a system-level permission and will not be granted to third-party apps. However, declaring the permission implies intention to use the API and the user of the device can grant permission through the Settings application.
Get a list of running apps:
- System apps will not be included on some Android versions because they have a higher SELinux context.
- This is not a full replacement of getRunningAppProcesses(). The library does not provide a processes’ pkgList, lru, or importance.
- This is currently not working on the N developer preview.
Download the latest AAR or grab via Gradle:
In 2017 I decompiled the top 150 free apps on Google Play and found numerous apps using this library. Companies using the library include Cheetah Mobile and Baidu. Apps using this library include ES File Explorer, Clean Master, Security Master, CM Launcher 3D, Virus Cleaner by Hi Security, and Super Cleaner. Combined, these apps have at least 1.2 billion downloads!
Источник
Есть ли способ получить имя текущего процесса в Android
Я установил Android: process = «: XX» для своей конкретной деятельности, чтобы запустить ее в отдельном процессе. Однако, когда новый процесс/процесс init, он вызовет мое приложение: onCreate(), которое содержит некоторую инициализацию уровня приложения.
Я думаю об избежании инициализации дублирования, проверяя текущее имя процесса.
Так есть ли доступный API?
ОТВЕТЫ
Ответ 1
Если я правильно понял ваш вопрос, вы должны использовать ActivityManager, согласно этот поток.
Ответ 2
Ответ 3
Решение ActivityManager содержит скрытую ошибку, особенно если вы проверяете свое собственное имя процесса из вашего объекта Application. Иногда список, возвращенный из getRunningAppProcesses, просто не содержит вашего собственного процесса, создавая особую экзистенциальную проблему.
Как я решаю это,
EDIT: обратите внимание, что это решение намного быстрее, чем через ActivityManager, но не работает, если пользователь запускает Xposed или аналогичный. В этом случае вы можете сделать решение ActivityManager в качестве резервной стратегии.
Ответ 4
Это обновление для ответа Дэвида Бурстрема. Это можно записать гораздо более кратко:
Ответ 5
У меня более эффективный метод, вам не нужно IPC для ActivityManagerService и опросить процесс выполнения или прочитать файл. Вы можете вызвать этот метод из своего пользовательского класса Application;
ActivityManagerService уже отправляет информацию о процессе в ActivityThread, когда процесс запускается. (ActivityThread.main → attach() → IActivityManager.attachApplication — IPC → ActivityManagerService → ApplicationThread.bindApplication)
Когда мы вызываем getProcessName, он, наконец, доставляет объект AppBindData. Таким образом, мы можем легко и эффективно получать текущее имя процесса;
Ответ 6
Во-первых, получите текущий процесс pid. Во-вторых, перечислите все процессы запуска. Наконец, если у него одинаковый pid, все в порядке или неверно.
Ответ 7
Существует метод класс ActivityThread, вы можете использовать отражение, чтобы получить текущее имя процесса. Вам не нужны никакие петли или трюки. Производительность лучше всего сравнить с другим решением. Ограничение — вы можете получить только собственное имя процесса. Это не имеет большого значения, поскольку он охватывает большинство случаев использования.
Ответ 8
Основным процессом отца должен быть зигот, это должно быть точное решение
- сначала оцените имя процесса из /proc/pid/cmdline, которое должно совпадать с именем пакета
- судить отец ли Zygote (почему это? потому что некоторые приложения имеют разные процессы с одинаковым именем)
Ответ 9
Начиная с Android Pie (SDK v28), в классе Application для этого существует официальный метод:
public static String getProcessName()
Ответ 10
Чтобы обернуть различные подходы получения имени процесса с помощью Kotlin:
Источник
Сервисы
Введение в сервисы Android
Сервисы представляют собой особую организацию приложения. В отличие от activity они не требуют наличия визуального интерфейса. Сервисы позволяют выполнять долговременные задачи без вмешательства пользователя.
Все сервисы наследуются от класса Service и проходят следующие этапы жизненного цикла:
Метод onCreate() : вызывается при создании сервиса
Метод onStartCommand() : вызывается при получении сервисом команды, отправленной с помощью метода startService()
Метод onBind() : вызывается при закреплении клиента за сервисом с помощью метода bindService()
Метод onDestroy() : вызывается при завершении работы сервиса
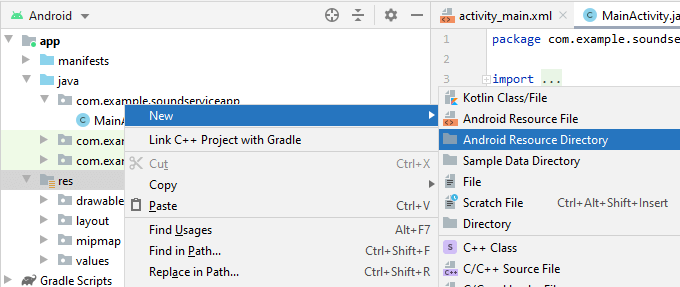
Создадим простейшее приложение с сервисом. Наш сервис будет воспроизводить музыкальный файл. И вначале добавим в проект в каталог res папку raw . Для этого нажмем правой кнопкой мыши на каталог res и в контекстном меню выберем пункт New -> Android Resource Directory .
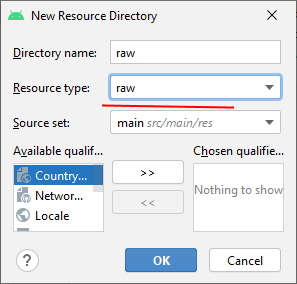
Далее укажем в качестве типа папки — raw :
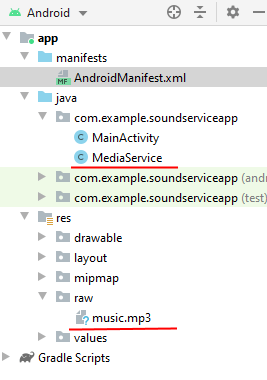
И поместим в эту папку ( res/raw ) какой-нибудь mp3-файл.
Затем добавим новый класс сервиса. Назовем его MediaService . В итоге получится следующий проект:
Для воспроизведения аудио-файла определим в классе MediaService следующий код:
Для воспроизведения музыкального файла сервис будет использовать компонент MediaPlayer .
В сервисе переопределяются все четыре метода жизненного цикла. Но по сути метод onBind() не имеет никакой реализации.
В методе onCreate() инициализируется медиа-проигрыватель с помощью музыкального ресурса, который добавлен в папку res/raw.
В методе onStartCommand() начинается воспроизведение.
Метод onStartCommand() может возвращать одно из значений, которое предполагает различное поведение в случае, если процесс сервиса был неожиданно завершен системой:
START_STICKY : в этом случае сервис снова возвращается в запущенное состояние, как будто если бы снова был бы вызван метод onStartCommand() без передачи в этот метод объекта Intent
START_REDELIVER_INTENT : в этом случае сервис снова возвращается в запущенное состояние, как будто если бы снова был бы вызван метод onStartCommand() с передачей в этот метод объекта Intent
START_NOT_STICKY : сервис остается в остановленном положении
Метод onDestroy() завершает воспроизведение.
Чтобы управлять сервисом, изменим activity. Сначала добавим в файл activity_main.xml пару кнопок для управления сервисом:
И изменим код MainActivity :
Для запуска сервиса используется объект Intent:
Для запуска сервиса в классе Activity определен метод startService() , в который передается объект Intent. Этот метод будет посылать команду сервису и вызывать его метод onStartCommand() , а также указывать системе, что сервис должен продолжать работать до тех пор, пока не будет вызван метод stopService().
Метод stopService() также определен к классе Activity и принимает объект Intent. Он останавливает работу сервиса, вызывая его метод onDestroy()
И в конце нам надо зарегистрировать сервис в файле манифеста:
Регистрация сервиса производится в узле application с помощью добавления элемента . В нем определяется атрибут android:name , который хранит название класса сервиса. И кроме того может принимать еще ряд атрибутов:
android:enabled : если имеет значение «true», то сервис может ли создаваться системой. Значение по умолчанию — «true».
android:exported : указывает, могут ли другие компоненты приложения обращаться к сервису. Если имеет значение «true», то могут, если имеет значение «false», то нет.
android:icon : значок сервиса, представляет собой ссылку на ресурс drawable
android:isolatedProcess : если имеет значение true, то сервис может быть запущен как специальный процесс, изолированный от остальной системы.
android:label : название сервиса, которое отображается пользователю
android:permission : набор разрешений, которые должно применять приложение для запуска сервиса
android:process : название процесса, в котором запущен сервис. Как правило, имеет то же название, что и пакет приложения.
Запустим приложение и нажмем на кнопку запуска сервиса:
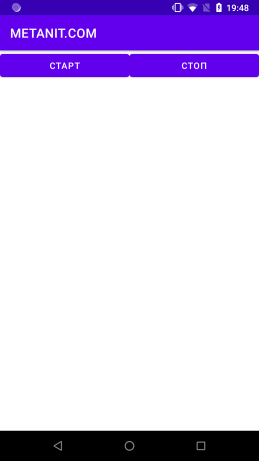
После этого начнется воспроизведение добавленной нами в приложение мелодии.
Источник
Android Application Launch explained: from Zygote to your Activity.onCreate()

Apr 30, 2018 · 6 min read
This article explains how Android launches your application when a user clicks an app icon. The Android system does a lot of heavy lifting behind the curtains to make your launch activity visible to a user. This article covers this process in detail by highlighting the important phases and call sequences.
Android applications are unique in two ways:
- Multiple Entry points: Android apps are composed of different components and they can invoke the components owned by other apps. These components roughly correspond to multiple entry points for any application. Hence, they differ from traditional applications which have a single entry point like main() method.
- Own Little World: Every Android application lives in its own world, it runs in a separate process, it has its own Dalvik VM instance and is assigned a unique user ID.
When does Android process start?
An Android process is started whenever it is required.
Any time a user or some other sys t em component requests a component (could be a service, an activity or an intent receiver) that belongs to your application be executed, the Android system spins off a new process for your app if it’s not already running. Generally processes keep running until killed by the system. Application processes are created on demand and a lot of things happen before you see your application’s launch activity up and running.
Every app runs in its own process: By default, every Android app runs in its own Android process which is nothing but a Linux process which gets one execution thread to start with. For example, when you click on a hyper-link in your e-mail, a web page opens in a browser window. Your mail client and the browser are two separate apps and they run in their two separate individual processes. The click event causes Android platform to launch a new process so that it can instantiate the browser activity in the context of its own process. The same holds good for any other component in an application.
Zygote : Spawning new life, new process
Let’s step back for a moment and have a quick look on system start-up process. Like the most Linux based systems, at startup, the boot loader loads the kernel and starts the init process. The init then spawns the low level Linux processes called “daemons” e.g. android debug daemon, USB daemon etc. These daemons typically handle the low level hardware interfaces including radio interface.
Init process then starts a very interesting process called ‘ Zygote ’.
As the name implies it’s the very beginning for the rest of the Android application. This is the process which initializes a very first instance of Dalvik virtual machine. It also pre-loads all common classes used by Android application framework and various apps installed on a system. It thus prepares itself to be replicated. It stats listening on a socket interface for future requests to spawn off new virtual machines (VM)for managing new application processes. On receiving a new request, it forks itself to create a new process which gets a pre-initialized VM instance.
After zygote, init starts the runtime process.
The zygote then forks to start a well managed process called system server. System server starts all core platform services e.g activity manager service and hardware services in its own context.
At this point the full stack is ready to launch the first app process — Home app which displays the home screen also known as Launcher application.
When a user clicks an app icon in Launcher …
The click event gets translated into startActivity(intent) and it is routed to ActivityManagerService via Binder IPC. The ActvityManagerService performs multiple steps
- The first step is to collect information about the target of the intent object. This is done by using resolveIntent() method on PackageManager object. PackageManager.MATCH_DEFAULT_ONLY and PackageManager.GET_SHARED_LIBRARY_FILES flags are used by default.
- The target information is saved back into the intent object to avoid re-doing this step.
- Next important step is to check if user has enough privileges to invoke the target component of the intent. This is done by calling grantUriPermissionLocked() method.
- If user has enough permissions, ActivityManagerService checks if the target activity requires to be launched in a new task. The task creation depends on Intent flags such as FLAG_ACTIVITY_NEW_TASK and other flags such as FLAG_ACTIVITY_CLEAR_TOP.
- Now, it’s the time to check if the ProcessRecord already exists for the process.If the ProcessRecord is null, the ActivityManager has to create a new process to instantiate the target component.
As you saw above many things happen behind the scene when a user clicks on an icon and a new application gets launched. Here is the full picture :

There are three distinct phases of process launch :
- Process Creation
- Binding Application
- Launching Activity / Starting Service / Invoking intent receiver …
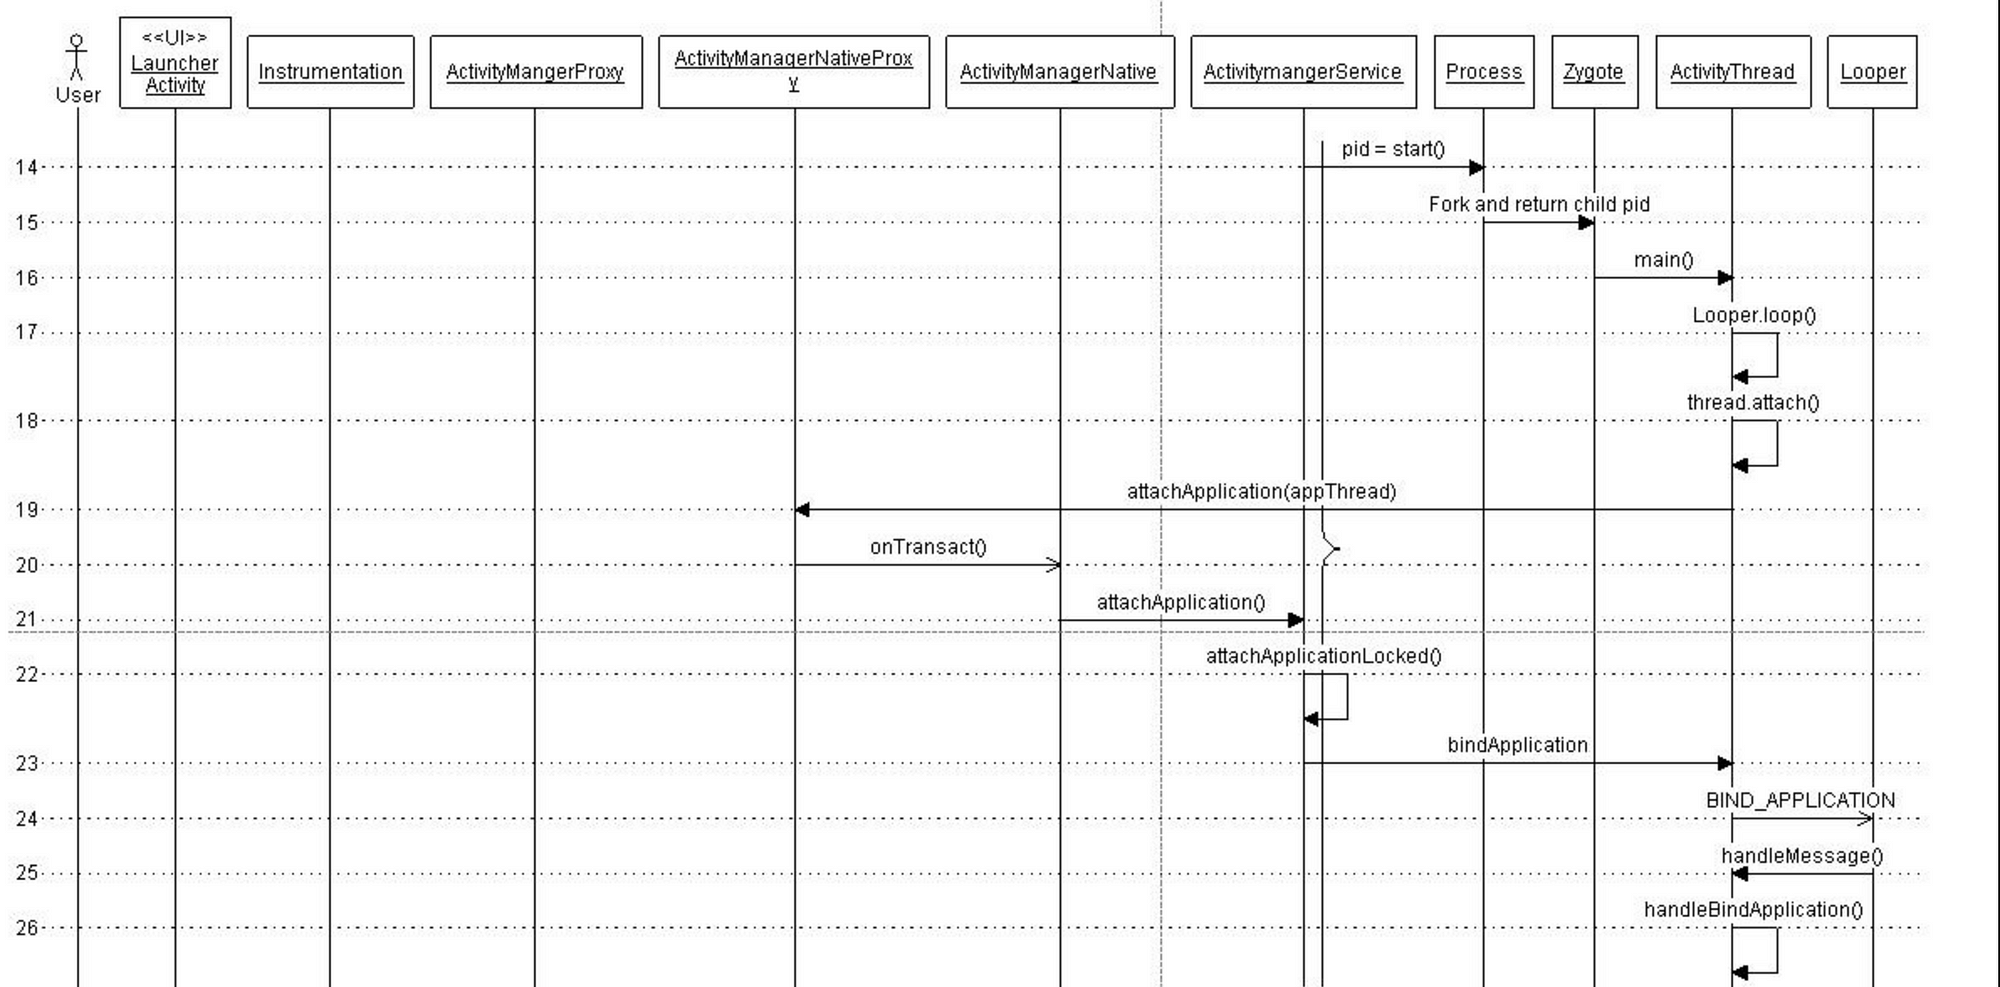
ActivityManagerService creates a new process by invoking startProcessLocked() method which sends arguments to Zygote process over the socket connection. Zygote forks itself and calls ZygoteInit.main() which then instantiates ActivityThread object and returns a process id of a newly created process.
Every process gets one thread by default. The main thread has a Looper instance to handle messages from a message queue and it calls Looper.loop() in its every iteration of run() method. It’s the job of a Looper to pop off the messages from message queue and invoke the corresponding methods to handle them. ActivityThread then starts the message loop by calling Looper.prepareLoop() and Looper.loop() subsequently.
The following sequence captures the call sequence in detail —

The next step is to attach this newly created process to a specific application. This is done by calling bindApplication() on the thread object. This method sends BIND_APPLICATION message to the message queue. This message is retrieved by the Handler object which then invokes handleMessage() method to trigger the message specific action — handleBindApplication(). This method invokes makeApplication() method which loads app specific classes into memory.
This call sequence is depicted in following figure.
Launching an Activity:
After the previous step, the system contains the process responsible for the application with application classes loaded in process’s private memory. The call sequence to launch an activity is common between a newly created process and an existing process.
The actual process of launching starts in realStartActivity() method which calls sheduleLaunchActivity() on the application thread object. This method sends LAUNCH_ACTIVITY message to the message queue. The message is handled by handleLaunchActivity() method as shown below.
Assuming that user clicks on Video Browser application. the call sequence to launch the activity is as shown in the figure.
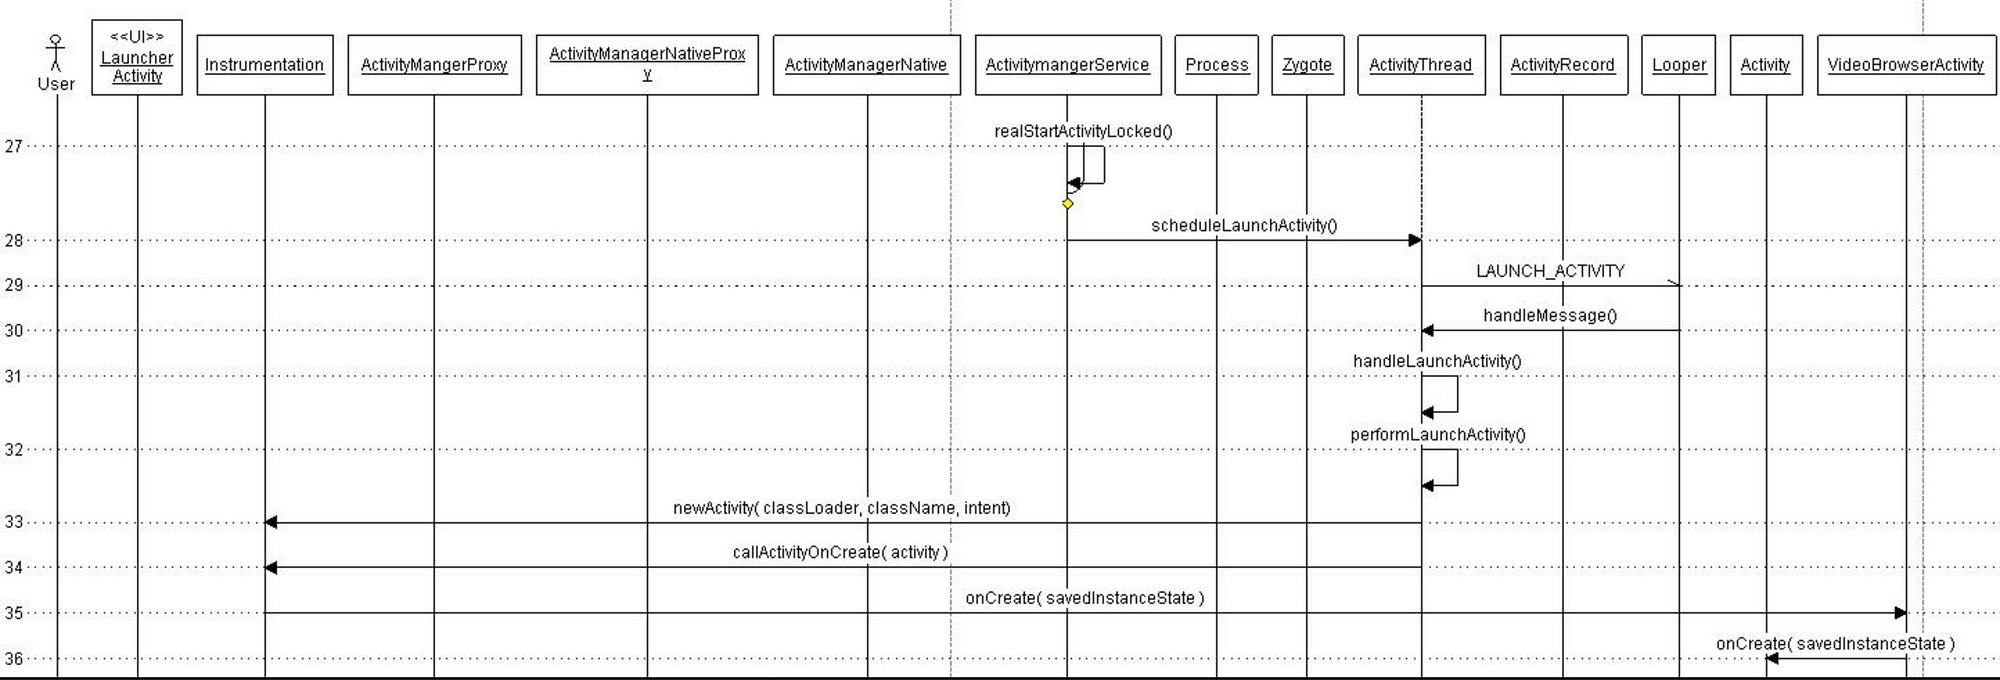
The Activity starts its managed lifecycle with onCreate() method call. The activity comes to foreground with onRestart() call and starts interacting with the user with onStart() call.
Thanks for reading through 🙌🏼. If you found this post useful, please applaud using the 👏 button and share it through your circles.
This article was initially published as two part series (Part 1 and Part 2) on my blog ./ mult-core-dump in 2010. These articles have been cited in multiple documents including the very famous Introduction to the Android Graphics Pipeline
Источник


