- Полный список
- Прочее
- Google Maps Intents for Android
- Overview
- Intent requests
- Kotlin
- Kotlin
- Kotlin
- URL encoded query strings
- Kotlin
- Displaying a map
- Kotlin
- Searching for a location
- Categorical search
- Kotlin
- Kotlin
- Location search
- Kotlin
- Kotlin
- Kotlin
- Kotlin
- Kotlin
- Launching turn-by-turn navigation
- Kotlin
- Kotlin
- Kotlin
- Kotlin
- Displaying a Street View panorama
- Kotlin
Полный список
— получаем данные о местоположении
Android устройства могут предоставить нам данные по нашему текущему местоположению. Это, конечно, очень удобно и вовсю используется для, например, пользования картой, получения актуальной для вашей местности информации (прогноз погоды), всевозможных чекинов и пр.
Реализация этого всего вполне проста. Мы вешаем слушателя на провайдера и получаем данные. На данный момент есть два провайдера: GPS и Network.
GPS – тут все понятно, это данные с GPS-спутников.
Network – это координаты, которые можно получить через сотовую связь или WiFi. Для этого провайдера нужен инет.
Напишем простое приложение, которое будет запрашивать и отображать координаты.
Project name: P1381_Location
Build Target: Android 2.3.3
Application name: Location
Package name: ru.startandroid.develop.p1381location
Create Activity: MainActivity
В strings.xml добавим строки:
Несколько TextView, в которые мы будем выводить данные, и кнопка для открытия настроек местоположения.
В onCreate определяем TextView-компоненты и получаем LocationManager, через который и будем работать.
В onResume вешаем слушателя с помощью метода requestLocationUpdates. На вход передаем:
— тип провайдера: GPS_PROVIDER или NETWORK_PROVIDER
— минимальное время (в миллисекундах) между получением данных. Я укажу здесь 10 секунд, мне этого вполне хватит. Если хотите получать координаты без задержек – передавайте 0. Но учитывайте, что это только минимальное время. Реальное ожидание может быть дольше.
— минимальное расстояние (в метрах). Т.е. если ваше местоположение изменилось на указанное кол-во метров, то вам придут новые координаты.
— слушатель, объект locationListener, который рассмотрим ниже
Также здесь обновляем на экране инфу о включенности провайдеров.
В onPause отключаем слушателя методом removeUpdates.
locationListener – слушатель, реализует интерфейс LocationListener с методами:
onLocationChanged – новые данные о местоположении, объект Location. Здесь мы вызываем свой метод showLocation, который на экране отобразит данные о местоположении.
onProviderDisabled – указанный провайдер был отключен юзером. В этом методе вызываем свой метод checkEnabled, который на экране обновит текущие статусы провайдеров.
onProviderEnabled – указанный провайдер был включен юзером. Тут также вызываем checkEnabled. Далее методом getLastKnownLocation (он может вернуть null) запрашиваем последнее доступное местоположение от включенного провайдера и отображаем его. Оно может быть вполне актуальным, если вы до этого использовали какое-либо приложение с определением местоположения.
onStatusChanged – изменился статус указанного провайдера. В поле status могут быть значения OUT_OF_SERVICE (данные будут недоступны долгое время), TEMPORARILY_UNAVAILABLE (данные временно недоступны), AVAILABLE (все ок, данные доступны). В этом методе мы просто выводим новый статус на экран.
Провайдеры включаются и отключаются в настройках системы. Тем самым, просто определяется доступен ли провайдер для получения от него координат. Чуть позже увидим, как можно отправить юзера в эти настройки. Программное включение/выключение провайдеров через стандартные методы недоступно.
Далее идут свои методы.
showLocation на вход берет Location, определяет его провайдера методом getProvider и отображает координаты в соответствующем текстовом поле.
formatLocation на вход берет Location, читает из него данные и форматирует из них строку. Какие данные он берет: getLatitude – широта, getLongitude – долгота, getTime – время определения.
checkEnabled определяет включены или выключены провайдеры методом isProviderEnabled и отображает эту инфу на экране.
Метод onClickLocationSettings срабатывает по нажатию кнопки Location settings и открывает настройки, чтобы пользователь мог включить или выключить провайдер. Для этого используется Intent с action = ACTION_LOCATION_SOURCE_SETTINGS.
Осталось в манифесте прописать разрешение на определение координат — ACCESS_FINE_LOCATION, которое позволит нам использовать и Network и GPS. Также существует разрешение ACCESS_COARSE_LOCATION, но оно дает доступ только к Network-провайдеру.
С кодом все, давайте смотреть, что получилось. Все сохраняем и запускаем приложение.
У меня на планшете сейчас выключен GPS, выключен WiFi, вставлена симка и выключен мобильный интернет.
Запускаю приложение и вижу такую картину:
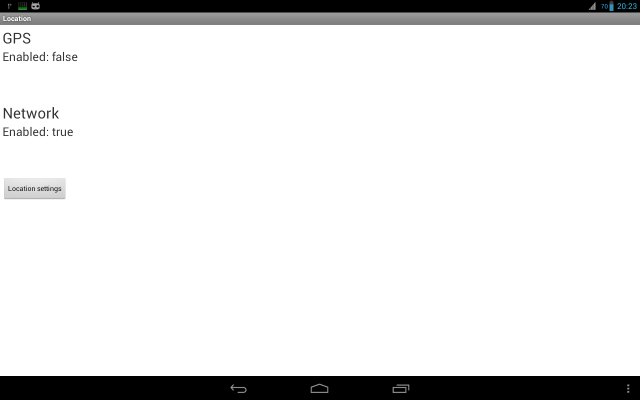
GPS выключен, Network включен. Но инета нет, поэтому Network мне ничего не дает. Надо включить либо мобильный инет, либо WiFi.
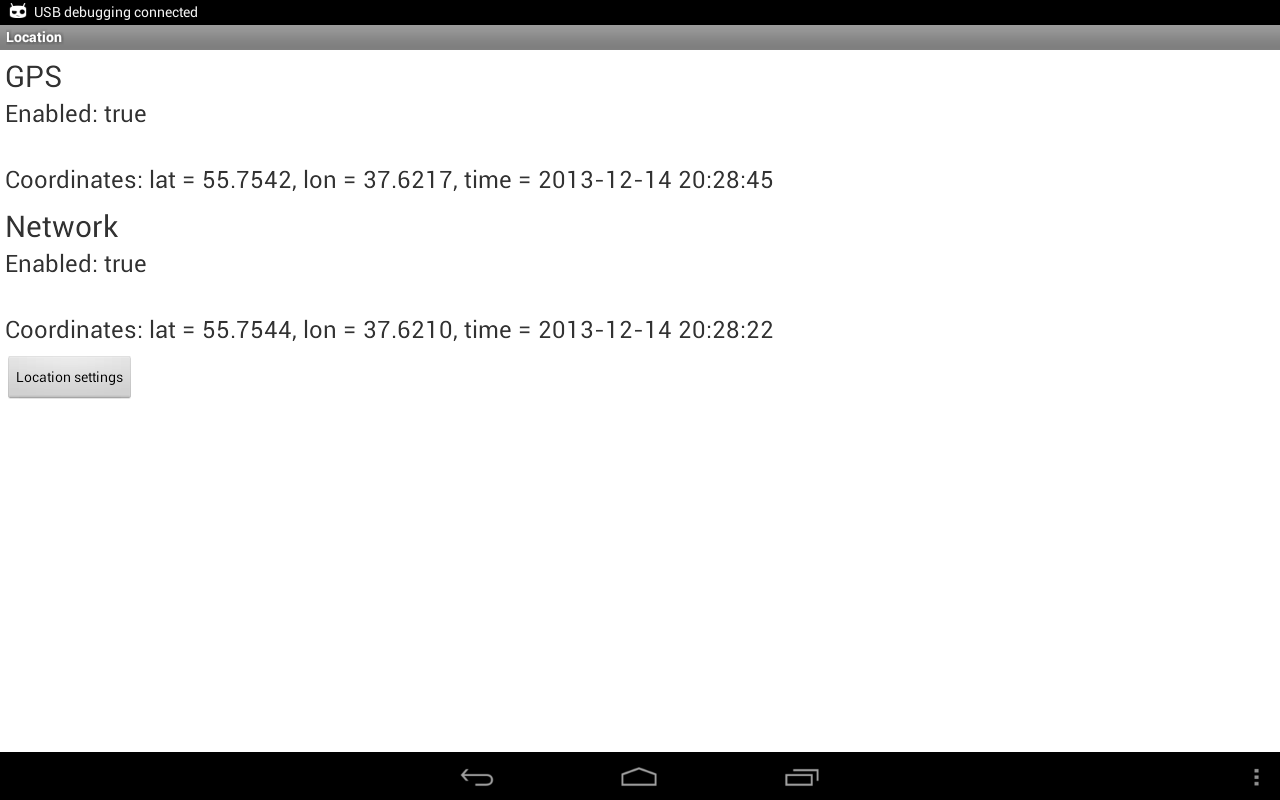
Я включаю WiFi. Проходит секунд 15-20 и инфа с Network пошла

Видим широту, долготу и время.
Напомню, что мы ставили минимальную скорость обновления – 10 сек. Но у меня провайдер Network выдает данные не чаще, чем раз в минуту.
Теперь давайте включим GPS. Для этого мы специально повесили кнопку Location settings, которую надо будет нажать пользователю, чтобы перейти в настройки. Жмем кнопку.
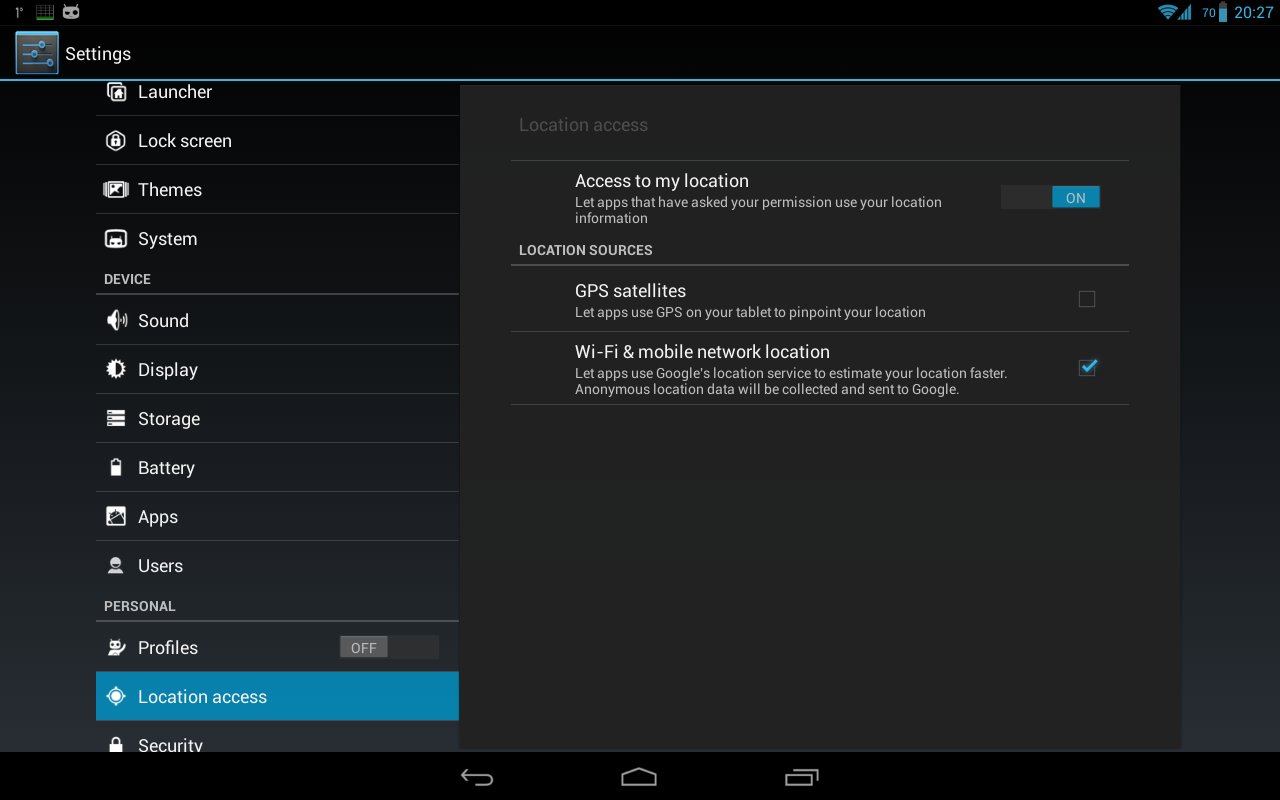
Видим, что GPS выключен, а Network включен. Наше приложение показывало все верно.
Разумеется, GPS можно включать и выключать через быстрые настройки системы (справа сверху). Но не все пользователи об этом знают. А тут мы их точно направим.
Включаем GPS и жмем Назад, чтобы вернуться в приложение.

GPS теперь показывает что он включен, ждем координаты. Для этого имеет смысл подойти к окну, больше вероятности, что поймаем сигнал.
В итоге сигнал пойман и получен результат.
У GPS через какое-то время включился статус 2 (AVAILABLE).
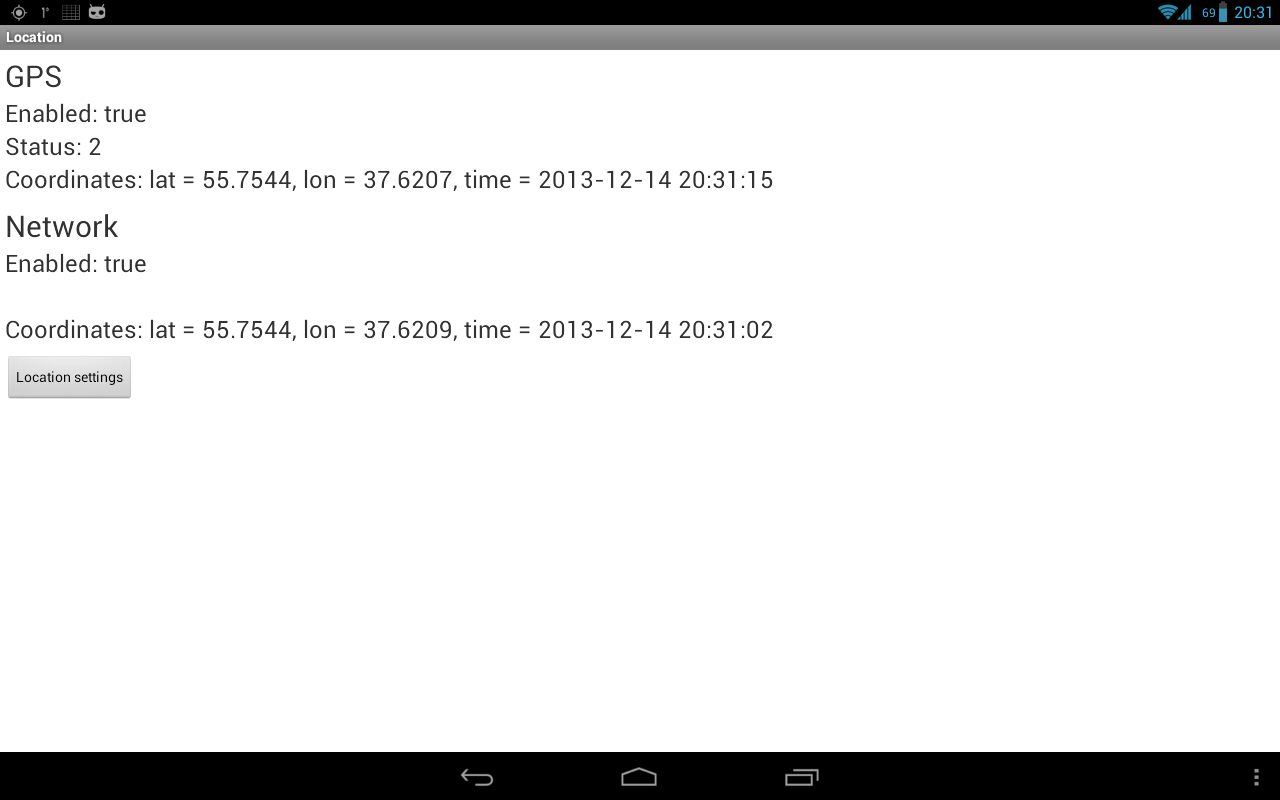
А у Network тишина со статусом. Не знаю, нормально это или нет.
Если с GPS сигналом все ок, то каждые 10 сек вы будете получать инфу о вашем местоположении. Если убрать планшет от окна, получим плохой сигнал: данные могут приходить реже и статус у меня иногда меняется на 1 (TEMPORARILY_UNAVAILABLE).
Прочее
Есть еще третий тип провайдера — PASSIVE_PROVIDER. Сам по себе этот провайдер никакие данные не вернет. Но повесив на него слушателя, вы сможете получать данные о местоположении, когда кто-то еще в системе пытается определить местоположение через обычные провайдеры. Система будет дублировать результаты и вам.
Метод getAllProviders вернет вам список всех доступных провайдеров. Метод getProviders(boolean enabledOnly) вернет либо все, либо только включенные.
Объект Location кроме координат, времени и провайдера имеет еще несколько атрибутов, которые могут прийти и пустыми:
getAccuracy – точность показания в метрах
getAltitude – высота над уровнем моря в метрах
getSpeed – скорость движения в м/с
getBearing – насколько я понял, это угол, на который текущая траектория движения отклоняется от траектории на север. Он же азимут.
Местоположение можно протестировать и через AVD эмулятор. Для этого надо в Eclipse открыть DDMS (Window > Open Perspective > DDMS) и выбрать вкладку Emulator Control. Внизу будет вкладка Manual, на которой есть поля для ввода координат и кнопка отправки.
На следующем уроке:
— создаем приложение с картой
— настраиваем карту и обрабатываем ее события
— программно меняем положение камеры
Присоединяйтесь к нам в Telegram:
— в канале StartAndroid публикуются ссылки на новые статьи с сайта startandroid.ru и интересные материалы с хабра, medium.com и т.п.
— в чатах решаем возникающие вопросы и проблемы по различным темам: Android, Kotlin, RxJava, Dagger, Тестирование
— ну и если просто хочется поговорить с коллегами по разработке, то есть чат Флудильня
— новый чат Performance для обсуждения проблем производительности и для ваших пожеланий по содержанию курса по этой теме
Источник
Google Maps Intents for Android
The Google Maps app for Android exposes several intents that you can use to launch Google Maps in display, search, navigation, or Street View modes. If you want to embed a map in your app, please refer to the Google Maps Android API Getting Started Guide.
Note: Maps URLs let you build a universal, cross-platform URL to launch Google Maps and perform searches, get directions, display map views, and display panoramic images. It is recommended that you use the cross-platform Maps URLs to launch Google Maps, since these universal URLs allow for broader handling of the maps requests no matter which platform the user is on. You should only use the Android-specific Maps Intents for features that may only be functional on a mobile platform (for example, turn-by-turn navigation).
Overview
Intents let you start an activity in another app by describing a simple action you’d like to perform (such as «display a map» or «show directions to the airport») in an Intent object. The Google Maps app for Android supports several different intents, allowing you to launch the Google Maps app and perform one of four actions:
- Display a map at a specified location and zoom level.
- Search for locations or places, and display them on a map.
- Request directions from one location to another. Directions can be returned for three modes of transportation: driving, walking, bicycling.
- Display panorama imagery in Google Street View.
This page describes the intents that you can use with Google Maps app for Android. For more information on Intents and Intent Filters, or Intents common to the Android platform, refer to the Android developer documentation.
Intent requests
In order to launch Google Maps with an intent you must first create an Intent object, specifying its action, URI and package.
- Action: All Google Maps intents are called as a View action — ACTION_VIEW .
- URI: Google Maps intents use URL encoded that specify a desired action, along with some data with which to perform the action.
- Package: Calling setPackage(«com.google.android.apps.maps») will ensure that the Google Maps app for Android handles the Intent. If the package isn’t set, the system will determine which apps can handle the Intent . If multiple apps are available, the user may be asked which app they would like to use.
After creating the Intent , you can request that the system launch the related app in a number of ways. A common method is to pass the Intent to the startActivity() method. The system will launch the necessary app — in this case Google Maps — and start the corresponding Activity .
Kotlin
If the system cannot identify an app that can respond to the intent, your app may crash. For this reason, you should first verify that a receiving application is installed before you present one of these intents to a user.
To verify that an app is available to receive the intent, call resolveActivity() on your Intent object. If the result is non-null, there is at least one app that can handle the intent and it’s safe to call startActivity() . If the result is null , you should not use the intent and, if possible, you should disable the feature that invokes the intent.
Kotlin
For example, to display a map of San Francisco, you can use the following code:
Kotlin
URL encoded query strings
All strings passed to the Google Maps Intents must be URI encoded. For example, the string «1st & Pike, Seattle» should become 1st%20%26%20Pike%2C%20Seattle . Spaces in the string can be encoded with %20 or replaced with the plus sign (+).
You can use the android.net.Uri parse() method to encode your strings. For example:
Kotlin
Displaying a map
Use the geo: intent to display a map at a specified location and zoom level.
Parameters
- latitude and longitude set the center point of the map.
- z optionally sets the initial zoom level of the map. Accepted values range from 0 (the whole world) to 21 (individual buildings). The upper limit can vary depending on the map data available at the selected location.
Examples
Kotlin
Searching for a location
Use this intent to display search queries within a specified viewport. When the query has a single result, you can use this intent to display a pin at a particular place or address, such as a landmark, business, geographic feature, or town.
Parameters
In addition to the parameters used to display a map, Search supports the following parameters:
q defines the place(s) to highlight on the map. The q parameter is required for all Search requests. It accepts a location as either a place name or address. The string should be URL-encoded, so an address such as «City Hall, New York, NY» should be converted to City+Hall,New+York,NY.
label lets you set a custom label at a place identified on the map. The label must be specified as a String.
Categorical search
If you pass a general search term, Google Maps will attempt to find a location near the lat/lng you specified that matches your criteria. If no location is specified, Google Maps will try to find nearby listings. For example:
Kotlin
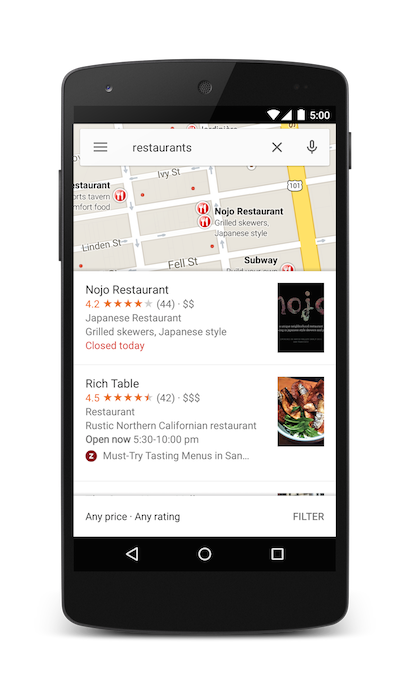
You can further bias the search results by specifying a zoom parameter along with the query string. In the below example, adding a zoom of 10 will attempt to find restaurants at a city level instead of nearby.
Kotlin
Location search
Searching for a specific address will display a pin at that location.
Kotlin
The above example sets a lat/lng of 0 , 0 , but passes an address as a query string. When searching for a very specific location, the latitude and longitude are not required. However, if you do not know the exact address, you can attempt to bias the results of the search by specifying a coordinate. For example, performing an address search for ‘Main Street’ will return too many results.
Kotlin
Adding a lat/lng to the intent URI will bias the results towards a particular area:
Kotlin
When you know your search will return a single value, you may wish to pass an optional label. Labels must be specified as a String, and will appear under the map marker. Note that labels are only available when q is specified as a lat/lng coordinate.
Kotlin
As an alternative to a street address or a latitude/longitude, you can display a pin at a known location using a plus code.
Kotlin
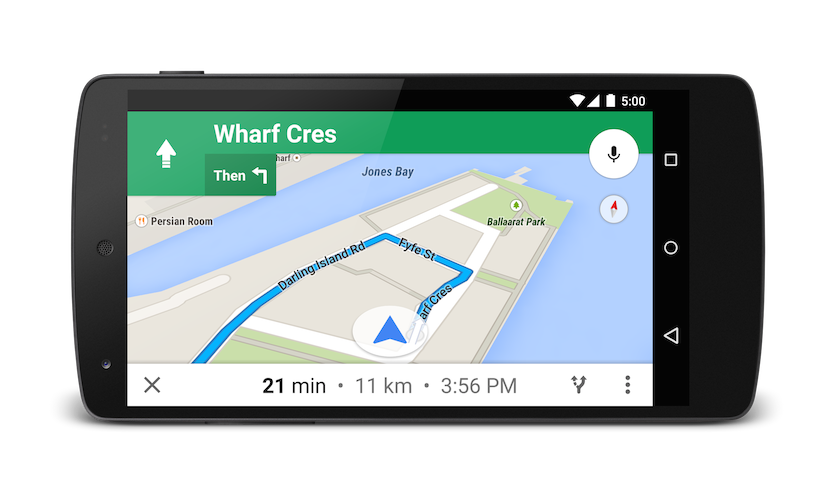
Launching turn-by-turn navigation
Use this intent to launch Google Maps navigation with turn-by-turn directions to the address or coordinate specified. Directions are always given from the user’s current location.
Parameters
q : Sets the end point for navigation searches. This value can be latitude, longitude coordinates or a query formatted address. If it is a query string that returns more than one result, the first result will be selected.
mode sets the method of transportation. Mode is optional, and can be set to one of:
- d for driving (default)
- b for bicycling
- l for two-wheeler
- w for walking
avoid sets features the route should try to avoid. Avoid is optional and can be set to one or more of:
Examples
The below Intent will request turn-by-turn navigation to Taronga Zoo, in Sydney Australia:
Kotlin
If you prefer not to pay tolls or ride a ferry, you can request routing that tries to avoid those things.
Kotlin
If you’d prefer a bit of exercise, you can request bicycling directions instead.
Kotlin
If you’d prefer taking a motorized two-wheeler, you can request that the directions include narrow roads and trails unavailable to cars. The below intent returns a route in India.
Kotlin
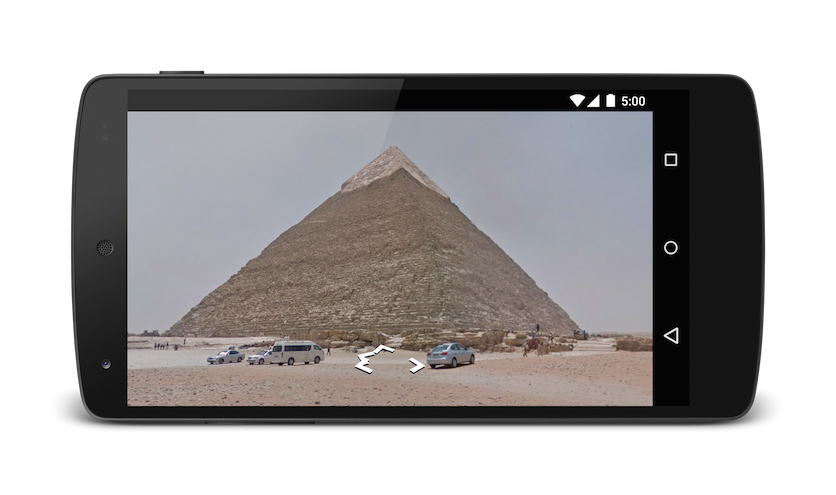
Displaying a Street View panorama
Use the google.streetview intent to launch Google Street View. Google Street View provides panoramic views from designated locations throughout its coverage area. User contributed Photospheres, and Street View special collections are also available.
Parameters
All google.streetview URIs must include either a cbll or a panoid parameter.
cbll accepts a latitude and a longitude as comma-separated values ( 46.414382,10.013988 ). The app will display the panorama photographed closest to this location. Because Street View imagery is periodically refreshed, and photographs may be taken from slightly different positions each time, it’s possible that your location may snap to a different panorama when imagery is updated.
panoid is a specific panorama ID. Google Maps will use the panorama ID if both a panoid and a cbll are specified. Panorama IDs are available to an Android app from the StreetViewPanoramaLocation object.
cbp is an optional parameter that adjusts the initial orientation of the camera. The cbp parameter takes 5 comma-separated values, all of which are optional. The most significant values are the second, fourth and fifth which set the bearing, zoom and tilt respectively. The first and third values are not supported, and should be set to 0 .
- bearing : indicates the compass heading of the camera in degrees clockwise from North. True north is 0, east is 90, south is 180, west is 270. Values passed to bearing will wrap; that is, 0°, 360° and 720° all point in the same direction. Bearing is defined as the second of five comma-separated values.
- zoom : Sets the zoom level of the camera. The default zoom level is set at 0. A zoom of 1 would double the magnification. The zoom is clamped between 0 and the maximum zoom level for the current panorama. This means that any value falling outside this range will be set to the closest extreme that falls within the range. For example, a value of -1 will be set to 0. Zoom is the fourth of five comma-separated values.
- tilt : specifies the angle, up or down, of the camera. The range is -90 through 0 to 90, with 90 looking straight down, 0 centered on the horizon, and -90 looking straight up.
Examples
Below are some examples of using the Street View intent.
Kotlin
Except as otherwise noted, the content of this page is licensed under the Creative Commons Attribution 4.0 License, and code samples are licensed under the Apache 2.0 License. For details, see the Google Developers Site Policies. Java is a registered trademark of Oracle and/or its affiliates.
Источник


