- Android glide cache image
- Cache Keys
- Cache Configuration
- Disk Cache Strategies
- Loading only from cache
- Skipping the cache.
- Implementation
- Cache Invalidation
- Custom Cache Invalidation
- Resource Management
- Memory Cache
- Disk Cache
- Best strategy to load images using Glide — Image loading library for Android
- How Glide Cache Works
- Best Image Loading and Caching Strategy
- Android glide cache image
Android glide cache image
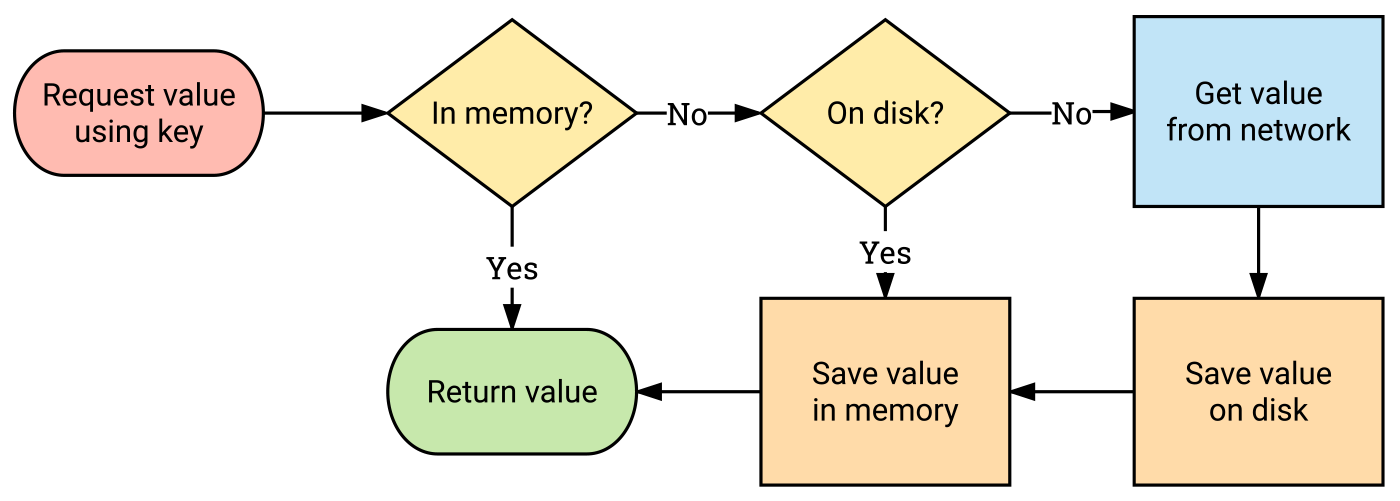
By default, Glide checks multiple layers of caches before starting a new request for an image:
- Active resources — Is this image displayed in another View right now?
- Memory cache — Was this image recently loaded and still in memory?
- Resource — Has this image been decoded, transformed, and written to the disk cache before?
- Data — Was the data this image was obtained from written to the disk cache before?
The first two steps check to see if the resource is in memory and if so, return the image immediately. The second two steps check to see if the image is on disk and return quickly, but asynchronously.
If all four steps fail to find the image, then Glide will go back to the original source to retrieve the data (the original File, Uri, Url etc).
For details on default sizes and locations of Glide’s caches or to configure those parameters, see the configuration page.
Cache Keys
In Glide 4, all cache keys contain at least two elements:
- The model the load is requested for (File, Uri, Url). If you are using a custom model, it needs to correctly implements hashCode() and equals()
- An optional Signature
In fact, the cache keys for steps 1-3 (Active resources, memory cache, resource disk cache) also include a number of other pieces of data including:
- The width and height
- The optional Transformation
- Any added Options
- The requested data type (Bitmap, GIF, etc)
The keys used for active resources and the memory cache also differ slightly from those used from the resource disk cache to accomodate in memory Options like those thataffect the configuration of the Bitmap or other decode time only parameters.
To generate the name of disk cache keys on disk, the individual elements of the keys are hashed to create a single String key, which is then used as the file name in the disk cache.
Cache Configuration
Glide provides a number of options that allow you to choose how loads will interact with Glide’s caches on a per request basis.
Disk Cache Strategies
DiskCacheStrategy can be applied with the diskCacheStrategy method to an individual request. The available strategies allow you to prevent your load from using or writing to the disk cache or choose to cache only the unmodified original data backing your load, only the transformed thumbnail produced by your load, or both.
The default strategy, AUTOMATIC , tries to use the optimal strategy for local and remote images. AUTOMATIC will store only the unmodified data backing your load when you’re loading remote data (like from URLs) because downloading remote data is expensive compared to resizing data already on disk. For local data AUTOMATIC will store the transformed thumbnail only because retrieving the original data is cheap if you need to generate a second thumbnail size or type.
Loading only from cache
In some circumstances you may want a load to fail if an image is not already in cache. To do so, you can use the onlyRetrieveFromCache method on a per request basis:
If the image is found in the memory cache or in the disk cache, it will be loaded. Otherwise, if this option is set to true, the load will fail.
Skipping the cache.
If you’d like to make sure a particular request skips either the disk cache or the memory cache or both, Glide provides a few alternatives.
To skip the memory cache only, use skipMemoryCache() :
To skip the disk cache only, use DiskCacheStrategy.NONE :
These options can be used together:
In general you want to try to avoid skipping caches. It’s vastly faster to load an image from cache than it is to retrieve, decode, and transform it to create a new thumbnail.
If you’d just like to update the entry for an item in the cache, see the documentation on invalidation below.
Implementation
If the available options aren’t sufficient for your needs, you can also write your own DiskCache implementation. See the configuration page for details.
Cache Invalidation
Because disk cache are hashed keys, there is no good way to simply delete all of the cached files on disk that correspond to a particular url or file path. The problem would be simpler if you were only ever allowed to load or cache the original image, but since Glide also caches thumbnails and provides various transformations, each of which will result in a new File in the cache, tracking down and deleting every cached version of an image is difficult.
In practice, the best way to invalidate a cache file is to change your identifier when the content changes (url, uri, file path etc) when possible.
Custom Cache Invalidation
Since it’s often difficult or impossible to change identifiers, Glide also offers the signature() API to mix in additional data that you control into your cache key. Signatures work well for media store content, as well as any content you can maintain some versioning metadata for.
- Media store content — For media store content, you can use Glide’s MediaStoreSignature class as your signature. MediaStoreSignature allows you to mix the date modified time, mime type, and orientation of a media store item into the cache key. These three attributes reliably catch edits and updates allowing you to cache media store thumbs.
- Files — You can use ObjectKey to mix in the File’s date modified time.
- Urls — Although the best way to invalidate urls is to make sure the server changes the url and updates the client when the content at the url changes, you can also use ObjectKey to mix in arbitrary metadata (such as a version number) instead.
Passing in signatures to loads is simple:
The media store signature is also straightforward data from the MediaStore:
You can also define your own signature by implementing the Key interface. Be sure to implement equals() , hashCode() and the updateDiskCacheKey() method:
Keep in mind that to avoid degrading performance, you will want to batch load any versioning metadata in the background so that it is available when you want to load your image.
If all else fails and you can neither change your identifier nor keep track of any reasonable version metadata, you can also disable disk caching entirely using diskCacheStrategy() and DiskCacheStrategy.NONE .
Resource Management
Glide’s disk and memory caches are LRU which means that they take increasingly more memory and/or disk space until they reach their limit at which point they will use at or near the limit continuously. For some added flexibility, Glide provides a few additional ways you can manage the resources your application uses.
Keep in mind that larger memory caches, bitmap pools and disk caches typically provide somewhat better performance, at least up to a point. If you change cache sizes, you should carefully measure performance before and after your changes to make sure the performance/size tradeoffs are reasonable.
Memory Cache
By default Glide’s memory cache and BitmapPool respond to ComponentCallbacks2 and automatically evict their contents to varying degrees depending on the level the framework provides. As a result, you typically don’t need to try to dynamically monitor or clear your cache or BitmapPool . However, should the need arise, Glide does provide a couple of manual options.
Permanent size changes
To change the amount of RAM available to Glide across your application, see the Configuration page.
Temporary size changes.
To temporarily allow Glide to use more or less memory in certain parts of your app, you can use setMemoryCategory :
Make sure to reset the memory category back when you leave the memory or performance sensitive area of your app:
Clearing memory
To simply clear out Glide’s in memory cache and BitmapPool , use clearMemory :
Clearing all memory isn’t particularly efficient and should be avoided whenever possible to avoid jank and increased loading times.
Disk Cache
Glide provides only limited controls for the disk cache size at run time, but the size and configuration can be changed in an AppGlideModule .
Permanent size changes
To change the amount of sdcard space available to Glide’s disk cache across your application, see the Configuration page.
Clearing the disk cache
To try to clear out all items in the disk cache, you can use clearDiskCache :
Источник
Best strategy to load images using Glide — Image loading library for Android

Feb 21, 2019 · 4 min read
Glide is an Image Loader Library for Android developed by bumptech and is a library that is recommended by Google. It has been used in many Google open source projects including Google I/O 2014 official application.
Many of us use glide for image loading but only some of us know its real power. If we dive into the features of glide, the article will go into TL;DR category. Instead I like it to be short and sweet 😉
I have been working on glide since long and the app I am working on relies on images heavily, images in recycler view, view pager, nested recycler views and every single image is a url.
To make app smooth, we had to brainstorm on cache strategy.
How Glide Cache Works
By default, Glide checks multiple layers of caches before starting a new request for an image:
- Active resources — Is this image displayed in another View right now?
- Memory cache — Was this image recently loaded and still in memory?
- Resource — Has this image been decoded, transformed, and written to the disk cache before?
- Data — Was the data this image was obtained from written to the disk cache before?
If all four steps fail to find the image, then Glide will go back to the original source to retrieve the data from the URL.
Best Image Loading and Caching Strategy

ONE — Enable Disk Cache
Applications that use the same resource multiple times in multiple sizes and are willing to trade off some speed and disk space in return for lower bandwidth usage may want to consider enabling disk cache.
You can find more details here.
To enable it we will write the following code.
TWO — Add Image Signature
Guess, what if the image on same URL is changed? Glide will show the old image from cache.
But glide is something from heaven 😍 — it comes with the solution.
Make sure whenever the image on server is changed, it also notifies client. Let it be the latest date time stamp.
Now it can be used for versioning in cache as well. Whenever new signature is provided, it will fetch the new image and cache it as well. Details.
Just add it to the request options.
THREE — Override Image Size (Optional)
If you need very specific size of the image and you are very sure of it, you can use the override request option. It is very useful for the thumbnails.
FOUR — Add Thumbnail Url
Glide’s thumbnail() API allows you to specify a RequestBuilder to start in parallel with your main request. The thumbnail() will be displayed while the primary request is loading. If the primary request completes before the thumbnail request, the image from the thumbnail request will not be shown.
If you only have a single remote URL, you can still benefit from the thumbnail API by using Glide’s override() or sizeMultiplier() APIs to force Glide to load a lower resolution image in the thumbnail request
FIVE — Setup Monthly Schedule for Cleaning
In case when image url is changed and old one is never used but it is still in cache and eating up the phone memory, what to do?
Glide don’t provide the solution for this but you can set up a monthly schedule to clear up all the cache. Details.
SIX — Setup Cache Limit (Optional)
Glide allows applications to use AppGlideModule implementations to completely control Glide’s memory and disk cache usage. Glide tries to provide reasonable defaults for most applications, but for some applications, it will be necessary to customise these values. Be sure to measure the results of any changes to avoid performance regressions. Details can be seen here.
These were the 6 easy steps to achieve better strategy for image caching. Implement and let me know if you find it helpful.
If you have any suggestions or better approach, please do let me know in comments below, I will add them to the article.
Thank you for reading and don’t forget to clap if you liked it 🙂
Источник
Android glide cache image
In this tutorial you can read about Glide. The advanced library for image uploading, caching, rotating and small memory usage.
Android SDK does not have a good way to get images from web and display it to android app. To solve this problem, numbers of third party libraries are available.
You can read some comparison here and here.
- supports thumbnail
- supports animations
- animated GIF decoding, you can load GIF animation into ImageView
- supports OkHttp and Volley library
- display video stills
- placeholder can be added before loading the original image
- any custom image can be shown if error occurs while loading the original image
Glide offers some additional advantages over other image loading libraries. For example, when loading an image, Glide will cache both a version of the image in its original size as well as one that’s the size of its intended ImageView . This means Glide loads the image noticeably faster than libraries like Picasso because no resize is necessary. Additionally, Glide works with Android’s ImageView (Facebook’s Fresco uses DraweeView and Volley uses NetworkImageView ).
Getting started with Glide is as easy as using Picasso. Their API also look quite similar.
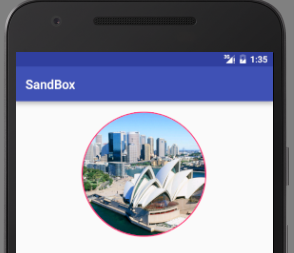
Add the Gradle dependency to your android module build.gradle. Glide also needs android support library v4. Also I’m going to use CircleImageView for circle effect for image.
The way to load an image to ImageView with Glide is quite the same as Picasso.
Although it looks quite the same but in details Glide is designed far better since with doesn’t accept only Context but also Activity and Fragment . The brilliant benefit from passing Activity/Fragment to Glide is: image loading would be integrated with Activity/Fragment‘s lifecycle for example, pause loading in Paused state and automatically resume on Resumed state.
Most options in Glide can be applied using the RequestOptions class and the apply() method.
Use request options to apply (among others):
- Placeholders
- Transformations
- Caching Strategies
- Component specific options, like encode quality, or decode Bitmap configurations.
For example, to apply a CenterCrop transformation, you’d use the following:
Glide is very customizable. Starting with the 4.0 release Glide creates a custom fluent interface depending on your customization. Glide’s developers call this result generated API.
In order to create the generated API, which we’ll use in all upcoming tutorials, you’ll have to create a class extending AppGlideModule somewhere in your app project:
Don’t forget the @GlideModule ! Then, by default, the generated API is accessible via GlideApp . For example:
Loading image from res/drawable folder
Show placeholder image
You can load image to Bitmap via following snippet
Let’s build simple application that will demonstrates Glide usage
In MainActivity file define variable for ImageView and set image URL for load method of Glide. Following is the complete code of java activity file.
We can use transformations for crop, blur, color, mask.
Glide’s default bitmap format is set to RGB_565 so image quality will be poorer compared with Picasso. But the advantage is that it will consume less memory. If you are ok with image quality, don’t change the bitmap format else change it to ARGB_8888 as below.
Then, add meta-tag into AndroidManifest.xml
If you run the app, images will look better now.
Glide creates cached images per size while Picasso saves the full image and process it. If you are trying to load image (500×500) into ImageView (200×200). Glide will download full image, then resize it to 200×200, then it will cache and load into ImageView while Picasso will download full image then it will cache full image then resize it to 200×200 and load it into ImageView.
Next time when you request same image (500×500) to load into ImageView (100×100), Glide will again download the full image (500×500) then resize it to 100×100 then cache and load into ImageView . Picasso, unlike Glide, picks up the cached full size image and resize and load it into ImageView (100×100). Picasso doesn’t download same image again.
However, you can configure Glide to cache full size and resized image as below.
Loading Image to Target
If you want to do something with the loaded image, you need to load the request into target instead of view. You can use Glide provided SimpleTarget class which implements Target or create custom Target class to capture downloaded image.
Custom Glide Object
In the example above we used default singleton Glide object for loading images. Glide allows you to build custom Glide object using GlideBuilder and set the created Glide object as global singleton object using init() method on Glide class.
GlideBuilder has various methods to set bitmap pool, array pool, request options, transition options, disk cache, memory cache, and executor service.
You can set an image as place holder that will be displayed while an image loading request is being processed by Glide or if loading of the image fails. To set placeholder and error images, you need to instantiate RequestOptions object, set placeholder and error images by calling placeholder() and error() methods on it. Then add RequestOptions object to RequestManager by calling applyDefaultRequestOptions() method on RequestManager as shown below.
You can apply transitions to an image loading request by calling transition() method on RequestBuilder , the method takes TransitionOptions as argument. Transition will be shown while image is being downloaded. That is why image transition will be applied to the image when it is being loaded from disk cache, locally from the device or remotely, but not when it is downloaded from memory cache.
In the example below, transition method is used with DrawableTransitionOptions . Other Glide provided TransitionOptions implementations are BitmapTransitionOptions , DrawableTransitionOptions , and GenericTransitionOptions .
You can use android provided animations with Glide using GenericTransitionOptions.
You can define animation in xml use it with Glide.
You can define custom animation using ViewPropertyTransition.Animator and apply it to image loading request as shown below.
How to add rounded corners to ImageView
Using Glide with Kotlin
Include the Glide dependencies, including the annotation processor:
Include the kotlin-kapt plugin in your build.gradle file:
Create a AppGlideModule implementation:
Build the project and then use the generated API:
Источник


