- Android glide on load
- Performance
- Getting Started
- Requirements
- Android glide on load
- Customizing requests.
- ListView and RecyclerView
- Non-View Targets
- Background Threads
- Best strategy to load images using Glide — Image loading library for Android
- How Glide Cache Works
- Best Image Loading and Caching Strategy
- Displaying Images with the Glide Library
- Glide Library – Image Loading Library For Android
- What is Glide Android?
- Why is Glide Android?
- Setup Glide in your Android Studio project
- Basic Usage of Glide
- Glide Basic Example
- Advanced Usage of Glide
- Cropping image
- Adding listener for Glide image loading
- Change Glide default Configuration
- Glide Transformations
- Adjusting Image Size Dynamically
Android glide on load
Glide is a fast and efficient image loading library for Android focused on smooth scrolling. Glide offers an easy to use API, a performant and extensible resource decoding pipeline and automatic resource pooling.
Glide supports fetching, decoding, and displaying video stills, images, and animated GIFs. Glide includes a flexible api that allows developers to plug in to almost any network stack. By default Glide uses a custom HttpUrlConnection based stack, but also includes utility libraries plug in to Google’s Volley project or Square’s OkHttp library instead.
Glide’s primary focus is on making scrolling any kind of a list of images as smooth and fast as possible, but Glide is also effective for almost any case where you need to fetch, resize, and display a remote image.
Glide uses a simple fluent API that allows users to make most requests in a single line:
Performance
Glide takes in to account two key aspects of image loading performance on Android:
- The speed at which images can be decoded.
- The amount of jank incurred while decoding images.
For users to have a great experience with an app, images must not only appear quickly, but they must also do so without causing lots of jank and stuttering from main thread I/O or excessive garbage collections.
Glide takes a number of steps to ensure image loading is both as fast and as smooth as possible on Android:
- Smart and automatic downsampling and caching minimize storage overhead and decode times.
- Aggressive re-use of resources like byte arrays and Bitmaps minimizes expensive garbage collections and heap fragmentation.
- Deep lifecycle integration ensures that only requests for active Fragments and Activities are prioritized and that Applications release resources when necessary to avoid being killed when backgrounded.
Getting Started
Start by visiting the Download and Setup page to learn how to integrate Glide in to your app. Then take a look at the Getting Started page to learn the basics. For more help and examples, continue on through the rest of the Documentation section, or take a look at one of our many sample apps.
Requirements
Glide v4 requires Android Ice Cream Sandwich (API level 14) or higher.
Источник
Android glide on load
Loading images with Glide is easy and in many cases requires only a single line:
Cancelling loads you no longer need is simple too:
Although it’s good practice to clear loads you no longer need, you’re not required to do so. In fact, Glide will automatically clear the load and recycle any resources used by the load when the Activity or Fragment you pass in to Glide.with() is destroyed.
Customizing requests.
Glide offers a variety of options that can be applied to individual requests, including transformations, transitions, caching options etc.
Default options can be applied directly on a request:
Options can be shared across requests using the RequestOptions class:
Glide’s API can be further extended to include custom options using Glide’s generated API for advanced use cases.
ListView and RecyclerView
Loading images in a ListView or RecyclerView uses the same load line as if you were loading in to a single View. Glide handles View re-use and request cancellation automatically:
You don’t need to null check your urls either, Glide will either clear out the view or set whatever placeholder Drawable or fallback Drawable you’ve specified if the url is null.
Glide’s sole requirement is that any re-usable View or Target that you may have started a load into at a previous position either has a new loaded started into it or is explicitly cleared via the clear() API.
By calling clear() or into(View) on the View , you’re cancelling the load and guaranteeing that Glide will not change the contents of the view after the call completes. If you forget to call clear() and don’t start a new load, the load you started into the same View for a previous position may complete after you set your special Drawable and change the contents of the View to an old image.
Although the examples we’ve shown here are for RecyclerView, the same principles apply to ListView as well.
Non-View Targets
In addition to loading Bitmap s and Drawable s into View s, you can also start asynchronous loads into your own custom Target s:
There are a few gotchas with using custom Target s, so be sure to check out the Targets docs page for details.
Background Threads
Loading images on background threads is also straight forward using submit(int, int) :
You can also start asynchronous loads on background threads the same way you would on a foreground thread if you don’t need the Bitmap or Drawable on the background thread itself:
Источник
Best strategy to load images using Glide — Image loading library for Android

Feb 21, 2019 · 4 min read
Glide is an Image Loader Library for Android developed by bumptech and is a library that is recommended by Google. It has been used in many Google open source projects including Google I/O 2014 official application.
Many of us use glide for image loading but only some of us know its real power. If we dive into the features of glide, the article will go into TL;DR category. Instead I like it to be short and sweet 😉
I have been working on glide since long and the app I am working on relies on images heavily, images in recycler view, view pager, nested recycler views and every single image is a url.
To make app smooth, we had to brainstorm on cache strategy.
How Glide Cache Works
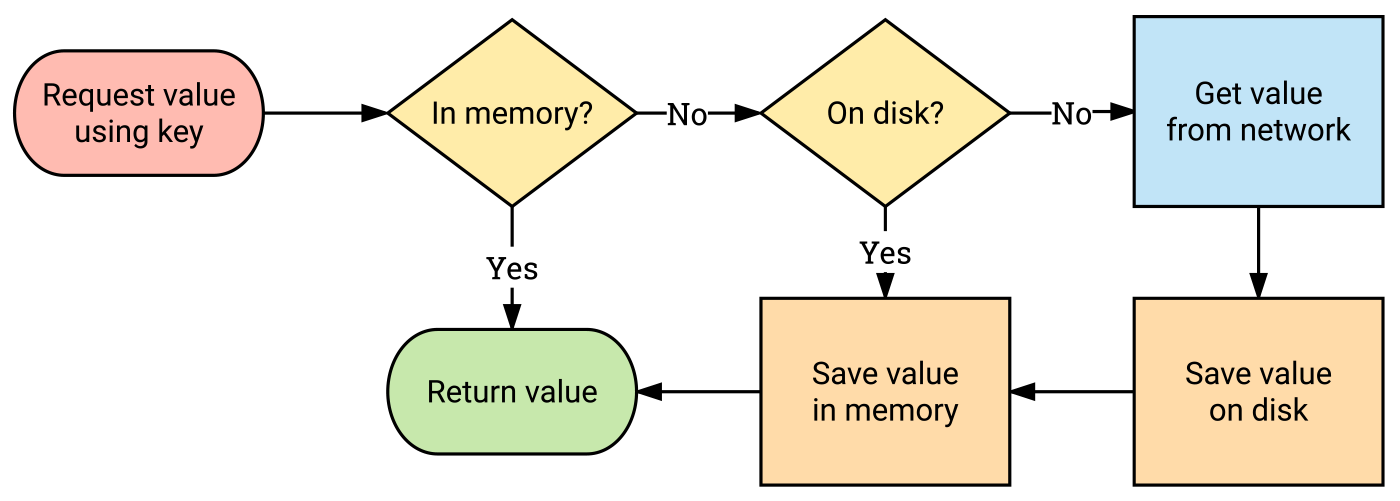
By default, Glide checks multiple layers of caches before starting a new request for an image:
- Active resources — Is this image displayed in another View right now?
- Memory cache — Was this image recently loaded and still in memory?
- Resource — Has this image been decoded, transformed, and written to the disk cache before?
- Data — Was the data this image was obtained from written to the disk cache before?
If all four steps fail to find the image, then Glide will go back to the original source to retrieve the data from the URL.
Best Image Loading and Caching Strategy

ONE — Enable Disk Cache
Applications that use the same resource multiple times in multiple sizes and are willing to trade off some speed and disk space in return for lower bandwidth usage may want to consider enabling disk cache.
You can find more details here.
To enable it we will write the following code.
TWO — Add Image Signature
Guess, what if the image on same URL is changed? Glide will show the old image from cache.
But glide is something from heaven 😍 — it comes with the solution.
Make sure whenever the image on server is changed, it also notifies client. Let it be the latest date time stamp.
Now it can be used for versioning in cache as well. Whenever new signature is provided, it will fetch the new image and cache it as well. Details.
Just add it to the request options.
THREE — Override Image Size (Optional)
If you need very specific size of the image and you are very sure of it, you can use the override request option. It is very useful for the thumbnails.
FOUR — Add Thumbnail Url
Glide’s thumbnail() API allows you to specify a RequestBuilder to start in parallel with your main request. The thumbnail() will be displayed while the primary request is loading. If the primary request completes before the thumbnail request, the image from the thumbnail request will not be shown.
If you only have a single remote URL, you can still benefit from the thumbnail API by using Glide’s override() or sizeMultiplier() APIs to force Glide to load a lower resolution image in the thumbnail request
FIVE — Setup Monthly Schedule for Cleaning
In case when image url is changed and old one is never used but it is still in cache and eating up the phone memory, what to do?
Glide don’t provide the solution for this but you can set up a monthly schedule to clear up all the cache. Details.
SIX — Setup Cache Limit (Optional)
Glide allows applications to use AppGlideModule implementations to completely control Glide’s memory and disk cache usage. Glide tries to provide reasonable defaults for most applications, but for some applications, it will be necessary to customise these values. Be sure to measure the results of any changes to avoid performance regressions. Details can be seen here.
These were the 6 easy steps to achieve better strategy for image caching. Implement and let me know if you find it helpful.
If you have any suggestions or better approach, please do let me know in comments below, I will add them to the article.
Thank you for reading and don’t forget to clap if you liked it 🙂
Источник
Displaying Images with the Glide Library
Glide is an Image Loader Library for Android developed by bumptech and is a library that is recommended by Google. It has been used in many Google open source projects including Google I/O 2014 official application. It provides animated GIF support and handles image loading/caching.
Add to your app/build.gradle file:
Make sure to create a MyAppGlideModule that simply extends from AppGlideModule and has the @GlideModule annotation. For now, the class is empty but later we will show how it can be used to set the default image resolution. If you upgrading from Glide v3, make sure you follow this step too:
Make sure to sync your project to Gradle before continuing, since Glide needs to generate the necessary code to invoke GlideApp.with() in Android Studio.
If you are migrating from Glide v3, make sure to review this guide. Instead of Glide.with() , you will need to use GlideApp.with() :
Resizing images with:
Placeholder and error images:
Cropping images with:
Modify your MyAppGlideModule to override applyOptions:
Ideally, an image’s dimensions would match exactly those of the ImageView in which it is being displayed, but as this is often not the case, care must be taken to resize and/or scale the image appropriately. Android’s native support for this isn’t robust, especially when displaying very large images (such as bitmaps returned from the camera) in smaller image views, which can often lead to errors (see Troubleshooting).
Glide automatically limits the size of the image it holds in memory to the ImageView dimensions. Picasso has the same ability, but requires a call to fit() . With Glide, if you don’t want the image to be automatically fitted to the ImageView , you can call override(horizontalSize, verticalSize) . This will resize the image before displaying it in the ImageView but without respect to the image’s aspect ratio:
Resizing images in this way without respect to the original aspect ratio will often make the image appear skewed or distorted. In most cases, this should be avoided, and Glide offers two standard scaling transformation options to prevent this: centerCrop and fitCenter .
If you only want to resize one dimension, use Target.SIZE_ORIGINAL as a placeholder for the other dimension:
Calling centerCrop() scales the image so that it fills the requested bounds of the ImageView and then crops the extra. The ImageView will be filled completely, but the entire image might not be displayed.
Calling fitCenter() scales the image so that both dimensions are equal to or less than the requested bounds of the ImageView . The image will be displayed completely, but might not fill the entire ImageView .
If an image or set of images aren’t loading, make sure to check the Android monitor log in Android Studio. There’s a good chance you might see an java.lang.OutOfMemoryError «Failed to allocate a [. ] byte allocation with [. ] free bytes» or a Out of memory on a 51121168-byte allocation. . This is quite common and means that you are loading one or more large images that have not been properly resized.
First, you have to find which image(s) being loaded are likely causing this error. For any given Glide . call, we can fix this by one or more of the following approaches:
- Add an explicit width or height to the ImageView by setting layout_width=500dp in the layout file.
- Call .override(width, height) during the Glide load and explicitly set a width or height for the image such as: GlideApp.with(. ).load(imageUri).override(500, 500).into(. ) .
- Try removing android:adjustViewBounds=»true» from your ImageView if present and if you not calling .override()
- Open up your static placeholder or error images and make sure their dimensions are relatively small ( AndroidManifest.xml and then add android:largeHeap to your manifest:
Note that this is not generally a good idea, but can be used temporarily to trigger fewer out of memory errors.
If you experience errors loading images, you can create a RequestListener and pass it in via Glide.listener() to intercept errors:
Transformations are supported by an additional third-party library, glide-transformations. First, add the dependencies:
Источник
Glide Library – Image Loading Library For Android
Table of Contents
What is Glide Android?
- Glide Android is an open source media management and image loading framework for Android.
- It supports fetching, decoding, and displaying video stills, images, and animated GIFs.
- Glide includes a flexible API that allows developers to plug into almost any network stack.
- By default, Glide uses a custom HttpUrlConnection based stack but also includes utility libraries to plug into Google’s Volley project or Square’s OkHttp library instead.
Why is Glide Android?
Glide’s primary focus is on making scrolling any kind of a list of images as smooth and fast as possible, but Glide is also effective for almost any case where you need to fetch, resize, and display a remote image.
Setup Glide in your Android Studio project
Add to your app/build.gradle file:
Basic Usage of Glide
Glide Basic Example
Advanced Usage of Glide
With PlaceHolder
With Placeholder and error placeholder
Resizing image
Cropping image
Center Crop
Circle crop
Fit Center
Resizing with the center crop
Resize and fit center
Adding listener for Glide image loading
Change Glide default Configuration
Extending AppGlideModule you can override the default config on the glide.
In this case, I just change the default image format of the glide.
Glide default Bitmap Format is set to RGB_565 since it
consumed just 50% memory footprint compared to ARGB_8888.
Glide Transformations
Transformations are supported by an additional third-party library, glide-transformations. First, add the dependencies:
Rounded Corners
Circle Crop
Blur Effect
Multiple transforms
Also, you can use multiple transformations at once.
Adjusting Image Size Dynamically
To readjust the ImageView size after the image has been retrieved, first define a SimpleTarget object to intercept the Bitmap once it is loaded:
Next, pass the SimpleTarget to Glide via into().
Источник


