- Android Current Location On Google Map Marker Example Tutorial
- Last Image
- Prerequisite For This Tutorial
- Step 1. Opening Maps Activity
- Step 2. Change gradle file
- Step 3. Writing GOOGLE API Key
- Step 4. Updating Manifest file
- Step 5. Final Changes
- Explanation of Maps Activity
- Google Maps Tutorials
- Download Source Code For Android Current Location On Google Map
- 5 thoughts on “Android Current Location On Google Map Marker Example Tutorial”
- Select Current Place and Show Details on a Map
- Get the code
- Set up your development project
- Get an API key and enable the necessary APIs
- Add the API key to your app
- Build and run your app
- Understand the code
- Instantiate the Places API client
- Kotlin
- Request location permission
- Kotlin
- Kotlin
- Add a map
- Kotlin
- Kotlin
- Kotlin
- Kotlin
- Get the location of the Android device and position the map
- Kotlin
- Get the current place
- Kotlin
- Kotlin
- Kotlin
- Kotlin
- Save the map’s state
- Kotlin
- Kotlin
- Kotlin
Android Current Location On Google Map Marker Example Tutorial

We will develop Android Current Location On Google Map with marker in this example.
Now a days, number of people using google map is increasing significantly.
So most applications are using google map to simplify the user experience.
This tutorial will guide you to show current location on google map with marker in android studio.
First we will fetch the current latitude and longitude and then we will use them to show current location marker on google map.
For getting current location, we will use google’s FusedLocationAPI.
We will update the current location marker constantly on the google map with the current movement of the user.
Last Image
After successful implementation of all the steps, you should get the following output
I am living in Rajkot, India so red marker is there.

Prerequisite For This Tutorial
To go ahead with this example, you need to know some important details regarding google map and API Key.
You should create a project in google developer console and should get API Key first using above tutorial.
Do not create android studio project from above example. Just get your Google map API Key and after getting API Key, follow all the below steps.
Step 1. Opening Maps Activity
Create a new project in android studio. Give the name, directory, sdk level etc. details of new project.
After this, you will have a screen like the below image.
Step 2. Change gradle file
Now it is time to do some changes in build.gradle(Module: app) file
By default, you will have the below line in your build.gradle(Module: app) file because of Google Maps Activity
We also require following two lines here
- First line will help us to get the current location.
- Second line will fetch all the classes from dexter library to get the runtime permissions.
So final code for build.gradle(Module: app) file is as below
Step 3. Writing GOOGLE API Key
There is a file named google_maps_api.xml which is system generated.
- This google_maps_api.xml file is available at res->values directory.
- You need to write your Google API Key here in this file.
Code for this file is as following
- Add your API key in between Your API Key tags.
Step 4. Updating Manifest file
By default, you will have ACCESS_COARSE_LOCATION in your AndroidManifest.xml file
- Replace it with ACCESS_FINE_LOCATION because it is required to fetch more accurate current location.
Final code for AndroidManifest.xml
Step 5. Final Changes
Now we need to change the code of activity_maps.xml and MapsActivity.java file
Replace your existing code of activity_maps.xml with the following one
- Here I have taken four textviews which will represent the latitude and longitude values.
- One fragment is also there, which will open a google map.
- You will also some pre-written code in MapsActivity.java file.
Replace it with the below source code
Explanation of Maps Activity
Following snippet defines necessary variables.
- As you can see that GoogleMap, LocationRequest, LocationManager, Location etc. class’s objects are defined in the above code.
- long variables UPDATE_INTERVAL and FASTEST_INTERVAL defines the specific time amount.
Now consider the following source code
- First of all, compiler will check if the location permissions is granted or not. It will use requestSinglePermission() method for this purpose.
- requestSinglePermission() method will return a boolean variable (true or false) . If the user grants the location permission then it will return true otherwise false.
- If requestSinglePermission() return true, then compiler will start the process to fetch the current location and then it will create google map with the help of that current location.
Code snippet for requestSinglePermission() method is as below
- We have used Dexter library in this method. We will request for ACCESS_FINE_LOCATION in this method.
Now look at the below method
- This method is called when google map is ready to load.
- You need to provide location in terms of latitude and longitude in this method. Map will move it’s camera at this location.
- Marker is also added in this method only.
- onConnected(), onConnectionSuspended(), onConnectionFailed(), and onLocationChanged() methods are called by the compiler while fetching the current location.
Compiler will get the current latitude and longitude in onLocationChanged() method.
Source Code for onLocationChanged() method is as following
- Compiler will call this method every 20 seconds. After getting the location, compiler will again navigate the camera to the new location.
- Hence, Google map will be updated every 20 seconds as per the current movement of the user.
End for this tutorial. Keep navigating over DemoNuts to enhance your knowledge.
Google Maps Tutorials
Following are other useful tutorials on Google Map.
Download Source Code For Android Current Location On Google Map
5 thoughts on “Android Current Location On Google Map Marker Example Tutorial”
I’ve used your code and run it in my android studio. Everything is good, the app also runs in the emulator and asks for location, but I can not see a red marker for the location.
Emulator causes errors regarding locations, try in the real android device. It will definitely work.
Hello,
First, thanks for sharing your work. I tried this class and it works fine.
However, I have a question:
I added 2 buttons (1 for start and 1 for stop)
When I press either button, all gestures are suddenly disabled! Map seems frozen but update continue
and if I press the button to see the running apps and come back to the app, all gestures are usable again.
Could you explain how to keep gestures available all time please ?
Thanks for your answer.
Thanks for the code its perfectly working but in initial it doesn’t show the location why ? At initial launch i need to restart the app for it to get worked . Please update the code for finding route between two locations .
error: cannot find symbol class FragmentActivity
error: package android.support.annotation does not exist
error: package android.support.annotation does not exist
error: cannot find symbol class ActivityCompat
error: package android.support.v7.app does not exist
error: cannot find symbol class FragmentActivity
error: cannot find symbol class Nullable
error: cannot find symbol class NonNull
error: method does not override or implement a method from a supertype
error: cannot find symbol variable super
error: cannot find symbol method setContentView(int)
error: cannot find symbol method getSupportFragmentManager()
error: cannot find symbol method findViewById(int)
error: cannot find symbol method findViewById(int)
error: incompatible types: MapsActivity cannot be converted to Context
error: cannot find symbol method getSystemService(String)
error: method does not override or implement a method from a supertype
error: cannot find symbol variable ActivityCompat
error: cannot find symbol variable ActivityCompat
error: no suitable method found for makeText(MapsActivity,String,int)
method Toast.makeText(Context,CharSequence,int) is not applicable
(argument mismatch; MapsActivity cannot be converted to Context)
method Toast.makeText(Context,int,int) is not applicable
(argument mismatch; MapsActivity cannot be converted to Context)
error: method does not override or implement a method from a supertype
error: method does not override or implement a method from a supertype
error: method does not override or implement a method from a supertype
error: no suitable method found for makeText(MapsActivity,String,int)
method Toast.makeText(Context,CharSequence,int) is not applicable
(argument mismatch; MapsActivity cannot be converted to Context)
method Toast.makeText(Context,int,int) is not applicable
(argument mismatch; MapsActivity cannot be converted to Context)
error: cannot find symbol method getSupportFragmentManager()
error: cannot find symbol variable ActivityCompat
error: cannot find symbol variable ActivityCompat
error: no suitable method found for requestLocationUpdates(GoogleApiClient,LocationRequest,MapsActivity)
method FusedLocationProviderApi.requestLocationUpdates(GoogleApiClient,LocationRequest,LocationListener) is not applicable
(argument mismatch; MapsActivity cannot be converted to LocationListener)
method FusedLocationProviderApi.requestLocationUpdates(GoogleApiClient,LocationRequest,PendingIntent) is not applicable
(argument mismatch; MapsActivity cannot be converted to PendingIntent)
error: method does not override or implement a method from a supertype
error: cannot find symbol variable super
error: method does not override or implement a method from a supertype
error: cannot find symbol variable super
error: package AlertDialog does not exist
error: package AlertDialog does not exist
error: cannot find symbol method startActivity(Intent)
error: cannot find symbol method getSystemService(String)
error: no suitable method found for makeText(MapsActivity,String,int)
method Toast.makeText(Context,CharSequence,int) is not applicable
(argument mismatch; MapsActivity cannot be converted to Context)
method Toast.makeText(Context,int,int) is not applicable
(argument mismatch; MapsActivity cannot be converted to Context)
error: incompatible types: MapsActivity cannot be converted to Activity
uses or overrides a deprecated API.
i have all these error. please help. i follow exactly with the code given here. thank you
Источник
Select Current Place and Show Details on a Map
This tutorial shows you how to find the current location of an Android device and display details of the place (a business or other point of interest) at that location. Follow this tutorial to build an Android app using the Maps SDK for Android, the Places SDK for Android, and the fused location provider in the Google Play services location APIs.
Get the code
View the Java version of the activity:
Show / Hide Code
View the Kotlin version of the activity:
Show / Hide Code
Set up your development project
Follow these steps to create the tutorial project in Android Studio.
Import the tutorial project:
- In Android Studio, select File > New > Import Project.
- Go to the location where you saved the Google Maps Android API v2 Samples repository after downloading it.
- Find the CurrentPlaceDetailsOnMap project at this location:
PATH-TO-SAVED-REPO/android-samples/tutorials/java/CurrentPlaceDetailsOnMap (Java) or
PATH-TO-SAVED-REPO/android-samples/tutorials/kotlin/CurrentPlaceDetailsOnMap (Kotlin) - Select the project directory, then click OK. Android Studio now builds your project, using the Gradle build tool.
Get an API key and enable the necessary APIs
To complete this tutorial, you need a Google API key that’s authorized to use the Maps SDK for Android and the Places SDK for Android.
Click the button below to get a key and activate the APIs.
For more details, see the full guide to getting an API key.
Add the API key to your app
- Open your project’s local.properties file.
Add the following string and then replace YOUR_API_KEY with the value of your API key:
When you build your app, the Secrets Gradle Plugin for Android will copy the API key and make it available as a build variable in the Android manifest.
Build and run your app
- Connect an Android device to your computer. Follow the instructions to enable developer options on your Android device and configure your system to detect the device. (Alternatively, you can use the Android Virtual Device (AVD) Manager to configure a virtual device. When choosing an emulator, make sure you pick an image that includes the Google APIs. For more details, see the getting started guide.)
- In Android Studio, click the Run menu option (or the play button icon). Choose a device as prompted.
Android Studio invokes Gradle to build the app, and then runs the app on the device or on the emulator. You should see a map with a number of markers centered around your current location, similar to the image on this page.
- If you don’t see a map, check that you’ve obtained an API key and added it to the app, as described above. Check the log in Android Studio’s Android Monitor for error messages about the API key.
- If the map shows just a single marker located on Sydney Harbour Bridge (the default location specified in the app), check that you’ve granted location permission to the app. The app prompts for location permission at run time, following the pattern described in the Android permissions guide. Note that you can also set permissions directly on the device, by choosing Settings > Apps >app name > Permissions > Location. For details on how to handle permissions in your code, see the guide below to requesting location permission in your app.
- Use the Android Studio debugging tools to view logs and debug the app.
Understand the code
This part of the tutorial explains the most significant parts of the CurrentPlaceDetailsOnMap app, to help you understand how to build a similar app.
Instantiate the Places API client
The following objects are the primary entry points to the Places SDK for Android:
- The Places class creates and manages clients for the Places SDK for Android.
- The PlaceDetectionClient interface retrieves the current location of the device and the places near the location.
The LocationServices interface is the main entry point for Android location services.
To use the APIs, do the following in the onCreate() method of your fragment or activity:
- Initialize a Places object.
- Create a PlaceDetectionClient object.
- Create a FusedLocationProviderClient object.
Kotlin
Request location permission
Your app must request location permission in order to determine the location of the device and to allow the user to tap the My Location button on the map.
This tutorial provides the code you need to request fine location permission. For more details, see the guide to Android permissions.
Add the permission as a child of the element in your Android manifest:
Request runtime permissions in your app, giving the user the opportunity to allow or deny location permission. The following code checks whether the user has granted fine location permission. If not, it requests the permission:
Kotlin
Override the onRequestPermissionsResult() callback to handle the result of the permission request:
Kotlin
A later section of this tutorial describes the updateLocationUI() method.
Add a map
Display a map, using the Maps SDK for Android.
Add a element to your activity’s layout file, activity_maps.xml . This element defines a SupportMapFragment to act as a container for the map and to provide access to the GoogleMap object. The tutorial uses the Android support library version of the map fragment, to ensure backward compatibility with earlier versions of the Android framework.
In your activity’s onCreate() method, set the layout file as the content view:
Kotlin
Implement the OnMapReadyCallback interface and override the onMapReady() method, to set up the map when the GoogleMap object is available:
Kotlin
In your activity’s onCreate() method, get a handle to the map fragment by calling FragmentManager.findFragmentById() . Then use getMapAsync() to register for the map callback:
Kotlin
Write an updateLocationUI() method to set the location controls on the map. If the user has granted location permission, enable the My Location layer and the related control on the map, otherwise disable the layer and the control, and set the current location to null:
Kotlin
Get the location of the Android device and position the map
Use the fused location provider to find the device’s last-known location, then use that location to position the map. The tutorial provides the code you need. For more details on getting the device’s location, see the guide to the fused location provider in the Google Play services location APIs.
Kotlin
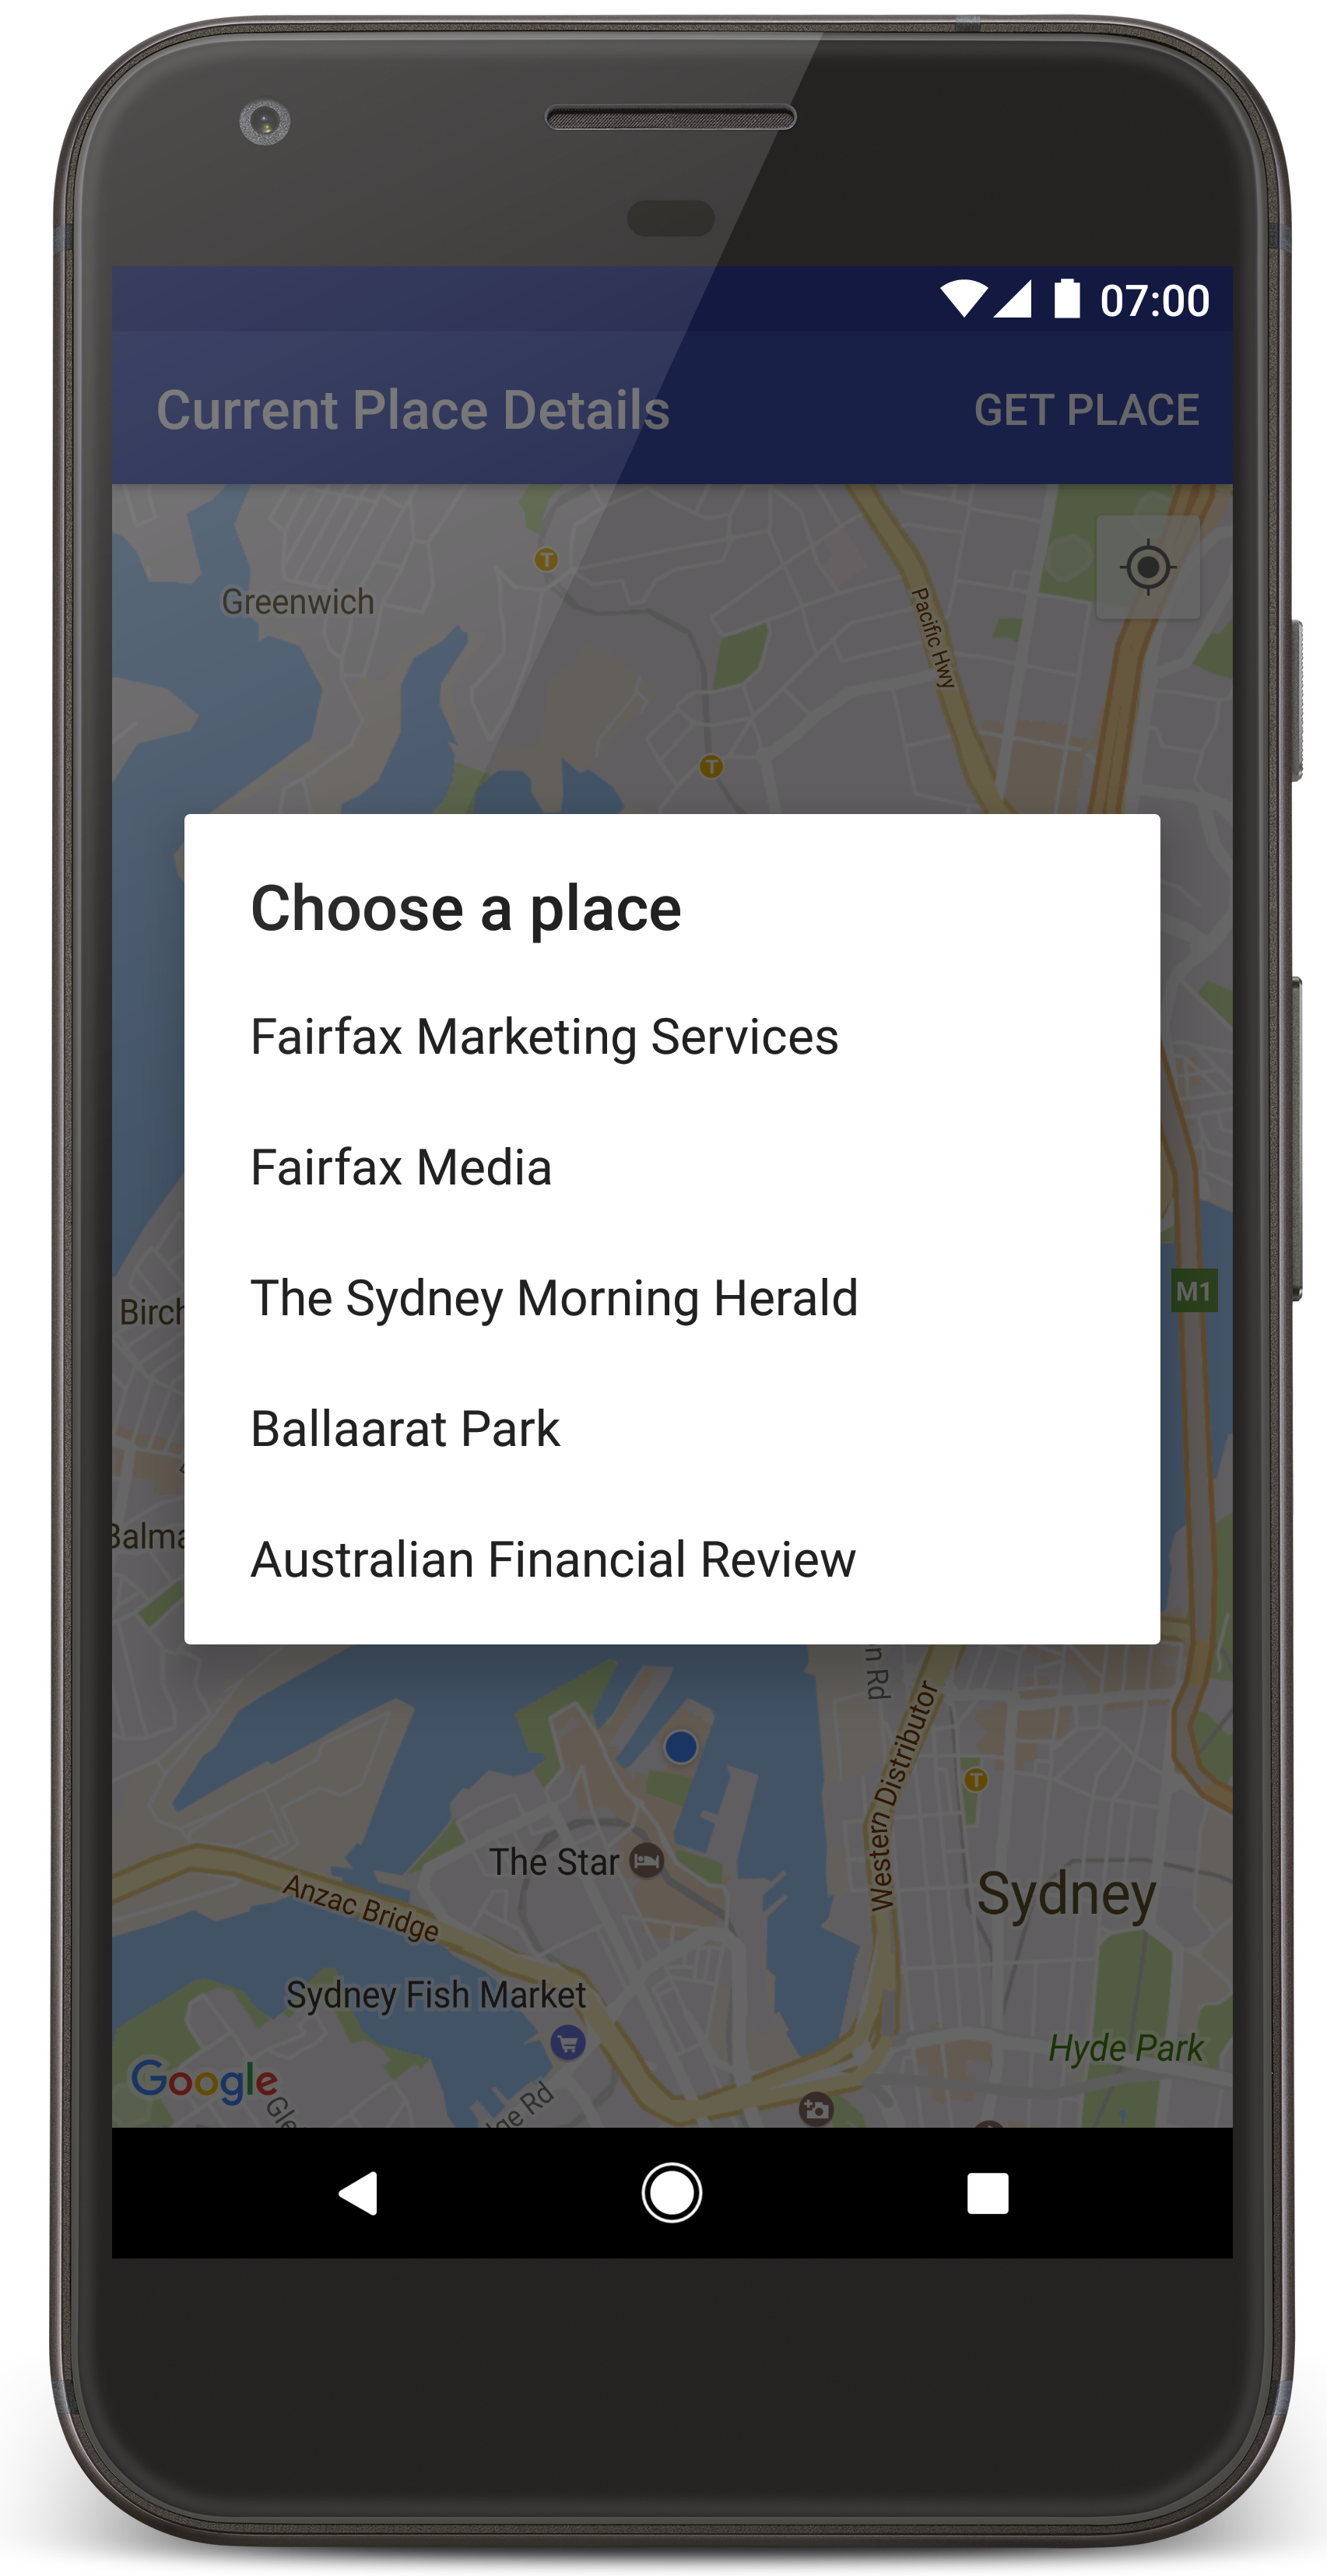
Get the current place
Use the Places SDK for Android to get a list of likely places at the device’s current location. In this context, a place is a business or other point of interest.
This tutorial gets the current place when the user clicks a Get Place button. It offers the user a list of likely places to choose from, then adds a marker on the map at the location of the selected place. The tutorial provides the code you need to interact with the Places SDK for Android. For more details, see the guide to getting the current place.
- Create a layout file ( current_place_menu.xml ) for the options menu, and override the onCreateOptionsMenu() method, to set up the options menu. See the accompanying sample app for the code.
- Override the onOptionsItemSelected() method to get the current place when the user clicks the Get Place option:
Kotlin
Create a showCurrentPlace() method to get a list of likely places at the device’s current location:
Kotlin
Create an openPlacesDialog() method to display a form allowing the user to select a place from a list of likely places. Add a marker on the map for the selected place. The marker content includes the name and address of the place, and any attributions that the API supplies:
Kotlin
Create a custom layout for the info window content. This makes it possible to display multiple lines of content in the info window. First, add an XML layout file, custom_info_contents.xml , containing a text view for the info window title, and another text view for the snippet (that is, the info window’s textual content):
Implement the InfoWindowAdapter interface to inflate the layout and load the info window content:
Kotlin
Save the map’s state
Save the map’s camera position and the device location. When a user rotates an Android device, or makes configuration changes, the Android framework destroys and rebuilds the map activity. To ensure a smooth user experience, it’s good to store relevant application state and restore it when needed.
This tutorial provides all the code you need to save the map’s state. For more details, see the guide to the savedInstanceState bundle.
In your map activity, set up key values for storing activity state:
Kotlin
Implement the onSaveInstanceState() callback to save the state when the activity pauses:
Kotlin
In your activity’s onCreate() method, retrieve the device’s location and the map’s camera position if previously saved:
Kotlin
Except as otherwise noted, the content of this page is licensed under the Creative Commons Attribution 4.0 License, and code samples are licensed under the Apache 2.0 License. For details, see the Google Developers Site Policies. Java is a registered trademark of Oracle and/or its affiliates.
Источник


