- Android Google Map Custom Marker Icon,Image,Color,Size,Title,Name
- Google Map Image
- Wait Before You Start
- Step 1. Default Activity
- Step 2. Adding API Key
- Step 3. Finishing the Changes
- Customizing Marker Title
- Customizing Marker Snippet or Text
- Customization of Marker Icon
- Changing Marker Color
- Other References On Map
- Markers
- Code samples
- Introduction
- Getting started with markers
- Add a marker
- Kotlin
- Display additional information about a marker
- Associate data with a marker
- Kotlin
- Make a marker draggable
- Kotlin
- Customize a marker
- Kotlin
- Customize the marker color
- Kotlin
- Customize the marker opacity
- Kotlin
- Customize the marker image
- Kotlin
- Flatten a marker
- Kotlin
- Rotate a marker
- Kotlin
- Marker z-index
- Kotlin
- Handle marker events
- Marker click events
- Marker drag events
Android Google Map Custom Marker Icon,Image,Color,Size,Title,Name

This page is about Android Google Map Custom Marker Icon with Image,Color,Size,Title and Name programmatically.
Google map gives us many ways to customize the look and feel of the map. One of them is to customize the marker.
By default, google map shows the red icon marker but we can change this red icon marker with our custom image and icon.
You can also change the Title, Name, Snippet, Size etc. of the marker to make it more attractive.
We have to work with some methods and options provided by android’s in built library to accomplish our task.
In this tutorial, I will show you how to do this with one practical example in android studio.
Google Map Image
Final output for our example is as the below image
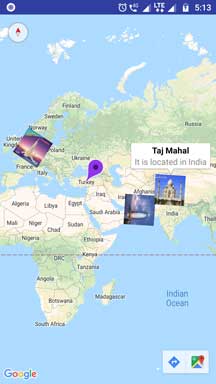 Output with Custom markers
Wait Before You Start
To integrate the google map in your android app, you need to have one Google API Key.
You need to create one app in the Google developer console to generate this API Key.
I have already written one separate article on this topic. Read it here : Android Integrate Google Map with API Key.
Just follow the “Work At Google Developer Console” part of this tutorial. After this, you will have one Google API Key which you need to write in your android studio project.
After getting Your Key, create new project in android studio.
Step 1. Default Activity
When you are creating new project in android studio, after giving project name, project directory and SDK level you need to select the activity type.
Activity type screen should look like the below picture
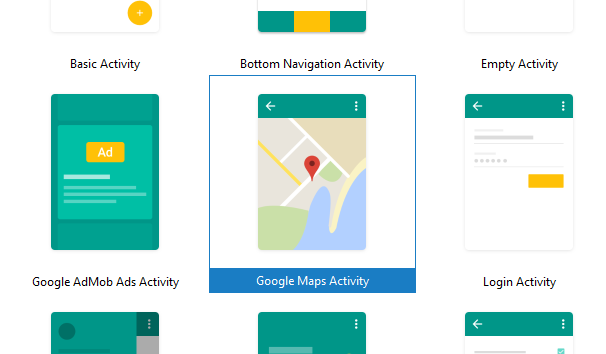 Select Google Map Activity
As you can see in the above image, there are many options like Basic Activity, Bottom Navigation Activity, Login Activity etc.
Among them select “Google Maps Activity” because it will load google map automatically to our default activity.
Thus, it will save our time and we do not need to write extra coding lines.
Step 2. Adding API Key
Now it is time to add the Google API Key, that you generated in the google developer console.
- There is a file named “google_maps_api.xml” in the res->values directory
- You need to write your key in this file.
Source Code for this file should look like below snippet
In the above code, last line have tags. You should write your Google API Key just between these two tags.
Step 3. Finishing the Changes
At last we just need to update the coding structure of MapsActivity.java file.
There should be some code lines already written by the compiler.
But replace all of them with the below lines including import statements.
Now let us read above code step by step.
Following code snippet is first one.
- Above lines will simply initiate the google map.
- When compiler is ready to create a google map, it will call onMapReady() method.
Following is the first few writings for onMapReady() method.
- First line will set the google map type. By default NORMAL MODE is selected.
- You can choose other options like : HYBRID, SATELLITE, TERRAIN etc.
- Then after camera options and position are specified. You need to give latitude and longitude in .target() option.
Now let us read how to customize markers.
I have created four markers like the above code snippet.
Customizing Marker Title
.title(“Taj Mahal”)
For customizing title of the marker, you just need to update the above line.
Customizing Marker Snippet or Text
.snippet(“It is located in India”)
Above line will help you to add some description about the marker.
Customization of Marker Icon
.icon(bitmapDescriptorFromVector(getApplicationContext(),R.drawable.taj)));
- Above line helps you to have custom image as a marker icon. All you need is to save your image into drawable folder.
- Here, I have used bitmapDescriptorFromVector() method to get the bitmap from the image.
Following is the source code for bitmapDescriptorFromVector() method
Changing Marker Color
.icon(BitmapDescriptorFactory.defaultMarker(BitmapDescriptorFactory.HUE_VIOLET)));
Above line will generate violet colored marker with the default shape.
Change various colors to make your marker more beautiful.
Other References On Map
Below are some useful examples for Google map in android.
Источник
Markers
Markers indicate single locations on the map. You can customize your markers by changing the default color, or replacing the marker icon with a custom image. Info windows can provide additional context to a marker.
Code samples
The ApiDemos repository on GitHub includes a sample that demonstrates various marker features:
Java
- MapWithMarker: A simple map with a marker. See the tutorial on adding a map with a marker.
- MarkerDemoActivity: Using markers on a map, including options and listeners
Kotlin
- MapWithMarker: A simple map with a marker. See the tutorial on adding a map with a marker-kt.
- MarkerDemoActivity: Using markers on a map, including options and listeners
Introduction
Markers identify locations on the map. The default marker uses a standard icon, common to the Google Maps look and feel. It’s possible to change the icon’s color, image or anchor point via the API. Markers are objects of type Marker , and are added to the map with the GoogleMap.addMarker(markerOptions) method.
Markers are designed to be interactive. They receive click events by default, and are often used with event listeners to bring up info windows. Setting a marker’s draggable property to true allows the user to change the position of the marker. Use a long press to activate the ability to move the marker.
By default, when a user taps a marker, the map toolbar appears at the bottom right of the map, giving the user quick access to the Google Maps mobile app. You can disable the toolbar. For more information, see the guide to controls.
Getting started with markers
This episode of Maps Live covers the basics of adding markers to your map using the Maps SDK for Android.
Add a marker
The following example demonstrates how to add a marker to a map. The marker is created at coordinates -33.852,151.211 (Sydney, Australia), and displays the string ‘Marker in Sydney’ in an info window when clicked.
Kotlin
Display additional information about a marker
A common requirement is to show additional information about a place or location when the user taps a marker on the map. See the guide to info windows.
Associate data with a marker
You can store an arbitrary data object with a marker using Marker.setTag() , and retrieve the data object using Marker.getTag() . The sample below shows how you can count the number of times a marker has been clicked using tags:
Kotlin
Here are some examples of scenarios when it’s useful to store and retrieve data with markers:
- Your app may cater for different types of markers, and you want to treat them differently when the user clicks them. To accomplish this, you can store a String with the marker indicating the type.
- You may be interfacing with a system that has unique record identifiers, where the markers represent specific records in that system.
- Marker data may indicate a priority to be used when deciding the z-index of a marker.
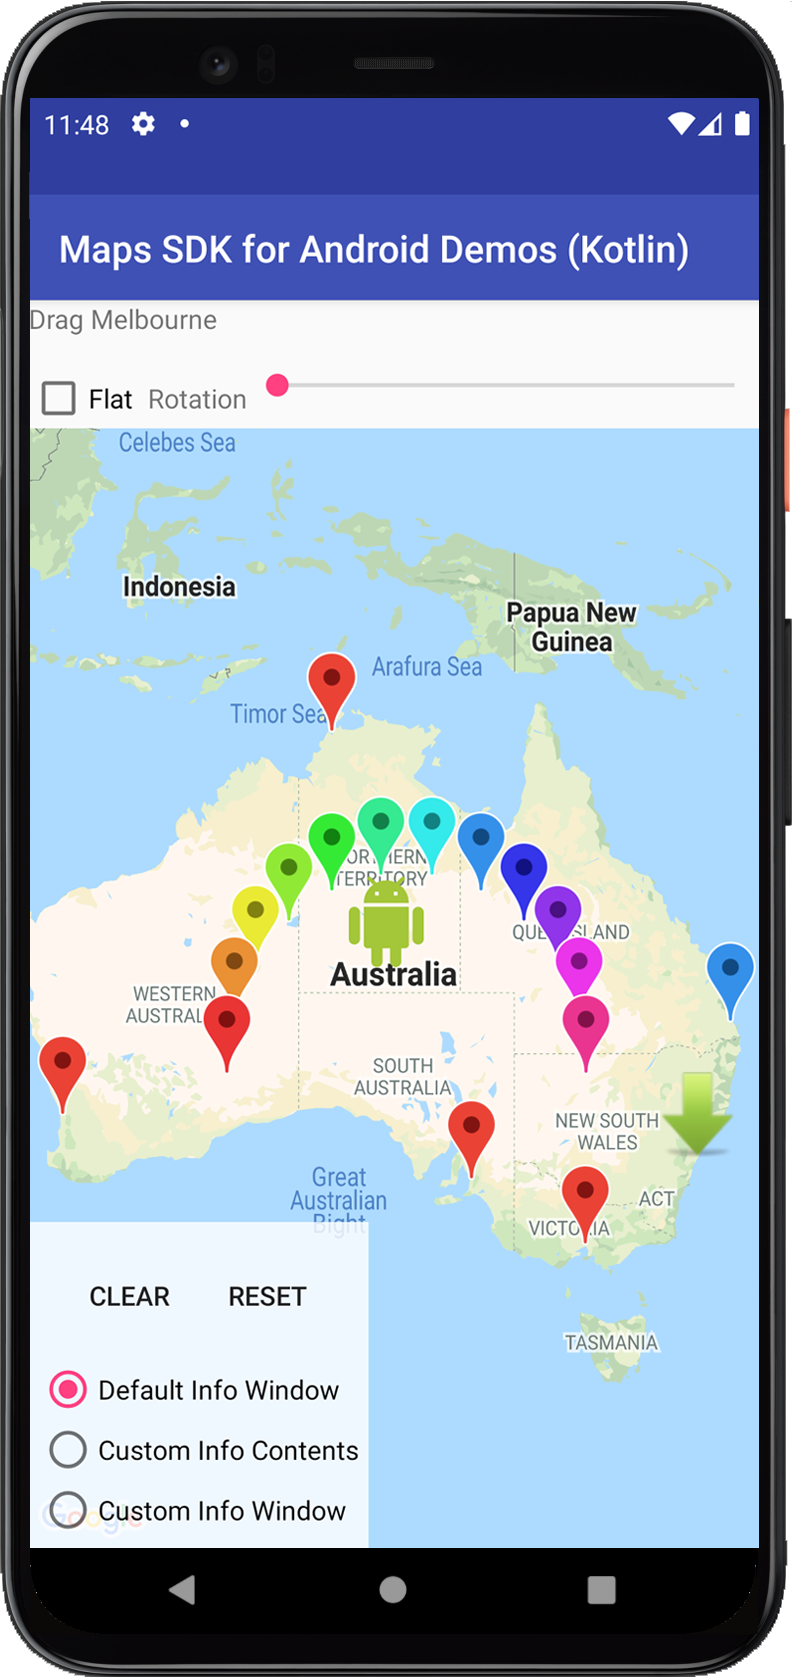
Make a marker draggable
You can reposition a marker once its been added to the map so long as its draggable property is set to true . Long press the marker to enable dragging. When you take your finger off the screen, the marker will remain in that position.
Markers are not draggable by default. You must explicitly set the marker to be draggable either with MarkerOptions.draggable(boolean) prior to adding it to the map, or Marker.setDraggable(boolean) once it has been added to the map. You can listen for drag events on the marker, as described in Marker drag events.
The below snippet adds a draggable marker at Perth, Australia.
Kotlin
Customize a marker
This video shows ways of using markers to visualize locations on a map.
Markers may define a custom image to show in place of the default icon. Defining an icon involves setting a number of properties that affect the visual behavior of the marker.
Markers support customization through the following properties:
Position (Required) The LatLng value for the marker’s position on the map. This is the only required property for a Marker object. Anchor The point on the image that will be placed at the LatLng position of the marker. This defaults to the middle of the bottom of the image. Alpha Sets the opacity of the marker. Defaults to 1.0. Title A string that’s displayed in the info window when the user taps the marker. Snippet Additional text that’s displayed below the title. Icon A bitmap that’s displayed in place of the default marker image. Draggable Set to true if you want to allow the user to move the marker. Defaults to false . Visible Set to false to make the marker invisible. Defaults to true . Flat or Billboard orientation By default, markers are oriented against the screen, and will not rotate or tilt with the camera. Flat markers are oriented against the surface of the earth, and will rotate and tilt with the camera. Both types of markers do not change size based on zoom. Use GroundOverlays if you desire this effect. Rotation The orientation of the marker, specified in degrees clockwise. The default position changes if the marker is flat. The default position for a flat marker is north aligned. When the marker is not flat, the default position is pointing up and the rotation is such that the marker is always facing the camera.
The below snippet creates a simple marker, with the default icon.
Kotlin
Customize the marker color
It’s possible to customize the color of the default marker image by passing a BitmapDescriptor object to the icon() method. You can use a set of predefined colors in the BitmapDescriptorFactory object, or set a custom marker color with the BitmapDescriptorFactory.defaultMarker(float hue) method. The hue is a value between 0 and 360, representing points on a color wheel.
Kotlin
Customize the marker opacity
You can control the opacity of a marker with the MarkerOptions.alpha() method. Alpha should be specified as a float between 0.0 and 1.0, where 0 is fully transparent and 1 is fully opaque.
Kotlin
Customize the marker image
You can replace the default marker image with a custom marker image, often called an icon. Custom icons are always set as a BitmapDescriptor , and defined using one of the methods in the BitmapDescriptorFactory class.
fromAsset(String assetName) Creates a custom marker using the name of a Bitmap image in the assets directory. fromBitmap(Bitmap image) Creates a custom marker from a Bitmap image. fromFile(String fileName) Creates a custom icon using the name of a Bitmap image file located in the internal storage. fromPath(String absolutePath) Creates a custom marker from an absolute file path of a Bitmap image. fromResource(int resourceId) Creates a custom marker using the resource ID of a Bitmap image.
The below snippet creates a marker with a custom icon.
Kotlin
Flatten a marker
Marker icons are normally drawn with respect to the screen; rotating, tilting or zooming the map will not change the orientation of the marker. You can set the orientation of a marker to be flat against the earth. Markers that are oriented in this way will rotate when the map is rotated, and change perspective when the map is tilted. Flat markers will retain their size when the map is zoomed in or out.
To change the orientation of the marker, set the marker’s flat property to true .
Kotlin
Rotate a marker
You can rotate a marker around its anchor point with the Marker . setRotation() method. The rotation is measured in degrees clockwise from the default position. When the marker is flat on the map, the default position is North. When the marker is not flat, the default position is pointing up and the rotation is such that the marker is always facing the camera.
The below example rotates the marker 90°. Setting the anchor point to 0.5,0.5 causes the marker to be rotated around its center, instead of its base.
Kotlin
Marker z-index
The z-index specifies the stack order of this marker, relative to other markers on the map. A marker with a high z-index is drawn on top of markers with lower z-indexes. The default z-index value is 0 .
Set the z-index on the marker’s options object by calling MarkerOptions.zIndex() , as shown in the following code snippet:
Kotlin
You can access the marker’s z-index by calling Marker.getZIndex() , and you can change it by calling Marker.setZIndex() .
Markers are always drawn above tile layers and other non-marker overlays (ground overlays, polylines, polygons, and other shapes) regardless of the z-index of the other overlays. Markers are effectively considered to be in a separate z-index group compared to other overlays.
Handle marker events
The Maps API allows you to listen and respond to marker events. To listen to these events, you must set the corresponding listener on the GoogleMap object to which the markers belong. When the event occurs on one of the markers on the map, the listener’s callback will be invoked with the corresponding Marker object passed through as a parameter. To compare this Marker object with your own reference to a Marker object, you must use equals() and not == .
You can listen to the following events:
Marker click events
You can use an OnMarkerClickListener to listen for click events on the marker. To set this listener on the map, call GoogleMap.setOnMarkerClickListener(OnMarkerClickListener) . When a user clicks on a marker, onMarkerClick(Marker) will be called and the marker will be passed through as an argument. This method returns a boolean that indicates whether you have consumed the event (i.e., you want to suppress the default behavior). If it returns false , then the default behavior will occur in addition to your custom behavior. The default behavior for a marker click event is to show its info window (if available) and move the camera such that the marker is centered on the map.
Effect of z-index on click events:
- When a user clicks on a cluster of markers, the click event is triggered for the marker with the highest z-index.
- At most one event is triggered per click. In other words, the click is not passed down to the markers or other overlays with lower z-index values.
- Clicking on a cluster of markers causes subsequent clicks to cycle through the cluster, selecting each in turn. The order of the cycle first prioritises z-index, then proximity to the click point.
- If the user clicks outside the proximity of the cluster, the API recalculates the cluster and resets the state of the click cycle so that it starts from the beginning.
- The click event falls through marker clusters to other shapes and overlays before restarting the cycle.
- Markers are effectively considered to be in a separate z-index group compared to other overlays or shapes (polylines, polygons, circles, and/or ground overlays), regardless of the z-index of the other overlays. If multiple markers, overlays or shapes are overlaid on top of each other, the click event is cycled through the cluster of markers first, then triggered for other clickable overlays or shapes, based on their z-index values.
Marker drag events
You can use an OnMarkerDragListener to listen for drag events on a marker. To set this listener on the map, call GoogleMap.setOnMarkerDragListener . To drag a marker, a user must long press on the marker. When the user takes their finger off the screen, the marker will stay in that position. When a marker is dragged, onMarkerDragStart(Marker) is called initially. While the marker is being dragged, onMarkerDrag(Marker) is called constantly. At the end of the drag onMarkerDragEnd(Marker) is called. You can get the position of the marker at any time by calling Marker.getPosition() .
Except as otherwise noted, the content of this page is licensed under the Creative Commons Attribution 4.0 License, and code samples are licensed under the Apache 2.0 License. For details, see the Google Developers Site Policies. Java is a registered trademark of Oracle and/or its affiliates.
Источник


