- Downgrading versions and excluding dependencies
- Overriding transitive dependency versions
- Consequences of using strict versions
- Forced dependencies vs strict dependencies
- Excluding transitive dependencies
- Declaring dependencies
- What are dependency configurations
- Configuration inheritance and composition
- Resolvable and consumable configurations
- Sharing dependency versions between projects
- Central declaration of dependencies
- Using a version catalog
- Declaring a version catalog
- Aliases and their mapping to type safe accessors
- Dependencies with same version numbers
- Dependency bundles
- Plugins
- The libs.versions.toml file
Downgrading versions and excluding dependencies
Overriding transitive dependency versions
Gradle resolves any dependency version conflicts by selecting the latest version found in the dependency graph. Some projects might need to divert from the default behavior and enforce an earlier version of a dependency e.g. if the source code of the project depends on an older API of a dependency than some of the external libraries.
Forcing a version of a dependency requires a conscious decision. Changing the version of a transitive dependency might lead to runtime errors if external libraries do not properly function without them. Consider upgrading your source code to use a newer version of the library as an alternative approach.
In general, forcing dependencies is done to downgrade a dependency. There might be different use cases for downgrading:
a bug was discovered in the latest release
your code depends on a lower version which is not binary compatible
your code doesn’t depend on the code paths which need a higher version of a dependency
In all situations, this is best expressed saying that your code strictly depends on a version of a transitive. Using strict versions, you will effectively depend on the version you declare, even if a transitive dependency says otherwise.
Strict dependencies are to some extent similar to Maven’s nearest first strategy, but there are subtle differences:
strict dependencies don’t suffer an ordering problem: they are applied transitively to the subgraph, and it doesn’t matter in which order dependencies are declared.
conflicting strict dependencies will trigger a build failure that you have to resolve
Let’s say a project uses the HttpClient library for performing HTTP calls. HttpClient pulls in Commons Codec as transitive dependency with version 1.10. However, the production source code of the project requires an API from Commons Codec 1.9 which is not available in 1.10 anymore. A dependency version can be enforced by declaring it as strict it in the build script:
Consequences of using strict versions
Using a strict version must be carefully considered, in particular by library authors. As the producer, a strict version will effectively behave like a force: the version declaration takes precedence over whatever is found in the transitive dependency graph. In particular, a strict version will override any other strict version on the same module found transitively.
However, for consumers, strict versions are still considered globally during graph resolution and may trigger an error if the consumer disagrees.
For example, imagine that your project B strictly depends on C:1.0 . Now, a consumer, A , depends on both B and C:1.1 .
Then this would trigger a resolution error because A says it needs C:1.1 but B , within its subgraph, strictly needs 1.0 . This means that if you choose a single version in a strict constraint, then the version can no longer be upgraded, unless the consumer also sets a strict version constraint on the same module.
In the example above, A would have to say it strictly depends on 1.1.
For this reason, a good practice is that if you use strict versions, you should express them in terms of ranges and a preferred version within this range. For example, B might say, instead of strictly 1.0 , that it strictly depends on the [1.0, 2.0[ range, but prefers 1.0 . Then if a consumer chooses 1.1 (or any other version in the range), the build will no longer fail (constraints are resolved).
Forced dependencies vs strict dependencies
Forcing dependencies via ExternalDependency.setForce(boolean) is deprecated and no longer recommended: forced dependencies suffer an ordering issue which can be hard to diagnose and will not work well together with other rich version constraints. You should prefer strict versions instead. If you are authoring and publishing a library, you also need to be aware that force is not published.
If, for some reason, you can’t use strict versions, you can force a dependency doing this:
If the project requires a specific version of a dependency on a configuration-level then it can be achieved by calling the method ResolutionStrategy.force(java.lang.Object[]).
Excluding transitive dependencies
While the previous section showed how you can enforce a certain version of a transitive dependency, this section covers excludes as a way to remove a transitive dependency completely.
Similar as forcing a version of a dependency, excluding a dependency completely requires a conscious decision. Excluding a transitive dependency might lead to runtime errors if external libraries do not properly function without them. If you use excludes, make sure that you do not utilise any code path requiring the excluded dependency by sufficient test coverage.
Transitive dependencies can be excluded on the level of a declared dependency. Exclusions are spelled out as a key/value pair via the attributes group and/or module as shown in the example below. For more information, refer to ModuleDependency.exclude(java.util.Map).
In this example, we add a dependency to commons-beanutils but exclude the transitive dependency commons-collections . In our code, shown below, we only use one method from the beanutils library, PropertyUtils.setSimpleProperty() . Using this method for existing setters does not require any functionality from commons-collections as we verified through test coverage.
Effectively, we are expressing that we only use a subset of the library, which does not require the commons-collection library. This can be seen as implicitly defining a feature variant that has not been explicitly declared by commons-beanutils itself. However, the risk of breaking an untested code path increased by doing this.
For example, here we use the setSimpleProperty() method to modify properties defined by setters in the Person class, which works fine. If we would attempt to set a property not existing on the class, we should get an error like Unknown property on class Person . However, because the error handling path uses a class from commons-collections , the error we now get is NoClassDefFoundError: org/apache/commons/collections/FastHashMap . So if our code would be more dynamic, and we would forget to cover the error case sufficiently, consumers of our library might be confronted with unexpected errors.
This is only an example to illustrate potential pitfalls. In practice, larger libraries or frameworks can bring in a huge set of dependencies. If those libraries fail to declare features separately and can only be consumed in a «all or nothing» fashion, excludes can be a valid method to reduce the library to the feature set actually required.
On the upside, Gradle’s exclude handling is, in contrast to Maven, taking the whole dependency graph into account. So if there are multiple dependencies on a library, excludes are only exercised if all dependencies agree on them. For example, if we add opencsv as another dependency to our project above, which also depends on commons-beanutils , commons-collection is no longer excluded as opencsv itself does not exclude it.
If we still want to have commons-collections excluded, because our combined usage of commons-beanutils and opencsv does not need it, we need to exclude it from the transitive dependencies of opencsv as well.
Historically, excludes were also used as a band aid to fix other issues not supported by some dependency management systems. Gradle however, offers a variety of features that might be better suited to solve a certain use case. You may consider to look into the following features:
Update or downgrade dependency versions: If versions of dependencies clash, it is usually better to adjust the version through a dependency constraint, instead of attempting to exclude the dependency with the undesired version.
Источник
Declaring dependencies
Before looking at dependency declarations themselves, the concept of dependency configuration needs to be defined.
What are dependency configurations
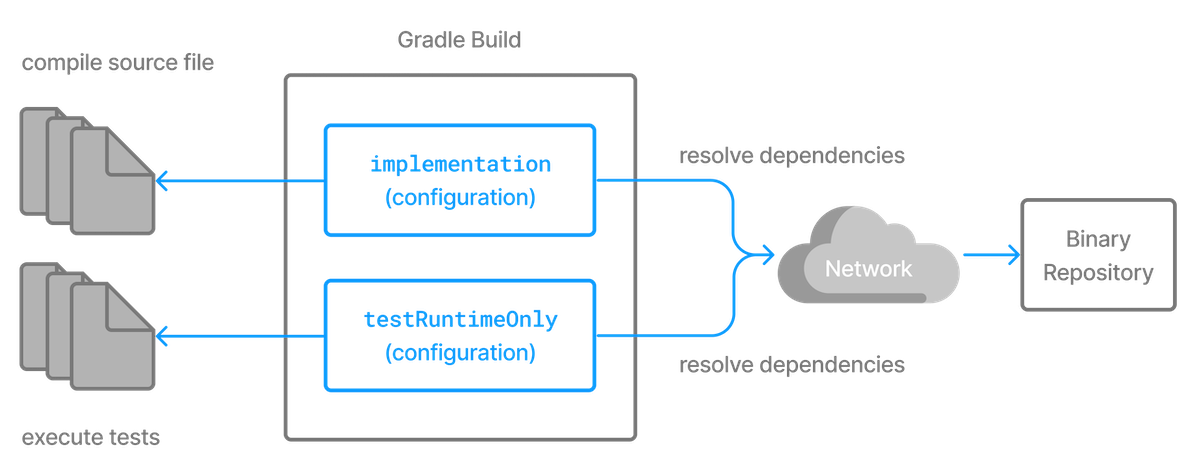
Every dependency declared for a Gradle project applies to a specific scope. For example some dependencies should be used for compiling source code whereas others only need to be available at runtime. Gradle represents the scope of a dependency with the help of a Configuration. Every configuration can be identified by a unique name.
Many Gradle plugins add pre-defined configurations to your project. The Java plugin, for example, adds configurations to represent the various classpaths it needs for source code compilation, executing tests and the like. See the Java plugin chapter for an example.
For more examples on the usage of configurations to navigate, inspect and post-process metadata and artifacts of assigned dependencies, have a look at the resolution result APIs.
Configuration inheritance and composition
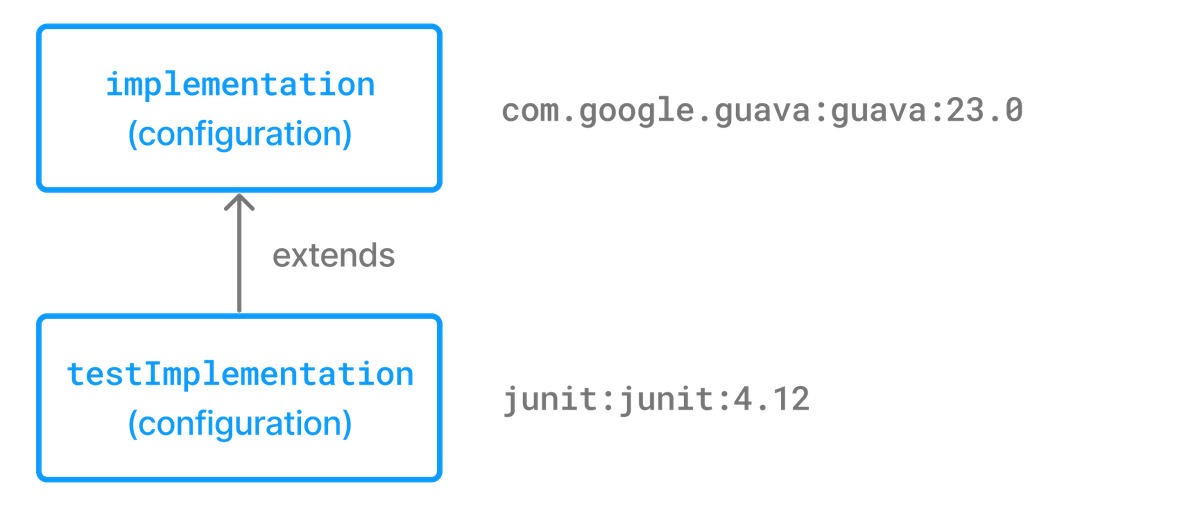
A configuration can extend other configurations to form an inheritance hierarchy. Child configurations inherit the whole set of dependencies declared for any of its superconfigurations.
Configuration inheritance is heavily used by Gradle core plugins like the Java plugin. For example the testImplementation configuration extends the implementation configuration. The configuration hierarchy has a practical purpose: compiling tests requires the dependencies of the source code under test on top of the dependencies needed write the test class. A Java project that uses JUnit to write and execute test code also needs Guava if its classes are imported in the production source code.
Under the covers the testImplementation and implementation configurations form an inheritance hierarchy by calling the method Configuration.extendsFrom(org.gradle.api.artifacts.Configuration[]). A configuration can extend any other configuration irrespective of its definition in the build script or a plugin.
Let’s say you wanted to write a suite of smoke tests. Each smoke test makes a HTTP call to verify a web service endpoint. As the underlying test framework the project already uses JUnit. You can define a new configuration named smokeTest that extends from the testImplementation configuration to reuse the existing test framework dependency.
Resolvable and consumable configurations
Configurations are a fundamental part of dependency resolution in Gradle. In the context of dependency resolution, it is useful to distinguish between a consumer and a producer. Along these lines, configurations have at least 3 different roles:
to declare dependencies
as a consumer, to resolve a set of dependencies to files
as a producer, to expose artifacts and their dependencies for consumption by other projects (such consumable configurations usually represent the variants the producer offers to its consumers)
For example, to express that an application app depends on library lib , at least one configuration is required:
Configurations can inherit dependencies from other configurations by extending from them. Now, notice that the code above doesn’t tell us anything about the intended consumer of this configuration. In particular, it doesn’t tell us how the configuration is meant to be used. Let’s say that lib is a Java library: it might expose different things, such as its API, implementation, or test fixtures. It might be necessary to change how we resolve the dependencies of app depending upon the task we’re performing (compiling against the API of lib , executing the application, compiling tests, etc.). To address this problem, you’ll often find companion configurations, which are meant to unambiguously declare the usage:
At this point, we have 3 different configurations with different roles:
someConfiguration declares the dependencies of my application. It’s just a bucket that can hold a list of dependencies.
compileClasspath and runtimeClasspath are configurations meant to be resolved: when resolved they should contain the compile classpath, and the runtime classpath of the application respectively.
This distinction is represented by the canBeResolved flag in the Configuration type. A configuration that can be resolved is a configuration for which we can compute a dependency graph, because it contains all the necessary information for resolution to happen. That is to say we’re going to compute a dependency graph, resolve the components in the graph, and eventually get artifacts. A configuration which has canBeResolved set to false is not meant to be resolved. Such a configuration is there only to declare dependencies. The reason is that depending on the usage (compile classpath, runtime classpath), it can resolve to different graphs. It is an error to try to resolve a configuration which has canBeResolved set to false . To some extent, this is similar to an abstract class ( canBeResolved =false) which is not supposed to be instantiated, and a concrete class extending the abstract class ( canBeResolved =true). A resolvable configuration will extend at least one non-resolvable configuration (and may extend more than one).
On the other end, at the library project side (the producer), we also use configurations to represent what can be consumed. For example, the library may expose an API or a runtime, and we would attach artifacts to either one, the other, or both. Typically, to compile against lib , we need the API of lib , but we don’t need its runtime dependencies. So the lib project will expose an apiElements configuration, which is aimed at consumers looking for its API. Such a configuration is consumable, but is not meant to be resolved. This is expressed via the canBeConsumed flag of a Configuration :
Источник
Sharing dependency versions between projects
Central declaration of dependencies
Central declaration of dependencies is an incubating feature. It requires the activation of the VERSION_CATALOGS feature preview.
Using a version catalog
A version catalog is a list of dependencies, represented as dependency coordinates, that a user can pick from when declaring dependencies in a build script.
For example, instead of declaring a dependency using a string notation, the dependency coordinates can be picked from a version catalog:
In this context, libs is a catalog and groovy represents a dependency available in this catalog. A version catalog provides a number of advantages over declaring the dependencies directly in build scripts:
For each catalog, Gradle generates type-safe accessors so that you can easily add dependencies with autocompletion in the IDE.
Each catalog is visible to all projects of a build. It is a central place to declare a version of a dependency and to make sure that a change to that version applies to every subproject.
Catalogs can declare dependency bundles, which are «groups of dependencies» that are commonly used together.
Catalogs can separate the group and name of a dependency from its actual version and use version references instead, making it possible to share a version declaration between multiple dependencies.
Adding a dependency using the libs.someLib notation works exactly like if you had hardcoded the group, artifact and version directly in the build script.
| A dependency catalog doesn’t enforce the version of a dependency: like a regular dependency notation, it declares the requested version or a rich version. That version is not necessarily the version that is selected during conflict resolution. |
Declaring a version catalog
Version catalogs can be declared in the settings.gradle(.kts) file. In the example above, in order to make groovy available via the libs catalog, we need to associate an alias with GAV (group, artifact, version) coordinates:
Aliases and their mapping to type safe accessors
Aliases must consist of a series of identifiers separated by a dash ( — , recommended), an underscore ( _ ) or a dot ( . ). Identifiers themselves must consist of ascii characters, preferably lowercase, eventually followed by numbers.
guava is a valid alias
groovy-core is a valid alias
commons-lang3 is a valid alias
androidx.awesome.lib is also a valid alias
Then type safe accessors are generated for each subgroup. For example, given the following aliases in a version catalog named libs :
guava , groovy-core , groovy-xml , groovy-json , androidx.awesome.lib
We would generate the following type-safe accessors:
Where the libs prefix comes from the version catalog name.
In case you want to avoid the generation of a subgroup accessor, we recommend relying on case to differentiate. For example the aliases groovyCore , groovyJson and groovyXml would be mapped to the libs.groovyCore , libs.groovyJson and libs.groovyXml accessors respectively.
When declaring aliases, it’s worth noting that any of the — , _ and . characters can be used as separators, but the generated catalog will have all normalized to . : for example foo-bar as an alias is converted to foo.bar automatically.
Some keywords are reserved, so they cannot be used as an alias. Next words cannot be used as an alias:
Additional to that next words cannot be used as a first subgroup of an alias for dependencies (for bundles, versions and plugins this restriction doesn’t apply):
So for example for dependencies an alias versions-dependency is not valid, but versionsDependency or dependency-versions are valid.
Dependencies with same version numbers
In the first example in declaring a version catalog, we can see that we declare 3 aliases for various components of the groovy library and that all of them share the same version number.
Instead of repeating the same version number, we can declare a version and reference it:
Versions declared separately are also available via type-safe accessors, making them usable for more use cases than dependency versions, in particular for tooling:
Dependencies declared in a catalog are exposed to build scripts via an extension corresponding to their name. In the example above, because the catalog declared in settings is named libs , the extension is available via the name libs in all build scripts of the current build. Declaring dependencies using the following notation…
…has exactly the same effect as writing:
Versions declared in the catalog are rich versions. Please refer to the version catalog builder API for the full version declaration support documentation.
Dependency bundles
Because it’s frequent that some dependencies are systematically used together in different projects, a version catalog offers the concept of a «dependency bundle». A bundle is basically an alias for several dependencies. For example, instead of declaring 3 individual dependencies like above, you could write:
The bundle named groovy needs to be declared in the catalog:
The semantics are again equivalent: adding a single bundle is equivalent to adding all dependencies which are part of the bundle individually.
Plugins
In addition to libraries, version catalog supports declaring plugin versions. While libraries are represented by their group, artifact and version coordinates, Gradle plugins are identified by their id and version only. Therefore, they need to be declared separately:
Then the plugin is accessible in the plugins block and can be consumed in any project of the build using:
The libs.versions.toml file
In addition to the settings API above, Gradle offers a conventional file to declare a catalog. If a libs.versions.toml file is found in the gradle subdirectory of the root build, then a catalog will be automatically declared with the contents of this file.
Declaring a libs.versions.toml file doesn’t make it the single source of truth for dependencies: it’s a conventional location where dependencies can be declared. As soon as you start using catalogs, it’s strongly recommended to declare all your dependencies in a catalog and not hardcode group/artifact/version strings in build scripts. Be aware that it may happen that plugins add dependencies, which are dependencies defined outside of this file.
Just like src/main/java is a convention to find the Java sources, which doesn’t prevent additional source directories to be declared (either in a build script or a plugin), the presence of the libs.versions.toml file doesn’t prevent the declaration of dependencies elsewhere.
The presence of this file does, however, suggest that most dependencies, if not all, will be declared in this file. Therefore, updating a dependency version, for most users, should only consists of changing a line in this file.
Источник


