- Grant Root Permission/Privilege/Access for Your Android Device via KingoRoot
- Steps of Rooting Your Android with KingoRoot APK
- KingoRoot on Windows
- KingoRoot for Android
- How to Grant Root Access on Android
- Part 1. Managing Root Permissions With the SuperSU App
- Step 1. Download SuperSU
- Step 2. Manage Root Permissions
- Part 2. Root Android with Android Data Recovery
- Step 1. Connect Device to PC
- Step 2. Check Android Status
- Case 1: Android Phone is Rooted
- Case 2: Phone is Unrooted
- How to Grant Root Access to Android Phone with SuperSU
- What is Rooting
- What is SuperSU Root
- How to Use SuperSU Root to Root Android Phone
- Managing Root Permissions With the SuperSU App
- How to Unroot Android with SuperSU/Uninstall SuperSU
- Android runtime permissions. Почему, зачем и как
- Общая информация
- Взаимодействие с пользователем
Grant Root Permission/Privilege/Access for Your Android Device via KingoRoot
KingoRoot grants root permission/privilege for all Android devices. Both KingoRoot on Windows and KingoRoot APK can easily and efficiently root your Android device.
Steps of Rooting Your Android with KingoRoot APK
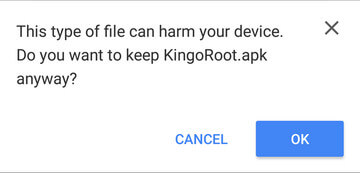
- Step 1: Free download KingoRoot APK


If Chrome has warned you about KingoRoot.apk, click OK to proceed.
Step 2: Install the KingoRoot APK
After KingoRoot APK download is complete, install the apk file.
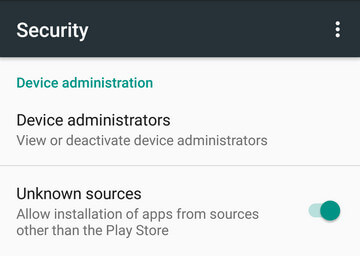
*Note: you may receive this install block message. Take the following steps:
- Install Blocked: Settings > Security > Unknown sources > Check the box and allow.
- Harmful App: Settings > Security > Verify apps > Uncheck it.
You may want to try it several times because KingoRoot.apk will only download one script at a time. Running different scripts may deliver different results.
For a detail tutorial with KingoRoot APK please visit: How to Root Android without Computer (APK ROOT without PC)
MORE TO SAY: If KingoRoot APK still failed to root your Android devices, you can try on KingoRoot on Windows (PC Version), which has a much higher success rate for technical reasons. How to root any Android device of any version with KingoRoot PC Version?
KingoRoot on Windows
KingoRoot Android on Windows has the highest success rate. It supports almost any Android device and version.

KingoRoot for Android
KingoRoot for Android is the most convenient and powerful apk root tool. Root any Android device and version without connecting to PC.
Источник
How to Grant Root Access on Android
By Louis Habersham , 14/10/2016, updated on 04/01/2021
When you open a root app on your Android, taking Samsung Galaxy S7 Edge as an example, the app may require permission for rooting. And you should receive a note as the below screenshot, which reads, «Allow *** to request root permission». Then you need to tap the «Allow» button and «Still Allow».
People Also Read:

But the thing is that, on some certain apps, there may be no such a popup notice occurred. Under such a circumstance, you will need to follow Part 1 to allow the permission, that is, to grant permission and allow root access. Then you can check the root status and root your phone under the instruction of Part 2. Now here we go.
Read before Rooting: Note that before granting root access and rooting your Android, it is significant to backup your Android data. This step is simple but quite important. Never skip it! Because some apps can cause a system crash.
The best and the easiest way to root your Android is to let professionals do it. If you’re looking to get a premium root access, look no further than Unlock Partner. They have an expert team of technicians who are available 24/7 to help you get the root access on your phone, safe and sound.
Part 1. Managing Root Permissions With the SuperSU App
SuperSU is a free but powerful root management tool for Android devices. If the permission request didn’t show up, it can help you give root permission on Android. Please follow the instructions and grant permission in order to give root access.
Step 1. Download SuperSU
First of all, you need an app that manages root permissions of your apps. Download and install SuperSu on your Samsung Galaxy S7 Edge. Then reboot your device. You should see the SuperSU icon.
Step 2. Manage Root Permissions
To manage root permissions, activate the SuperSU app. Apps that have been granted or denied Superuser access are orderly listed. You can touch to change its permissions.
With SuperSU app on your Android, whenever an app is intended to request root permissions, it has to ask SuperSU on your phone.

Part 2. Root Android with Android Data Recovery
Android Data Recovery, as a multi-functional program, also allows users to root their Android without a hitch. All you should do is to connect to the software and let it do all the rest.
Step 1. Connect Device to PC
To start with, download and open Android Data Recovery on your computer. At the left pane, select and click «More Tools» > «Android Root». When in the «Android Root» page, you will be prompted to connect your Android device to the computer. Take use of your cable to help the connection. During the process, do not start any other Android phone management software. Then USB debugging is required.

Step 2. Check Android Status
When your phone is recognized, you will have a note, which reads like «Samsung Galaxy S7 Edge is connected». Then Android Data Recovery will check the root status of your device. The result will be shown in the interface. There will be two cases:

Case 1: Android Phone is Rooted
Should your Android phone bee rooted, you will have an interface with a note saying something like «Samsung Galaxy S7 has been rooted». You don’t need to root your phone one more time.

Case 2: Phone is Unrooted
If your phone has not been rooted, you will have the interface as below. The program will detect your phone to find a proper solution before rooting. Please read the software terms and agreements and click the Start button to continue.

Next, the software will check if your phone is supported or not. Here are some notices you need to pay attention to:
First of all, please do not unplug your device during the detecting process.Second, the phone will restart sometimes when detecting.Last, it will take longer to detect some phones. Please wait patiently.

If your Android is unsupported, you will have an interface as below. You can submit your phone information if you need to root it urgently. The developer will respond to your feedback as soon as possible.

If your device is supported, you can check the «Root Now» button to start the rooting process. When the operation is completed, you will be prompted «Model downloaded» and «Phone Rooted».


If you ever want to unroot your device, turn on the SuperSU app > go to its Settings screen > tap the «Full unroot» option. Then your phone will be unrooted. This is definitely the easiest way to unroot your phone.
That’s all. Questions and feedbacks are welcomed. Just leave your message.
Источник
How to Grant Root Access to Android Phone with SuperSU
You need to root your phone if you want to run a specific app that requires root access. Apps that require root aren’t hard to find, they’re available in Google Play, but they won’t work until you gain root access. Some apps have features that only work on a rooted device, like iSumsoft Windows password refixer for Android.
What is Rooting
Rooting is the process of enabling access to the root account, installing the Su binary. Applications can call Su to gain elevated privileges, so they can break free from Android’s security sandbox and do more powerful things. Android devices come with a «root» user that functions like te Administrator user account on Windows. By default, Android doesn’t give you access to the root account for security purposes. However, there are many ways to root an Android phone, and which one you should use depends on your phone.
Common Android rooting ways including: Using the built-in one-click root process, Meizu and XiaoMi phone have Root Permission option, which can be enabled in Settings. You can root android with One-click tool, like Kingoroot. TWRP recovery method, which is the most widely supported method for rooting your device.
What is SuperSU Root
SuperSU was created by world-famous Android developer Chainfire.В It is an app that allows for advanced management of superuser access on a rooted Android device. Rooting can be done through two methods: Using Android Application Package (APK), which is usually provided by 3rd party rooting service, and manually granting root access (can be achieved in recovery mode).
How to Use SuperSU Root to Root Android Phone
SuperSU is available in the Google Play Store, but that version doesn’t actually give you root access. In fact, you need root access to use it in the first place. Thankfully,В SuperSU is also available as a .zipВ file that we can “flash” with TWRP.
To use SuperSU, you first of all need to install TWRP recovery environment on your device. Go toВ TWRP siteВ to download the right one for your device. Once TWRP recovery environment is installed on your device, you are ready to Flash SuperSU and gain root access. Just do as the following steps below.
Note: Make sure it is fully charged so that it cannot be switched off while being rooted.В Backup your Android before proceeding. Since there are risks that it will brick your phone if the rooting doesn’t go well, it’s important to back up your phone data before rooting. So if anything goes wrong, you don’t end up to losing all precious data on the phone.
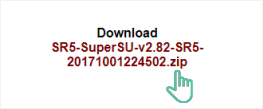
Step 1: Go toВ SuperSU Root siteВ and download the SuperSU zip file. If you download it on your computer, you need to transfer it to your device.
Step 2: Get the device in the TWRP recovery environment. To do:
Hold down specific buttons on your device. This buttons you have to hold down vary from one device to another. for example, you may have to hold the Power and Volume Down buttons simultaneously, then use the volume keys to boot Recovery Mode. For your specific device, find the proper button combination by searching for «TWRP (Device Model name)» in Google.
On the TWRP recovery screen, tap «Install» to begin the process.
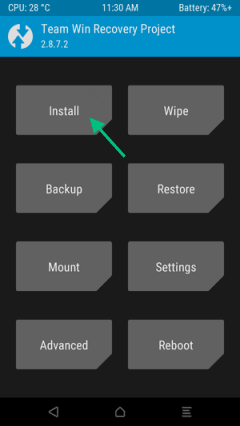
Step 3: Scroll down and navigate to the SuperSU ZIP file you downloaded. Select it and then Swipe to confirm flash.

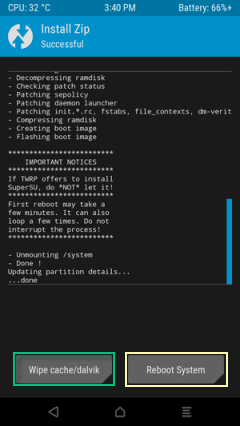
Step 4: Wait for it flashing. Tap Wipe cache/Dalvik when SuperSU is installed. When that finished, select the Reboot System to continue your operation.
Managing Root Permissions With the SuperSU App
When you reboot your phone, you should see the new SuperSU icon in your app drawer.В SuperSUВ controlsВ which other apps on your phone get root permissions. Whenever an app wants to request root permissions, it has to ask your SuperSU app, which will show a request prompt asking for root access. If you click Grant and you get a success message, you have successfully achieved root on your phone.
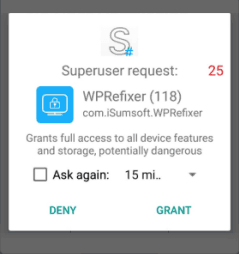
To manage root permissions, open your app drawer and tap the SuperSU icon. You’ll see a list of apps that have been granted or denied superuser access. You can tap on an app to change its permissions.
How to Unroot Android with SuperSU/Uninstall SuperSU
If you ever want to unroot, use the following steps, this is definitely the easiest way to unroot your phone.
Step 1: Open SuperSU app.
Step 2: Go to the Settings tab.
Step 3: Scroll down below to the Cleanup section.
Step 4: Tap on Full Unroot toВ uninstall SuperSUВ and unroot your phone.
Step 5: Confirm by pressing Continue.
Источник
Android runtime permissions. Почему, зачем и как
Часто при установке приложения на Android нам приходилось видеть, что оно запрашивает какое-то немыслимое количество разрешений. Например:

Хорошо, если вы устанавливаете приложение от какого-то известного разработчика, которому можете доверять. Но весьма подозрительно, если вы устанавливаете новый музыкальный плеер, а ему для работы требуется, например, получать ваше местоположение. Или, тем более, фонарик, требующий доступ к смс и звонкам.
Некоторые разработчики, чтобы уменьшить недоверие, добавляют в описание приложения на Google Play информацию о том, зачем нужно то или иное разрешение.
К шестой версии Android ситуация поменялась. Теперь разрешения нужно запрашивать в процессе работы. О том, как этой новой возможностью пользоваться и ее некоторых подводных камнях будет рассказано далее.
Общая информация
Подобно тому, как это происходит в iOS, при запросе появится системный диалог с запросом разрешения.
|
|
Отличие в том, что после нажатия на кнопку “Deny” разрешение не будет полностью запрещено для приложения, как это происходит у Apple. Его можно будет запросить повторно, но в этом случае появится опция “Never ask again”, после выбора которой “Deny” работает как “Don’t allow” в iOS.
Разрешения делятся на два типа (есть и другие, но они нас не интересуют):
- обычные (normal);
- опасные (dangerous).
Обычные разрешения будут получены приложением при установке, никакого подтверждения от пользователя не потребуется (немного спорный момент, на мой взгляд, стоило бы уведомлять пользователя об обязательных разрешениях). В дальнейшем отозвать их у приложения будет невозможно. Опасные же должны быть запрошены в процессе работы приложения и в любой момент могут быть отозваны. Список опасных и не очень разрешений можно посмотреть тут.
Можно увидеть, что доступ к интернету не считается опасным. Все, кто использует рекламу в своих программах, могут вздохнуть с облегчением: отключить её, просто отобрав разрешение, не получится (все еще можно просто отключить интернет, но факт остается фактом).
Для того чтобы отозвать разрешение, которое было выдано ранее (или предоставить его, если вы выбрали “Never ask again”) нужно перейти в настройки приложения (Settings->Apps->*AppName*) в раздел Permissions и кликнуть по соответствующим переключателям. В этом меню также можно посмотреть все разрешения этой программы, выбрав пункт “All permissions” из контекстного меню. Еще есть возможность просматривать, каким приложениям выдано конкретное разрешение (и соответственно предоставить или отобрать его). Для этого в настройках в разделе Apps нужно кликнуть по меню с иконкой шестеренки и в открывшемся разделе выбрать App permissions. Далее, выбрав нужное разрешение, можно увидеть все приложения, которым оно нужно.
Второй момент заключается в том, насколько ясно будет человеку, для чего нужно это разрешение. Зачем приложению для смс доступ к календарю? Наверное, для какой-то классной функции, которая облегчит перенос дат из сообщений в календарь и тому подобное. Но знаете об этом только вы, поэтому сначала нужно объяснить причину запроса и показать какие возможности даст доступ к этому разрешению. Это относится и к первичным и к вторичным разрешениям.
|
|
Еще раз кратко:
- важные разрешения запрашиваем при запуске, вторичные — при первом использовании соответствующей функции;
- если понять, зачем нужно разрешение тяжело, предоставляем объяснение.
В случае, когда вам все-таки отказали, пояснение причины в следующий раз является обязательным. А если помимо отказа, пользователь попросил вас никогда не запрашивать данное разрешение, используя опцию “Never ask again”, но пытается использовать соответствующую функцию приложения, предложите ему перейти в настройки вашей программы и вручную включить необходимые разрешения. Это особенно важно, если разрешение критично для работы программы.


