- Android graphview auto scroll
- Auto Scroll ViewPager Android
- Auto Scroll ViewPager Demo App
- Prerequisite
- Implementation steps of Auto Scroll ViewPager
- 1. Project Setup
- 2.1 Create a custom component (AutoScrollViewPager)
- 2.2 Creates a custom DurationScroller
- 3. Prepare XML layout
- 4. Write FragmentPagerAdapter
- 5. Create a Fragment named is SlideFragment
- In Java file paste this code
- Google recommend ViewModel for communicating fragment
- Finally, Open MainActivity and add below line of code
- Conclusion
- Get Solution Code
- Keep in touch
- Android graphview auto scroll
- About
- Create a real time line graph in Android with GraphView
- Android graphview auto scroll
- About
Android graphview auto scroll


![]()

![]()
![]()
![]()
Androidx Auto Scroll ViewPager
- ViewPager which can auto scrolling, cycling, decelerating.
- ViewPager which can be slided manually in parent ViewPager.
- ViewPager which is compatible with AndroidX library.
- ViewPager which is written in Kotlin and be supported for a long time.
Many thanks to Trinea because this library is the newest, kotlin version of his library. We support AndroidX library, so if you have problem when migrating to AndroidX, this version should work like a charm.
Add this to your root build.gradle file under repositories:
Add this to your app level build.gradle as dependency:
Latest version:
Источник
Auto Scroll ViewPager Android
Welcome Guys, Recently I have implemented Auto Scroll ViewPager. It’s not easy, that why I have simplified it in step. In this android tutorial, I will tell you the real implementation of auto scroll ViewPager Android with proper step. I have created a sample application that contains ViewPager, FragmentStatePagerAdapter, and TabLayout. It’s very easy, just follow below steps.
Auto Scroll ViewPager Demo App
Prerequisite
In this demo app, we’ll use auto scrollViewPager with tab indicator. For auto scroll ViewPager implementation, you have to basic knowledge of ViewPager and TabLayout. If you have then it’s good, 😉 otherwise, read our another article there I have explained all core concepts of ViewPager in Android.
Implementation steps of Auto Scroll ViewPager
- Project Setup
- Create a custom component (AutoScrollViewPager)
- Prepare XML layout
- Write FragmentPagerAdapter
- Create an Adapter item Fragment
- Design layout for slider item
- Bind this layout to fragment
- Create a ViewModel for ViewPager communication
- Finally, update Activity class
- Create an instance of FragmentPagerAdapter
- Set this adapter on ViewPager
- Set ViewPager on tab layout for tab indicator
1. Project Setup
Let’s move to Android Studio, create a new project with androidx and material io library. after doing that your app build.gradle seems like below.
2.1 Create a custom component (AutoScrollViewPager)
In source, folder creates a subclass of ViewPager named is AutoScrollViewPager and paste below code.
2.2 Creates a custom DurationScroller
For controlling the scroll duration, create a java class named is DurationScroller and paste below code.
Summary uses AutoScrollViewPager
Now your components are ready to use. For using this replace your ViewPager component with this.
And we can implement followings settings.
- startAutoScroll() – start auto scroll
- startAutoScroll(int) – start auto scroll delayed.
- stopAutoScroll() – stop auto scroll.
- setInterval(long) – set auto scroll time in milliseconds, default is DEFAULT_INTERVAL .
- setDirection(int) – set auto scroll direction, default is RIGHT .
- setCycle(boolean) – set whether automatic cycle when auto scroll reaching the last
That all about setting now comes to implematation
3. Prepare XML layout
Open main activity xml file and add below code. In this code I’m adding AutoScrollViewPager, TabLayout for tab indicator, and some view for beautying the layout.
In this layout, I’m using some resource file these are below
3.1 Create a resource file named is viewpager_tab_selector
3.2 Resource file for selected dot named is viewpager_selected_dot
3.4 Resource file for unselected dot named is viewpager_un_selected_dot
I’m using a few other as well. but it’s not important
4. Write FragmentPagerAdapter
Create a subclass of FragmentPagerAdapter named is AutoScrollPagerAdapter and paste below code
5. Create a Fragment named is SlideFragment
Above code, you see we are using a common in AutoScrollPagerAdapter. Next step will we create a new fragment with layout. Open the layout file and add below code
In Java file paste this code
your design stuff is almost done and let’s come to the java coding part. In the below code you see, we are using two ids arrays that contain ids of title and images. Later on, you are observing live data change that observing the position of the current fragment. Based on the slide postion we are setting text and images in this fragment.
Google recommend ViewModel for communicating fragment
In this ViewModel, we are maintaining the index of the current fragment with the help of MutableLiveData
Finally, Open MainActivity and add below line of code
Put the blow closing code in MainActivity. Its code is self-explanatory
Conclusion
That all, In this article, we learned Auto Scroll ViewPager in Android, I hope it’s helpful for you, Help me by sharing this post with all your friends who learning android app development.
Get Solution Code
Keep in touch
If you want to keep in touch and get an email when I write new blog posts, follow me on facebook or subscribe us. It only takes about 10 seconds to register.
Still, if you have any queries please put your comment below.
Источник
Android graphview auto scroll
Chart and Graph Library for Android
Project maintainer wanted! For time reasons I can not continue to maintain GraphView. Contact me if you are interested and serious about this project. g.jjoe64@gmail.com
What is GraphView
GraphView is a library for Android to programmatically create flexible and nice-looking diagrams. It is easy to understand, to integrate and to customize.
Supported graph types:
- Line Graphs
- Bar Graphs
- Point Graphs
- or implement your own custom types.

- Line Chart, Bar Chart, Points
- Combination of different graph types
- Scrolling vertical and horizontal . You can scroll with a finger touch move gesture.
- Scaling / Zooming vertical and horizontal . With two-fingers touch scale gesture (Multi-touch), the viewport can be changed.
- Realtime Graph (Live change of data)
- Second scale axis
- Draw multiple series of data . Let the diagram show more that one series in a graph. You can set a color and a description for every series.
- Show legend . A legend can be displayed inline the chart. You can set the width and the vertical align (top, middle, bottom).
- Custom labels . The labels for the x- and y-axis are generated automatically. But you can set your own labels, Strings are possible.
- Handle incomplete data . It’s possible to give the data in different frequency.
- Viewport . You can limit the viewport so that only a part of the data will be displayed.
- Manual Y axis limits
- And much more. Check out the project page and/or the demo app
Download Demo project at Google Play Store
More examples and documentation
To show you how to integrate the library into an existing project see the GraphView-Demos project! See GraphView-Demos for examples. https://github.com/jjoe64/GraphView-Demos
View GraphView wiki page https://github.com/jjoe64/GraphView/wiki
About
Android Graph Library for creating zoomable and scrollable line and bar graphs.
Источник
Create a real time line graph in Android with GraphView
In Android applications, there are a lot of use cases in which you must create graphs. Fortunately, a lot of open source libraries exist letting you to easily create line graphs, bar graphs or other style of graphs. These libraries have the main advantages to be designed entirely for Android and so, they are optimized.
Among the main libraries, we’re going to try three of them :
- GraphView
- AChartEngine
- MP Android Chart
To test these libraries, we’re going to try to create a real time graph in Android. In this first article, we’re going to use GraphView.
GraphView is an open source library available on GitHub : https://github.com/jjoe64/GraphView
GraphView has also an interesting website with a great documentation : http://www.android-graphview.org
In this tutorial, we use Eclipse so we must download the library as a jar file in version 4.0.0 and add it in libs folder of our Android application project. First step is to add the GraphView in a layout XML file :
Then, we can use it in an Activity like this :
In this code, we get GraphView instance defined in the layout file. Then, we define data that will be displayed thanks to LineGraphSeries class. So, we choose to display a line graph. Each data is designed inside a DataPoint class. Method addEntry lets to add new entries to graph’s data.
To simulate real time data addition, we create a thread that add data to the LineGraphSeries dataset and then we make a sleep in the thread. To update UI state in the UI thread, we put the addEntry call in a runOnUiThread method.
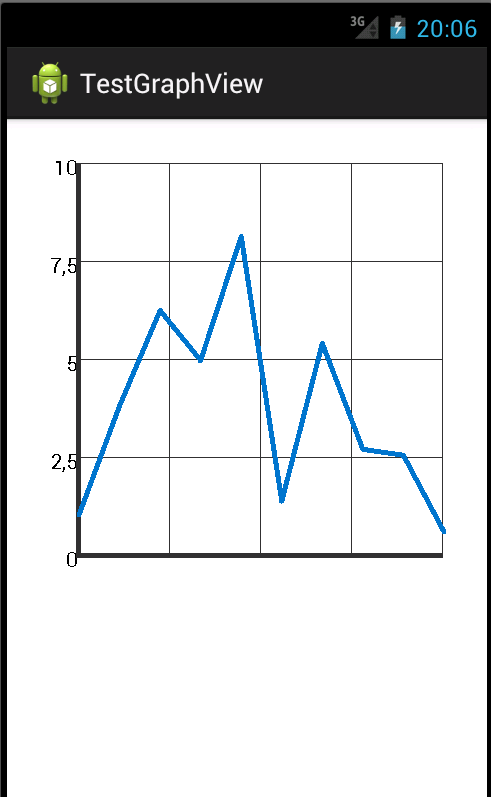
Thanks to GraphView, we have created a real time line graph on Android. However, if result works well, the rendering is not very beautiful. We will try to get a better rendering with AChartEngine or MP Android Chart in next tutorials.
You can also check this Youtube video that show live coding of this tutorial :
Источник
Android graphview auto scroll

An adaptive scrollable graph view for iOS to visualise simple discrete datasets. Written in Swift. Originally written for a small personal project.


Adding the GraphView to your project:
Add GraphView.swift to your project in Xcode
Create a GraphView instance and set the data and labels
Add the GraphView to the view hierarchy.
Things you could use it for:
- ✔ Study applications to show time studied/etc
- ✔ Weather applications
- ✔ Prototyping
- ✔ Simple data visualisation
Things you shouldn’t/cannot use it for:
- ✘ Rigorous statistical software
- ✘ Important & complex data visualisation
- ✘ Graphing continuous mathematical functions
Note: Examples here use a «colorFromHex» extension for UIColor.


Solid Pink with Margins
You can use the top and bottom margin to leave space for other content:

The graph can be customised by setting any of the following public properties before displaying the GraphView. The defaults are shown below.
Specifies how thick the graph of the line is. In points.
The color of the graph line. UIColor.
Whether or not the line should be rendered using bezier curves are straight lines.
How each segment in the line should connect. Takes any of the Core Animation LineJoin values.
The line caps. Takes any of the Core Animation LineCap values.
The background colour for the entire graph view, not just the plotted graph.
Specifies whether or not the plotted graph should be filled with a colour or gradient.
Specifies whether to fill the graph with a solid colour or gradient.
If fillType is set to .Solid then this colour will be used to fill the graph.
If fillType is set to .Gradient then this will be the starting colour for the gradient.
If fillType is set to .Gradient , then this will be the ending colour for the gradient.
If fillType is set to .Gradient , then this defines whether the gradient is rendered as a linear gradient or radial gradient.

How far the «maximum» reference line is from the top of the view’s frame. In points.
How far the «minimum» reference line is from the bottom of the view’s frame. In points.
How far the first point on the graph should be placed from the left hand side of the view.
How far the final point on the graph should be placed from the right hand side of the view.
How much space should be between each data point.
Which way the user is expected to scroll from.
The minimum value for the y-axis. This is ignored when shouldAutomaticallyDetectRange or shouldAdaptRange = true
The maximum value for the y-axis. This is ignored when shouldAutomaticallyDetectRange or shouldAdaptRange = true
If this is set to true, then the range will automatically be detected from the data the graph is given.
Forces the graph’s minimum to always be zero. Used in conjunction with shouldAutomaticallyDetectRange or shouldAdaptRange , if you want to force the minimum to stay at 0 rather than the detected minimum.
Data Point Drawing
Whether or not to draw a symbol for each data point.
The shape to draw for each data point.
- GraphViewDataPointType.Circle
- GraphViewDataPointType.Square
- GraphViewDataPointType.Custom
The size of the shape to draw for each data point.
The colour with which to fill the shape.
If dataPointType is set to .Custom then you can provide a closure to create any kind of shape you would like to be displayed instead of just a circle or square. The closure takes a CGPoint which is the centre of the shape and it should return a complete UIBezierPath .
Whether or not the y-axis’ range should adapt to the points that are visible on screen. This means if there are only 5 points visible on screen at any given time, the maximum on the y-axis will be the maximum of those 5 points. This is updated automatically as the user scrolls along the graph.
If shouldAdaptRange is set to true then this specifies whether or not the points on the graph should animate to their new positions. Default is set to true. Looks very janky if set to false.
How long the animation should take. Affects both the startup animation and the animation when the range of the y-axis adapts to onscreen points.
The animation style.
- GraphViewAnimationType.EaseOut
- GraphViewAnimationType.Elastic
- GraphViewAnimationType.Custom
If adaptAnimationType is set to .Custom , then this is the easing function you would like applied for the animation.
Whether or not the graph should animate to their positions when the graph is first displayed.
Whether or not to show the y-axis reference lines and labels.
The colour for the reference lines.
The thickness of the reference lines.
Where the labels should be displayed on the reference lines.
- GraphViewReferenceLinePosition.Left
- GraphViewReferenceLinePosition.Right
- GraphViewReferenceLinePosition.Both
The type of reference lines. Currently only .Cover is available.
How many reference lines should be between the minimum and maximum reference lines. If you want a total of 4 reference lines, you would set this to 2. This can be set to 0 for no intermediate reference lines.
This can be used to create reference lines at specific intervals. If the desired result is to have a reference line at every 10 units on the y-axis, you could, for example, set rangeMax to 100, rangeMin to 0 and numberOfIntermediateReferenceLines to 9.
Whether or not to add labels to the intermediate reference lines.
Whether or not to add units specified by the referenceLineUnits variable to the labels on the intermediate reference lines.
Reference Line Labels
The font to be used for the reference line labels.
The colour of the reference line labels.
Whether or not to show the units on the reference lines.
The units that the y-axis is in. This string is used for labels on the reference lines.
The number of decimal places that should be shown on the reference line labels.
Data Point Labels (x-axis)
Whether or not to show the labels on the x-axis for each point.
How far from the «minimum» reference line the data point labels should be rendered.
How far from the bottom of the view the data point labels should be rendered.
The font for the data point labels.
The colour for the data point labels.
Pull requests, improvements & criticisms to any and all of the code are more than welcome.
If you find any bugs please create an issue on Github.
Follow me on twitter for interesting updates (read: gifs) about other things that I make.
About
An adaptive scrollable graph view for iOS to visualise simple discrete datasets. Written in Swift.
Источник


