- GridView
- Знакомьтесь — GridView
- Свойства
- Базовый пример
- GridView с картинками
- GridView с картинками и пояснительным текстом
- res/layout/cellgrid.xml
- Убрать вертикальную прокрутку
- Галерея
- Загружаем картинки из внешнего накопителя
- ImageAdapter.java
- Полный список
- numColumns и columnWidth
- horizontalSpacing, verticalSpacing
- stretchMode
- Android GridView Tutorial
- Getting Started
- Setting The Data Provider
- Selecting Items
- Screen Orientation Changes
- Customizing GridView Properties
- Performance Tips
- Remote Image Loading
- Where to Go From Here
GridView
Знакомьтесь — GridView
Компонент GridView представляет собой плоскую таблицу. Для GridView можно использовать собственные поля для отображения элементов данных, создав класс, производный от класса ArrayAdapter или BaseAdapter и т.п, и переопределив его метод getView().
В старых версиях студии находился в разделе Containers, сейчас находится в Legacy и считается устаревшим.
Число столбцов для GridView чаще задаётся статически. Число строк в элементе определяется динамически на основании числа элементов, которые предоставляет адаптер.
Свойства
- android:numColumns — определяет количество столбцов. Если поставлено значение auto_fit, то система вычислит количество столбцов, основанное на доступном пространстве
- android:verticalSpacing — устанавливает размер пустого пространства между ячейками таблицы
- android:columnWidth — устанавливает ширину столбцов
- android:stretchMode — указывает, куда распределяется остаток свободного пространства для таблицы с установленным значением android:numColumns=»auto_fit». Принимает значения columnWidth для paспределения остатка свободного пространства между ячейками столбцов для их увеличения или spacingWidth — для увеличения пространства между ячейками
Базовый пример
Если поместить GridView на форму, то увидим следующую картину.

Внесём небольшие правки
В коде реализуем наполнение таблицы через адаптер. Создадим новый файл DataAdapter.java:
Теперь напишем код для основного окна приложения. Как и у ListView, нам нужно использовать метод setAdapter(), а также методы setOnItemSelectedListener(), onItemSelected(), onNothingSelected().
Запустите проект и начинайте выбирать любой элемент — его название отобразится в текстовой метке в верхней части экрана. Я обратил внимание, что в эмуляторе с помощью джойстика можно выбрать нужный элемент, но в современных телефонах джойстика нет, поэтому я позже добавил метод setOnItemClickListener(), чтобы можно было щёлкать по элементам в GridView и выводить их названия в метке.

GridView с картинками
Вместо текста можно использовать и картинки. Немного модифицируем проект. В шаблоне разметки изменим GridView:
Создадим новый адаптер ImageAdapter.java, в котором будет возможность подключать картинки
Теперь код в основной активности:

Зная номер позиции можно доработать программу, чтобы при щелчке на картинке, она открывалась на весь экран. Давайте так и сделаем. Создадим новый XML-файл разметки в папке res/layout под именем full_image.xml:
Создадим новую активность, в которой будет выводиться изображение на весь экран (файл FullImageActivity.java):
Класс получает от намерения номер позиции и выводит по этому номеру изображение из ресурсов.
Теперь в основной активности модифицируем код для щелчка
Осталось добавить в манифест новую активность:
У нас получилась галерея с просмотром отдельной картинки.
GridView с картинками и пояснительным текстом
Модифицируем предыдущий пример и создадим сетку, состоящую из картинок с сопроводительным текстом внизу.
Можно было оставить предыдущую разметку для активности, но я решил чуть её изменить, убрав лишние элементы
Теперь создадим разметку для отдельной ячейки сетки — нам нужны ImageView и TextView:
res/layout/cellgrid.xml
Создадим новый класс ImageTextAdapter. Он практически не отличается от класса ImageAdapter, поменялся только метод getView(), разницу в коде я закоментировал для сравнения
Осталось вызвать нужный адаптер в активности:

Убрать вертикальную прокрутку
Прочитал заметку про убирание вертикальной прокрутки, которая возникает при движении пальцем вверх. Может пригодится кому-то:
Галерея
Рассмотрим вариант создания галереи на основе GridView.
Создаём новый проект. Также нужно подготовить фотографии для галереи, которые следует поместить в папку res/drawable-hdpi.
Поместим на главном экране приложения GridView:
Создадим новый класс ImageAdapter.java, наследующий от BaseAdapter, для размещения изображений в сетке GridView через собственный адаптер.
Открываем основной класс приложения и связываем через созданный адаптер изображения с GridView:
Запустим проект и проверим, что всё отображается нормально.

Не обращайте внимания, что картинки на скриншоте повторяются, просто было лень готовить пятнадцать разных фотографий.
На этом урок можно было закончить, но давайте доработаем приложение, чтобы выбранная картинка отображалась в полном размере на весь экран. Для этого нужно передать идентификатор выбранного изображения новой активности.
Создадим в папке layout файл разметки full_image.xml для этой цели.
Создадим новый класс FullImageActivity.java для активности, которая будет отображать картинку на весь экран. Активность через намерение будет получать идентификатор картинки и выводить её на экран.
Не забываем прописать новый класс в манифесте проекта.
Возвращаемся к главной активности и добавляем обработчик щелчков на сетке:
Снова запускаем проект и щёлкаем по любой миниатюре — должен запуститься новый экран с картинкой во весь рост. Теперь можно разглядеть кота получше.


Загружаем картинки из внешнего накопителя
Попробуем загрузить картинки с внешнего накопителя в GridView. Пример писался под Android 2.3, возможно сейчас уже не заработает.
Разметка основного экрана состоит из одного компонента GridView:
Для данного компонента нужен адаптер. Создадим новый класс ImageAdapter.
ImageAdapter.java
Код для главной активности:
В этом примере при щелчке выводится всплывающее сообщение. Вы можете запустить новую активность с показом выбранной картинки.
Источник
Полный список
GridView – еще один из компонентов, использующих адаптеры. Он выводит элементы в виде сетки/матрицы/таблицы, нужное подчеркнуть )
Сделаем простой пример. И рассмотрим интересные атрибуты этого компонента.
Project name: P0571_GridView
Build Target: Android 2.3.3
Application name: GridView
Package name: ru.startandroid.develop.p0571gridview
Create Activity: MainActivity
В экран main.xml поместим GridView:
Создадим в любой папке res/drawable-* файл rect.xml
Это просто прямоугольник, залитый синим цветом. Я буду использовать его как фон. Я эту тему еще не рассматривал в уроках, тут можно почитать подробнее .
Создадим свой layout для адаптера – item.xml
LinearLayout с фоном drawable/rect, который мы создали ранее. И TextView.
Кода немного. Определяем GridView и создаем адаптер. В качестве layout для адаптера используем созданный item.xml, а tvText – это элемент, в который адаптер будет вставлять текст. Метод adjustGridView пока пустой, в нем будем кодить настройки Grid-а.
Давайте смотреть, какие для GridView есть атрибуты.
numColumns и columnWidth
numColumns – кол-во столбцов в сетке. Если его не задавать, то столбец будет по умолчанию один. Запустим приложение и убедимся.

Давайте поменяем это свойство — укажем, например 3. Сделаем это в пустом пока что методе adjustGridView
Сохраним и запустим.

Все верно, получилось три столбца.
Это свойство также может иметь значение AUTO_FIT. В этом случае проверяется значение поля атрибута columnWidth (ширина столбца).
— если ширина столбца явно указана, то кол-во столбцов рассчитывается исходя из ширины, доступной GridView, и ширины столбцов.
— иначе, кол-во столбцов считается равным 2
Проверим. Укажем кол-во столбцов = AUTO_FIT, а ширину столбцов задавать пока не будем.
Запускаем, видим два столбца

Теперь укажем явно ширину столбцов, пусть будет 50.
Теперь кол-во столбцов рассчитывается исходя из их ширины.

Видно, что в экран влезло 6 столбцов. Вы можете поизменять параметр ширины столбцов и убедиться, что их кол-во будет меняться.
horizontalSpacing, verticalSpacing
Это горизонтальный и вертикальный отступы между ячейками. Пусть будет 5.

Между ячейками появилось расстояние.
stretchMode
Этот параметр определяет, как будет использовано свободное пространство, если оно есть. Используется в случае, когда вы указываете ширину столбца и кол-во ставите в режим AUTO_FIT. Изменим наш метод, добавим туда настройку stretch-параметра.
stretchMode может принимать 4 значения:
NO_STRETCH – свободное пространство не используется

Столбцы выровнены по левому краю. Все свободное пространство справа.
STRETCH_COLUMN_WIDTH – свободное пространство используется столбцами, это режим по умолчанию

Столбцы растянуты по ширине. Она уже может не соответствовать той, что указана в setColumnWidth.
STRETCH_SPACING – свободное пространство равномерно распределяется между столбцами

Ширина столбцов неизменна. Увеличены интервалы между ними.
STRETCH_SPACING_UNIFORM – свободное пространство равномерно распределяется не только между столбцами, но и справа и слева

Ширина столбцов неизменна. Увеличены интервалы между ними и с боков.
Разумеется, все эти параметры можно задавать не только программно, но и через атрибуты в layout-файлах. Вместо ArrayAdapter можно использовать любой другой. Можно прикрутить обработчик setOnItemClickListener и получать позицию или id нажатого элемента. Все как в обычных списках.
Есть также хороший гугловский пример по этой теме:
На следующем уроке:
Присоединяйтесь к нам в Telegram:
— в канале StartAndroid публикуются ссылки на новые статьи с сайта startandroid.ru и интересные материалы с хабра, medium.com и т.п.
— в чатах решаем возникающие вопросы и проблемы по различным темам: Android, Kotlin, RxJava, Dagger, Тестирование
— ну и если просто хочется поговорить с коллегами по разработке, то есть чат Флудильня
— новый чат Performance для обсуждения проблем производительности и для ваших пожеланий по содержанию курса по этой теме
Источник
Android GridView Tutorial
In this Android GridView tutorial, you will build an app using a GridView and learn how to customize it to create a beautiful user interface.


These days, people are always being told to relax, go off-grid and put their smartphones down. But where’s the fun in that? I’m here to encourage you not to get off the grid. Instead, get onto our grid—our Android GridView tutorial, that is!
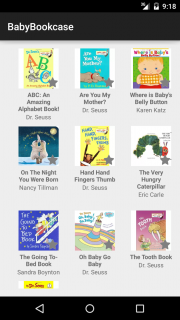
Today you’ll learn how to tame this widely-used Android component and construct your own Bookcase application containing various books for babies.
If you’re familiar with Android’s ListView component, you should feel right at home here. We also have a great tutorial on ListViews if you’d like to familiarize yourself with them first (although you don’t need to for this tutorial).
GridView follows the same formula to render each cell. Basically, you:
- Create a BaseAdapter subclass.
- Set an instance of this class as your data provider to the GridView .
- Return each cell’s view from getView() on your adapter.
Android’s GridView is a useful component for constructing easy-to-browse lists. And since grids are everywhere these days (notably in the Instagram app) it’s a necessary skill. After completing this tutorial, you’ll be ready to conquer the world with your own amazing grid views!
Getting Started
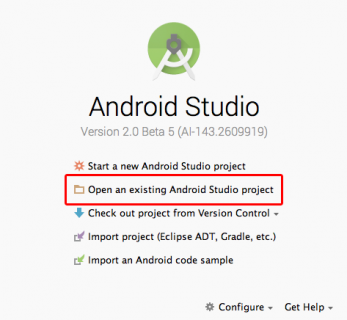
Download the starter project here. Included are the image assets for each book and a list of Book objects describing the contents of our Baby Bookcase. Open the project by starting Android Studio and selecting Open an existing Android Studio project:
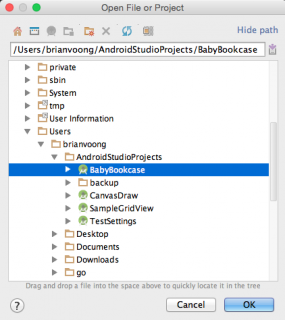
Navigate to the directory where you unzipped the sample project and hit OK:
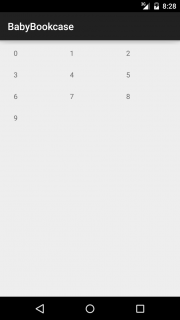
Build and run the project on your preferred emulator or Android device—you should see the most amazing blank screen ever: ![]()
You are now ready to start integrating your GridView .
Navigate to app\res\layout\activity_main.xml and insert the following block of XML between the RelativeLayout tags (make sure to view the file as “Text” by clicking the tab near the bottom):
Your editor should now show a preview of your GridView :
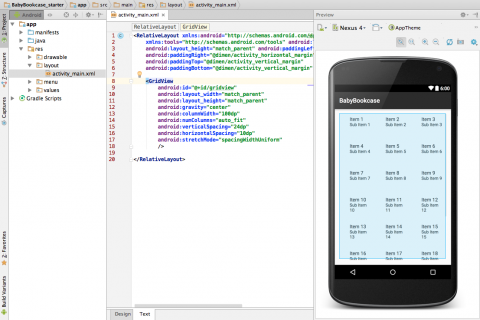
The snippet above specifies a GridView with some customized properties. We’ll discuss property customization in more detail later on.
Setting The Data Provider
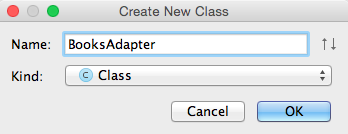
Empty grids are hungry for data to display. To feed this one, you’ll set up a class called BooksAdapter , an adapter which is a subclass of the BaseAdapter class, as your data provider for the GridView . In the project navigator pane, right-click on com.raywenderlich.babybookcase, and select New/Java Class. After that, type in BooksAdapter for Name, keep Class for Kind, and hit OK.
The adapter acts as the middleman between the GridView and the data source. It loads the information to be displayed in your grid view from a data source, such as an array or database query, then creates a view for each item. If you’re interested, the ListView tutorial has more information on adapters.
Replace the contents of this file with the following:
Here’s the play-by-play of each step in the above code:
- You use this constructor to instantiate a BooksAdapter .
- You return the number of cells to render here.
- You don’t need to return an id for this tutorial, so just return 0 . Android still requires you to provide an implementation for this method.
- See #3, but instead return null .
- You return a dummy TextView as the cell view for your GridView .
Now that you have a basic adapter implementation, you can use this class as the data provider for the GridView in MainActivity . Within onCreate() in MainActivity.java, underneath
insert the following:
Build and run. You should see something like this:
Great—we’re getting somewhere!
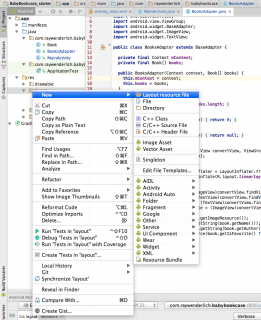
To provide the proper view for the cells that represent each Book object, create a new XML layout file by right-clicking on the layout directory and selecting New/Layout resource file:
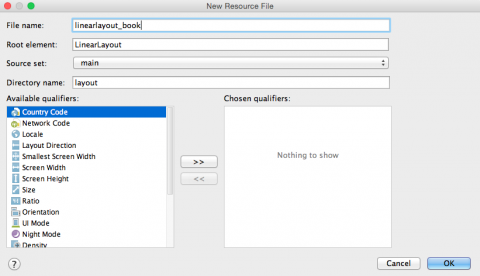
Use linearlayout_book as the file name and hit OK:
Replace the file contents with the following:
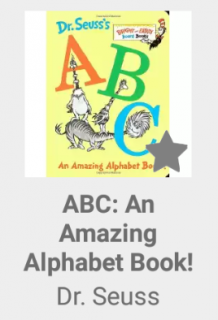
This new layout file will be used to represent your Book objects inside the grid. Each book will be drawn inside a cell that contains four items:
- An ImageView for the cover art.
- Another ImageView for a “favorited” star icon.
- A TextView for the book name.
- Another TextView for the book’s author.
Here’s a sample of what a book cell will look like:
Now that your layout is established, you can return a more complex view for your cells. Open BooksAdapter.java again and finish the implementation of getView() by replacing it with the following:
Here’s an explanation of each step:
- You find the proper book for this cell by using the position index.
- GridView optimizes memory usage by recycling the cells. This means that if convertView is null, you instantiate a new cell view by using a LayoutInflater and inflating your linearlayout_book layout.
- You create references for each individual view you created in your XML layout file.
- You set the book’s cover art, name and author using the above references.
Build and run the application again. You should see the following:
Selecting Items
Now you’ve got a pretty grid of books. Hooray! But what if your user wants to favorite a book by tapping on it? To allow this, set up an on-click listener for your GridView . Open MainActivity.java and add the following snippet at the bottom of onCreate() :
A variable must be declared as final to be used inside an anonymous nested class (like our on-click listener), so to change the booksAdapter variable’s declaration to final, replace this line in onCreate() :
To toggle the star icon in your cell, add this line of code in getView in BooksAdapter , right before you return the convertView :
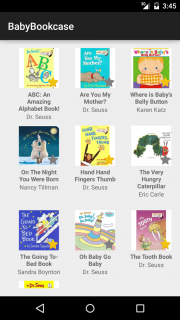
Build and run. You can now tap on each book to favorite your selections:
Screen Orientation Changes
You’ve happily selected some favorite books … but when you rotate the screen (CTRL + F11 for emulator rotation), the selections aren’t remembered. What!?

This is because Android Activities are destroyed and then recreated when the screen rotates. By default, the system uses the Bundle instance state to save information about each View object in your activity layout (such as the text displayed in the TextView s of your GridView ). When your activity instance is destroyed and recreated, the state of the layout is restored to its previous state with no code required by you.
This means that to make the selections behave correctly, you need to save the selection information yourself. Thankfully, Android Activities have two useful methods for this:
- onSaveInstanceState() : Android will call this method right before the activity is destroyed.
- onRestoreInstanceState() : Android will call this method when recreating the activity.
To remember the selected books, the app needs to save the selection information to a list, then use that list to select the books when the activity is recreated.
First, establish an identifying key for the list at the beginning of your class by adding the following line before onCreate() in MainActivity.java:
Add the following to MainActivity.java under onCreate() :
To restore the selections when the activity is recreated, add the following to MainActivity.java under onSaveInstanceState() :
Build and run. Now when you rotate the screen, your books are still favorited!
Customizing GridView Properties
As you play around with the GridView component, you may run into situations where the layout doesn’t suit your design perfectly. Luckily, the great folks at Google have provided a few properties that allow you to tweak how each cell is rendered.
You can modify columnWidth , horizontalSpacing and verticalSpacing with a dimension value such as 14.5dp . These properties can be set programmatically or from the XML layout files.
To find properties to set, type gridView.set at the bottom of onCreate() in MainActivity.java and wait for Android Studio to show suggestions.
Alternatively, take a look at the GridView documentation for a list of available methods, some of which set these properties. You can also head back to app/res/layout/activity_layout.xml and play around with the properties within the GridView tag. The properties are fairly self-explanatory, so I definitely encourage you to experiment with different values.
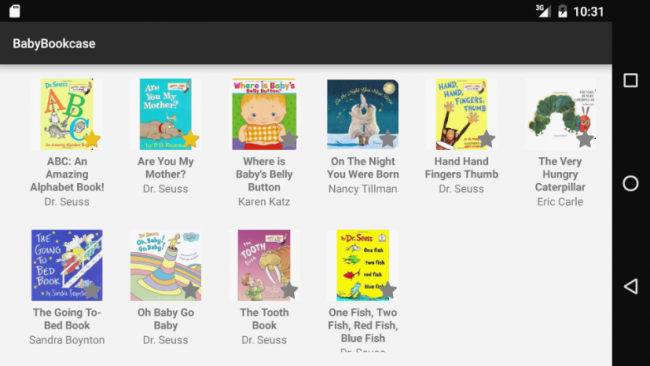
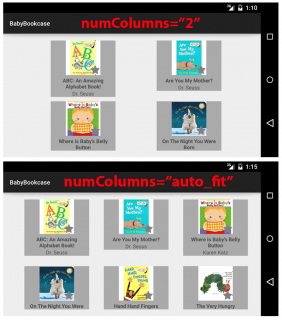
To specify the number of columns to render, provide an integer value for the property numColumns . If you want to display as many columns as possible to fill the available horizontal space, use numColumns=»auto_fit» . Here’s a comparison between the two options in landscape orientation (I’ve used darker grey cell backgrounds for clarity purposes):
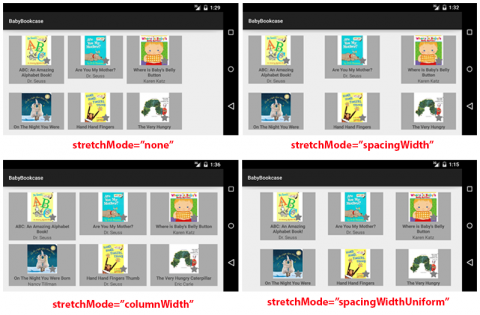
Finally, to control how your columns stretch to fill available space, specify stretchMode as one of the following:
- none : Stretching is disabled.
- spacingWidth : Spacing between each column is stretched.
- columnWidth : Each column is stretched equally.
- spacingWidthUniform : Spacing between each column is uniformly stretched.
The following screenshot illustrates those options:
Using the customizable properties, you can easily get your GridView looking just the way you want it!
Performance Tips
Your first few implementations of GridView will likely be simple in terms of view layouts, but as your app scales and you get more content, the stress on your users’ devices can become quite high in terms of loading cells and maintaining smooth scrolling.
The current implementation of this sample app recycles each cell view as needed within BooksAdapter.getView() , so make sure to use this strategy whenever you need to provide views for your cells.
One technique to improve performance is called the ViewHolder design pattern. As the name suggests, you implement a class to “hold” the subviews inside of your cells. This avoids memory-expensive calls to findViewById() .
To see what this pattern looks like, add this private class inside BooksAdapter , directly below getView() . Remember to paste inside the BooksAdapter class brackets!
Your ViewHolder is quite simple. It holds references to each subview and doesn’t bother with anything else.
To take advantage of your ViewHolder , change getView() to the following:
The ViewHolder is stuffed into convertView ‘s tag using setTag() and retrieved using getTag() . With your cells scrolling by, it helps them load quick quickly when they can skip over all the inflation, right to the getTag() call and the fun part of inserting content.
Build and run. Your app will look the same, but underneath the hood it is now capable of handling much faster view recycling.
For additional documentation, visit Google’s page on smooth scrolling here.
Remote Image Loading
What if your application requires loading external images inside each individual cell? This task generally requires subclassing AsyncTask and firing off an image download task for each cell as the user scrolls down the list and back up.
Having implemented a custom solution for this in the past, I can tell you that it gets complicated. For example, you’d need to cache images in memory as each download is successfully completed, while making sure you’re not firing off multiple download tasks for the same image file download.
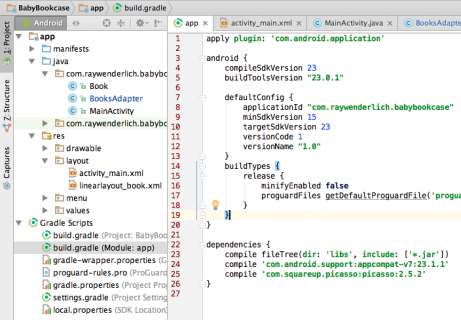
Fortunately, there is a fantastic library available from Square called Picasso that solves many of the common issues with list views and image downloads. To install the library, open up build.grade (Module: app) in your project and add the following line of code inside dependencies :
Your build file should look like this:
Next, click the Sync Now link to install Picasso and update your project:

After successfully syncing your project, you can let Picasso do all the heavy lifting of downloading your images. To do this, comment out the line in BooksAdapter.getView() where the cover art is set and include Picasso like this:
Build and run, then scroll through the GridView to test the external image loading. Note that the images are still the same for each book, but they are coming from a remote URL now.
Where to Go From Here
Congratulations! You’ve conquered the powerful GridView component, created a library for your favorite kids’ books and learned how to do the following:
- Add a GridView to your layouts.
- Create an adapter to provide your GridView with the proper cell views.
- React to item selections.
- Persist selections for orientation changes.
- Customize the GridView .
- Optimize performance.
You can download the completed project here. If you’re curious about what else you can do with GridView s, check out Google’s documentation.
I hope you’ve enjoyed this introduction to Android’s GridView . If you have any questions, comments or feedback please join the forum discussion below.
Источник


