- Установка среды разработки Android
- Что вы создадите
- Что вам потребуется
- Настройка среды для разработки под Android
- Если необходимо, создание виртуального устройства Android
- How To Set Android SDK Path In Windows And Mac
- 1. Configure Android SDK Variable In Windows.
- 1.1 Get Android SDK Install Directory Path.
- 1.2 Set %ANDROID_HOME% and %Path% System Environment Variable.
- 2. Configure Android SDK Variable In macOS.
- Software testing tutorials and automation
- Pages
- Set ANDROID_HOME and Path Environment Variables For SDK In Windows
- Set ANDROID_HOME windows Variable
- 21 comments:
- Как развернуть окружение для разработки приложений на React Native на Windows
- Доброго времени суток!
- Node, Python2, JDK
- React Native CLI
- Android development environment
- Переменные среды
- Создаем приложение и запускаем эмулятор
Установка среды разработки Android
Этот урок описывает установку и настройку среды для разработки под Android.
Что вы создадите
Вы изучите, как установить инструменты для сборки Android приложений. При необходимости, создадите виртуальное устройство Android (AVD).
Что вам потребуется
- Примерно 15 минут свободного времени
- Любимый текстовый редактор или IDE
- JDK 6 и выше
Настройка среды для разработки под Android
Перед тем, как вы сможете собрать Android приложение, вы должны установить Android SDK. При установке Android SDK также устанавливается AVD Manager, графический пользовательский интерфейс для создания и управления Android Virtual Devices (AVDs).
- С сайта Android скачайте актуальную версию Android SDK для вашей операционной системы.
- Распакуйте архив в выбранное вами место. К примеру, в Linux или Mac этим местом может быть пользовательский каталог. Более подробную информацию по установке смотрите на сайте Android Developers.
- Установите значение переменной окружения ANDROID_HOME в местоположение Android SDK. Дополнительно, добавьте в переменную окружения PATH значения ANDROID_HOME/tools и ANDROID_HOME/platform-tools .
Mac OS X
Linux
Windows
Загруженный Android SDK не содержит какую-то конкретную платформу. Для запуска кода этого урока вам необходимо загрузить и установить последнюю версию SDK платформы. Для этого вы можете использовать Android SDK и AVD Manager, которые вы установили в предыдущем разделе.
1. Откройте окно Android SDK Manager:
2. Установите галочку для Tools.
3. Установите галочку для latest Android SDK.
4. В каталоге Extras установите галочку для Android Support Library.
5. Нажмите кнопку Install packages. для завершения загрузки и установки.
Если необходимо, создание виртуального устройства Android
Если у вас нет Android устройства для тестирования, то вы можете использовать виртуальное устройство Android. Для этого у вас должны быть установлены Android SDK и соответствующая версия SDK платформы и пакетов. См. Настройка среды для разработки под Android.
Эта команда создает новое AVD под названием «Default» на основе Android 4.2.2, API Level 19:
Как вариант, вы можете использовать android GUI инструмент для создания AVD.
Ниже приведена информация об использованных параметрах:
- —name Название нового AVD
- —target Назначаемый ID нового AVD
- —abi CPU/ABI, которое будет эмулировано для AVD
Эта команда отображает список доступных заданий. Используйте их для создания различных AVD на основе различных Android версий по необходимости.
Как вы можете увидеть, значение «29» ассоциировано с Android 4.2.2. Обратите внимание на три доступных ABI(CPU) для данного ID. Команда, использованная ранее для создания AVD указывала на ARM CPU.
Просмотр списка доступных AVD производится командой:
Ниже информация о только что созанном AVD:
Проверяем, что AVD работает:
Поздравляем! Вы только что установили и настроили окружение для разработки под Android, которое можно использовать с Spring.
Источник
How To Set Android SDK Path In Windows And Mac
After you installed android studio, you still need to configure some android SDK environment variables then you can use it easily. This article will tell you how to correctly configure Android SDK environment variables such as ANDROID_HOME, PATH on Windows and macOS.
1. Configure Android SDK Variable In Windows.
1.1 Get Android SDK Install Directory Path.
Before you can configure it, you should first get the android SDK install directory follow below steps.
- Open android studio, click File —> Settings menu item in the top men bar.
- Expand Appearance & Behavior —>System Settings —>Android SDK menu item on the left side of the popup window. Then you can find the Android SDK Location directory path on the right side ( in this example, the Android SDK location path is C:\Users\Jerry\AppData\Local\Android\Sdk ), remember it.
1.2 Set %ANDROID_HOME% and %Path% System Environment Variable.
- Right-click the computer icon in Windows file explorer left side, click Properties menu item in the popup menu list. This will open the windows system configuration window.
- Click the Advanced system settings link on left panel, it will popup the System Properties window, click the Environment Variables button to open Environment Variables window.
- Click the New… button to add a new system variable, input ANDROID_HOME as the variable name, and input the Android SDK location directory path ( such as C:\Users\Administrator\AppData\Local\Android\Sdk ) as the variable value.
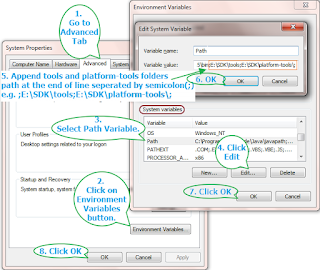
- Select variable Path and click Edit button and add ;%ANDROID_HOME%\tools;%ANDROID_HOME%\tools\bin;%ANDROID_HOME%\platform-tools at the end of its value. Please note the ; must be English character otherwise it will not take effect .
- Click OK to close the system environment variables settings window, open a dos window, type command adb in it. If you see output like below that means the android SDK path variable has been configured successfully.
2. Configure Android SDK Variable In macOS.
- Open Android Studio on macOS, then click Android Studio —> Preferences menu item at the left top toolbar.
- Input search keyword sdk in the search box of the popup Preferences dialog window left side.
- It will focus on the Android SDK menu item on the left side, and you can get the Android SDK Location directory path value on the right side Android SDK Location text box.
- Generally, the Android SDK is installed in the /Users/user-name/Library/Android/sdk folder on macOS.
- If you can not find the above folder in macOS finder or terminal, this is because the Library folder is a hidden folder by default, you should make the hidden folder visible by executing the command $ defaults write com. apple . finder AppleShowAllFiles TRUE in a macOS terminal window ( please read article How To Show Hidden Files In Mac OS Finder And Select Hidden Files In Html Upload File Form ).
- You can also see the hidden Library folder by opening a macOS Finder window, then click Go —> Go to Folder… menu item, and input
/Library in the popup dialog input text box, then click Go button.
Источник
Software testing tutorials and automation
A blog on Selenium tutorial, Selenium webdriver tutorial, Selenium IDE tutorial, Appium Tutorial, Selenium Grid Tutorial, Jmeter Tutorial.
Pages
Set ANDROID_HOME and Path Environment Variables For SDK In Windows
Set ANDROID_HOME windows Variable
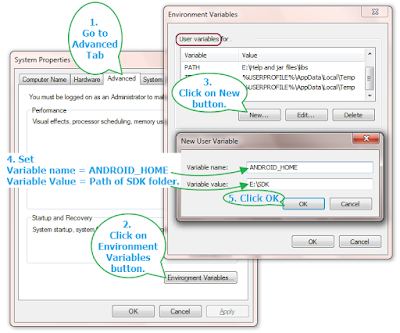
- Open » Environment Variables» dialog from win start menu -> Right click on My Computer -> Select properties -> Advanced system settings -> Environment Variables button from Advanced tab. You can view detailed steps to open Environment Variables dialog in THIS POST.
- Click on New button under User Variable table. It will open New User Variable dialog.
- Set Variable Name = ANDROID_HOME and Variable value = E:\SDK (Path of SDK folder). Path can be different for you as per your SDK folder location as described in previous post.
- Click on OK button to close New User Variable dialog as shown in bellow image.

That means android is configured properly in your system.
Now android_home environment variable windows and Path Environment Variables are set for android SDK in windows environment. So android environment is configured and ready to use with appium to execute software automation tests. Next post will describe you how to integrate SDK with eclipse using Eclipse ADT Plugin to use android SDK with eclipse.
21 comments:
Thanks for the post its really help full for initial android user
Thank you for your help but i have an issue that is i do not find the sdk path in my computer. I want this setup for an ionic app create android platform and generate apk file. I also installed in my computer android studio.
Please help me to find the sdk path. I’m getting the error ANDROID_HOME veriable not setup, setup it manually.
u have to add JAVA_HOME variable also along with ANDROID_HOME to have proper functionality.
u have to add JAVA_HOME variable also along with ANDROID_HOME to have proper functionality.
I’m getting ANDROID_HOME variable not setup setup it manually to generate a apk from a ionic framework project. i did not find the sdk path in my computer but i also installed android studio in my computer. Please help me.
You are developing project means you are developer and asking for help regarding deploy from a testing background funny.
I am answering late but hope someone will find it useful :
If you have already installed android studio then you will find your sdk in user appdata hidden folder.
thanks for the help!
‘android’ is not recognised as internal or external command,operable program or batch file- message is displayed in command prompt. I had set the path correctly, But don’t know what is the problem can you please help me with it??
maybe you have spaces in your path, for example if your sdk in Program files folder.
you should set the correct path, use such scheme:
Progra
1 = ‘Program Files’
Progra
2 = ‘Program Files(x86)’
it is for windows x64
maybe you have some spaces in your path, for example your sdk is located in «Program files».
use such scheme:
Progra
1 = ‘Program Files’
Progra
2 = ‘Program Files(x86)’
it’s for windows x64
![]()
I have also faced the same error. But once after providing ‘SDK path’ in the System variables ‘Path’. The error is cleared
thanks for help
By far the most helpful page I have found about setting up all the variables and paths for android 🙂
I run the command prompt I got the sdk manager, but I also got «this system cannot find the specified path», let me know what I have to do solve this issue
The «android» command is depercated
For manual sdk, avd, and project management, please use android studio.
For command-line tools, use tools\bin\sdk manager.bat
And tools\bin\avdmanager.bat
Same issue, What is the solution for this ?
Источник
Как развернуть окружение для разработки приложений на React Native на Windows
Доброго времени суток!
Решив начать разрабатывать приложения на React Native, я столкнулся с проблемами разворачивания окружения. Сегодня я хочу поделиться опытом его настройки.
Конечно, на официальном сайте есть подробное описание, но следуя только этим рекомендациям, было довольно сложно сделать все настройки.

Итак, начнём:
Node, Python2, JDK
- Установить NodeJS. У меня последняя версия на момент написания статьи 10.11.0
- Установить Python2 и JavaSE. Использовался jdk-10.0.2
React Native CLI
- Установим React Native CLI
npm install -g react-native-cli
Android development environment
После запуска выбираем кастомную установку
Далее отмечаем галочкой «Android Virtual Device» и указываем пусть до папки Android — либо оставляем как есть C:\Users\%USERNAME%\AppData\Local\Android\Sdk
Главное, чтобы в пути не было кириллицы!
Особенно с этим могут возникнут проблемы в будущем. Например, у меня имя пользователя системы было на кириллице «C:\Users\Александр», и после запуска приложения grandle не мог найти путь, т. к. путь выглядел как «C:\Users\. \. »
Нажимаем «далее». Оставляем рекомендуемый объем оперативной памяти, нажимаем далее и устанавливаем.
Android SDK — открываем студию и переходим в настройки
Appearance & Behavior → System Settings → Android SDK.
На вкладке «SDK Platforms» включаем галочку «Show Package Details» и для «Android 8.0 (Oreo)» устанавливаем:
- Android SDK Platform 26
- Intel x86 Atom_64 System Image
- Google APIs Intel x86 Atom_64 System Image
Теперь выбираем вкладку «SDK Tools», включаем галочку «Show Package Details»
и устанавливаем пакет
Переменные среды
- ANDROID_HOME
Создадим переменную для ANDROID_HOME:
- Имя переменной ANDROID_HOME
- Значение переменной (можно посмотреть в Android Studio)
По аналогии создадим переменную JAVA_HOME:
- Имя переменной: JAVA_HOME
- Значение переменной: C:\Program Files\Java\jdk-(версия)
Добавим 4 значения:
Создаем приложение и запускаем эмулятор
- Переходим в удобную для нас папку в консоли и набираем:
react-native init MyTestProject - Открываем в Android Studio наш проект и открываем AVD Manager
Если AVD не скачан, скачиваем и запускаем
Далее переходим в консоли в папку с приложением и набираем:
react-native run-android
После чего нашел приложение запустилось.
В этой статье использовались официальное руководство от React Native
+ личный опыт!
Надеюсь, эта статья поможет тем, кто столкнулся с проблемами или решил начать разрабатывать нативные приложения на React
Источник


