- webserver on an android hotspot — what’s its IP?
- How configure the DHCP settings of WIFI Tethering (Hotspot) on Android?
- 4 Answers 4
- How to change the default hotspot DHCP IP address range on Android?
- 1 Answer 1
- Как настроить параметры DHCP для WIFI Tethering (Hotspot) на Android?
- How to Set a Static IP-Address for Wi-Fi on Android 10, 9, 8
- Set a Static IP-Address on Stock Android
- Android 8
- Android 9 and 10
- Manually Configure a Static IP on Samsung Galaxy
- Static IP on Samsung Galaxy S20 with One UI 2.0
- Samsung Experience (Galaxy S7)
- Static IP-address assignment on Android 4.2.2 (Touchwiz)
- How to Switch Back to Automatic IP Address Obtaining
webserver on an android hotspot — what’s its IP?
I want to setup an android phone as a wifi-hotspot, then run a webserver on it, and browse it from another phone connected to the hotspot.
My phone isn’t rooted, but I have termux, which has many unix utilities. I don’t want to install an extra app. (But happy to write one!)
I can view python’s simple webserver on http://localhost (on the host), but not on the other phone. I tried using the public-facing IP of the host phone (checking it using whatsmyip-type webpages), but didn’t work. Someone said that mobile ISPs prevent this, by mapping different internal and external IPs. but here, it’s not going through the ISP, just the hotspot.
I also tried IP addresses from ifconfig and from the wifi controls within android, which does work for netcat — but only the IP of the client phone connected to the hotspot (not the host).
That is, netcat is on the phone connected to the hotspot and listens, then netcat on hotspot phone connects to it. (i.e.role swap: hotspot client is netcat server). Weirdly, the hotspot phone doesn’t seem to have an IP (at least, not one I’ve been able to discover, so far). But it must have one, mustn’t it, for netcat to connect.
Anyway, I want the webserver on the hotspot host, so I need its IP to connect to it. is there a way to get it?
This has been bugging me for ages. Many thanks for any help!
EDIT the answers to this question says it’s (almost) always 192.168.43.1. I can’t try it right now; will update when I have.
UPDATE
1. 192.168.43.1 works
2. py http.server works fine for regular files (e.g. txt, pdf), but video files seem to require some streaming protocol it lacks. I found lighttpd had this (available within termux using apt install lighttpd ). But it needs config (and no eg/default). I used:
The dir listing makes it much easier to use, but obviously no security configured here, so want to be careful what you make available.
3. Android (my 5.1, anyway) needs airplane mode off before you can make it a wifi hotspot — which makes sense for internet access. but here, I want only the client to have access to the host, not have it accessible to the whole internet. So I found you can turn off data-access to prevent that, and the hotspot still works. (There’s surely a way to have a hotspot in airplane mode programmatically. )
Источник
How configure the DHCP settings of WIFI Tethering (Hotspot) on Android?
When connecting my PC to Android Wi-Fi hotspot, it assigned a 192.168.42.x address to my PC. I really need to change this as it conflicts with one of our work subnets — is this possible?
4 Answers 4
Unfortunately, there is no way to change the IP address range for the builtin tethering support, even in CyanogenMod. The Wi-Fi hotspot IP is hardcoded in android.net.wifi.WifiStateMachine.startTethering(); the USB tethering IP is hardcoded in com.android.server.connectivity.Tethering.
However, if your phone is rooted, you can try using third-party apps for tethering which have the option to change the IP address range. E.g., when the builtin USB tethering was broken in CyanogenMod alphas for Samsung Galaxy W, I used Wired Tether for Root Users, which has such option. For Wi-Fi tethering you can try the Wireless Tether for Root Users app from the same authors, which also has the option to change the IP address range.
Because Google Code was shut down, the above links no longer work. Some people exported the source code from those repositories to GitHub:
However, there was no further development activity, and the apps probably no longer work on recent Android versions.
Just in case someone wants to try those obsolete apps, I have been able to find some APK files in the Google Code Archive:
The Android builtin wifi tethering is designed to use 192.168.43.1/24 as the server, with netd handling the tethering, using dnsmasq . First DNS range is 192.168.42.1-254 and and 2nd DNS range is 192.168.43.1-254 .
Netd is not easy to change. It requires a socket to communicate with it, and that socket is taken when android starts tethering. But going through the source files for Tethering.java (I used Froyo) we see:
And Later on we see those ranges used, AS BACKUPS.
The main source for the dhcp ranges is not the hardcoded 42 and 43, but read from array.config_tether_dhcp_range, an internal string array. But it is currently empty.
You could edit the android framework. On my phone, it is /system/framework/framework-res.apk . There are a ton of tutorials online for editing framework-res.apk, from simple strings to full theming. Find one for your phone and android version.
Main thing you want to change is the /res/values/arrays.xml
compile/zip/sign as needed (follow a tutorial), then reinstall.
If you want more than one range, just copy the two items over and over. You always need to provide a start and a stop for each range. Try to keep it in the same /24, ie 192.168.50. 5 and 192.168.50.99 or whatever. You can confirm it is working with busybox ps | grep dnsmasq or if you don’t have busybox ps dnsmasq then use the pid in cat /proc/pid/cmdline . You should get (or similar):
/system/bin/dnsmasq —no-daemon —no-poll -no-resolv —dhcp-range=192.168.50.5,192.168.50.99,1h
FWIW, my WIFI tethering uses the default dnsmasq ranges, yet my computer was assigned 192.168.43.147/24 and gateway 192.168.43.1/24 . Not sure why yours defaulted to a 42.x address.
Источник
How to change the default hotspot DHCP IP address range on Android?
As the title says I look for a way to permanently change the default IP address range form 192.168.43.xxx to 192.168.1.xxx .
Reason: On my router some of my devices get a static IP trough DHCP, in the 192.168.1.xxx range. Using the hotspot on the road I would like to have the same setup.
I have tried to change the range following this steps, but it did not work out on both of my devices. They are rooted and Lineage OS is installed. The last answer suggest an easy way to do this, but it is not possible in Lineage OS.
Also this post from anroidpolice.com suggests that it is possible by an app, I look for a solution to do this with adb . I have no access to Google Play, and do not want it.
1 Answer 1
NOTE: Root is required.
Default DHCP IP address range is hard-coded (1) , you can’t change it without rebuilding ROM with modified source code. Or use a little hack.
When you switch on tethering, what happens (at least):
- hostapd — the daemon which manages access points — is started.
- Network interfaces are set up, IP address is added to Wi-Fi interface (hard-coded before Android Pie (2, 3) , randomized afterwards (4) ), and routing table is added (5) for local network.
- dnsmasq — the DHCP/DNS server (up to Pie) — is started with hard-coded commandline arguments (6) (which can be set through /etc/dnsmasq.conf (7) otherwise).
So we can replace /system/bin/dnsmasq with a custom shell script, taking control of the process in between. Rename the original binary to something else:
Create script /system/bin/dnsmasq :
Confirm the name of your Wi-Fi interface ( wlan0 usually). Check with ip link or ls /sys/class/net/ or iw :
Also confirm your local_network (8, 9) routing table ( 97 ) is being used for hotspot. Android’s routing is a mess, getting more complex with every new release. So I’m not sure if this has been persistent or not. Also before making any changes, check your routing policies and tables to figure out what you should put in your script:
SELinux rules also need to be defined if (all or some) not already defined and if status is enforcing . Use Magisk’s suploicy or some other similar tool like sepolicy-inject :
* Rules are not persistent across reboots, use some init.d script or replace /sepolicy in ramdisk
Set permissions on files:
Another options is to modify the value of config_tether_dhcp_range (10) in Android framework as explained in this answer, but I haven’t tested this.
Or you can setup complete tethering from commandline, running your own processes. This answer includes the instructions, though the question is different.
Источник
Как настроить параметры DHCP для WIFI Tethering (Hotspot) на Android?
При подключении моего компьютера к точке доступа Wi-Fi на Android он назначил 192.168.42.x адрес моему компьютеру. Мне действительно нужно изменить это, так как это конфликтует с одной из наших рабочих подсетей — возможно ли это?
К сожалению, нет способа изменить диапазон IP-адресов для встроенной поддержки модема, даже в CyanogenMod. IP-адрес точки доступа Wi-Fi жестко задан в android.net.wifi.WifiStateMachine.startTethering () ; IP-адрес USB-подключения жестко запрограммирован в com.android.server.connectivity.Tethering .
Однако, если ваш телефон рутирован, вы можете попробовать использовать сторонние приложения для модема, у которых есть возможность изменить диапазон IP-адресов. Например, когда встроенный USB-модем был нарушен в CyanogenMod alphas для Samsung Galaxy W, я использовал Wired Tether для корневых пользователей , у которого есть такая опция. Для подключения к Wi-Fi вы можете попробовать приложение Wireless Tether for Root Users от тех же авторов, у которого также есть возможность изменить диапазон IP-адресов.
Поскольку код Google был закрыт, вышеуказанные ссылки больше не работают. Некоторые люди экспортировали исходный код из этих репозиториев в GitHub:
Однако дальнейших разработок не было, и приложения, вероятно, больше не работают на последних версиях Android.
На тот случай, если кто-то захочет попробовать эти устаревшие приложения, я смог найти некоторые APK-файлы в архиве кода Google :
Встроенный Wi-Fi-модем Android предназначен для использования 192.168.43.1/24 в качестве сервера с netd использованием модема-модема dnsmasq . Первый диапазон DNS 192.168.42.1-254 и 2-й диапазон DNS 192.168.43.1-254 .
Netd не легко изменить. Для связи с ним требуется сокет, и этот разъем берется, когда андроид начинает подключаться. Но, просматривая исходные файлы для Tethering.java (я использовал Froyo), мы видим:
И позже мы увидим эти диапазоны, как резервные копии .
Основным источником для диапазонов dhcp являются не жестко закодированные 42 и 43, а чтение из array.config_tether_dhcp_range, внутреннего строкового массива. Но это в настоящее время пусто.
Вы можете редактировать рамки Android. На моем телефоне это так /system/framework/framework-res.apk . Есть целая тонна учебников онлайн для редактирования рамки-res.apk, от простых строк до полной тематизации. Найти один для вашего телефона и Android-версии.
Главное, что вы хотите изменить, это /res/values/arrays.xml
скомпилируйте / запакуйте / подпишите как необходимо (следуйте инструкциям), затем переустановите.
Если вы хотите более одного диапазона, просто скопируйте два элемента снова и снова. Вы всегда должны обеспечить старт и остановку для каждого диапазона. Старайтесь держать его в том же / 24, то есть 192.168.50. 5 и 192.168.50.99 или что-то еще Вы можете подтвердить, что он работает, busybox ps | grep dnsmasq или если у вас нет busybox, ps dnsmasq используйте pid cat /proc/pid/cmdline . Вы должны получить (или подобное):
/ system / bin / dnsmasq —no-daemon —no-poll -no-resolv —dhcp-range = 192.168.50.5,192.168.50.99,1h
FWIW, мой WIFI-модем использует dnsmasq диапазоны по умолчанию , но мой компьютер был назначен 192.168.43.147/24 и шлюз 192.168.43.1/24 . Не уверен, почему ваш 42.x адрес по умолчанию .
Я знаю, что это старый пост, но думал, что предоставлю обновление. Похоже, некоторые производители и версии Android теперь позволяют изменять диапазон IP-подсетей для DHCP-сервера через пользовательский интерфейс при использовании функции точки доступа WiFi. Вот где его можно найти на HTC One M8 под управлением Android 6.0. YMMV.
На экране «Мобильная точка доступа» щелкните значок 3 точки (подробнее), перейдите в раздел «Дополнительно», а затем «Параметры локальной сети». В разделе «Локальный IP» измените IP-адрес на нужный вам IP. В разделе «Локальный DHCP» измените начальный IP-адрес, чтобы он соответствовал подсети вашего IP-адреса.
ПРИМЕЧАНИЕ. Требуется рут.
Диапазон IP-адресов DHCP по умолчанию жестко задан ( 1 ) , вы не можете изменить его, не восстанавливая ПЗУ с измененным исходным кодом. Или использовать небольшой взломать.
Когда вы включаете модем, что происходит (по крайней мере):
- hostapd — демон, который управляет точками доступа — запущен.
- Сетевые интерфейсы настроены, IP-адрес добавлен к интерфейсу Wi-Fi (жестко задан до Android Pie ( 2 , 3 ) , рандомизирован после ( 4 ) ) и добавлена таблица маршрутизации ( 5 ) для локальной сети ( 6 ) .
- dnsmasq — сервер DHCP / DNS (до Pie) — запускается с жестко закодированными аргументами командной строки ( 7 ) (в противном случае можно задать /etc/dnsmasq.conf ( 8 ) ).
Таким образом, мы можем заменить /system/bin/dnsmasq пользовательский сценарий оболочки, взяв на себя управление процессом между ними. Переименуйте исходный бинарный файл в другое:
Создать скрипт /system/bin/dnsmasq :
Подтвердите название вашего интерфейса Wi-Fi ( wlan0 обычно). Проверьте с помощью ip link или ls /sys/class/net/ .
Кроме того, убедитесь ваша локальная таблица маршрутизации сети является 97 : grep local_network /data/misc/net/rt_tables . Маршрутизация Android — беспорядок, усложняющийся с каждым новым выпуском. Так что я не уверен, было ли это постоянным или нет. Также, прежде чем вносить какие-либо изменения, проверьте свою политику маршрутизации и таблицы, чтобы выяснить, что вы должны добавить в свой скрипт:
Правила SELinux также должны быть определены, если (все или некоторые) еще не определены, и если статус равен enforcing . Используйте Magisk suploicy или другой подобный инструмент, например sepolicy-inject :
* не сохраняется при перезагрузке, используйте какой-либо init.d скрипт или замените /sepolicy в ramdisk
Установить права на файлы:
Или вы можете настроить полную привязку из командной строки, запустив свои собственные процессы. Этот ответ включает в себя инструкции, хотя вопрос в другом.
Источник
How to Set a Static IP-Address for Wi-Fi on Android 10, 9, 8
If you encounter problems while using DHCP (auto IP obtaining) on Android you might need to manually set a static IP-address.
You may also decide to assign a static address to your Android phone if you want to use a specific IP on a Wi-Fi network but don’t want to set up the IP reservation on your access point or if you simply don’t have access to the router settings.
You can easily revert the network setting to its default state at any time and continue using DHCP.
Here is how to set a static IP-address on a phone or tablet running Android 10 and older versions.
We illustrated the article using screenshots from Samsung Galaxy One UI 2.0 (Galaxy S20, S10), One UI 1.1 (S9), Samsung Experience (S7), old Touchwiz (Ace 3) and stock Android 8 to 10 version (Google Pixel).
Set a Static IP-Address on Stock Android
Android 8
Android 9 and 10
In Android 9 Pie you should tap the network name in the list (no long tap available), then select the pencil icon to modify its profile:
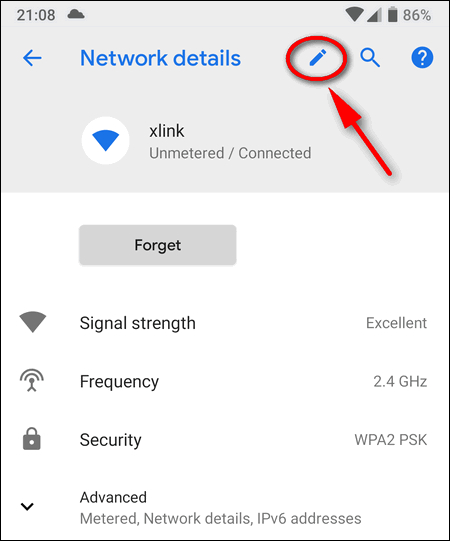
The remaining steps are equal to the steps from Android 8 section.
Manually Configure a Static IP on Samsung Galaxy
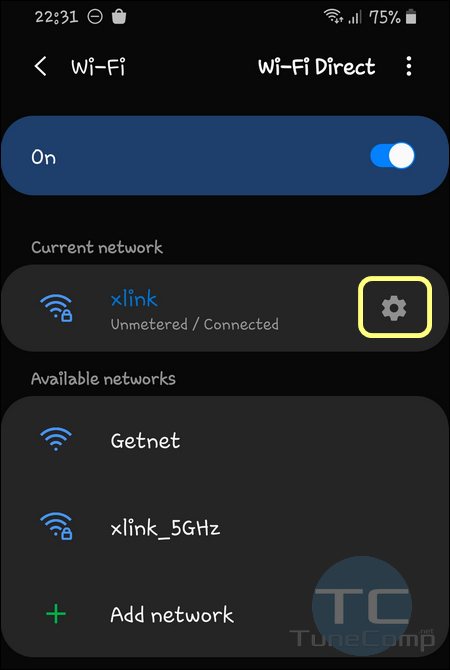
Static IP on Samsung Galaxy S20 with One UI 2.0
- Pull down the notification shade.
- Hold down the Wi-Fi toggle to open Wi-Fi settings.
- Make sure to connect to the right hotspot, where you are going to use a manually configured IP address.
- Tap the gear icon to modify settings of your current network:

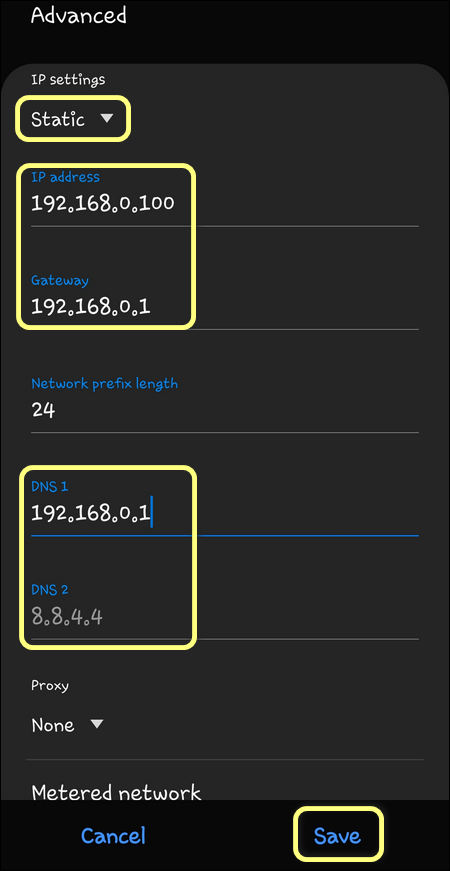
- Tap on Advanced at the very bottom:
- Switch from DHCP to Static.
- Specify the IP address you want to use on your Galaxy phone.
- Type the Gateway IP and DNS.
- Finally tap Save for changes to take effect:

Samsung Experience (Galaxy S7)
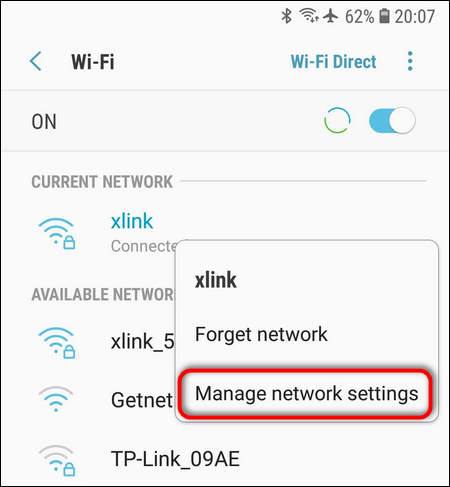
- Hold down the Wi-Fi toggle to dive into network settings.
- Long tap on your current wireless network.
- Select Manage Network Settings:
- Set the checkbox Show advanced options.
- In the IP settings switch to the Static option.
- Now manually specify IP address, gateway IP, DNS.
- Don’t forget to tap Save for new static IP address to apply.
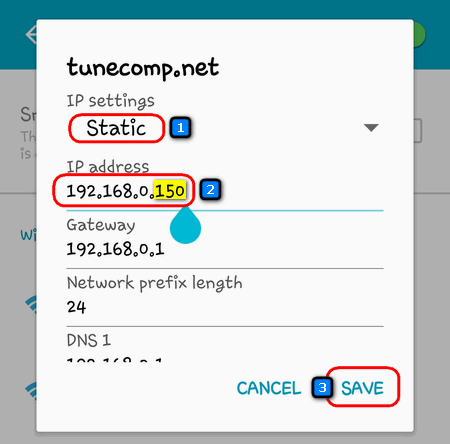
Static IP-address assignment on Android 4.2.2 (Touchwiz)
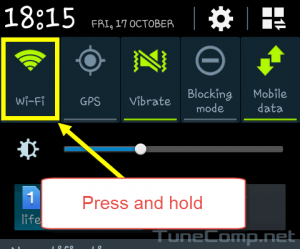
1. Pull down the status bar.
2. Press and hold the Wi-Fi icon in the quick panel:
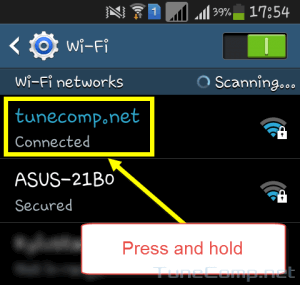
3. Perform the long press on your network name:
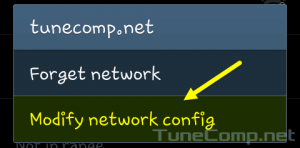
4. Tap on Modify network config:
5. Set the checkbox Show advanced options:
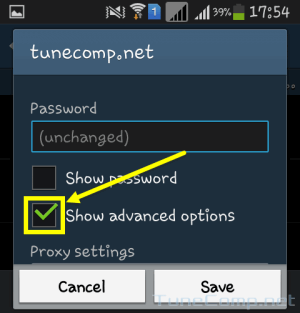
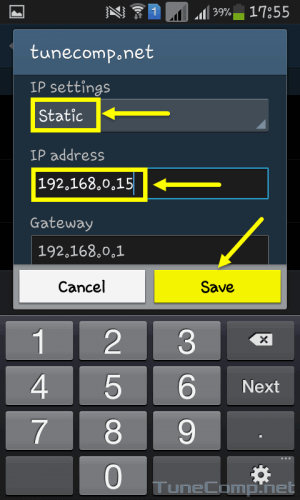
6. In advanced options area:
- Select Static in IP settings drop-down menu .
- Specify the desired address in IP address field .
- Tap the Save button to apply new settings:
Do not forget to specify the Gateway IP address when using a static IP settings. Otherwise you won’t have the Internet connection on your Android!
How to Switch Back to Automatic IP Address Obtaining
If you wish to obtain an IP-address automatically again perform the following actions:
Go to network config again:
Make sure the checkbox Show advanced options is set.
Select DHCP in IP settings drop down menu.
Press Save:
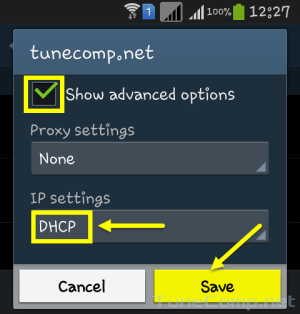
After that your device will reconnect to the network and obtain the IP from DHCP server.
Источник


