- Android how to create menu
- Определение меню в xml
- Наполнение меню элементами
- Обработка нажатий в меню
- Программное создание меню
- Steps to create a Android Menu
- Step 1: Open an Activity Class
- Step 2: Create a Resources Folder
- Step 3: Create a Menu XML File
- Step 4: Add Items to Your Menu
- Step 5: Create Icons for Your Menu Items
- Step 6: Inflate Your Menu Resource
- Step 7: Detect User Interaction
- Step 8: Respond to Menu Item Selection
- How to Create Android Menus
- Android Menus
- Types of Menus in Android
- Options Menu
- Context Menu
- Submenu
- Creating a Menu Resource
- Inflating a Menu Resource
- Creating an Options Menu
- Responding to a user action
- Changing menu items at runtime
- Creating a Context Menu
- Register a ListView
- Creating Submenus
Android how to create menu
Меню в приложениях представляет класс android.view.Menu , и каждая activity ассоциируется с объектом этого типа. Объект android.view.Menu может включать различное количество элементов, а те в свою очередь могут хранить подэлементы.
Определение меню в xml
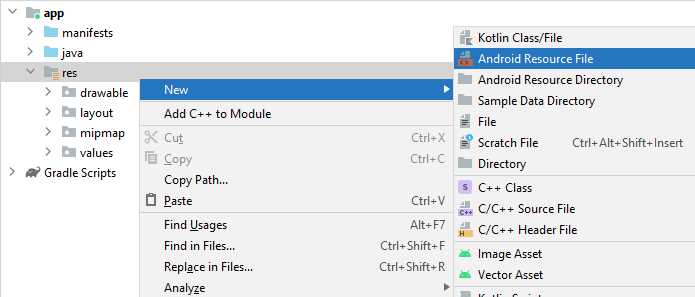
Меню, как и файлы интерфейса или изображений, также представляет собой ресурс. Однако при создании нового проекта с Empty Activity по умолчанию нет никаких ресурсов меню, поэтому при необходимости их нужно добавлять вручную. Так, для определения ресурсов меню в проекте нажмем правой кнопкой мыши в проекте на каталог res и далее в открывшемся списоке выберем пункт New -> Android Resource File :
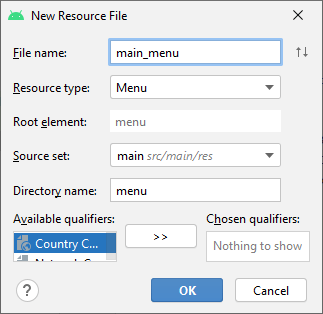
Далее в появившемся окне укажем для имени файла название main_menu , а для поля Resource Type (тип ресурса) выберем Menu :
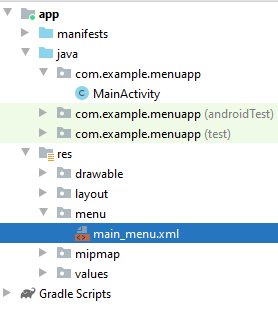
После этого в каталоге res будет создан подкаталог menu, в котором будет находиться файл main_menu.xml .
По умолчанию этот файл определяет один пустой элемент menu:
Изменим содержимое файла, определив несколько пунктов:
Тег является корневым узлом файла и определяет меню, состоящее из одного или нескольких элементов и .
Элемент представляет объект MenuItem, которой является одним из элементов меню. Этот элемент может содержать внутренний подэлемент , с помощью которого создается подменю.
Элемент включает следующие атрибуты, которые определяют его внешний вид и поведение:
android:id : уникальный id элемента меню, который позволяет его опознать при выборе пользователем и найти через поиск ресурса по id
android:icon : ссылка на ресурс drawable, который задает изображение для элемента ( android:icon=»@drawable/ic_help» )
android:title : ссылка на ресурс строки, содержащий заголовок элемента. По умолчанию имеет значение «Settings»
android:orderInCategory : порядок следования элемента в меню
Наполнение меню элементами
Мы определили меню с тремя элементами, но само определение элементов в файле еще не создает меню. Это всего лишь декларативное описание. Чтобы вывести его на экран, нам надо использовать его в классе Activity. Для этого надо переопределить метод onCreateOptionsMenu . Итак, перейдем к классу MainActivity и изменим его следующим образом:
Метод getMenuInflater возвращает объект MenuInflater , у которого вызывается метод inflate() . Этот метод в качестве первого параметра принимает ресурс, представляющий наше декларативное описание меню в xml, и наполняет им объект menu, переданный в качестве второго параметра.
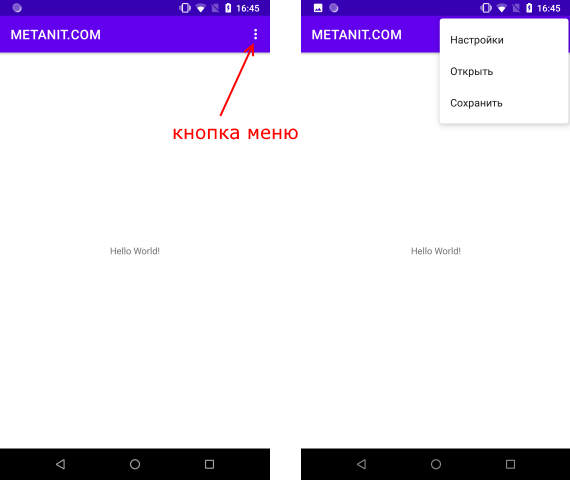
Запустим приложение по умолчанию и нажмем на кнопку меню в правом верхнем углу:
Обработка нажатий в меню
Если мы нажмем на любой из пунктов меню, то ничего не произойдет. Чтобы привязать к меню действия, нам надо переопределить в классе activity onOptionsItemSelected .
Для вывода выбранного элемена меню в файле activity_main.xml определим текстовое поле с >
И изменим класс MainActivity:
Чтобы понять, какой пункт меню выбран, вначале получаем его идентификатор int >. Затем пробегаемся в конструкции switch..case и выбираем нужный вариант и в зависимости от выбора производим определенные действия — в данном случае устанавливаем текст TextView.

Стоит отметить, что в данном случае, если наша задача заключалась, чтобы просто в выводе текста выбранного пункта меню, то мы вместо конструкции switch просто могли написать так:
Программное создание меню
Кроме определения элементов меню в xml, можно также создать меню программным способом. Для добавления новых пунктов меню используется метод add() класса Menu .
Например, изменим код MainActivity :
Использованная версия метода add() принимает заголовок для пункта меню.
Источник
Steps to create a Android Menu

Apr 16, 2017 · 3 min read
This tutorial will teach you how to implement an options menu in any of your Android SDK applications.
In Android apps, you can make use of three standard menus supported within the platform: the context menu, the options menu, and submenus.This is a common feature in almost all apps, so your users will be used to the menu appearing in this way
To implement an options menu for an Activity in an Android app, a few fairly straightforward steps are required.
Step 1: Open an Activity Class
Select your applica t ion package and choose “File”, “New”, then “Class” and enter a name of your choice. Remember to make your class extend the Activity class and add it to the application Manifest.
Step 2: Create a Resources Folder
The “res” folder holds all of your application resources. To create a menu, you need a menu folder, so create one inside the “res” folder by selecting it and choosing “File”, “New”, then “Folder” and entering “menu” as the name.

Your new folder will appear within the “res” directory:

Step 3: Create a Menu XML File
Choose the folder and create a new file by selecting “File”, “New”, then “File” and entering a name.You can choose any filename you like, for example “my_options_menu.xml”.
Step 4: Add Items to Your Menu
You can add one or more items to your options menu depending on the needs of your own project. Add an item for each menu option using the following syntax:
Step 5: Create Icons for Your Menu Items
Once you have your icons in their folders, you can alter your menu item XML to include them as follows:
Step 6: Inflate Your Menu Resource
Add the following method to your Java code, inside the class declaration and after the “onCreate” method:
public boolean onCreateOptionsMenu(Menu menu) <
MenuInflater inflater = getMenuInflater();

Step 7: Detect User Interaction
Add the following method outline after the “onCreateOptionsMenu” method:
public boolean onOptionsItemSelected(MenuItem item) <
//respond to menu item selection
Step 8: Respond to Menu Item Selection
Add a switch statement to your method using the following sample syntax:
Источник
How to Create Android Menus
In android application menu is one of the important user interface entity which provides some action options for a particular view. In this tutorial i am discussing about creating android menus.

The final output of menu tutorial will be like below image

In this tutorial we are creating a simple menu with 6 menu items. On clicking on single menu item a simple Toast message will be shown.
1. Create a new project File ⇒ New ⇒ Android Project and give activity name as AndroidMenusActivity.
2. Now create an XML file under res/layout folder and name it as menu.xml.
3. Open menu.xml file and type following code. In the following code we are creating a single menu with 6 menu items. Each menu item has an icon and title for display the label under menu icon. Also we have id for each menu item to identify uniquely.
4. Now open your main Activity class file (AndroidMenusActivity.java) and type following code. In the following code each menu item is identified by its ID in switch case statement.
5. Finally run your project by right clicking on your project folder ⇒ Run As ⇒ 1 Android Application to test your application. On Android Emulator click on Menu Button to launch menu.

Ravi is hardcore Android programmer and Android programming has been his passion since he compiled his first hello-world program. Solving real problems of Android developers through tutorials has always been interesting part for him.
Источник
Android Menus
Related articles
Latest Published Articles
Angular JS community
Active Free Webinars
Menus are a common user interface component in many types of applications. To provide a familiar and consistent user experience, you should use the Menu APIs to present user actions and other options in your activities.
If you would like to Enrich your career with an Android certified professional, then visit Mindmajix — A Global online training platform: “ Android training ” Course. This course will help you to achieve excellence in this domain.
MENUS are an important part of an activity’s user interface, which provides users with a familiar way to perform actions. Android offers a simple framework for you to add standard menus to your application. There are three types of application menus:
Types of Menus in Android
Options Menu
Android Option Menus are the primary menus for android. They can be used for settings, search, delete an item,s, etc.
It is the primary collection of menu items for an activity, which appears when the user touches the MENU button. When your application is running on Android 3.0 or later, you can provide quick access to select menu items by placing them directly in the Action Bar, as “action items.”
Context Menu
An android context menu appears when the user press long clicks on the element. It is also known as a floating menu.
It doesn’t support item shortcuts and icons.
Submenu
A floating list of menu items appears when the user touches a menu item that contains a nested menu.
- Submenus are displayed as regular Menu Items that, when selected, reveal more items.
- Traditionally, submenus are displayed in a hierarchical tree layout. Android uses a different approach to simplify menu navigation for small-screen devices. Rather than a tree structure, selecting a submenu presents a single floating window that displays all of its Menu Items.
- You can add submenus using the add submenu() method. It supports the same parameters as the add method used to add normal Menu Items, enabling you to specify a group, unique identifier, and text string for each submenu. You can also use the setHeaderIcon and setIcon methods to specify an icon to display in the submenu’s header bar or icon menu, respectively.
Creating a Menu Resource
A menu resource defines an application menu (Options Menu, Context Menu, or submenu) that can be inflated with MenuInflater.
Instead of instantiating a Menu in your application code, you should define a menu and all its items in an XML menu resource, then inflate the menu resource (load it as a programmable object) in your application code. Using a menu resource to define your menu is a good practice because it separates the content for the menu from your application code.
It’s also easier to visualize the structure and content of a menu in XML. To create a menu resource, create an XML file inside your project’s res/menu/ directory and build the menu with the following elements:
Defines a menu, which is a container for menu items.A element must be the root node for the file and can hold one or more and elements
Creates a menuitem, which represents a single item in a menu. This element may contain a nested element in order to create a submenu.
An option , invisible container for elements. It allows you to categorize menu items so they share properties such as active state and visibility.
here’s an example menu named game_menu.xml:
This example defines a menu with two items. Each item includes the attributes:
android:id
A resource ID that’s unique to the item, which allows the application can recognize the item when the user selects it.
android:icon
A reference to a drawable to use as the item’s icon.
android:title
A reference to a string to use as the item’s title.
Inflating a Menu Resource
From your application code, you can inflate a menu resource (convert the XML resource into a programmable object) using MenuInflater.inflate(). For example, the following code inflates the game_menu.xml file defined above, during the onCreateOptionsMenu() callback method, to use the menu as the activity’s Options Menu:
The getMenuInflater() method returns a MenuInflater for the activity. With this object, you can call inflate(), which inflates a menu resource into a Menu object. In this example, the menu resource defined by game_menu.xml is inflated into the Menu that was passed into onCreateOptionsMenu().
Creating an Options Menu
The Options Menu is where you should include basic activity actions and necessary navigation items (for example, a button to open the application settings). Items in the Options Menu are accessible in two distinct ways: the MENU button or in the Action Bar (on devices running Android 3.0 or higher).
When running on a device with Android 2.3 and lower, the Options Menu appears at the bottom of the screen, as shown in figure 1. When opened, the first visible portion of the Options Menu is the icon menu. It holds the first six menu items. If you add more than six items to the Options Menu, Android places the sixth item and those after it into the overflow menu, which the user can open by touching the “More” menu item.
By default, all items from the Options Menu are placed in the overflow menu, which the user can open by touching the menu icon on the right side of the Action Bar. However, you can place select menu items directly in the Action Bar as “action items,” for instant access.
When the Android system creates the Options Menu for the first time, it calls your activity’s onCreateOptionsMenu()method. Override this method in your activity and populate the Menu that is passed into the method, Menu by inflating a menu resource as described above in Inflating a Menu Resource. For example:
You can also populate the menu in code, using add() to add items to the Menu.
Note: On Android 2.3 and lower, the system calls onCreateOptionsMenu() to create the Options Menu when the user opens it for the first time, but on Android 3.0 and greater, the system creates it as soon as the activity is created, in order to populate the Action Bar.
Responding to a user action
When the user selects a menu item from the Options Menu (including action items in the Action Bar), the system calls your activity’s onOptionsItemSelected() method. This method passes the MenuItem that the user selected. You can identify the menu item by calling getItemId(), which returns the unique ID for the menu item (defined by the android:id attribute in the menu resource or with an integer given to the add() method). You can match this ID against known menu items and perform the appropriate action. For example:
In this example, getItemId() queries the ID for the selected menu item and the switch statement compares the ID against the resource IDs that were assigned to menu items in the XML resource. When a switch case successfully handles the menu item, it returns true to indicate that the item selection was handled. Otherwise, the default statement passes the menu item to the superclass, in case it can handle the item selected.
Additionally, Android 3.0 adds the ability for you to define the on-click behavior for a menu item in the menu resource XML, using the android:onClick attribute.
So you don’t need to implement onOptionsItemSelected(). Using the android:onClick attribute, you can specify a method to call when the user selects the menu item.
Your activity must then implement the method specified in the android:onClick attribute so that it accepts a single MenuItem parameter—when the system calls this method, it passes the menu item selected.
Tip: If your application contains multiple activities and some of them provide the same Options Menu, consider creating an activity that implements nothing except the onCreateOptionsMenu() and onOptionsItemSelected() methods. Then extend this class for each activity that should share the same Options Menu.
This way, you have to manage only one set of code for handling menu actions and each descendant class inherits the menu behaviors.
If you want to add menu items to one of your descendant activities, override onCreateOptionsMenu() in that activity. Call super.onCreateOptionsMenu(menu) so the original menu items are created, then add new menu items with menu.add(). You can also override the super class’s behavior for individual menu items.
Changing menu items at runtime
Once the activity is created, the onCreateOptionsMenu() method is called only once. The system keeps and re-uses the Menu you define in this method until your activity is destroyed. If you want to change the Options Menu any time after it’s first created, you must override the onPrepareOptionsMenu() method.
This passes you the Menu object as it currently exists. This is useful if you’d like to remove, add, disable, or enable menu items depending on the current state of your application.
On Android 2.3 and lower, the system calls onPrepareOptionsMenu() each time the user opens the Options Menu.
On Android 3.0 and higher, you must call invalidateOptionsMenu() when you want to update the menu, because the menu is always open. The system will then call onPrepareOptionsMenu(), so you can update the menu items.
Note: You should never change items in the Options Menu based on the View currently in focus. When in touch mode (when the user is not using a trackball or d-pad), views cannot take focus, so you should never use focus as the basis for modifying items in the Options Menu. If you want to provide menu items that are context-sensitive to a View, use a Context Menu.
Creating a Context Menu
A context menu is conceptually similar to the menu displayed when the user performs a “right-click” on a PC. You should use a context menu to provide the user access to actions that pertain to a specific item in the user interface. On Android, a context menu is displayed when the user performs a “long press” (press and hold) on an item.
You can create a context menu for any View, though context menus are most often used for items in a ListView. When the user performs a long-press on an item in a ListView and the list is registered to provide a context menu, the list item signals to the user that a context menu is available by animating its background color—it transitions from orange to white before opening the context menu.
Register a ListView
If your activity uses a ListView and you want all list items to provide a context menu, register all items for a context menu by passing the ListView to registerForContextMenu(). For example, if you’re using a ListActivity, register all list items like this:
In order for a View to provide a context menu, you must “register” the view for a context menu. Call registerForContextMenu() and pass it the View you want to give a context menu. When this View then receives a long-press, it displays a context menu.
To define the context menu’s appearance and behavior, override your activity’s context menu callback methods, onCreateContextMenu() and onContextItemSelected().
For example, here’s an onCreateContextMenu() that uses the context_menu.xml menu resource:
MenuInflater is used to inflate the context menu from a menu resource. (You can also use add() to add menu items).
The callback method parameters includes the View that the user selected and a ContextMenu.ContextMenuInfo object that provides additional information about the item selected.
You might use these parameters to determine which context menu should be created, but in this example, all context menus for the activity are the same.
Then when the user selects an item from the context menu, the system calls onContextItemSelected(). Here is an example of how you can handle selected items:
The structure of this code is similar to the example for Creating an Options Menu, in which getItemId() queries the ID for the selected menu item and a switch statement matches the item to the IDs that are defined in the menu resource. And like the options menu example, the default statement calls the superclass in case it can handle menu items not handled here, if necessary.
In this example, the selected item is an item from a ListView. To perform an action on the selected item, the application needs to know the list ID for the selected item (it’s position in the ListView). To get the ID, the application calls getMenuInfo(), which returns a AdapterView.AdapterContextMenuInfo object that includes the list ID for the selected item in the id field.
The local methods editNote() and deleteNote() methods accept this list ID to perform an action on the data specified by the list ID.
Note: Items in a context menu do not support icons or shortcut keys.
Creating Submenus
A submenu is a menu that the user can open by selecting an item in another menu. You can add a submenu to any menu (except a submenu). Submenus are useful when your application has a lot of functions that can be organized into topics, like items in a PC application’s menu bar (File, Edit, View, etc.).
when creating your menu resource, you can create a submenu by adding a element as the child of an
When the user selects an item from a submenu, the parent menu’s respective on-item-selected callback method receives the event. For instance, if the above menu is applied as an Options Menu, then the onOptionsItemSelected()method is called when a submenu item is selected.
You can also use addSubMenu() to dynamically add a SubMenu to an existing Menu. This returns the new SubMenu object, to which you can add submenu items, using add().
Источник


