- Tek Eye
- How to Display A Smaller Window on Top of an Activity
- Design the Layout for the Pop-Up
- Code to Load a Pop-up Window
- Calling the Pop-up Function
- See Also
- Do you have a question or comment about this article?
- Popupwindow Android example in Kotlin
- 1. Adding Dependencies
- 2. Create PopupWindow Layouts
- 3. Implement PopupWindow With Data
- 4. Show / Hide the PopupWindow
- Popup Menu in Android With Example
- Example
- Step by Step Implementation
- How to create a Popup Window in Android using Kotlin
- Adding the CardView library
- Creating the Popup Window Activity
- Using the Popup Window
Tek Eye
The main screen for an Activity is not the only way to interact with the user of an app. A brief message or dialog can be displayed in appropriate circumstances to ask a specific question, get specific input, or show a brief message. Android has build in support for such small focused interactions that require immediate attention.
(This Android pop-up tutorial assumes that Android Studio is installed, a basic App can be created and run, and the code in this article can be correctly copied into Android Studio. The example can be changed to meet other requirements. When entering code in Studio add import statements when prompted by pressing Alt-Enter.)
How to Display A Smaller Window on Top of an Activity
There are different ways in Android to pop-up a brief window over the current Activity screen, these include:
- The Toast class – to display brief informational only message.
- The Dialog class, managed by a DialogFragment – to support a flexible input that can display information and can ask for inputs or choices. There are several built in sub-classes including:
- AlertDialog – supports buttons (from zero to three), list selections, check boxes and radio buttons (see the article About Box in Android App Using AlertBuilder).
- ProgressDialog – supports a progress bar or wheel and supports buttons because it extends AlertDialog.
- DatePickerDialog – supports selecting a date.
- TimePickerDialog – supports a time selection.
- The PopupWindow class – allows a View to float on top of an existing activity. Suitable for custom informational messages.
These classes build their user interfaces through class methods with support from custom layouts when required. For this article the PopupWindow class is used. This Android pop-up tutorial includes example code. What is the PopupWindow? The Android developer PopupWindow documention gives this class overview:
«This class represents a popup window that can be used to display an arbitrary view. The popup window is a floating container that appears on top of the current activity.»
It can be used to display extra information without needing to code another Activity. An example would be to show results at the end of a game (or end of a level), which will be done in this tutorial. The steps for this example project and code are:
- Create a new project in Android Studio.
- Design the pop-up window.
- Add the code to load and populate the pop-up window.
- Call the code.
Design the Layout for the Pop-Up
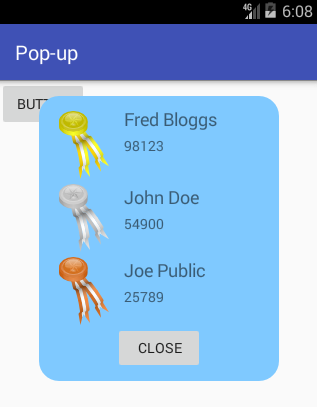
For this example a pop-up is going to display a game’s result as gold, silver and bronze medal positions. The pop-up will have a graphic, shown in a ImageView , for each of the medals; a TextView for the winner’s name, and one for the score. The images for the medals came from the Open Clip Art Library by user momoko. They have been resized for the Android project and are available in medals_png.zip. Ready to download and add into the app project.


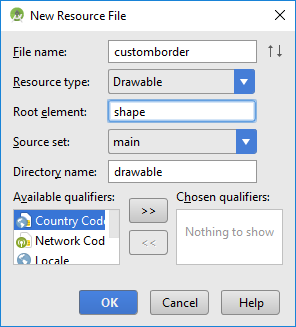
Start a new app project in Android Studio. Here it was called Pop-up and uses an Empty Activity with all other settings left at their default values. The pop-up window will be defined in a new layout XML file in the project’s layout folder, called winners.xml. To add some interest to the pop-up screen it will have a blue background and rounded corners, this is done using a shape drawable (see Add a Border to an Android Layout). The shape drawable for the custom background definition is a drawable resource XML file in the folder res/drawable. With the app or res folder highlighted in the Project explorer use the File or context (often called right-click) menu. Select the New then Android resource file option. Call the new resource customborder.xml:
Add this code for the pop-up window background shape definition. The android:shape is a rectangle:
Add the images for the medals to the project’s res/drawable folders (see medals_png.zip). Now create the winners.xml layout file, again use the New menu and select XML then Layout XML File. A RelativeLayout is used for the Root Tag. Open the file, add the ImageViews for the medals and TextViews for winners names and scores. Here is the code used for the layout used in this example:
Code to Load a Pop-up Window
The code to display the pop-up window will be wrapped in a function called showWinners(). It can be called from a button press or other action. The first code in the function inflates the pop-up window layout using a LayoutInflater :
The inflated layout is used to get the id of the TextViews. The ids are used to set the names of the winners and their scores, e.g. here we assume that the name of the gold medal winner is stored in the string goldWinner:
The pop-up window is created by passing in the layout and required size. We defined a size in the XML which is used here, scaled by the screens density to support different devices:
The button on the pop-up is given an OnClickListener so that the pop-up can be closed (if not familiar with coding event handlers see the article Different Ways to Code Android Event Listeners).
A touch event outside of the pop-up will also close it. The trick here is to call setBackgroundDrawable with a transparent drawable. This allows for screen presses outside of the pop-up to also close the pop-up:
Finally display the pop-up:
Calling the Pop-up Function
The following listing is for a simple Activity with a button that has an OnCLickListener to call the showWinners() function that is described above. The names of the medal winners and there scores are simple variables, in a real app game they would come from the game results. This is the complete code for the example in action shown at the beginning of the article:
Bookmark this page in your browser so that you can use the code as a template for future projects that require a pop-up.
See Also
- Download the project code for this pop-up example, available in android-pop-up.zip ready for importing into Android Studio
- For more android example projects see the Android Example Projects page.
- The medal images are also available via the Free Launcher Icons, Menu Icons and Android Graphics page.
- View the Tek Eye full Index for other articles.
Author: Daniel S. Fowler Published: 2013-02-05 Updated: 2017-07-23


Do you have a question or comment about this article?
(Alternatively, use the email address at the bottom of the web page.)
↓markdown↓ CMS is fast and simple. Build websites quickly and publish easily. For beginner to expert.
Free Android Projects and Samples:
Источник
Popupwindow Android example in Kotlin

Popupwindow is a floating view that is displayed on top of an activity. Android provides a PopupWindow class for creating a popup window with the custom design.
It is present from the first versions of the API, but not as popular as other dialog boxes due to the need for additional configuration, which is not always necessary.
Android PopupWindow very useful when you want to show the dialog just over the view items. For Example you can able to show the dialog near to the more option of your cardview / button view.
Check out my popup window android example demo.
Now we are going to create popup window showed in the popupwindow example video.
1. Adding Dependencies
In this example, we are going to show list of items in the recyclerview. So, we need recyclerview and cardview dependencies.
I have explained about using recyclerview and cardview in separate post. Please check it in the links.
2. Create PopupWindow Layouts

As mentioned in the design, First we need to create popupWindow layout with recyclerview.
Recyclerview need a adapter view to hold the popup items. So, we need to create adapter layout file.

3. Implement PopupWindow With Data
We are using recyclerview in the popup window. so, we need model class to hold the data.
Also, we need to create adpater to set popup items.
In the Adapter, set the click listener interface for the popup window click callbacks.
Already, we have created layouts and adapter for the PopupWindows. Lets create the PopupWindow.
In the above code, I am using adapter.setOnClick to pass the implementation of the RecyclerviewCallbacks interface to receive the callbacks of the popup window items.
4. Show / Hide the PopupWindow
Now, our popup window is ready to display. So, whenever we need to show the popup window. call the below code.
To dismiss the popup window,
That’s it. Now we can able to show and hide the popup window in android.
Download the example code from Github.
Thanks for reading.
Please try this with example and let me know your feedback in comments.
Источник
Popup Menu in Android With Example
In android, Menu is an important part of the UI component which is used to provide some common functionality around the application. With the help of the menu , users can experience smooth and consistent experiences throughout the application. In android, we have three types of Menus available to define a set of options and actions in our android applications. The Menus in android applications are the following:
- Android Options Menu: Android Options Menu is a primary collection of menu items in an android application and useful for actions that have a global impact on the searching application.
- Android Context Menu: Android Context Menu is a floating menu that only appears when the user clicks for a long time on an element and useful for elements that affect the selected content or context frame.
- Android Popup Menu: Android Popup Menu displays a list of items in a vertical list which presents to the view that invoked the menu and useful to provide an overflow of actions that related to specific content.
So in this article, we are going to discuss the Popup Menu. A PopupMenu displays a Menu in a popup window anchored to a View. The popup will be shown below the anchored View if there is room(space) otherwise above the View. If any IME(Input Method Editor) is visible the popup will not overlap it until the View(to which the popup is anchored) is touched. Touching outside the popup window will dismiss it.
Example
In this example, we are going to make a popup menu anchored to a Button and on click, the popup menu will appear, and on a touch of the popup menu item, a Toast message will be shown. A sample GIF is given below to get an idea about what we are going to do in this article. Note that we are going to implement this project using the Java language.

Step by Step Implementation
Step 1: Create a New Project
To create a new project in Android Studio please refer to How to Create/Start a New Project in Android Studio. Note that select Java as the programming language.
Step 2: Working with the activity_main.xml file
In this step, we will add a button to the layout file and give it an id as clickBtn to it.
Источник
How to create a Popup Window in Android using Kotlin
Today, I’m going to show you how to create very easy a nice popup window with a semi-transparent background!
In this example I’m using CardView to have rounded corners in the popup window. If you don’t like it, and you want to use something else (RelativeLayout, FrameLayout e.t.c), just skip the next step.
Adding the CardView library
If you like your popup window to have rounded corners, add the cardView library to your build.gradle of your app module
Creating the Popup Window Activity
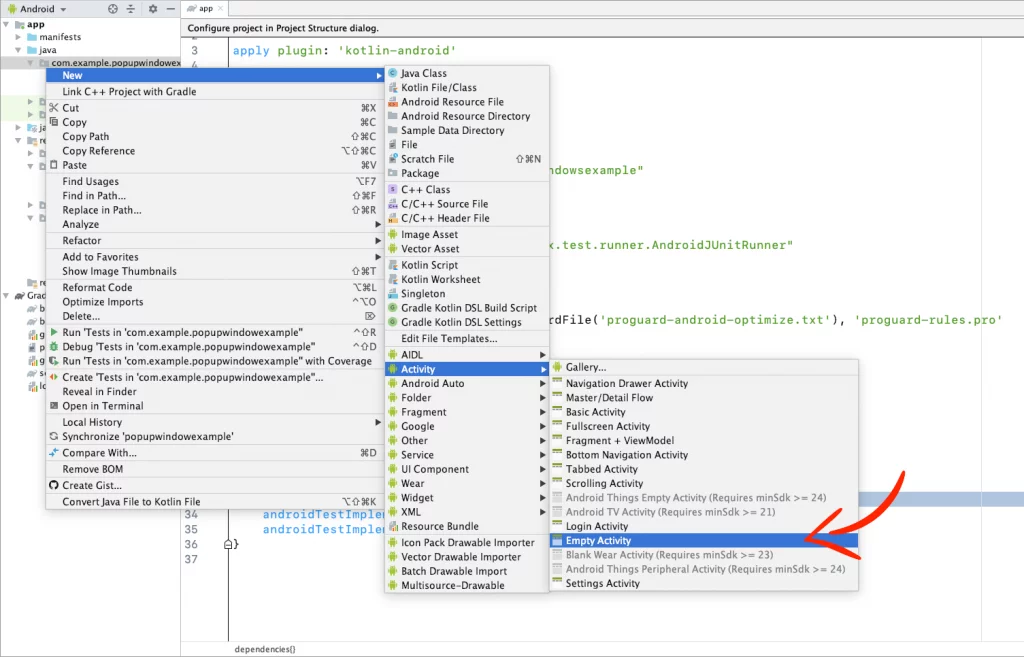
Create a new Empty Activity in your project. In this example, we call it PopUpWindow

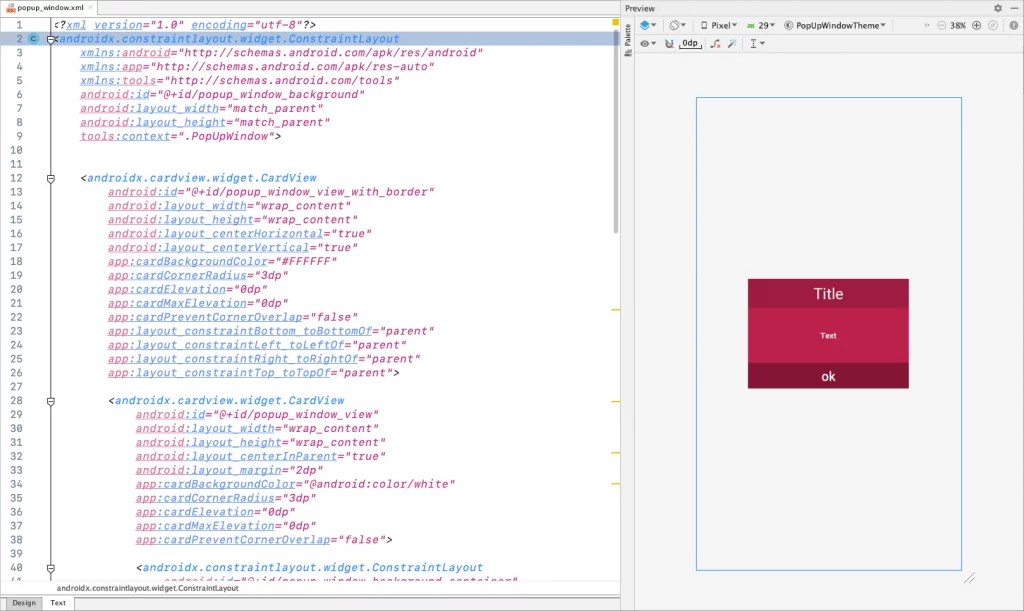
Go to the xml layout and paste the following code:
Go to your activity file (PopUpWindow.kt) and disable Activity’s open/close animation by giving the number 0 on the overridePendingTransition before the setContentView
Use Bundle to get the data we’ll pass later on when we call the popup window from the MainActivity
Set the data to the TextViews and Button
Make the status bar appearance transparent at different API levels
Create a fade animation for the popup window background when the Activity starts
Create the fade animation for the popup window too
Close the popup window with fade animation when you press the ‘OK’ button or the back button on your device.
Using the Popup Window
To use the popup window, just pass the values for the Title, Text, Button text and Status Bar appearance.
In this example, when you press the button in the MainActivity, it shows the popup window with title ‘Error’ and text ‘Sorry, that email address is already used!’
If you have any questions, please feel free to leave a comment below
Источник


