- SwipeRefreshLayout With NestedScrollView — Android
- Refresh you View Content with SwipeRefreshLayout
- Introduction:
- How to Solve:
- Conclusion:
- Pull to Refresh with RecyclerView in Android with Example
- Example
- Step by Step Implementation
- Новый SwipeRefreshLayout из библиотеки Android support — «потяните чтобы обновить»
SwipeRefreshLayout With NestedScrollView — Android
Refresh you View Content with SwipeRefreshLayout

Aug 26, 2019 · 2 min read
Introduction:
In Android we have SwipeRefreshLayout, we often used this in our layouts to refresh the content of a view with the vertical gesture feature, whenever we need it. The SwipeRefreshLayout can only support direct one child only, so whenever we need to add in our layout, we always try to add before our RecyclerView like this below code snippet:
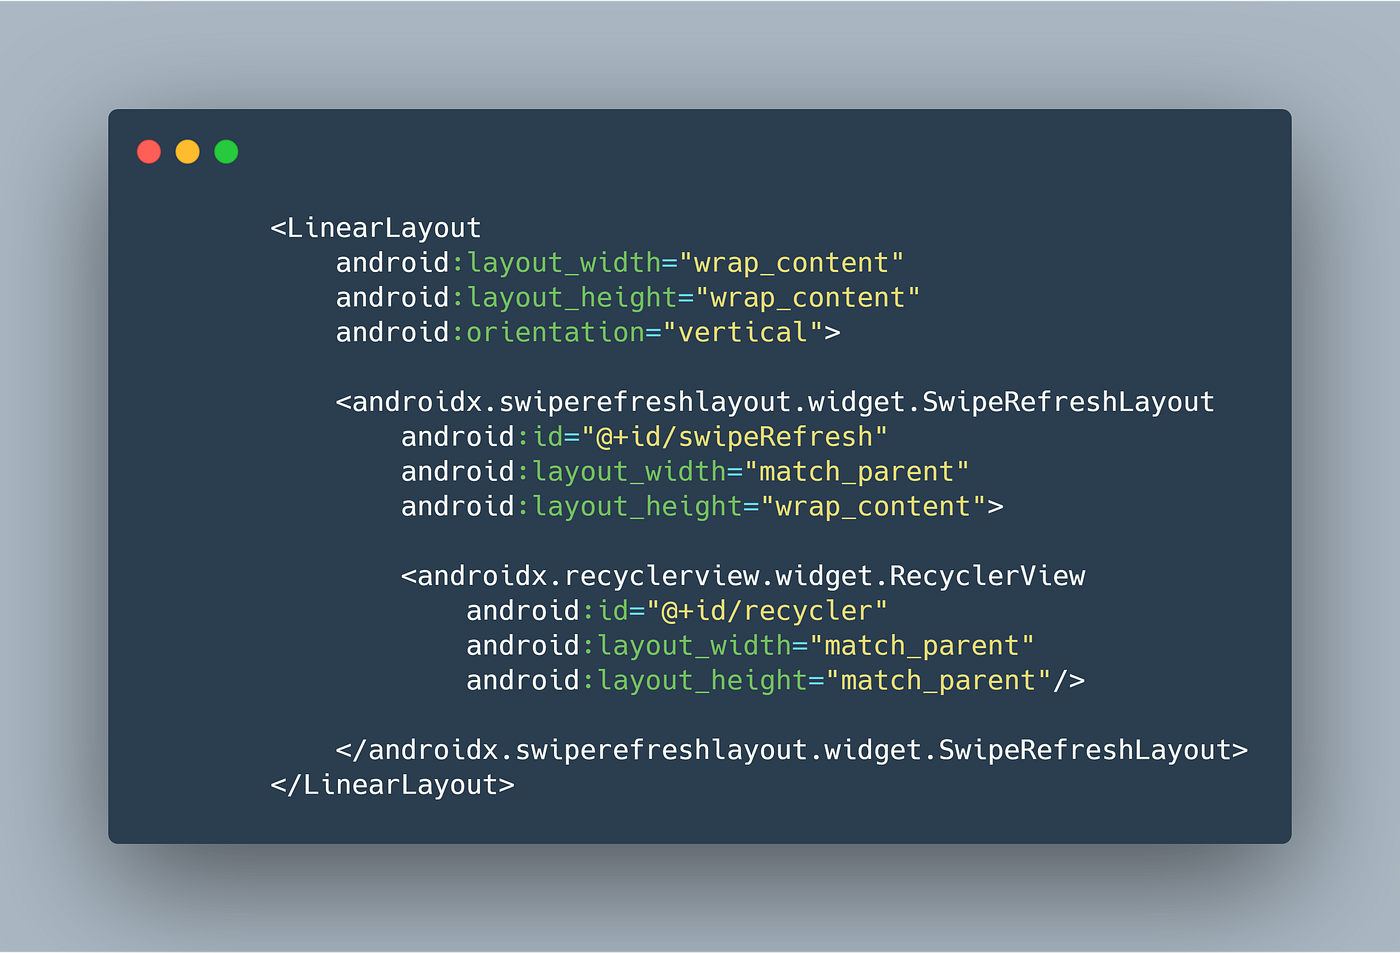
Recently I have been working in an Application where I have a RecyclerView with CoolapingToolbar and NestedScrollView , and I need to add a SwipeRefreshLayout , so I just Implemented the way it looked above simply put the SwipRefreshLayout above the RecyclerView .
A f ter that, I just run the application and guess what, nothing happened and the data was not showing in the list, so then I figured it out what’s goes wrong in the Implementation.
How to Solve:
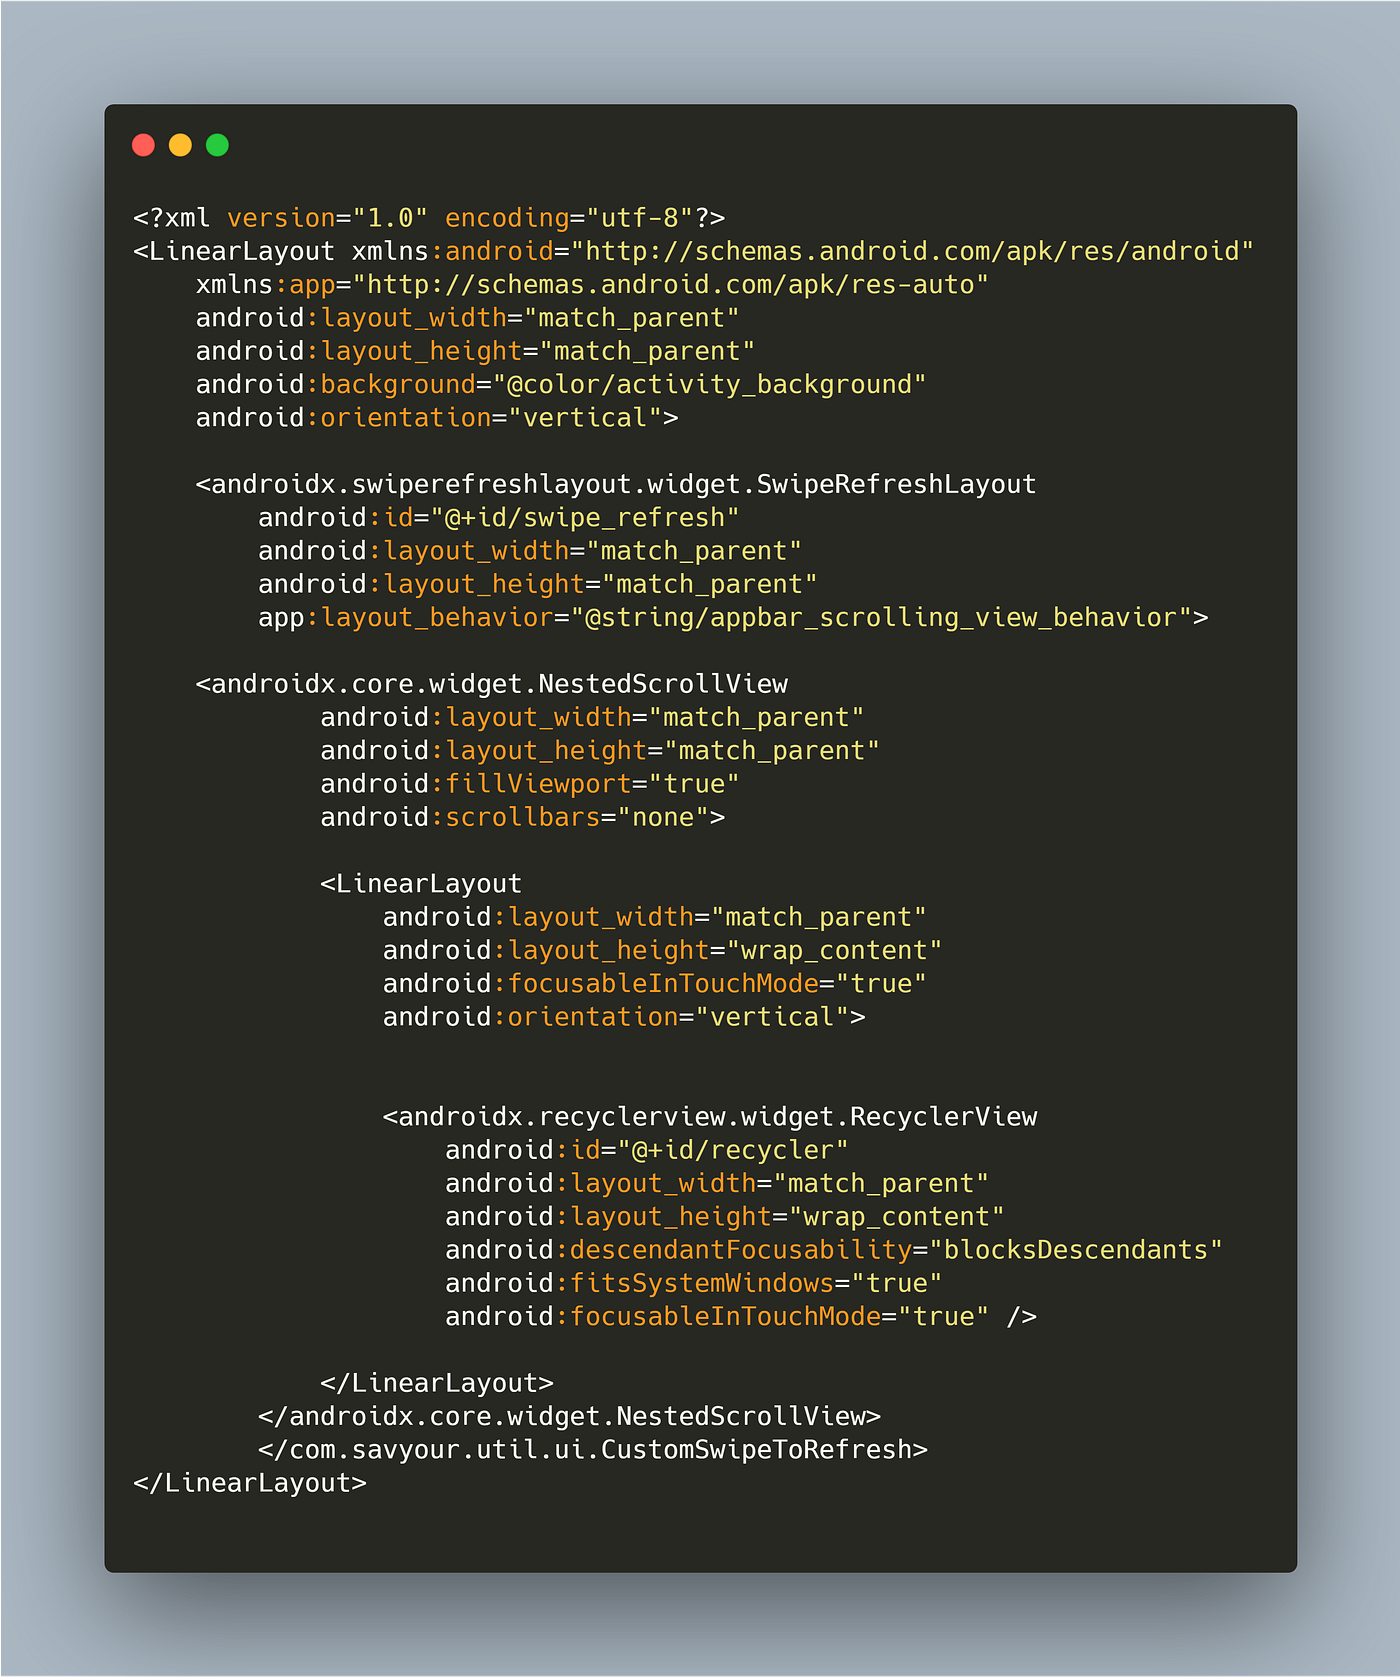
The solution is very simple, We need to add a SwipRefreshLayout above the NestedScrollView and So you should move app:layout_behavior=»@string/appbar_scrolling_view_behavior» from NestedScrollView to SwipeRefreshLayout .
That’s it just runs your application and sees the results.
Let’s see with the XML File.
Conclusion:
This article described you how to Implement the SwipeRefreshLayoyut with NestedScrollView, hows the Implementation is different from the traditional one.
I hope this article is helpful. If you think something is missing, have questions, or would like to give feedback, go ahead and leave a comment below. I’d appreciate the feedback.
I’ve written some other Android-related content, and if you liked what you read here, you’ll probably also enjoy this:
Источник
Pull to Refresh with RecyclerView in Android with Example
The SwipeRefreshLayout widget is used for implementing a swipe-to-refresh user interface design pattern. Where the user uses the vertical swipe gesture to refresh the content of the views. The vertical swipe is detected by the SwipeRefreshLayout widget and it displays a distinct progress bar and triggers the callback methods in the app. In order to use this behavior, we need to use the SwipeRefreshLayout widget as the parent of a ListView or GridView. These Material Design UI Patterns are seen in applications like Gmail, Youtube, Facebook, Instagram, etc. It allows the user to refresh the application manually. SwipeRefreshLayout class contains a listener called OnRefreshListener. The classes which want to use this listener should implement SwipeRefreshLayout.OnRefreshListener interface. On vertical swipe-down gesture, this listener is triggered and onRefresh() method is called and can be overridden according to the needs.
Example
In this example, we would store data into the ArrayList which is used for populating the RecyclerView. Whenever onRefresh() method is called the ArrayList data gets rearranged. A sample GIF is given below to get an idea about what we are going to do in this article. Note that we are going to implement this project using the Java language.

Step by Step Implementation
Step 1: Create a New Project
To create a new project in Android Studio please refer to How to Create/Start a New Project in Android Studio. Note that select Java as the programming language.
Step 2: Adding dependencies
Источник
Новый SwipeRefreshLayout из библиотеки Android support — «потяните чтобы обновить»
Тихо и незаметно вместе с обновлением библиотеки Android support до версии 19.1 в нее прокрался новый компонент, который часто бывает нужным и полезным в быту. Сей совсем крохотный росчерк я посвящаю ему, SwipeRefreshLayout.
Он добавляет функционал, который один мой коллега называет «резинка от трусов», а остальные знают этот UI-паттерн под названием «потяни, чтобы обновить». Он бывает нужен, когда есть какой-то контент, который пользователь хочет часто обновлять, и может это сделать, просто потянув контент жестом вниз, а потом отпустив.
Очень похоже, что компонент был создан для GoogleNow, а потом перекочевал в support lib (очень похожа анимация).
Алгоритм простой.
- Компонент «оборачивается» вокруг View или Layout, для которого нужно сделать обновление и может содержать только одного потомка (похоже на ScrollView).
- Устанавливается OnRefreshListener с одним единственным методом onRefresh(). Как на него реагировать — решаем сами.
- Когда нужно показать, что идет обновление (и запустить анимацию), вызываем метод setRefreshing(boolean) и передаем ему true. Наиболее логичным кажется вызов метода внутри onRefresh().
- Когда обновление закончено, вызываем метод setRefreshing(boolean) и передаем ему false.
Давайте попробуем набросать пример использования.
Наш XML (если нужно, можно и динамически создать компонент и добавить в него потомка, компонент наследуется от ViewGroup).
Теперь наша Activity, а именно метод onCreate:
В данном случае я сделал нашу Activity реализующей интерфейс OnRefreshListener
Обратите внимание на метод setColorScheme, он как раз и раскрашивает в разные цвета прогресс во время обновления. В видео ниже видно, о чем я говорю. Первый цвет из 4-х — цвет прогресса во время оттягивания контента вниз перед обновлением. Остальные — сменяющиеся цвета прогресса.
А теперь сам onRefresh();
UPD:
Для желающих добавил саму APK
Ссылка на APK в виде кода, чтобы было жить легче: 
Источник


