- How to install Flash on an Android phone or tablet
- Installing Flash on Android devices running Android 4.1 or newer
- Puffin
- Photon Flash Player & Browser
- Installing Flash on Android devices running Android 4.0 or older
- Step 1: Configure security settings
- Step 2: Download Flash from Adobe’s website
- Step 3: Install Flash Player
- Step 4: Reactivate Security Settings
- How to install and use Flash Player on your Android device
- Installing Flash on Android
- Using Flash on Android
- Closing Words
- How to: Use Your Android as a Flash Drive
- Step 1 – Downloading Drivedroid & Setting Up
- Step 2 – Downloading your Bootable .iso
- Step 3 – Finishing the Process
How to install Flash on an Android phone or tablet

When Google released Android 4.1 Jelly Bean in 2012, Flash support found itself on the cutting room floor, no longer downloadable in the Google Play Store and dropped from the mobile platform. Convenient for watching TV on your phone or playing a slew of online games, Flash was an application that set the Android ecosystem apart from iOS, for better and worse.
Android users today operate their phones out-of-the-box sans Flash, yet many still want a way to get the software platform back again. Luckily, Adobe realized this and now allows Android users to download its Flash player directly from the company’s website. Because Flash is no longer supported on Android devices, you won’t find any security updates, bug fixes, or official support. You may experience stability issues when downloading and using Flash, too, many of which worsen when using modern devices running more recent versions of Android like Marshmallow, Nougat, Oreo, and Pie.
That said, read on if you’re still set on installing Flash on your device.
Installing Flash on Android devices running Android 4.1 or newer
If you’re running Android 4.1 — aka Jelly Bean — or newer, all you need to do is install a browser that supports Flash on your device. These are becoming rare, however. Let’s take a look at two options that we can currently recommend if you feel it necessary to deal with Flash content on your Android device.
Puffin

In short, if you need to access Flash content on your Android device, your best bet is to install the Puffin browser. It runs Flash in the cloud, though it does so as if it were running locally on your device. You can play games, watch video, and access a multitude of Flash content. It also boasts quick speeds and encrypts your browsing activity, a plus if you’re concerned about online security. Puffin also offers all sorts of other tools and an array of themes.
What’s the catch? The cloud servers that are handling your browsing are based in the United States. If there are location restrictions on the content you’re trying to access, then the content may not be available for users outside of the U.S. The browser is also blocked in countries such as China, Saudi Arabia, and the United Arab Emirates. Still, Puffin remains your best option if you need to access Flash on your Android device.
Photon Flash Player & Browser

Another great way to access Flash content, both on the web and on your phone, is Photon Flash Player & Browser. The app not only supports Flash videos but also Flash games — so if you’re feeling a little nostalgic, you can play some of those classic online games. As you would expect, the app supports formats like FLV and SWF, though it also supports more modern formats — so if you want to make this your default browser you can do so.
Another great feature here is that the Photon Flash Player & Browser claims to act as a VPN when you’re using it. In other words, it ensures that even when you’re on a public network, your browsing is secure and private. Plus, it unblocks content.
Installing Flash on Android devices running Android 4.0 or older
Before we get started, you’ll want to make sure that your phone or tablet is running an operating system between Android 2.2 and 4.1. You can find which OS your device is running by going to Settings > About phone (or About tablet).
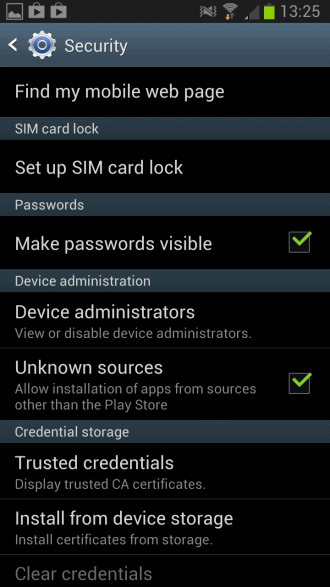
Step 1: Configure security settings
Once the prerequisites above are in order, the real fun of installing Flash on your Android device can begin. First, access your phone’s security settings to allow for application downloads outside of Google Play. To do this, go to Settings > Applications (for older Android operating systems), or Settings > Security (for Android 4.1 Jelly Bean), and check the box next to Unknown sources. It should ask you to confirm your selection, and when it does, select OK. Now that your security settings have changed, navigate back to your home screen and open your browser. Again, Google Chrome will not work for this on Android devices using Jelly Bean 4.1 or newer.

Step 2: Download Flash from Adobe’s website
Navigate to Adobe’s Flash Player archives in your browser and scroll down until you arrive at the listings for Android Flash player downloads, where you’ll find two separate sections: one with download links for recent operating system versions and one for versions compatible with Android OS 2.1-2.3 and 3.0. Adobe’s most recent Flash Player updates for Android (11.1.111.73 for Android 2.x and 3.x and 11.1.115.81 for Android 4.0.x) were released in 2013, and lead off the top of both sections. We recommended that you choose the most recent, compatible download for your Android device.

Once you click on the compatible download, the Flash Player Installer should begin automatically. When the download finishes, navigate back to your home screen or close the browser.
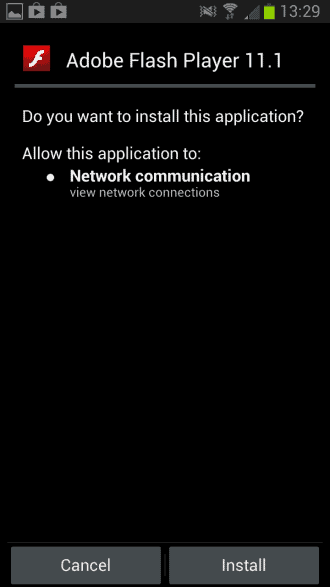
Step 3: Install Flash Player
Next, access the Notifications on your phone and tap on the file titled “install_flash_player.apk”. Once you see the download alert, tap Install to begin installing Flash on your Android device.

Next, tap Done after the installation is finished and click back into your phone’s stock browser to enable the new plug-ins. If you are using an Android 3.0 or later, go to your browser’s Menu then click Settings > Advanced > Enable Plug-ins. If you’re using Android 2.2, or 2.3, enter your browser’s Menu and click on More Settings > Enable Plug-ins. Once the plug-ins are active, your Android phone should begin using Flash. You can run a Flash test by visiting this site; You’ll see a brief Flash animation at the top, followed by the version information.
Step 4: Reactivate Security Settings
Now that the download is complete, be sure to go back into your Settings folder — or the Security folder, if you’re running Android 4.1 — and de-select the Unknown sources box to keep your Android device secure. Once the security settings are back to normal, you’ll be free to use Flash Player on your Android phone or tablet. If you have trouble with the download, or would like to reference Adobe’s site for help, you can always visit the Flash Player FAQs page.
Источник
How to install and use Flash Player on your Android device
So, Adobe made the decision to cease any mobile Flash development some time ago which had the consequence that newer versions of Android shipped without it. While many may see that as a step in the right direction, it means that Flash-based contents on the Internet cannot be accessed on the device.
This includes the majority of online game sites, several video hosting sites, and other media sites that make use of Flash.
The following guide looks at possibilities that you have to enable Flash on your Android device. While you may still be limited somewhat in terms of the application that you can use to make use of Flash Player, it is better than not having access to Flash at all.
Installing Flash on Android
Adobe Flash is no longer available on Google Play, which means that you have to download the Android version of it from another source. Note that you can only download older versions of Flash, and that this may pose a security risk. It is generally not recommended to install Flash unless you really, really need it.
The official source is Adobe’s archived Flash Player versions page where you find Flash versions for Android listed. Do not get confused too much by the versions displayed here though. Even though it lists only 4.0 as supported, it works just fine on newer Android devices as well.
Just tap on the latest version of the file to download it to your Android device.
Note: To install it, you need to enable the installation from unknown sources in the settings. To do so select Settings > Security > Unknown Sources under Device Administration. Note that the menus may have different names on your system.
Once done, open the default file browser on your system or the notifications area of your phone if the downloaded Flash Android file is still listed there, and tap on it. You may be asked to pick a program to install it on the system, and both choices that you can make here are just fine so do not worry about them.
Once you tap on the install button Flash is installed on your device.
Using Flash on Android
Now that Adobe Flash Player is installed on your device, you need to find a program to use it with. You cannot just use any browser as many do not support the Flash plugin (anymore).
Probably the best choice in this regard is the Firefox web browser for Android. You can download and install the latest version on Google Play.
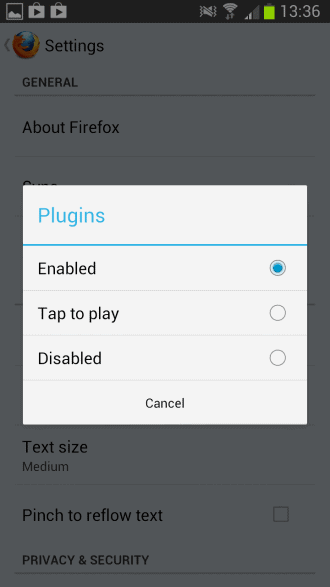
Once installed it will pick up the Flash plugin automatically. You can make a configuration change however:
- Tap on the menu button when Firefox is open on your Android smartphone or tablet.
- Select Settings from the context menu and locate the Plugins preference here.
- Tap on it to either set plugins to be enabled at all time, or activated only when you tap on them. Here you can also disable plugins but that is not really something that you want to do if you want to access Flash contents on the Internet.
Please note that while Flash may run on most sites you visit, but some may detect the user agent of your device to prevent Flash contents from being displayed at all. You may be able to overcome that by installing the Phony extension for Firefox mobile which lets you change your phone’s or tablet’s user agent to avoid this.
Closing Words
Running Flash, especially a version that is no longer updated, poses a security risk and you need to be aware of that. One option that you have to avoid many of the issues associated with that, is to make sure plugins are configured as «tap to play» in Firefox so that they do not run automatically.
Источник
How to: Use Your Android as a Flash Drive
Have you ever been desperately in need of a flash drive but haven’t had one around? The simple solution, besides going out and buying one, may be to set up your Android as a flash drive. It may sound wacky, but it’s completely possible to set your Android device up and use it as a boot device. All it takes is a single application called Drivedroid.
This app works in almost all cases, but there are rare instances where some devices or kernels aren’t supported. Luckily it doesn’t take too long to set up so it’s worth giving it a try.
In this guide we’ll explain how you can use your Android as a flash drive with the Drivedroid tool and install an operating system onto a PC with a bootable .iso file. It should be noted that this guide requires root access.
Step 1 – Downloading Drivedroid & Setting Up
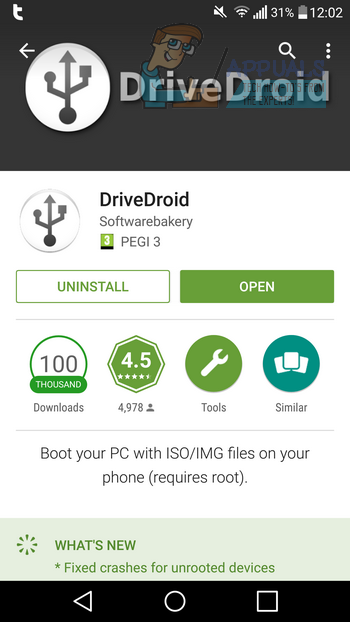
Firstly, you’ll need to download Drivedroid from the Google Play Store. There is a paid version of this application but the free version provides all of the functionality you will need to use your Android as a flash drive.
When you open the application for the first time, it will ask if you’d like to go through the initial setup process. We would recommend choosing the setup – do not skip it. At this point the application will ask for root access. Please keep in mind that you will need your device to be rooted to use Drivedroid.
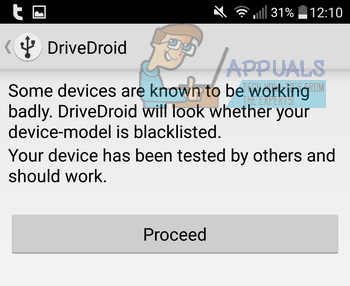
The first stage of the Drivedroid setup process will test whether your smartphone is capable of using the application or not. In the majority of cases, your smartphone will be supported, but if it is not supported, you will not be able to continue with this guide.
Next, the application will ask you to plug your smartphone into your PC via USB. Once you have plugged your smartphone in, tap the ‘I plugged in the USB cable’ button.
Next the app will ask you to choose a USB system. The application can predict what system works best for your particular device. Tap proceed, and then tap the option that has been listed at the top. In this example, the ‘Standard Android kernel’ option has appeared at the top – it may be different for your device!

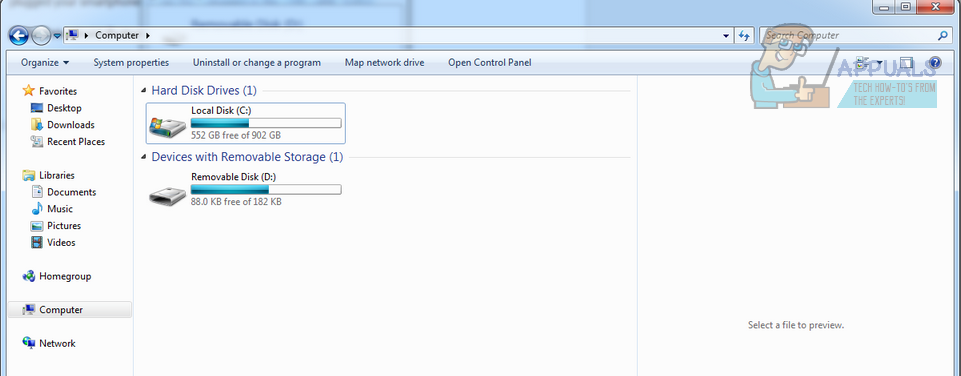
Your PC should now recognize the smartphone as a USB drive. Here is an example of what we have seen on our Windows 7 PC.
Next, tap the ‘I see an USB drive, proceed’ option within the application. You’ll now need to restart your PC and check whether you can choose your Android device within the boot menu. Typically boot buttons are F2, F8 or Delete key. You’ll find the particular on-screen instructions for your computer when it boots up, just before the OS loading screen appears.
Now tap on the app to let it know it has successfully been recognized as a boot device. Now tap the ‘close wizard’ button.
Once you have downloaded and set up the app, you’ll next need to locate and download a bootable .iso file that you can use alongside Drivedroid. If you’ve found this guide, chances are you may already have the files you need for installing a new operating system. However, if you don’t, you can actually find a lot of different Linux distros from within the application itself.
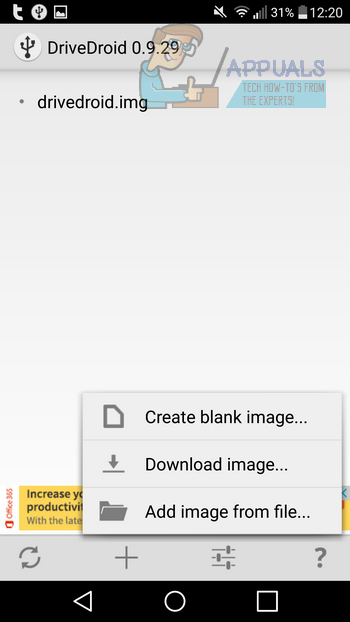
If you already have an .iso file you’d like to use, please skip step 2 and head straight to step 3. If you already have a bootable .iso tap the ‘+’ button at the bottom of the app UI, then tap ‘Add image from file.’
Next, give the image any name you like – this is simply for your own reference. Click the search icon under the path option and then search for your .iso file. If you haven’t already, move it to your smartphone’s internal memory first.
Step 2 – Downloading your Bootable .iso
If you don’t have a bootable .iso already, tap the ‘+’ button at the bottom of the app UI, then tap download image. There are a number of options to choose from, including Debian, Fedora and Ubuntu. Tap on the option you’d like and download one of the available files.
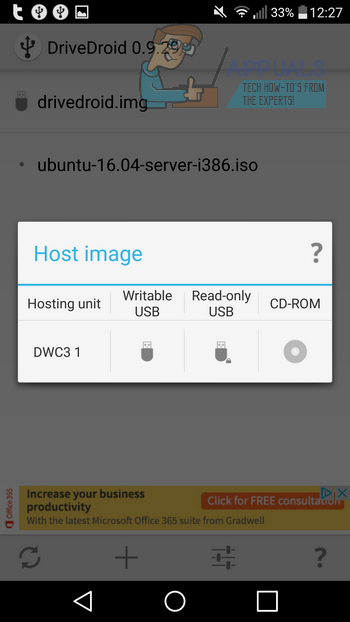
Step 3 – Finishing the Process
Next, your created or download .iso file will appear on the main Drivedroid home page. From here, simply tap your .iso file and wait for the ‘host image’ pop-up to load. Next, tap the icon underneath the ‘read-only’ USB option.
You can now disconnect your smartphone from your PC and connect it to the PC you’d like to boot the .iso onto. Make sure your PC is off and then go through your own PC’s boot menu to select the Android device as your flash drive.
That should be it – after this the process should be finished and your .iso will install onto your PC.
Источник


