- RecyclerView
- RecyclerView
- Requirements
- Overview
- Sections
- RecyclerView Parts and Functionality
- A Basic RecyclerView Example
- Extending the RecyclerView Example
- Summary
- Android RecyclerView Part 1 — Creating a Simple List
- Android RecyclerView Part 2 — Creating RecyclerView with multiple view-types
- This tutorial is the second part of the RecyclerView tutorial series. If you don’t know how to use RecyclerView or you…
- Why using RecyclerView?
- What will we build in this tutorial?
- Adding the RecyclerView dependency
- Adding the RecyclerView object to our layout
- Creating ViewHolder and Adapter
- Connecting all pieces together
- Updating an item
- Handling click-events
- Summary
- О RecyclerView и выделении элементов
- Содержание
- 1. Немного о ViewHolder’ах
- 2. Вкратце о RecyclerView
- 3. Выделяем элементы
- 4. Заключение + Бонус
RecyclerView
RecyclerView is a view group for displaying collections; it is designed to be a more flexible replacement for older view groups such as ListView and GridView. This guide explains how to use and customize RecyclerView in Xamarin.Android applications.
RecyclerView
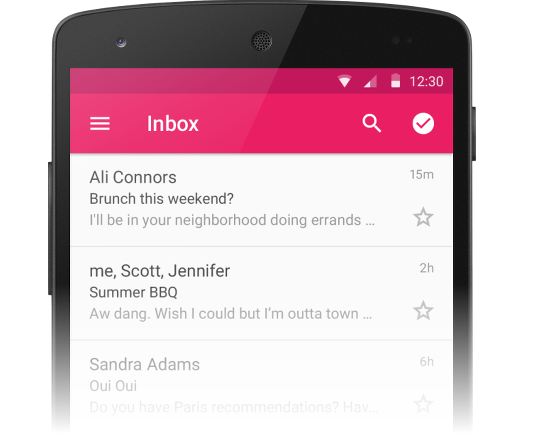
Many apps need to display collections of the same type (such as messages, contacts, images, or songs); often, this collection is too large to fit on the screen, so the collection is presented in a small window that can smoothly scroll through all items in the collection. RecyclerView is an Android widget that displays a collection of items in a list or a grid, enabling the user to scroll through the collection. The following is a screenshot of an example app that uses RecyclerView to display email inbox contents in a vertical scrolling list:
RecyclerView offers two compelling features:
It has a flexible architecture that lets you modify its behavior by plugging in your preferred components.
It is efficient with large collections because it reuses item views and requires the use of view holders to cache view references.
This guide explains how to use RecyclerView in Xamarin.Android applications; it explains how to add the RecyclerView package to your Xamarin.Android project, and it describes how RecyclerView functions in a typical application. Real code examples are provided to show you how to integrate RecyclerView into your application, how to implement item-view click, and how to refresh RecyclerView when its underlying data changes. This guide assumes that you are familiar with Xamarin.Android development.
Requirements
Although RecyclerView is often associated with Android 5.0 Lollipop, it is offered as a support library – RecyclerView works with apps that target API level 7 (Android 2.1) and later. The following is required to use RecyclerView in Xamarin-based applications:
Xamarin.Android – Xamarin.Android 4.20 or later must be installed and configured with either Visual Studio or Visual Studio for Mac.
Your app project must include the Xamarin.Android.Support.v7.RecyclerView package. For more information about installing NuGet packages, see Walkthrough: Including a NuGet in your project.
Overview
RecyclerView can be thought of as a replacement for the ListView and GridView widgets in Android. Like its predecessors, RecyclerView is designed to display a large data set in a small window, but RecyclerView offers more layout options and is better optimized for displaying large collections. If you are familiar with ListView , there are several important differences between ListView and RecyclerView :
RecyclerView is slightly more complex to use: you have to write more code to use RecyclerView compared to ListView .
RecyclerView does not provide a predefined adapter; you must implement the adapter code that accesses your data source. However, Android includes several predefined adapters that work with ListView and GridView .
RecyclerView does not offer an item-click event when a user taps an item; instead, item-click events are handled by helper classes. By contrast, ListView offers an item-click event.
RecyclerView enhances performance by recycling views and by enforcing the view-holder pattern, which eliminates unnecessary layout resource lookups. Use of the view-holder pattern is optional in ListView .
RecyclerView is based on a modular design that makes it easier to customize. For example, you can plug in a different layout policy without significant code changes to your app. By contrast, ListView is relatively monolithic in structure.
RecyclerView includes built-in animations for item add and remove. ListView animations require some additional effort on the part of the app developer.
Sections
RecyclerView Parts and Functionality
This topic explains how the Adapter , LayoutManager , and ViewHolder work together as helper classes to support RecyclerView . It provides a high-level overview of each of these helper classes and explains how you use them in your app.
A Basic RecyclerView Example
This topic builds on the information provided in RecyclerView Parts and Functionality by providing real code examples of how the various RecyclerView elements are implemented to build a real-world photo-browsing app.
Extending the RecyclerView Example
This topic adds additional code to the example app presented in A Basic RecyclerView Example to demonstrate how to handle item-click events and update RecyclerView when the underlying data source changes.
Summary
This guide introduced the Android RecyclerView widget; it explained how to add the RecyclerView support library to Xamarin.Android projects, how RecyclerView recycles views, how it enforces the view-holder pattern for efficiency, and how the various helper classes that make up RecyclerView collaborate to display collections. It provided example code to demonstrate how RecyclerView is integrated into an application, it explained how to tailor RecyclerView ‘s layout policy by plugging in different layout managers, and it described how to handle item click events and notify RecyclerView of data source changes.
For more information about RecyclerView , see the RecyclerView class reference.
Источник
Android RecyclerView Part 1 — Creating a Simple List

This Tutorial is the first part of the RecyclerView tutorials series. If you know how to create a RecyclerView, how to handle click-events, and how to update it, maybe it’s better to read the second part of this series.
Android RecyclerView Part 2 — Creating RecyclerView with multiple view-types
This tutorial is the second part of the RecyclerView tutorial series. If you don’t know how to use RecyclerView or you…
If the scrolling list of elements needs to be displayd based on large datasets, the RecyclerView should be used
The RecyclerView is used in almost all Android applications. The followings are 3 different famous applications that use RecyclerView.
Why using RecyclerView?
You may ask why don’t we use a ScrollView instead of RecyclerView? Imagine you have a list of 1000 items and you want to show them in a scrollable list in your application, if you use a ListView, it creates 1000 views at once and will keep all of them in memory. This approach can cause a memory leak or at least the user won’t be able to scroll items smoothly. But the RecyclerView creates only as many as views are needed to fill up the display portion, in addition to some more. As the user scrolls through the list, the RecyclerView takes the off-screen views and rebinds them to the data which is scrolling on the screen.
What will we build in this tutorial?
This tutorial consists of three parts. In part 1 , we’ll build an application that shows a list of names vertically and the user can scroll through them. In part 2 will learn how to update our list and In part 3 we also learn how to handle click-events in the RecyclerView.
To use the RecyclerView we need:
1- The RecyclerView object: The overall container for your user interface is a RecylerView object that you add to your layout(You can add this object to your layout after adding its dependency to your build.gradle file).
2- Layout manager: The RecyclerView fills itself with views provided by a layout manager. There are 3 different types of layout managers that can be used:
Also, we can implement our own layout manager
3- ViewHolder: The views in the list are represented by the view holder. Each view holder is in charge of displaying a single item with a view. We create a view holder object by extending our class from ReclerView.ViewHolder.
The RecyclerView creates only as many view holders as are needed to display the on-screen portion of the dynamic content, plus a few extra. As the user scrolls through the list, the RecyclerView takes the off-screen views and rebinds them to the data which is scrolling onto the screen.
4- Adapter: An adapter manages the ViewHolder objects. It creates not only ViewHolders as needed, but also binds the ViewHolders with their data. We create an adapter by extending our class from RecyclerView.Adapter.
5- List of datasets: A list of datasets that we want to show in our RecyclerView. In this tutorial, we use a list of Strings.
Adding the RecyclerView dependency
The first step to build our application is adding the RecyclerView dependency. So open the build.gradle file in your app module and add this dependency into the dependencies section.
Adding the RecyclerView object to our layout
Now we add the RecyclerView to our layout file, also add an id for it(rclNames).
Creating ViewHolder and Adapter
Before creating our adapter, we should create a layout file. This layout will be used for each item in our RecyclerView. So, create a layout named name_item which contains a LinearLayout. And add a TextView and a View in it. Also, give the TextView an id. For example txtName.
We have to create an adapter class by extending our class from RecyclerView.Adapter which is a generic class that we have to give it our ViewHolder class.
For now, just create a class named NameAdapter and give it a constructor that takes a list of strings (we will extend it from the RecyclerView.Adapter class after creating our ViewHolder). In the NameAdapter class create a nested class named NameViewHolder and extend it from RecyclerView.ViewHolder class(Later we will complete this class).
After extending the NameAdapter class from the RecyclerView.Adapter, we have to override 3 functions which are:
- onCreateViewHolder(parent: ViewGroup, viewType: Int): called every time the RecyclerView needs a new View. In this function, we have to create an instance of NameViewHolder which should be constructed with a new View. We create a new View by inflating the name_item.xml layout file.
As it’s mentioned earlier, the RecyclerView creates only as many as views are needed to fill up the display portion, plus a few additionals. For example, if the RecyclerView creates 10 views, this function will be called only 10 times and by scrolling the list won’t be called again anymore. - onBindViewHolder(holder: RecyclerView.ViewHolder, position: Int): Called by RecyclerView to show the data at the specific position. This function should update the contents of the RecyclerView’s item to reflect the data at the given position. For example, if the position is 10, this function gets the 10th item of the dataset(a list of names that the NameAdapter’s constructor takes) to update the 10th item in the RecyclerView.
- getItemCount(): returns the total number of items in the dataset, that’s held by the adapter. In this function, we will return the size of the names list.
Before completing the NameAdapter’s functions, in the NameViewHolder we have to get the reference of our TextView(txtName) which is inside name_item.xml.
Now we have all requirements to complete the NameAdapter
Connecting all pieces together
We’re almost done and it’s time to connect all pieces together. So In our Activity, we must get our RecyclerView and set its adapter, equal to an instance of the NameAdapter. Also, we have to create a list of names and pass them to our adapter. As I mentioned earlier, the RecyclerView fills itself with views provided by a LayoutManager, so we must create an instance of LinearLayoutManager and pass it to the RecyclerView.
Now you can run the app and see the result.
We can convert our vertical RecyclerView to a horizontal RecyclerView just by setting the LinearLayoutManager like this:
Practice: Try to use GridLayoutManager and see the result.
Updating an item
First, we must add a button to our activity_main.xml layout. By clicking on this button, the last item of our list will be updated.
So our activity_main.xml may look like something like this:
To update our ReclclerView, first we have to update our dataset (nameList in our example) then call our adapter’s notifyDataSetChanged() function. We do all these two steps when the user clicks on the btnUpdateList. So in our MainAvtivity, we add this code:
Also this way, we can add or remove items from our RecyclerView.
Practice: Try to add or remove an item from the RecyclerView.
You may wonder what the notifyDataSetChanged does? By calling the notifyDataSetChanged function the LayoutManager will rebind any affected ViewHolder, to allow their data to be updated.
Handling click-events
In this section, we want to handle click-events in our RecyclerView. So by clicking on each item, we’ll return its position and its name to our Activity and we’ll toast them from there.
To do this we do the following steps:
- First, in our NameAdapter, we create a Unit function as a variable named itemClickListener that takes an Int and a String as parameters.
- Second, in the NamesAdapter’s onBindViewHolder, we add an OnClickListener to the holder.item and in this listener, we’ll invoke our itemClickListener and pass it the position and name of the corresponding item.
- Lastly in our Activity, we’ll grab NameAdapter’s itemClickListener variable and initialize it.
Summary
This tutorial wanted to teach us why and how to use the ReyclerView in our application. Also, it taught how to update items in our ReyclerView and handle click-events.
You can find the source code from this repo at Part1_Creating_a_simple_list branch:
Источник
О RecyclerView и выделении элементов

Содержание
1. Немного о ViewHolder’ах
До выхода в свет Android SDK 5.0 Lollipop для отображения списков и таблиц использовались виджеты ListView и GridView. Общей рекомендацией при работе с этим виджетом было использование паттерна ViewHolder. Суть паттерна заключается в том, что для каждого элемента списка создаётся объект, хранящий ссылки на отдельные вьюхи внутри элемента. Таким образом, приходится выполнять достаточно дорогой вызов findViewById(int) только один раз при создании элемента.
Пример типичного ViewHolder’а прямиком из руководств гугла:
Cсылка на такой холдер для каждого элемента сохраняется в корневом layout’е, используя метод setTag(int, Object) (с моей точки зрения тот ещё костыль).
2. Вкратце о RecyclerView
К выходу Android SDK 5.0 Lollipop разработчиков Google наконец-то озарило, что два вышеперечисленных виджета морально устарели и нужно бы заменить их на нечто более стильное, модное и молодёжное. Было принято решение не переделывать старые виджеты, а написать новый. Так и появился на свет RecyclerView. Так в чём же его отличия, спросите вы?
Я приведу вкратце основные, а для более полного их раскрытия советую к ознакомлению вот эту статью на хабре. Итак:
- Сам виджет больше не берёт на себя обязанность по размещению элементов. Для этого появились LayoutManager’ы.
- Паттерн ViewHolder стал обязательным. Причём виджет научился заново использовать уже созданные ViewHolder’ы и удалять уже не используемые (отсюда и название), что благоприятно сказывается на быстродействии и размере используемой памяти.
- Новый, удобный способ работы с анимацией.
Я попробовал его и виджет оставил у меня противоречивые впечатления. С одной стороны, да, здорово, что теперь использование ViewHolder’а является обязательным, работает вроде тоже быстрей, памяти жрёт меньше. С другой стороны, есть проблемы со сложностью и недоделанностью виджета.
Что я понимаю под сложностью? Если что-то не работало в ListView (или работало не так как задумано) всегда можно было залезть в исходники, разобраться, в чём ошибка, исправить её, подоткнуть костылей тут и там и всё начинало работать. RecyclerView гораздо сложнее в плане логики работы, мозг сломаешь, пока разберёшься. Я пытался, но забросил, уж слишком много времени и сил для этого нужно.
Вторая проблема — банальное отсутствие функционала, присутствовавшего в ListView и GridView. За примерами далеко ходить не надо — стандартный функционал выделения элементов (дальнейшая тема этой статьи), отступы между элементами. Раньше, чтобы добавить всё это, нужно было написать буквально пару строчек кода, теперь на это уйдут уже десятки строк. Есть анимации, но только для добавления/удаления/редактирования элемента. Если же вы хотите, например, анимировать частичное изменение элемента, то к вам в дверь уже стучится птица обломинго. Виджет не поддерживает анимацию части элемента, и если анимировать элемент извне (из адаптера, например), то лучше этого не делать — подобные манипуляции оставляют элементы виджета (те самые ViewHolder’ы) в неопределённом состоянии, что приводит к совершенно фантастическому поведению вашего списка.
Резюмируя — если у вас в проекте используются старые виджеты и вы не используете анимации, то лучше пока оставить всё как есть и дождаться, когда виджет наполнят отсутствующим функционалом. Если же вы хотите простые анимации и при этом взаимодействие пользователя с виджетом подразумевается простое — попробуйте RecyclerView, вдруг понравиться.
3. Выделяем элементы
Итак, перейдём к главному — к технической части статьи. Поговорим о том, как выделять элементы в RecyclerView. Сразу оговорюсь — идея реализации почерпнута из замечательной серии статей Билла Филлипса про RecyclerView (ссылки в конце), так что всё нижеследующее можно считать вольным кратким пересказом.
В ListView для выделения элементов использовался метод setChoiceMode(int), RecyclerView же понятия не имеет, что элементы могут выделяться, поэтому мы должны научить этому наш адаптер.
Схема такая:
На диаграмме я схематично обозначил связи между объектами. Пунктирные стрелки — ссылки, остальные — вызовы методов. Зелёным я обозначил объекты, которые непосредственно реализуют логику выделения.
Принцип работы получается следующий:
- ViewHolderWrapper устанавливает себя в качестве ClickListener’а для корневой вьюхи ViewHolder’а и начинает получать события onClick и onLongClick. В зависимости от реализации он может просто проксировать эти события в HolderClickObservable (ViewHolderClickWrapper), либо, исходя из текущего статуса SelectionHelper’а выделять элемент вызовом setItemSelected(ViewHolder, boolean) (ViewHolderMultiSelectionWrapper).
- SelectionHelper сохраняет информацию о выделенных элементах и оповещает слушателей (SelectionObserver) об изменении выделения.
- Слушатель (в нашем случае адаптер) отвечает за визуальное отображение выделения элемента, а также взаимодействия с ним (на диаграмме вызов startActionMode у Activity).
В самом адаптере необходимо сделать следующие изменения:
1. Создать SelectionHelper и зарегистрировать слушателей (в данном случае сам адаптер, но это может быть и Activity, например)
2. Обернуть создаваемые ViewHolder’ы во ViewHolderWrapper нужного типа.Метод wrapSelectable(ViewHolder) у SelectionHelper’а:
3. Не забывать прицеплять наши ViewHolder’ы к SelectionHelper’у в методе onBindViewHolder(ViewHolder, int) нашего адаптера!
Это нужно по причине того, что пока нет другого способа получить от RecyclerView список используемых в настоящий момент ViewHolder’ов. Если не вести их учёт, при необходимости обновить отрисовку выделения у всех выбранных элементов (пользователь закрыл ActionMode, например), SelectionHelper просто не сможет этого сделать. Вьюхи останутся выглядеть выделенными, когда по факту таковыми не будут.
Вы спросите — «А почему бы просто не запоминать выделяемые ViewHolder’ы в методе setItemSelected(ViewHolder, boolean)?». Тут как раз сказывается особенность RecyclerView — он использует заново уже созданные ViewHolder’ы.
Выглядит это примерно так:
- Открываем приложение. На экране 10 элементов — 10 ViewHolder’ов создано для них.
- Запускаем ActionMode, начинаем выделять элементы — 1,2,3.
- Прокручиваем вьюху вниз, видим элементы с 10 по 20. Думаете, что теперь в памяти висит 20 ViewHolder’ов? Как бы ни так! Для части данных RecyclerView создаст новые ViewHolder’ы, а для другой заново использует уже имеющиеся. Причём неизвестно в каком порядке.
- Теперь если мы прокрутим вьюху обратно вверх, часть из наших 10 ViewHolder’ов будет уничтожена, вместо них будут созданы новые. Оставшаяся часть будет использована заново и совершенно не обязательно для тех же позиций.
- Отменяем ActionMode. SelectionHelper должен раскидать слушателям уведомления о сменившемся выделении на элементах с указанием ViewHolder’а для каждого элемента, но он уже не владеет актуальными данными, все Holder’ы поменялись!
В результате это приведёт к тому, что часть элементов останется отображаться с выделением.
И здесь становится очевидным ещё один важный момент — нельзя сохранять строгие ссылки (strong reference) на ViewHolder’ы! Они могут быть удалены из RecyclerView в зависимости от фазы Луны и желания левой пятки Ларри Пейджа. В этом случае, если мы будем хранить строгие ссылки на них, случится утечка памяти. Поэтому для хранения ссылок в ViewHolderWrapper и WeakHolderTracker используются только WeakReference.
4. Также важно не забыть в onBindViewHolder(ViewHolder, int) визуально отобразить выделение если оно есть (если нет — не забыть убрать!). Вы же помните, что для не выделенного элемента может быть использован ViewHolder, ранее использовавшийся для не выделенного и наоборот?
У меня это реализовано следующим образом:
4.1. SelectableRecyclerViewAdapter.onBindViewHolder(ViewHolder, int)
4.2. layout-файл для элемента
CheckableAutofitHeightFrameLayout добавляет к FrameLayout всего 2 вещи: во-первых, он всегда квадратный (смотри onMeasure(int, int)) и, во-вторых, добавляет к DrawableStates (те самые, которые используются в xml) состояние state_checked. В результате, для отображения выделения у такого layout’а можно использовать StateListDrawable на вроде этого:и все детали отображения уползают в xml-ки, в Java только нужно установить соответствующие состояния.
5. Передать событие onSelectableChanged(boolean) в Activity и запустить ActionMode:
Как вы видите, при запуске ActionMode, она регистрирует себя как SelectionObserver. Таким образом, можно обновлять количество выделенных элементов в заголовке. Не забудьте вызвать unregisterSelectionObserver(SelectionObserver) при закрытии!
4. Заключение + Бонус
Кажется, с выделением разобрались. Весь исходный код также можно посмотреть на GitHub.
В заключение вкратце приведу ещё несколько фишек для работы с RecyclerView, которые вы можете найти в примере.
1. Если не нужно выделять элементы, а нужно просто обрабатывать нажатия, вместо ViewHolderMultiSelectionWrapper оборачивайте элементы в ViewHolderClickWrapper методом wrapClickable(ViewHolder). Сам адаптер в таком случае будет выглядеть примерно так:
Виджет подбирает ширину столбцов в зависимости от параметра columnWidth. Важный момент: если доступная ширина 330 пикселей, а мы передадим желаемую ширину 100, в итоге в таблице будет 3 столбца по 110 пикселей и элементы будут этой ширины. Именно поэтому я также сделал CheckableAutofitHeightFrameLayout автоматически изменяющим свою высоту в зависимости от ширины.
3. Для добавления отступов между элементами можно выставить paddingTop/Left у RecyclerView и marginRight/Bottom у элементов, однако это выглядит как костыль. Рекомендуемым способом является добавление ItemDecoration к RecyclerView. В примере можно найти несколько. Для добавления отступов к обычному GridLayoutManager (под «обычным» я имею ввиду GridLayoutManager со стандартным SpanSizeLookup, в нём каждый элемент занимает 1 span) можно использовать
Источник


