- Android imageview with zooming
- Android imageview with zooming
- About
- Pinch to Zoom Android ImageView Tutorial
- Android imageview with zooming
- About
- ShapeableImageView — Material components for android
- Important attributes of ShapeableImageView
- Imageview in circle shape
- Corner Radius Imageview
- Corner cut imageview
- Selected Corner Radius / Cut imageview
Android imageview with zooming


![]()
A simple pinch-to-zoom ImageView library for Android with an emphasis on a smooth and natural feel.
Simply add a ZoomageView as you would any typical ImageView in Android. The scaleType that you set on your ZoomageView will determine the starting size and position of your ZoomageView’s image. This is the inherited ImageView.ScaleType from Android. With a ZoomageView, the fitCenter or centerInside scale types usually make the most sense to use, fitCenter being Android’s default scale type.
If using a ZoomageView with a view pager, it is recommended that ViewPager2 is used.
Restricts the bounds of the image so it does not wander outside the border of the ImageView when it’s smaller than the frame size, and restricts the bounds to stop at the edges of the ImageView when the image is larger than the frame size. Default value is false.
Image will animate back to its starting size whenever it is reset if true, and will snap back to its starting size when false. Default value is true.
Determines at what times the image will reset to its starting size. Note that UNDER, OVER, and ALWAYS all have the effect of resetting the image to its starting position if its size has not changed. Default value is UNDER.
This will cause the image to pull itself into view on-screen if it is partially off-screen. Default value is true.
The minimum allowed scale for the image. Ideally this should be less than 1, must be greater than 0, and must be less than maxScale. Default value is 0.6.
The maximum allowed scale for the image. Ideally this should be greater than 1, must be greater than 0, and must be greater than minScale. Default value is 8.
Sets whether zooming is allowed. Default value is true.
Sets whether translation is allowed. Default value is true.
Sets whether double tap to zoom functionality is enabled. Default is true.
Sets the scale factor for double tap to zoom functionality. Default is 3.
Special thanks to @mchowning for all his help
Источник
Android imageview with zooming
PhotoView aims to help produce an easily usable implementation of a zooming Android ImageView.

Add this in your root build.gradle file (not your module build.gradle file):
Then, add the library to your module build.gradle
- Out of the box zooming, using multi-touch and double-tap.
- Scrolling, with smooth scrolling fling.
- Works perfectly when used in a scrolling parent (such as ViewPager).
- Allows the application to be notified when the displayed Matrix has changed. Useful for when you need to update your UI based on the current zoom/scroll position.
- Allows the application to be notified when the user taps on the Photo.
There is a sample provided which shows how to use the library in a more advanced way, but for completeness, here is all that is required to get PhotoView working:
Issues With ViewGroups
There are some ViewGroups (ones that utilize onInterceptTouchEvent) that throw exceptions when a PhotoView is placed within them, most notably ViewPager and DrawerLayout. This is a framework issue that has not been resolved. In order to prevent this exception (which typically occurs when you zoom out), take a look at HackyDrawerLayout and you can see the solution is to simply catch the exception. Any ViewGroup which uses onInterceptTouchEvent will also need to be extended and exceptions caught. Use the HackyDrawerLayout as a template of how to do so. The basic implementation is:
Usage with Fresco
Due to the complex nature of Fresco, this library does not currently support Fresco. See this project as an alternative solution.
This library aims to keep the zooming implementation simple. If you are looking for an implementation that supports subsampling, check out this project
About
Implementation of ImageView for Android that supports zooming, by various touch gestures.
Источник
Pinch to Zoom Android ImageView Tutorial
Hi and welcome to another tutorial from Codingdemos, today you will learn how to build pinch to zoom Android function on an ImageView using 3rd party library called PhotoView. The experience will be a lot similar to what you see today in social media apps.
You will be building an app that have an Android ImageView and a TextView, when you tap on the ImageView an Android Alertdialog will appear on the screen showing you the image in full size where you can pinch and zoom on the image itself.
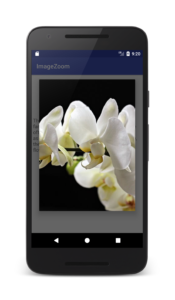
By the end of this tutorial, you will have an app that looks like this. (Large preview)
In this tutorial we will be using the following:
- – Android studio version 3.0
– Android emulator Nexus 5 with API 26
– Minimum SDK API 16
– PhotoView 3rd party library
1- Open up Android Studio and create a new project and give it a name, in our case we’ve named it (ImageZoom), choose API 16 as the minimum SDK, then choose a blank activity, click “Finish” and wait for Android Studio to build your project.
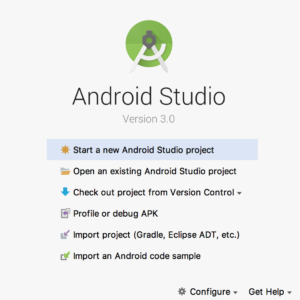
Create new Android Studio project. (Large preview)
2- Open up build.gradle (Module:app) and add PhotoView library.
3- Now you need to open up build.gradle (Project) and you need to add this line maven < url "https://jitpack.io" >inside (allprojects) tag.
4- Sync the project by clicking on (Sync Now).
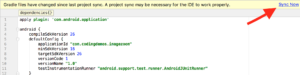
Android studio sync gradle file. (Large preview)
5- Open activity_main.xml file, here you will add 3 views:
– Android ImageView that will hold the picture.
– Android TextView for the image title and description.
6- Add Android ImageView and make sure that you have added the image that you want to use for the ImageView inside the project drawable folder.
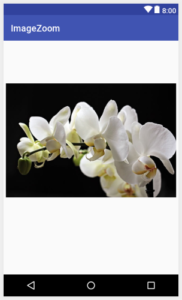
Android ImageView with image. (Large preview)
7- Reduce the size of the ImageView by adjusting android:layout_width and android:layout_height
Adjust width and height of Android ImageView. (Large preview)
8- Add some margin above the ImageView and place it in the center.
Android ImageView placed in the center with margin. (Large preview)
9- When you tap on the ImageView inside Android Studio preview window, you will see an empty space from top and bottom of the ImageView. You can fix that by using android:scaleType=»centerCrop» which allow the image to fill the remaining space.
Android ImageView with scaletype. (Large preview)
10- Add Android TextView which will hold the name of the picture, this TextView will be placed below ImageView (ivIcon) in the center, add some margin from the top, try to increase text size to (20sp) and change text style to (italic and bold).
11- Now you add the final TextView for this layout which will hold the description about the picture, this TextView will be placed below (tvName), try to increase text size to (16sp) and don’t forget to add some margin from the top so that it doesn’t appear to close with (tvName) TextView.
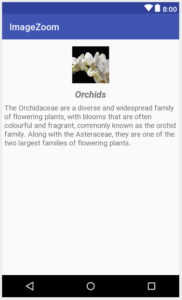
Flower title and description. (Large preview)
12- Now you are done working on activity_main.xml file, next you need to open up MainActivity.java file and initialize Android ImageView and Android AlertDialog.
13- Initialize ImageView (ivIcon).
14- Next you need to change the shape of ImageView (ivIcon) to circle using RoundedBitmapDrawable and Bitmap .
15- Build and run the app to see the progress.
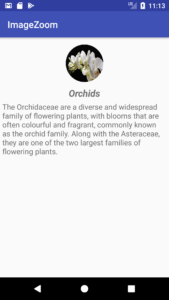
Changed the shape of ImageView (ivIcon) to circle. (Large preview)
16- Now you need to work on Android AlertDialog, the AlertDialog will appear on the screen when you try to tap on ImageView (ivIcon). Before you start that, you first need to create another layout file that you will use it later for AlertDialog.
17- Create a new layout file and name it (dialog_custom_layout.xml), this file will have a PhotoView that will match the width and height of the screen.
18- Now go back to MainActivity.java file, to be able to tap on the ImageView you will need to use setOnClickListener and inside onClick is where you will create AlertDialog.
19- Build and run the app to test out Android pinch and zoom function.
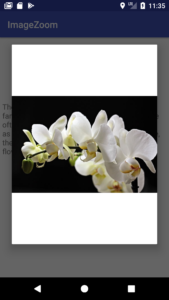
PhotoView image doesn’t completely fill out AlertDialog. (Large preview)
20- Hmm it seems that the image doesn’t fill the entire AlertDialog! You can actually fix it by using android:scaleType=»centerCrop» .
21- Build and run the app to see the result.
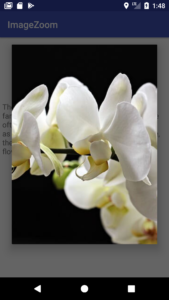
PhotoView image appears inside AlertDialog. (Large preview)
22- Great now you have a fully working app with pinch to zoom Android function 🙂
The source code for this tutorial is available on GitHub, I hope you find this tutorial helpful and if you have any question please post them in the comment below.
Источник
Android imageview with zooming
A custom ImageView Implementation
- Double-tap to zoom
- Pinch zoom
- Drag to pan
- Fling to pan
- Swipe to dismiss


Extends the standard AppCompatImageView api with a few minor additions
Get/Set zoom level
Reset pan and zoom
Parent layout touch intercept
Allow/disallow parent viewgroup to intercept touch event while zoomed in. Panning and swiping in a parent like ViewPager can cause some issues with gesture detection
Display drawable bounds and scale/translate info on the view. Can be useful when modifying/debugging the view
Swipe to dismiss
Dismiss callback. For best results use shared activity/fragment transition
Track swipe to dismiss progress. Can be used to update UI accordingly
Planned improvements and future additions
- Support for multiple scale types (only fit-center works for now)
- Publish as a library (maybe)
License and usage
Feel free to use this file in your code. Just download and add to your project
About
Android ImageView with support for zoom and pan
Источник
ShapeableImageView — Material components for android

Do you want to change the shape of your ImageView in android ? . If yes then its the right place to look into it. Material Design 1.2.0 introduced ShapeableImageView that draws the image with the provided Shape in your imageview.
By using ShapeableImageView, you can change the shape of your image to circle, diamond, etc. Also, you can set corner radius to your imageview. You can do much more by using this ShapeableImageView with minimal code.
To work with ShapeableImageView in your android project, you need to add dependency material design 1.2.0 or higher.
Sliders — Material Components also introduced in material design 1.2.0.
Important attributes of ShapeableImageView
app:shapeAppearanceOverlay — This is working as a ThemeOverlay. ShapeAppearanceOverlay apply the defined changes without affecting the active theme.
The key to the overlay behavior is the empty parent attribute. This is what causes the overlay behavior. Lets create imageview in different shapes.
In the above style, cornerSize only affected by the overlay. remaining properties same as active theme.
cornerFamily — corner family to be used for all four corners
cornerFamilyTopLeft — corner family to be used for the top left corner
cornerFamilyTopRight — corner family to be used for the top right corner
cornerFamilyBottomRight — corner family to be used for the bottom right corner
cornerFamilyBottomLeft — corner family to be used for the bottom left corner
cornerFamily is a enum type and the supported values are rounded, cut.
cornerSize — corner size to be used for all four corners
cornerSizeTopLeft — corner size to be used for the top left corner
cornerSizeTopRight — corner size to be used for the top right corner
cornerSizeBottomRight — corner size to be used for the bottom right corner
cornerSizeBottomLeft — corner size to be used for the bottom left corner
Imageview in circle shape

as mentioned above, first we need to set the app:shapeAppearanceOverlay. In the overlay we need to mention the corner radius size to 50% to make the imageview as circle.
In your style.xml add,
If you want to add stroke to circle imageview, you can add stroke attributes in your ShapeableImageView.

Dynamically using Kotlin
set the corner radius in dimens.xml
Corner Radius Imageview

we need to set the app:shapeAppearanceOverlay. In the overlay we need to mention the corner radius size to 10% to set the corner radius.
In your style.xml add,
same way, If you want to add stroke to corner radius imageview, you can add stroke attributes in your ShapeableImageView.

Dynamically using Kotlin
set the corner radius in dimens.xml
Corner cut imageview

For the corner cut imageview, we are going to use cornerFamily attribute.
by default, cornerFamily will be rounded. In our case, we need it to be cut. So we are changes cornerFamily to cut.
By changing the cornerSize, we can make different shapes like diamond, hexagon, etc.
Dynamically using Kotlin
setAllCorners() used to set both cornerFamily and cornerRadius.
Selected Corner Radius / Cut imageview

To set corner radius for the selected position, we need to use both cornerSize and cornerFamily for the particular position.
For example, check the below example to set the corner radius for the right top position of the imageview.
for the cut corner radius in style.xml :
same way for the multiple corners, we need to add cornerRadius and cornerFamily.

Dynamically using Kotlin
setTopRightCorner() used to set the corner radius for the top right corner. To set multiple corners we can use setBottomLeftCorner(), setTopLeftCorner() and setBottomRightCorner() .
Thanks for reading.
You can download the example in github.
Источник


