- Как поставить кастомное рекавери на Андроид
- Как поставить кастомное рекавери на Андроид
- Виды кастомных рекавери
- CWM Recovery
- TWRP Recovery
- Как установить кастомное Recovery
- Способ 1: Official TWRP App
- Способ 2: Flashify
- Способ 3: Fastboot
- Способ 4: SP Flash Tool (для MTK)
- Способ 5: Odin (для Самсунг)
- How to install TWRP recovery on Android smartphones
- Why TWRP for Custom Recovery?
- How to install TWRP on a popular Android smartphone
- Motorola
- OnePlus
- Samsung
- Xiaomi
- How to install TWRP on any Android device
- Step 1: Downloading TWRP for your device
- Step 2: Flashing TWRP
- Step 4: Verification
Как поставить кастомное рекавери на Андроид

Если вы решили перейти с официальной Android-прошивки на стороннюю модификацию ОС, то практически в любом случае столкнетесь с необходимостью разблокировки загрузчика и установки кастомного рекавери на устройство.
По умолчанию соответствующее программное обеспечение используется для восстановления гаджета к заводским настройкам и обновления операционной системы. Кастомное же рекавери предоставляет значительно большее количество возможностей. С ним вы не только сможете устанавливать пользовательские прошивки и всевозможные модификации, но также получите инструмент для полноценной работы с резервными копиями и разделами карты памяти.
Как поставить кастомное рекавери на Андроид
Содержание — Как поставить кастомное рекавери на Андроид
Виды кастомных рекавери
Выбор есть всегда и этот случай — не исключение. Впрочем, здесь все вполне очевидно: есть два варианта, но актуальным из них является лишь один.
CWM Recovery

Одна из первых пользовательских сред восстановления для Android от команды разработчиков ClockworkMod. Ныне проект закрыт и поддерживается разве что отдельными энтузиастами для совсем небольшого количества устройств. Так, если для вашего гаджета CWM — единственный вариант, ниже вы узнаете, как же можно произвести его инсталляцию.
TWRP Recovery

Популярнейший кастомный Recovery от команды TeamWin, полностью заменивший собою CWM. Перечень устройств, поддерживающих этот инструмент, действительно впечатляет, и если официальной версии для вашего гаджета нет, скорее всего найдется соответствующим образом адаптированная пользовательская модификация.
Как установить кастомное Recovery
Есть целый ряд способов установки модифицированного рекавери: одни предполагают проведение операций непосредственно на смартфоне, а другие — задействование ПК. Для некоторых девайсов и вовсе необходимо использовать специальный софт — к примеру, программу Odin для смартфонов и планшетов Samsung.
Способ 1: Official TWRP App
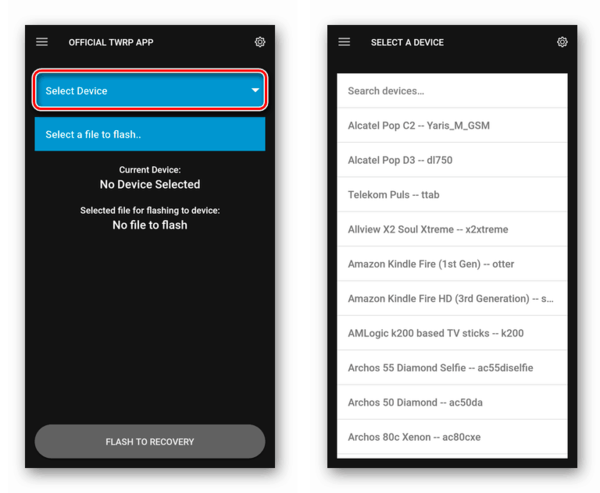
Само название приложения сообщает нам о том, что это официальный инструмент для установки TeamWin Recovery на Android. Если устройство напрямую поддерживается разработчиком рекавери, вам даже не придется предварительно скачивать установочный образ — все можно выполнить прямо в TWRP App.
Способ предполагает наличие Root-прав на вашем смартфоне или планшете. Если таковые отсутствуют, прежде ознакомьтесь с соответствующей инструкцией и выполните необходимые действия для получения привилегий суперпользователя.
1. Для начала установите рассматриваемое приложение и запустите его.
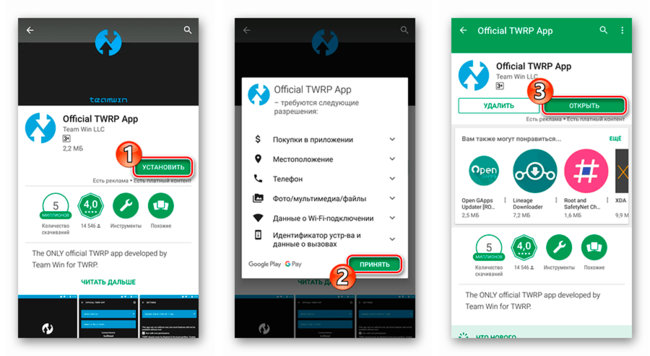
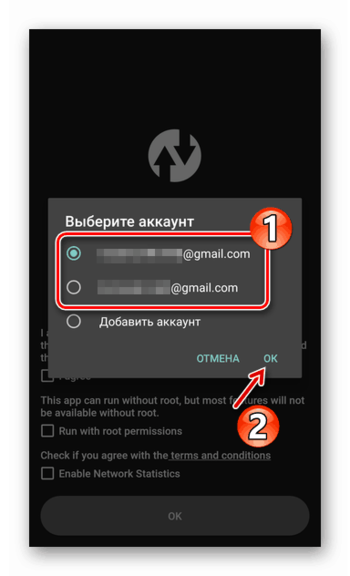
2. Затем прикрепите к TWRP App одну из учетных записей Google.
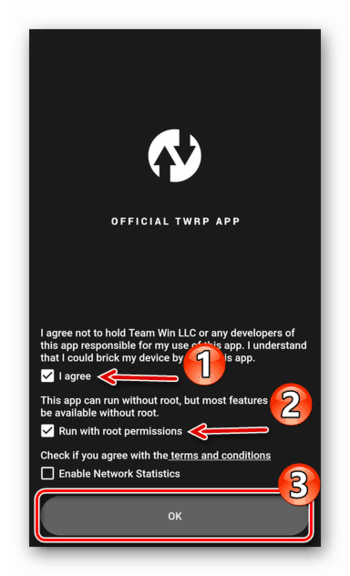
3. Отметьте пункты «I agree» и «Run with root permissions», после чего нажмите «Ок».
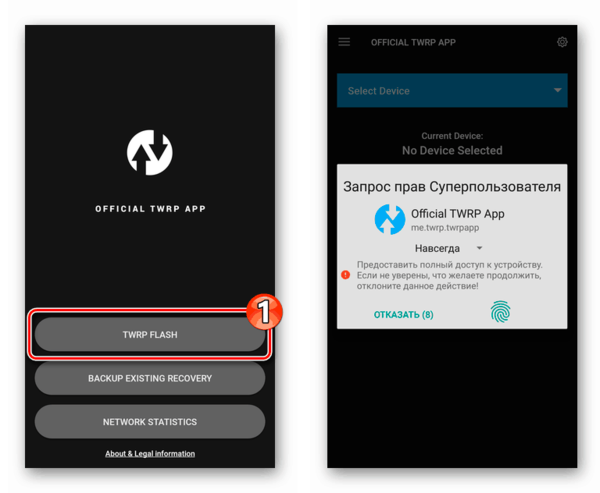
Тапните по кнопке «TWRP Flash» и предоставьте приложению права суперпользователя.
4. Далее у вас есть два варианта действий. Если девайс официально поддерживается разработчиком рекавери, загрузите установочный образ, используя приложение, иначе же импортируйте его из памяти смартфона или SD-карты.
В первом случае вам нужно открыть выпадающий список «Select Device» и выбрать нужный гаджет из представленного перечня.
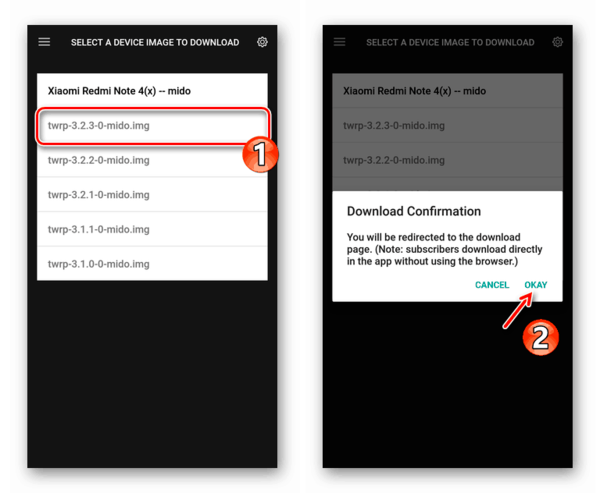
Выберите последнюю версию IMG-образа рекавери и подтвердите переход к странице загрузки.
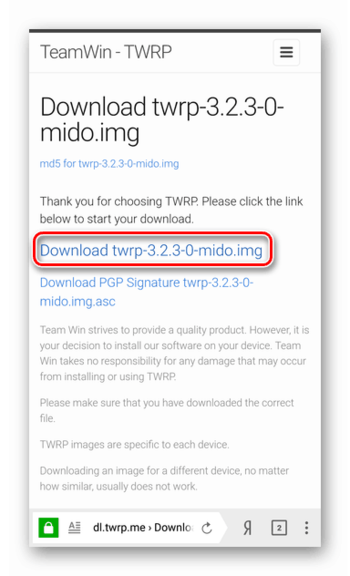
Чтобы приступить к скачиванию, тапните по ссылке вида «Download twrp-*версия*.img».
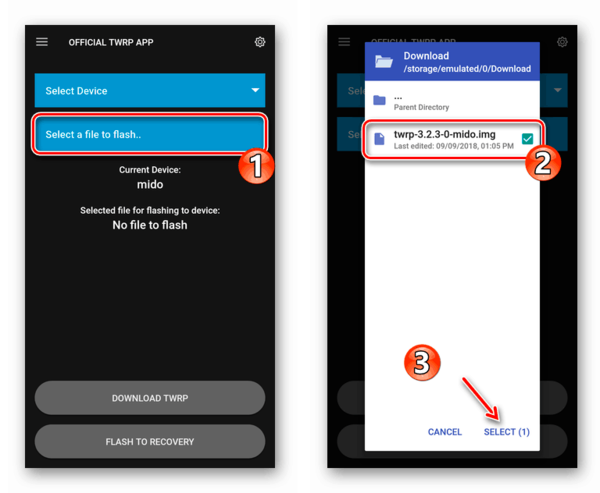
Ну а для импорта образа из встроенного или внешнего хранилища воспользуйтесь кнопкой «Select a file to flash», после чего выберите требуемый документ в окне файлового менеджера и нажмите «Select».
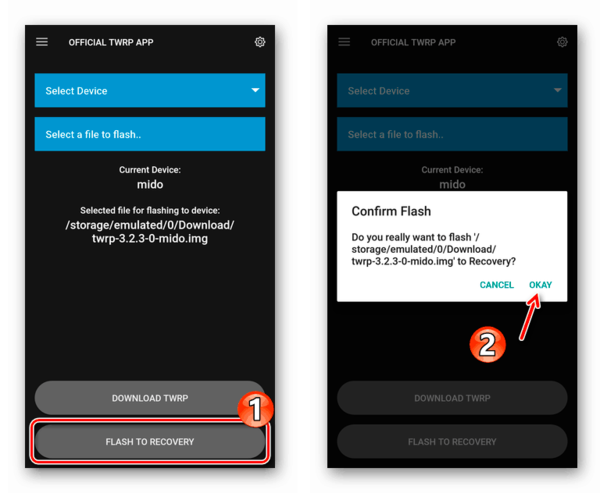
5. Добавив установочный файл в программу, вы можете приступить к самой процедуре прошивки рекавери на устройство. Так, нажмите на кнопку «Flash to recovery» и подтвердите запуск операции, тапнув «Okay» во всплывающем окне.
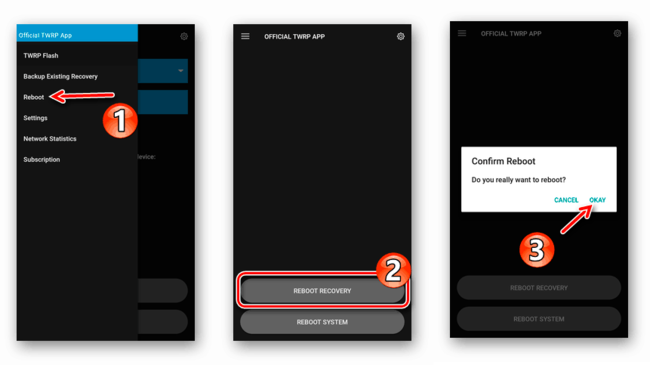
6. Процесс установки образа не займет много времени. По окончании процедуры вы можете выполнить перезагрузку в установленный Recovery прямо из приложения. Для этого в боковом меню выберите пункт «Reboot», тапните «Reboot recovery», а затем подтвердите действие во всплывающем окне.
Вообще это самый простой и очевидный способ прошивки кастомного рекавери на ваш смартфон или планшет. Компьютер не нужен, достаточно лишь самого устройства и наличия доступа в сеть.
Способ 2: Flashify
Официальное приложение от TeamWin — далеко не единственный инструмент для установки Recovery прямо из системы. Есть целый ряд подобных решений от сторонних разработчиков, лучшей и наиболее популярной из которых является утилита Flashify.
Программа умеет все то же, что и Official TWRP App, и даже больше. Приложение позволяет прошивать любые скрипты и образы без необходимости перезагрузки в среду восстановления, а значит, без проблем справится с установкой CWM или TWRP Recovery на ваш гаджет. Единственное условие — наличие рут-прав в системе.
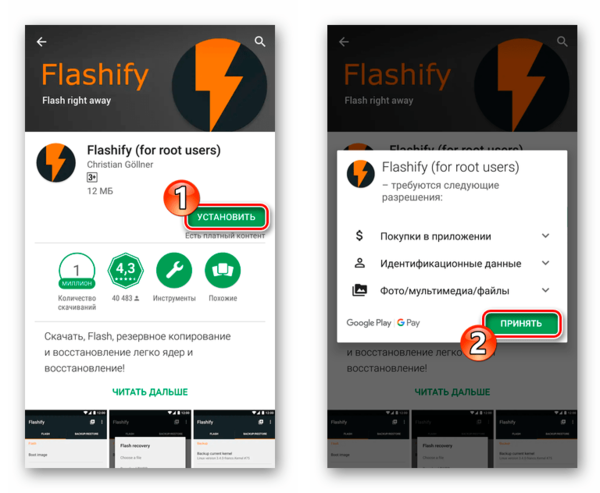
1. Первым делом откройте страничку утилиты и произведите ее установку.
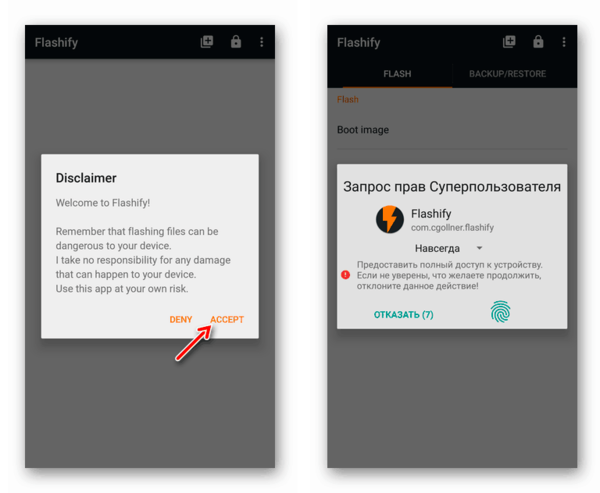
2. Запустите приложение и подтвердите свою осведомленность о возможных рисках, щелкнув по кнопке «Accept» во всплывающем окне. Затем предоставьте Flashify права суперпользователя.
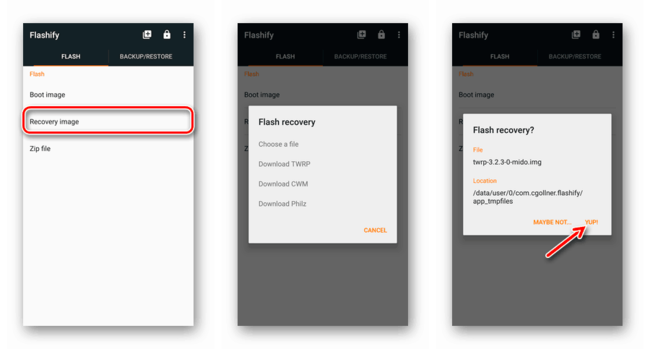
3. Выберите пункт «Recovery image», чтобы перейти к прошивке рекавери. Есть несколько вариантов дальнейших действий: вы можете тапнуть «Choose a file» и импортировать скачанный образ среды восстановления либо же нажать «Download TWRP/CWM/Philz» для загрузки соответствующего IMG-файла прямо из приложения. Далее щелкните по кнопке «Yup!», чтобы запустить процесс установки.
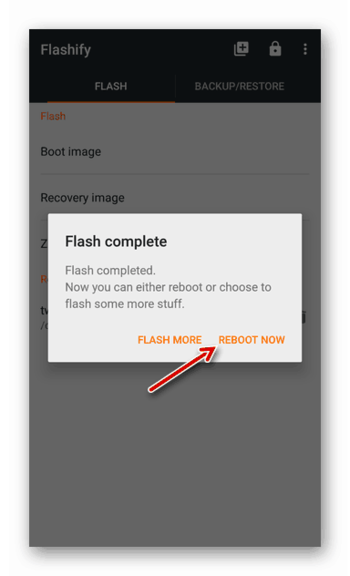
4. Об успешном завершении операции вы будете уведомлены PopUp-окном с заголовком «Flash complete». Тапнув «Reboot now», можно сразу же перезагрузиться в новую среду восстановления.
Подобная процедура занимает считанные минуты и не требует дополнительных устройств, а также иного программного обеспечения. С установкой кастомного Recovery таким образом без каких-либо проблем справится даже новичок в Андроид.
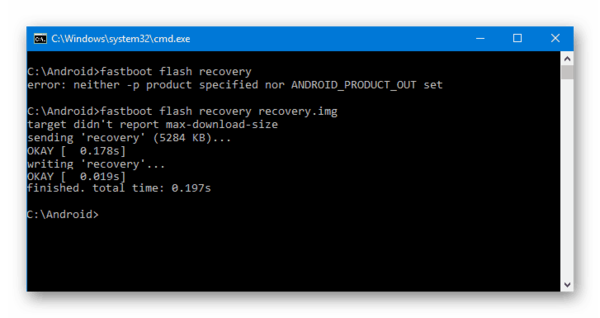
Способ 3: Fastboot
Использование режима быстрой загрузки — наиболее предпочтительный метод прошивки Recovery, так как позволяет работать с разделами Андроид-девайса напрямую.
Работа с Fastboot подразумевает взаимодействие с ПК, ведь именно с компьютера отправляются команды, впоследствии выполняемые «загрузчиком».
Способ универсальный и может быть применен как для прошивки Recovery от TeamWin, так и для установки альтернативной среды восстановления — CWM. Подробно ознакомиться со всеми особенностями использования Fastboot и сопутствующего инструментария вы сможете в одной из наших статей.
Урок: Как прошить телефон или планшет через Fastboot
Способ 4: SP Flash Tool (для MTK)
Владельцы гаджетов на базе MediaTek могут использовать «особый» инструмент для прошивки кастомного рекавери на свой смартфон или планшет. Таковым решением является программа SP Flash Tool , представленная в качестве версий для Windows и Linux ОС.
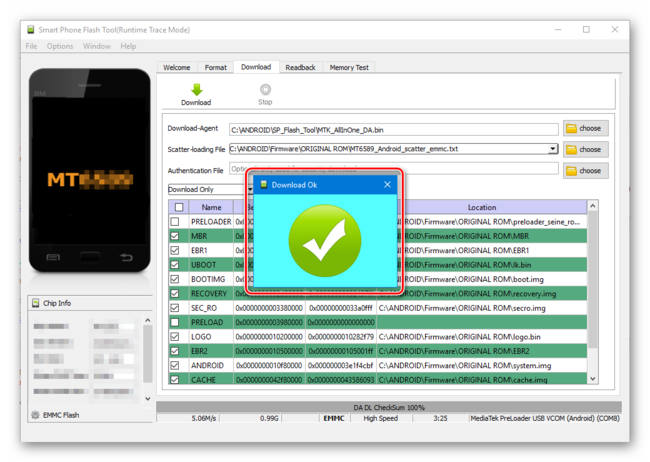
Помимо Recovery, утилита позволяет устанавливать как полноценные ROM, пользовательские и официальные, так и отдельные системные компоненты. Все действия производятся при помощи графического интерфейса, без необходимости применения командной строки.
Способ 5: Odin (для Самсунг)
Ну а если производителем вашего гаджета является всем известная южнокорейская компания, вы также имеете в своем арсенале универсальный инструмент. Для прошивки кастомных рекавери и любых компонентов операционной системы Samsung предлагает использовать Windows-программу Odin .
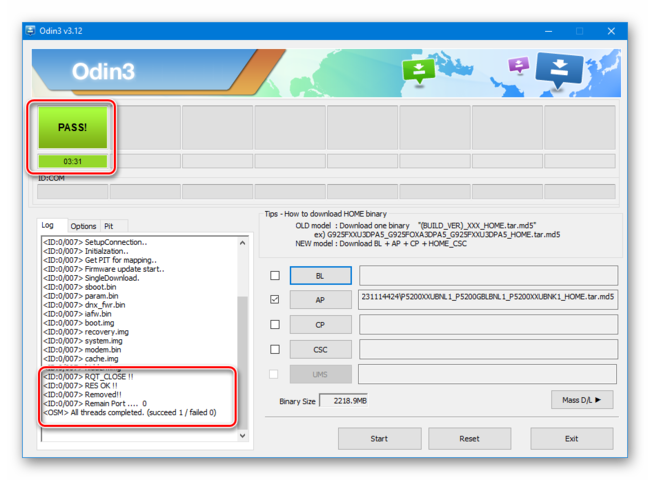
Для работы с одноименной утилитой от вас не требуется знание специальных консольных команд и наличие дополнительных инструментов. Все, что нужно — это компьютер, смартфон с USB-кабелем и немного терпения.
Перечисленные в статье методы установки модифицированных Recovery — далеко не единственные в своем роде. Есть еще целый перечень значительно менее популярных инструментов — мобильных приложений и компьютерных утилит. Однако представленные здесь решения являются наиболее актуальными и проверенными временем, а также сообществом пользователей по всему миру.
Источник
How to install TWRP recovery on Android smartphones
TeamWin Recovery Project, more widely known by its TWRP abbreviation, is the most popular custom recovery solution for Android devices. For the unaware, TWRP replaces the default recovery environment that came with your device, so you can root your device via Magisk, flash custom ROMs and kernels, create full backups, and so on. If you’re wondering how to get TWRP on your device, this guide should help you with that. In case you don’t see your device listed or you see a misplaced link, send a message to Skanda Hazarika (SkandaH on the forums) with the device details.
Table of Contents:
Why TWRP for Custom Recovery?
One of the reasons Android modders swear by TWRP is its active development and support for a wide variety of devices, with new devices being added to the official build roster regularly. Thanks to the open-source nature of the project, aftermarket developers can also port TWRP unofficially to many other devices. The internal structure of the custom recovery is quite modular, which is why you can find numerous forks as well as further functionality enhancements such as dual boot mods based on TWRP.
DISCLAIMER: Replacing the stock recovery with TWRP usually needs an unlocked bootloader, which may void the warranty on the device. It may also make the device unstable or if not done properly, may completely brick the device. XDA and the author do not take any responsibility for your device. Install TWRP at your own risk and only if you understand what you are doing!
How to install TWRP on a popular Android smartphone
Have you already unlocked the bootloader of your device? Eager to enjoy the first step towards the aftermarket development scene? Head to the following section to begin the journey. You should find device-specific TWRP installation guides for the latest flagship models from every major OEM below.
| Sr. No. | Device | Codename and Device Forum | TWRP Installation Guide |
|---|---|---|---|
| 1. | ASUS ROG Phone II | I001D | Click Here |
| 2. | ASUS ROG Phone 3 | I003D | Click Here |
| 3. | ASUS ROG Phone 5 ASUS ROG Phone 5s | I005D | Click Here |
| 4. | ASUS ZenFone 6 | I01WD | Click Here |
| 5. | ASUS ZenFone 7/7 Pro | I002D | Click Here |
| 6. | ASUS ZenFone 8 | I006D | Click Here |
For other ASUS devices, kindly check out theВ ASUS section of our forums. You should be able to find similar fine-tuned guides for your device under the device sub-forums. You can also follow the generic TWRP installation guide from this tutorial.
| Sr. No. | Device | Codename and Device Forum | TWRP Installation Guide |
|---|---|---|---|
| 1. | Google Pixel 4 | flame | Click Here |
| 2. | Google Pixel 4 XL | coral | Click Here |
| 3. | Google Pixel 4a | sunfish | Click Here |
| 4. | Google Pixel 5 | redfin | Click Here |
For other Google devices, kindly check out theВ Google section of our forums. You should be able to find similar fine-tuned guides for your device under the device sub-forums. You can also follow the generic TWRP installation guide from this tutorial.
Motorola
| Sr. No. | Device | Codename and Device Forum | TWRP Installation Guide |
|---|---|---|---|
| 1. | Motorola Edge Plus | burton | Click Here |
| 2. | Motorola Moto G100/Edge S | nio | Click Here |
| 3. | Motorola Edge 20 Pro/Edge S Pro | pstar | Click Here |
For other Motorola devices, kindly check out theВ Motorola section of our forums. You should be able to find similar fine-tuned guides for your device under the device sub-forums. You can also follow the generic TWRP installation guide from this tutorial.
OnePlus
| Sr. No. | Device | Codename and Device Forum | TWRP Installation Guide |
|---|---|---|---|
| 1. | OnePlus 7 | guacamoleb | Click Here |
| 2. | OnePlus 7 Pro | guacamole | Click Here |
| 3. | OnePlus 7T | hotdogb | Click Here |
| 4. | OnePlus 7T Pro | hotdog | Click Here |
| 5. | OnePlus 8 | instantnoodle | Click Here |
| 6. | OnePlus 8 Pro | instantnoodlep | Click Here |
| 7. | OnePlus 8T | kebab | Click Here |
| 8. | OnePlus 9 | lemonade | Click Here |
| 9. | OnePlus 9 Pro | lemonadep | Click Here |
| 10. | OnePlus 9R | lemonades | Click Here |
| 11. | OnePlus Nord | avicii | Click Here |
| 12. | OnePlus Nord 2 | denniz | Click Here |
| 13. | OnePlus Nord N10 5G | billie | Click Here |
| 14. | OnePlus Nord N100 | clover | Click Here |
| 15. | OnePlus Nord N200 | holi | Click Here |
For other OnePlus devices, check out the OnePlus section of our forums. You should be able to find similar fine-tuned guides for your device under the device sub-forums. You can also follow the generic TWRP installation guide from this tutorial.
Samsung
| Sr. No. | Device | Codename and Device Forum | TWRP Installation Guide |
|---|---|---|---|
| 1. | Samsung Galaxy Tab S7/S7 Plus | gts7xl | Click Here |
| 2. | Samsung Galaxy S21 | unboundm1(q) | Exynos variant / Qualcomm Snapdragon variant |
| 3. | Samsung Galaxy S21 Plus | unboundn2(q) | Exynos variant / Qualcomm Snapdragon variant |
| 4. | Samsung Galaxy S21 Ultra | unboundo3(q) | Exynos variant / Qualcomm Snapdragon variant |
For other Samsung devices, kindly check out theВ Samsung section of our forums. You should be able to find similar fine-tuned guides for your device under the device sub-forums. You can also follow the generic TWRP installation guide from this tutorial.
| Sr. No. | Device | Codename and Device Forum | TWRP Installation Guide |
|---|---|---|---|
| 1. | Sony 1 II | pdx203 | Click Here |
For other Sony Xperia devices, kindly check out theВ Sony section of our forums. You should be able to find similar fine-tuned guides for your device under the device sub-forums. You can also follow the generic TWRP installation guide from this tutorial.
Xiaomi
| Sr. No. | Device | Codename and Device Forum | TWRP Installation Guide |
|---|---|---|---|
| 1. | Xiaomi Mi 11 | venus | Click Here |
| 2. | Xiaomi Mi 11X/POCO F3/Redmi K40 | alioth | Click Here |
For other Mi, Redmi, and POCO branded devices, kindly check out theВ Xiaomi section of our forums. You should be able to find similar fine-tuned guides for your device under the device sub-forums. You can also follow the generic TWRP installation guide from this tutorial.
How to install TWRP on any Android device
Before getting started with TWRP, make sure that:
- You have access to a PC/Mac withВ adb and fastboot installed.
- On your device, go into Settings -> About and find the Build Number. Tap on it 7 times to enable Developer options. Go back to the Settings menu and find the Developer options entry (on older Android versions), or tap on System -> Advanced, and go into Developer options. Finally enable USB debugging.
- The bootloader of the target Android device is unlocked.
- For Samsung devices, unlocking the bootloader will trip KNOX.
Step 1: Downloading TWRP for your device
Let’s start by downloading the appropriate TWRP image for your device. You can find a list of devices that are officially supported by following the link below.
As mentioned earlier, you may also find unofficial TWRP builds for your device in our forums.
Step 2: Flashing TWRP
Since TWRP replaces the stock recovery image of your device, the installation process depends on the target device’s partition scheme. Users can easily check it by running the following command in ADB shell or a Terminal Emulator app:
This will return “true” if the device supports A/B partitions. On legacy A-only devices, the output should be blank.
Case I: Devices with A-only partition scheme
If you have a device that still uses the A-only partition scheme, then you should be able to directly replace the stock recovery image with TWRP via Fastboot.
- Copy the TWRP image to a suitable location on your PC. You can even put it on the folder where the Fastboot binary is located.
- From your PC, open a command prompt/terminal and type:
- Rename the TWRP image to twrp.img and type:
- Many devices will replace a custom recovery automatically during first boot. To prevent this, search to find the proper key combo for your device to enter recovery. After typing ‘fastboot reboot’, hold the key combo and boot to TWRP.
- You can also try to temporary boot the downloaded image using the following command:
- Once TWRP is booted, TWRP will patch the stock ROM to prevent it from replacing TWRP. If you don’t follow this step, you will have to repeat the install.
- Congrats! TWRP is now successfully installed on your device.
Power users can also flash the custom recovery without using a PC, but the process needs root access. To do so, download the appropriate TWRP image file to your phone, rename it to twrp.img, and place it in the root of the internal storage (/sdcard). Run the following commands via adb shell or a terminal emulator app:
On some rare occasions, your device doesn’t feature a standalone recovery partition. Instead, the recovery is part of the boot image. The TWRP maintainers for such devices may repurpose a different partition as the recovery environment. As a result, the aforementioned flashing process might need some tweaking on those devices.
Case II: Devices with A/B partition scheme
In case of a device having A/B partition scheme, the recovery environment is fused with the boot image. Due to this design, you need to temporarily boot TWRP first and later perform a more permanent installation within the custom recovery environment.
- Copy the TWRP image to a suitable location on your PC. You can even put it on the folder where the Fastboot binary is located.
- From your PC, open a command prompt/terminal and type:
- Rename the TWRP image to twrp.img and type the following to boot it temporarily:
- Copy the twrp.img file to the device:
- Navigate to the Advanced menu of TWRP and tap on “Install Recovery Ramdisk”:

- Choose the twrp.img file from the device’s internal storage.
- Swipe to install and then reboot.
- Congrats! TWRP is now successfully installed on your device.

Special Case: Samsung
Samsung Galaxy devices don’t a traditional Fastboot interface, hence the installation process of TWRP on them is quite different.
- Download and extract Odin (Samsung’s Flash Tool) to your computer.
- On your PC, download the *.tar image of TWRP for the target device.
- Reboot to download mode. Open Odin on your PC, and flash that tar file in the [AP] slot.
- Hold the recovery mode key-combo (usually volume up and power) while Odin is flashing until you are in TWRP environment.
- Once you’re in, you may need to flash Multidisabler to semi-permanently disable a number of device protection features and services that become problematic on a modified device.
- Congrats! TWRP is now successfully installed on your device.
Step 4: Verification
The last step is to verify that the custom recovery is working properly. Use the device-specific key-combo or the adb reboot recovery command on an already running device to boot to the recovery mode. If you can see the menu like the one shown below, it means you have successfully install TWRP. Great job!

Lastly, be sure to download the official app for the custom recovery project from Google Play. The app will alert you when new versions of the custom recovery are available. It’ll also let you download the latest version right from your device, provided you’ve root access.
Источник


