- Installation
- Prerequisites
- Additional resources
- Installing with a package manager
- › Additional helpful information
- Installing manually
- Step 1. Download the latest Gradle distribution
- Step 2. Unpack the distribution
- Step 3. Configure your system environment
- Step 4. Verify your installation
- › Additional helpful information
- Upgrade with the Gradle Wrapper
- › Additional helpful information
- Older Releases
- Command-Line Completion
- Installing Gradle
- Prerequisites
- Installing with a package manager
- Installing manually
- Step 1. Download the latest Gradle distribution
- Step 2. Unpack the distribution
- Linux & MacOS users
- Microsoft Windows users
- Step 3. Configure your system environment
- Linux & MacOS users
- Microsoft Windows users
- Verifying installation
- Next steps
- The Gradle Wrapper
- Adding the Gradle Wrapper
- Using the Gradle Wrapper
- Upgrading the Gradle Wrapper
- Customizing the Gradle Wrapper
- Authenticated Gradle distribution download
- Verification of downloaded Gradle distributions
- Downloading the SHA-256 file
- Configuring checksum verification
- Verifying the integrity of the Gradle Wrapper JAR
- Automatically verifying the Gradle Wrapper JAR on GitHub
- Manually verifying the Gradle Wrapper JAR
Installation
The current Gradle release is 7.3.1. You can download binaries and view docs for all Gradle versions from the releases page.
Prerequisites
Gradle runs on all major operating systems and requires only a Java JDK version 8 or higher to be installed. To check, run java -version :
Additional resources
- On-demand and live online training is available for free to Gradle users.
- Self-paced tutorials are a good place to try Gradle with a variety of languages in addition to the docs.
- Gradle has a visual build inspection tool: Build Scan™.
- Finally, the Gradle Newsletter is a great way to keep UP-TO-DATE , with issues crafted monthly.
Installing with a package manager
SDKMAN! is a tool for managing parallel versions of multiple Software Development Kits on most Unix-based systems.
Homebrew is “the missing package manager for macOS”.
Other package managers are available, but the version of Gradle distributed by them is not controlled by Gradle, Inc. Linux package managers may distribute a modified version of Gradle that is incompatible or incomplete when compared to the official version (available from SDKMAN! or below).
› Additional helpful information
Installing manually
Step 1. Download the latest Gradle distribution
The current Gradle release is version 7.3.1, released on 01 Dec 2021. The distribution zip file comes in two flavors:
If in doubt, choose the binary-only version and browse docs and sources online.
Need to work with an older version? See the releases page.
Step 2. Unpack the distribution
Linux & MacOS users
Unzip the distribution zip file in the directory of your choosing, e.g.:
Microsoft Windows users
Create a new directory C:\Gradle with File Explorer.
Open a second File Explorer window and go to the directory where the Gradle distribution was downloaded. Double-click the ZIP archive to expose the content. Drag the content folder gradle-7.3.1 to your newly created C:\Gradle folder.
Alternatively you can unpack the Gradle distribution ZIP into C:\Gradle using an archiver tool of your choice.
Step 3. Configure your system environment
Linux & MacOS users
Configure your PATH environment variable to include the bin directory of the unzipped distribution, e.g.:
Microsoft Windows users
In File Explorer right-click on the This PC (or Computer ) icon, then click Properties -> Advanced System Settings -> Environmental Variables .
Under System Variables select Path , then click Edit . Add an entry for C:\Gradle\gradle-7.3.1\bin . Click OK to save.
Step 4. Verify your installation
Open a console (or a Windows command prompt) and run gradle -v to run gradle and display the version, e.g.:
› Additional helpful information
Upgrade with the Gradle Wrapper
If your existing Gradle-based build uses the Gradle Wrapper, you can easily upgrade by running the wrapper task, specifying the desired Gradle version:
Note that it is not necessary for Gradle to be installed to use the Gradle wrapper. The next invocation of gradlew or gradlew.bat will download and cache the specified version of Gradle.
› Additional helpful information
Older Releases
You can find all releases and their checksums on the releases page.
Command-Line Completion
Command-line completion scripts are available for bash and zsh. This provides completion for Gradle tasks and command-line options.
Источник
Installing Gradle
You can install the Gradle build tool on Linux, macOS, or Windows. This document covers installing using a package manager like SDKMAN! or Homebrew, as well as manual installation.
Use of the Gradle Wrapper is the recommended way to upgrade Gradle.
You can find all releases and their checksums on the releases page.
Prerequisites
Gradle runs on all major operating systems and requires only a Java Development Kit version 8 or higher to run. To check, run java -version . You should see something like this:
Gradle ships with its own Groovy library, therefore Groovy does not need to be installed. Any existing Groovy installation is ignored by Gradle.
Gradle uses whatever JDK it finds in your path. Alternatively, you can set the JAVA_HOME environment variable to point to the installation directory of the desired JDK.
Installing with a package manager
SDKMAN! is a tool for managing parallel versions of multiple Software Development Kits on most Unix-like systems (macOS, Linux, Cygwin, Solaris and FreeBSD). We deploy and maintain the versions available from SDKMAN!.
Homebrew is «the missing package manager for macOS».
Other package managers are available, but the version of Gradle distributed by them is not controlled by Gradle, Inc. Linux package managers may distribute a modified version of Gradle that is incompatible or incomplete when compared to the official version (available from SDKMAN! or below).
Installing manually
Step 1. Download the latest Gradle distribution
The distribution ZIP file comes in two flavors:
Complete (all) with docs and sources
Need to work with an older version? See the releases page.
Step 2. Unpack the distribution
Linux & MacOS users
Unzip the distribution zip file in the directory of your choosing, e.g.:
Microsoft Windows users
Create a new directory C:\Gradle with File Explorer.
Open a second File Explorer window and go to the directory where the Gradle distribution was downloaded. Double-click the ZIP archive to expose the content. Drag the content folder gradle-7.3.1 to your newly created C:\Gradle folder.
Alternatively, you can unpack the Gradle distribution ZIP into C:\Gradle using an archiver tool of your choice.
Step 3. Configure your system environment
To run Gradle, the path to the unpacked files from the Gradle website need to be on your terminal’s path. The steps to do this are different for each operating system.
Linux & MacOS users
Configure your PATH environment variable to include the bin directory of the unzipped distribution, e.g.:
Alternatively, you could also add the environment variable GRADLE_HOME and point this to the unzipped distribution. Instead of adding a specific version of Gradle to your PATH , you can add $GRADLE_HOME/bin to your PATH . When upgrading to a different version of Gradle, just change the GRADLE_HOME environment variable.
Microsoft Windows users
In File Explorer right-click on the This PC (or Computer ) icon, then click Properties → Advanced System Settings → Environmental Variables .
Under System Variables select Path , then click Edit . Add an entry for C:\Gradle\gradle-7.3.1\bin . Click OK to save.
Alternatively, you could also add the environment variable GRADLE_HOME and point this to the unzipped distribution. Instead of adding a specific version of Gradle to your Path , you can add %GRADLE_HOME%/bin to your Path . When upgrading to a different version of Gradle, just change the GRADLE_HOME environment variable.
Verifying installation
Open a console (or a Windows command prompt) and run gradle -v to run gradle and display the version, e.g.:
You can verify the integrity of the Gradle distribution by downloading the SHA-256 file (available from the releases page) and following these verification instructions.
Next steps
Now that you have Gradle installed, use these resources for getting started:
Create your first Gradle project by following one of our step-by-step samples.
Sign up for a live introductory Gradle training with a core engineer.
Learn how to achieve common tasks through the command-line interface.
Configure Gradle execution, such as use of an HTTP proxy for downloading dependencies.
Subscribe to the Gradle Newsletter for monthly release and community updates.
Источник
The Gradle Wrapper
The recommended way to execute any Gradle build is with the help of the Gradle Wrapper (in short just “Wrapper”). The Wrapper is a script that invokes a declared version of Gradle, downloading it beforehand if necessary. As a result, developers can get up and running with a Gradle project quickly without having to follow manual installation processes saving your company time and money.
In a nutshell you gain the following benefits:
Standardizes a project on a given Gradle version, leading to more reliable and robust builds.
Provisioning a new Gradle version to different users and execution environment (e.g. IDEs or Continuous Integration servers) is as simple as changing the Wrapper definition.
So how does it work? For a user there are typically three different workflows:
You set up a new Gradle project and want to add the Wrapper to it.
You want to run a project with the Wrapper that already provides it.
You want to upgrade the Wrapper to a new version of Gradle.
The following sections explain each of these use cases in more detail.
Adding the Gradle Wrapper
Generating the Wrapper files requires an installed version of the Gradle runtime on your machine as described in Installation. Thankfully, generating the initial Wrapper files is a one-time process.
Every vanilla Gradle build comes with a built-in task called wrapper . You’ll be able to find the task listed under the group «Build Setup tasks» when listing the tasks. Executing the wrapper task generates the necessary Wrapper files in the project directory.
To make the Wrapper files available to other developers and execution environments you’ll need to check them into version control. All Wrapper files including the JAR file are very small in size. Adding the JAR file to version control is expected. Some organizations do not allow projects to submit binary files to version control. At the moment there are no alternative options to the approach.
The generated Wrapper properties file, gradle/wrapper/gradle-wrapper.properties , stores the information about the Gradle distribution.
The server hosting the Gradle distribution.
The type of Gradle distribution. By default that’s the -bin distribution containing only the runtime but no sample code and documentation.
The Gradle version used for executing the build. By default the wrapper task picks the exact same Gradle version that was used to generate the Wrapper files.
All of those aspects are configurable at the time of generating the Wrapper files with the help of the following command line options.
The Gradle version used for downloading and executing the Wrapper.
The Gradle distribution type used for the Wrapper. Available options are bin and all . The default value is bin .
The full URL pointing to Gradle distribution ZIP file. Using this option makes —gradle-version and —distribution-type obsolete as the URL already contains this information. This option is extremely valuable if you want to host the Gradle distribution inside your company’s network.
Let’s assume the following use case to illustrate the use of the command line options. You would like to generate the Wrapper with version 7.3.1 and use the -all distribution to enable your IDE to enable code-completion and being able to navigate to the Gradle source code. Those requirements are captured by the following command line execution:
As a result you can find the desired information in the Wrapper properties file.
Let’s have a look at the following project layout to illustrate the expected Wrapper files:
A Gradle project typically provides a settings.gradle(.kts) file and one build.gradle(.kts) file for each subproject. The Wrapper files live alongside in the gradle directory and the root directory of the project. The following list explains their purpose.
The Wrapper JAR file containing code for downloading the Gradle distribution.
A properties file responsible for configuring the Wrapper runtime behavior e.g. the Gradle version compatible with this version. Note that more generic settings, like configuring the Wrapper to use a proxy, need to go into a different file.
A shell script and a Windows batch script for executing the build with the Wrapper.
You can go ahead and execute the build with the Wrapper without having to install the Gradle runtime. If the project you are working on does not contain those Wrapper files then you’ll need to generate them.
Using the Gradle Wrapper
It is recommended to always execute a build with the Wrapper to ensure a reliable, controlled and standardized execution of the build. Using the Wrapper looks almost exactly like running the build with a Gradle installation. Depending on the operating system you either run gradlew or gradlew.bat instead of the gradle command. The following console output demonstrate the use of the Wrapper on a Windows machine for a Java-based project.
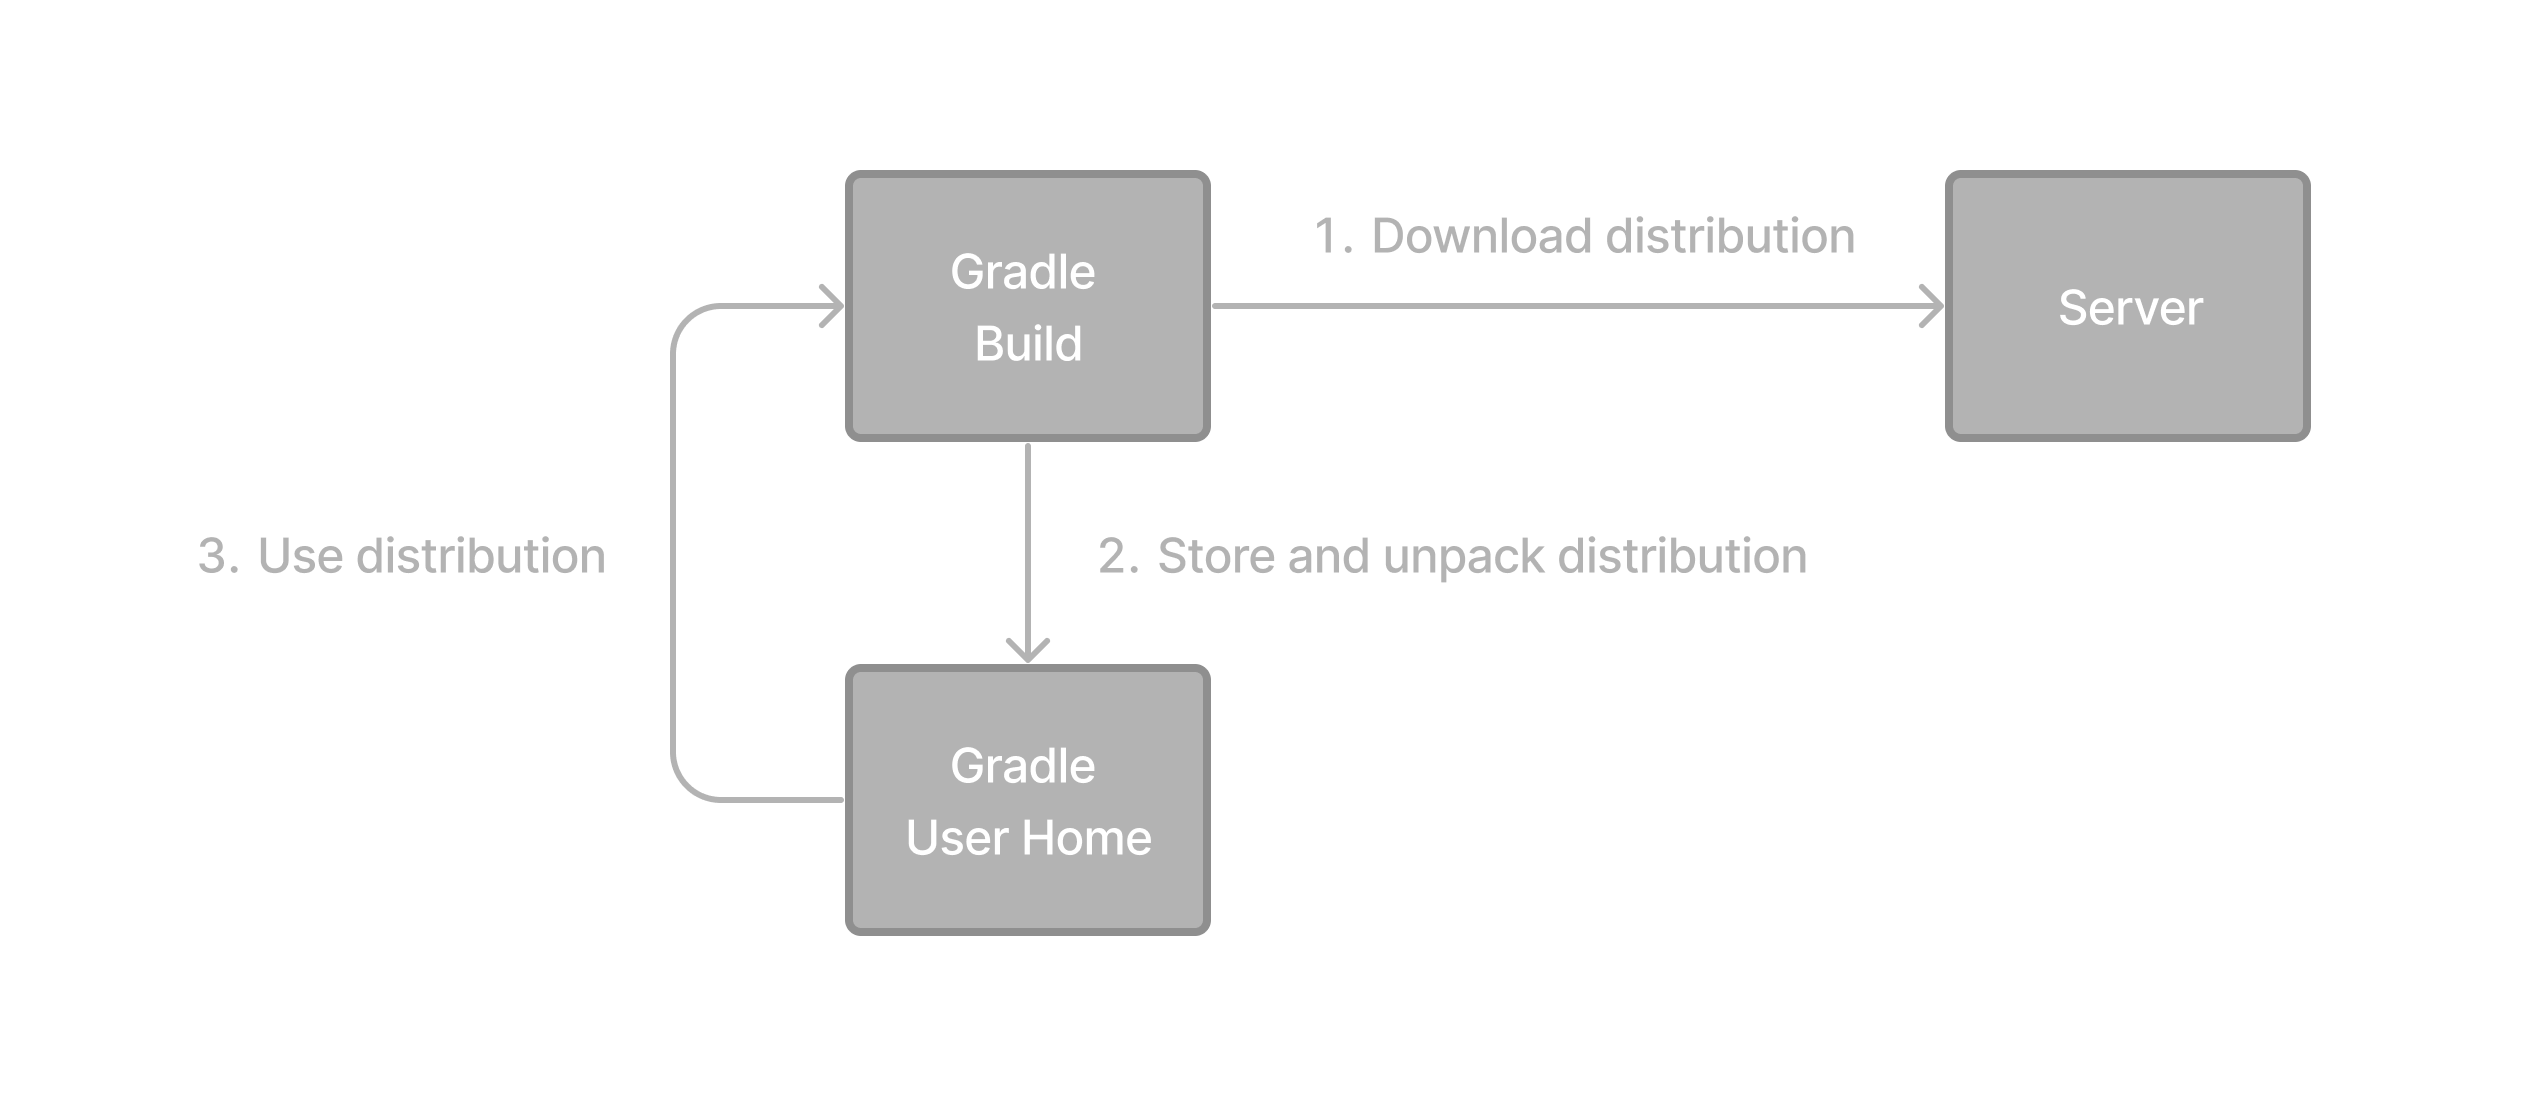
In case the Gradle distribution is not available on the machine, the Wrapper will download it and store in the local file system. Any subsequent build invocation is going to reuse the existing local distribution as long as the distribution URL in the Gradle properties doesn’t change.
The Wrapper shell script and batch file reside in the root directory of a single or multi-project Gradle build. You will need to reference the correct path to those files in case you want to execute the build from a subproject directory e.g. ../../gradlew tasks .
Upgrading the Gradle Wrapper
Projects will typically want to keep up with the times and upgrade their Gradle version to benefit from new features and improvements. One way to upgrade the Gradle version is manually change the distributionUrl property in the Wrapper’s gradle-wrapper.properties file. The better and recommended option is to run the wrapper task and provide the target Gradle version as described in Adding the Gradle Wrapper. Using the wrapper task ensures that any optimizations made to the Wrapper shell script or batch file with that specific Gradle version are applied to the project. As usual, you should commit the changes to the Wrapper files to version control.
Note that running the wrapper task once will update gradle-wrapper.properties only, but leave the wrapper itself in gradle-wrapper.jar untouched. This is usually fine as new versions of Gradle can be run even with ancient wrapper files. If you nevertheless want all the wrapper files to be completely up-to-date, you’ll need to run the wrapper task a second time.
Use the Gradle wrapper task to generate the wrapper, specifying a version. The default is the current version. Once you have upgraded the wrapper, you can check that it’s the version you expect by executing ./gradlew —version .
Customizing the Gradle Wrapper
Most users of Gradle are happy with the default runtime behavior of the Wrapper. However, organizational policies, security constraints or personal preferences might require you to dive deeper into customizing the Wrapper. Thankfully, the built-in wrapper task exposes numerous options to bend the runtime behavior to your needs. Most configuration options are exposed by the underlying task type Wrapper.
Let’s assume you grew tired of defining the -all distribution type on the command line every time you upgrade the Wrapper. You can save yourself some keyboard strokes by re-configuring the wrapper task.
With the configuration in place running ./gradlew wrapper —gradle-version 7.3.1 is enough to produce a distributionUrl value in the Wrapper properties file that will request the -all distribution.
Check out the API documentation for more detail descriptions of the available configuration options. You can also find various samples for configuring the Wrapper in the Gradle distribution.
Authenticated Gradle distribution download
The Gradle Wrapper can download Gradle distributions from servers using HTTP Basic Authentication. This enables you to host the Gradle distribution on a private protected server. You can specify a username and password in two different ways depending on your use case: as system properties or directly embedded in the distributionUrl . Credentials in system properties take precedence over the ones embedded in distributionUrl .
HTTP Basic Authentication should only be used with HTTPS URLs and not plain HTTP ones. With Basic Authentication, the user credentials are sent in clear text.
Using system properties can be done in the .gradle/gradle.properties file in the user’s home directory, or by other means, see Gradle Configuration Properties.
Embedding credentials in the distributionUrl in the gradle/wrapper/gradle-wrapper.properties file also works. Please note that this file is to be committed into your source control system. Shared credentials embedded in distributionUrl should only be used in a controlled environment.
This can be used in conjunction with a proxy, authenticated or not. See Accessing the web via a proxy for more information on how to configure the Wrapper to use a proxy.
Verification of downloaded Gradle distributions
The Gradle Wrapper allows for verification of the downloaded Gradle distribution via SHA-256 hash sum comparison. This increases security against targeted attacks by preventing a man-in-the-middle attacker from tampering with the downloaded Gradle distribution.
To enable this feature, download the .sha256 file associated with the Gradle distribution you want to verify.
Downloading the SHA-256 file
You can download the .sha256 file from the stable releases or release candidate and nightly releases. The format of the file is a single line of text that is the SHA-256 hash of the corresponding zip file.
Configuring checksum verification
Add the downloaded hash sum to gradle-wrapper.properties using the distributionSha256Sum property or use —gradle-distribution-sha256-sum on the command-line.
Gradle will report a build failure in case the configured checksum does not match the checksum found on the server for hosting the distribution. Checksum Verification is only performed if the configured Wrapper distribution hasn’t been downloaded yet.
Verifying the integrity of the Gradle Wrapper JAR
The Wrapper JAR is a binary file that will be executed on the computers of developers and build servers. As with all such files, you should be sure that it’s trustworthy before executing it. Since the Wrapper JAR is usually checked into a project’s version control system, there is the potential for a malicious actor to replace the original JAR with a modified one by submitting a pull request that seemingly only upgrades the Gradle version.
To verify the integrity of the Wrapper JAR, Gradle has created a GitHub Action that automatically checks Wrapper JARs in pull requests against a list of known good checksums. Gradle also publishes the checksums of all releases (except for version 3.3 to 4.0.2, which did not generate reproducible JARs), so you can manually verify the integrity of the Wrapper JAR.
Automatically verifying the Gradle Wrapper JAR on GitHub
The GitHub Action is released separately from Gradle, so please check its documentation for how to apply it to your project.
Manually verifying the Gradle Wrapper JAR
You can manually verify the checksum of the Wrapper JAR to ensure that it has not been tampered with by running the following commands on one of the major operating systems:
Источник


