- Android на iPhone — технические подробности проекта
- Как запустить Android на iPhone? Смотри на видео
- How to Install Android on an iPhone in Six Easy Steps
- What You’ll Need:
- Step One: Jailbreak Your iPhone
- Step Two: Install Bootlace in Cydia
- Step Three: Run Bootlace and Patch the Kernel
- Step Four: Install OpeniBoot
- Step Five: Install iDroid
- Step Six: Reboot and Play Around with Android
- How Does It Work?
- How to Install Android on Your iPhone
- Still a Work in Progress
- Required Reading
- What You Need
- Android on iPhone, Step-by-Step
- Android on iPhone, Continued
Android на iPhone — технические подробности проекта
Основные этапы реализации just-for-fun проекта известного разработчика

Разработчик Ник Ли стал известным благодаря своим проектам по запуску различных операционных систем на гаджетах Apple, включая Windows 95 на Apple Watch. Сейчас он решил попробовать запустить Android на iPhone. В новом проекте автор решил использовать Android Open Source Project (AOSP). Это проект Android с открытым исходным кодом. Разработан он был специалистами, которые считали необходимым создать платформу с открытым кодом для упрощения создания приложений для мобильных устройств. Работать open-source Android может на большинстве известных устройств, включая смартфоны и Android-совместимые одноплатные ПК.
Для своих нужд Ли создал кастомную версию Android Marshmallow, которая без всяких проблем «завелась» на LG Nexus 5 (прототип проекта «Android на iPhone» работал именно с этим смартфоном). В дистрибутив были включены следующие компоненты:
- libimobiledevice: программный пакет для нативной связи с iOS-устройствами;
- usbmuxd: клон одноименного демона ПО Apple. Этот компонент позволил использовать USB дата-кабель для скоростного обмена данными с iPhone;
- screenstreamer: демон, написанный Ли, для связи с сервисом usbmuxd и передачей «картинки» на дисплей iPhone. После того, как все было проверено, Ли запустил систему в первый раз, причем успешно.
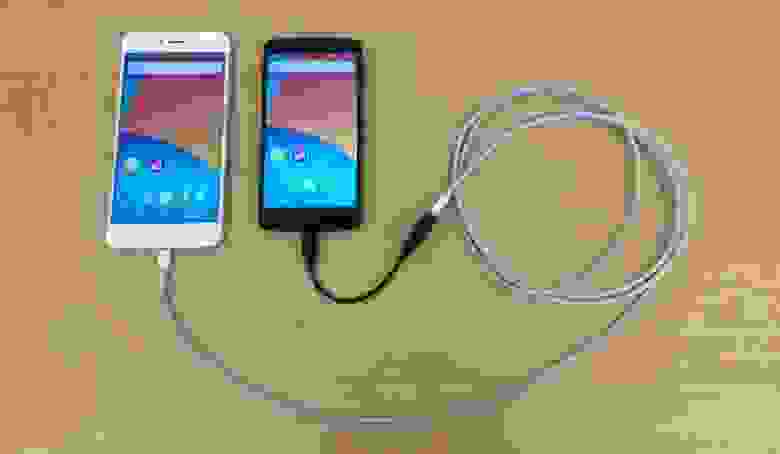
Конечно, два телефона рядом это хорошо, но автор проекта решил сделать систему более компактной. А в этом случае второй телефон в качестве Android-донора уже не подходит, нужно что-то другое. Что? Одноплатный Android-совместимый компьютер (некоторые из них показаны в этой подборке, — прим. ред.).
Такой компьютер должен был соответствовать ряду критериев:
- Производительность: устройство должно уметь захватывать, сжимать и передавать изображение на дисплее в режиме реального времени с высоким fps;
- Совместимость: устройство должно работать с последней версией Android (6.0.1 Marshmallow на момент реализации проекта);
- Размер: плата должна быть небольшой и тонкой, равной по размеру кредитной карте;
- Связь: устройство должно иметь модули Wi-Fi и Bluetooth. Также должен быть порт USB 2.0 для передачи данных на iPhone.
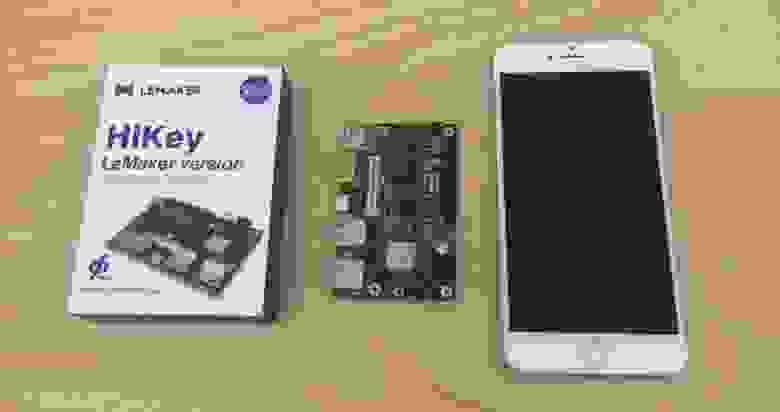
Кастомная версия Android, доработанная Ли, была успешно запущена на одноплатном ПК Lemaker HiKey с 8-ядерным 64-х битным процессором ARM Cortex-A53. HiKey и был выбран для проекта.
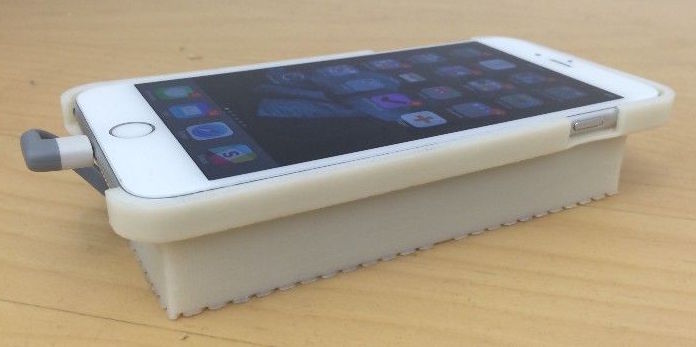
В распечатанном на 3D-принтере чехле для iPhone разместился этот компьютер, аккумулятор на 650 мАч и встроенной защитой, повышающий преобразователь и резистор. Последний понадобился для того, чтобы не давать iPhone потреблять слишком большой ток, что блокировало обмен данными между HiKey и телефоном.

После добавления резистора все заработало. Компоненты были размещены в распечатанном на 3D-принтере чехле.

Результат получился довольно габаритным — iPhone с чехлом стали похожи на сотовые телефоны, бывшие в ходу лет 15 назад.


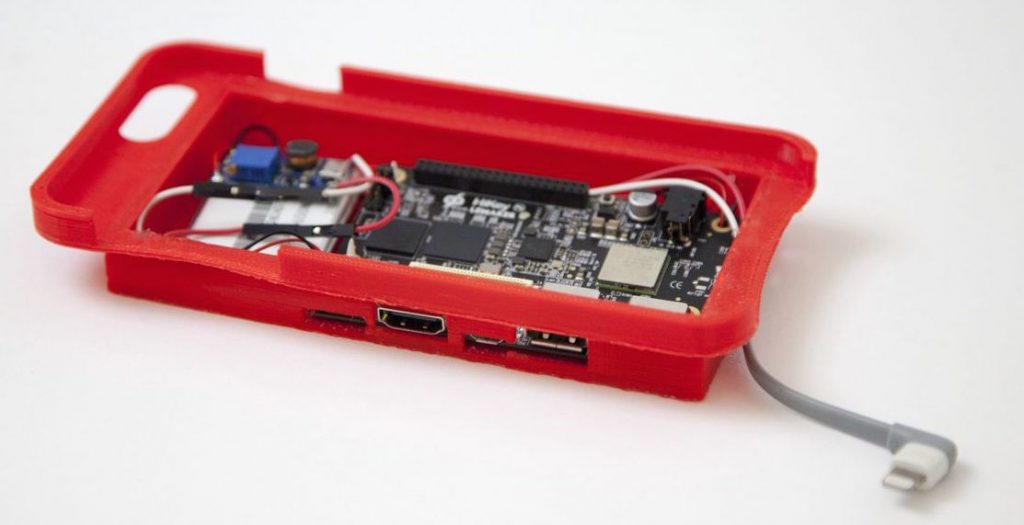
После доработки чехла и рабочей схемы для запуска Android на iPhone габариты системы значительно уменьшились. Ли добавил и новые элементы — порты HDMI и USB, которые были выведены на левую сторону отпечатанного на 3D принтере нового чехла. Поместился здесь и и слот для карт памяти типа SD. Перед тем, как надеть чехол на iPhone, автор проекта защитил электронные компоненты чехла тонким пластиковым листом.

После того, как плата с Android была подключена к iPhone, на дисплее смартфона появился стандартный интерфейс ОС от Google. Для запуска Android использовалось кастомное приложение, разработанное студией Tendigi. Именно оно обеспечило взаимодействия смартфона с одноплатным компьютером, заключенным в чехол.
Процесс разработки всей системы, по словам Ли, занял много дней. Практической пользы здесь немного, работа велась ради собственного удовольствия умельца. Тем не менее, теперь автор проекта может всем говорить, что смог запустить Android на iPhone — а это многого стоит.
Источник
Как запустить Android на iPhone? Смотри на видео
Когда на Android запускают Windows я еще могу пережить, но зачем, зачем мучать iPhone и пользоваться на нем мобильной системой Google? Наверное, просто так, доказать остальным, что было бы желание, ничего невозможного не существует.
Команда Tendigi, которая уже запустила Windows на Apple Watch, показала свое новое достижение. Для воплощения проекта потребовался 3D-принтер, на котором распечатали специальный аксессуар для iPhone, напоминающий коробку.
За основу взяли Android AOSP, а в коробку положили материнскую плату, батарейку и несколько других железяк, необходимых для запуска системы. Потом добавили щепотку волшебства и вуаля, на iPhone заработал Android. И как все это работает? В коробочке работает собранный вручную мини-компьютер, который стримит на iPhone Android.
Впоследствии конструкцию доработали и громоздкая коробка приняла форму большого чехла для iPhone. Как видно, тут еще и набор из портов присутствует, получается практически полноценный комп, только на Android.
В чем смысл и практическая польза такого изобретения? Ведь просто так поставить Android на iOS не получится, да и кому это надо. Не проще ли купить клон iPhone от китайцев и не мучаться? Но как же наука и прогресс. По мне так изобретение любопытное, в текущем состоянии бесполезное для пользователя, но вдруг придумают для него практическое применение.
Источник
How to Install Android on an iPhone in Six Easy Steps
If you’ve got an iPhone, are a little bored with iOS, and you’re interested in moonlighting with Google’s Android operating system, you can dual boot Android and iOS side-by-side on your iPhone in a few relatively simple steps.
What You’ll Need:
All you’ll need to get started is an iOS device; Right now, the iPhone 3G has the best support, and that’s what we’re using in this guide.
Step One: Jailbreak Your iPhone
Learn everything forever
Improve yourself in the new year (and new years to come) with this unbelievable deal on a lifetime pass to classes. Includes everything from blockchain to Rosetta Stone.
You’ve got a number of jailbreaking options, including PwnageTool, Redsn0w, and Blackra1n. Pick one that works on your platform, download it, and walk through the jailbreak process. (I’m not going to detail the jailbreak here since the latest jailbreaking methods often change a little, but at this point, jailbreaking an iPhone is a relatively simple process.)
Step Two: Install Bootlace in Cydia
In order to do this, you’ll need to launch Cydia from the homescreen, tap on the Manage button, select Sources, then tap Edit, then Add. The repository you’ll need to add is repo.neonkoala.co.uk. Tap Add Source, let Cydia work its magic, and then tap on your newly added repository and install Bootlace.
Step Three: Run Bootlace and Patch the Kernel
Leave Cydia, and launch Bootlace. If Bootlace isn’t on your homescreen after you leave Cydia, restart your iPhone and it should be there. Then just launch Bootlace, and let it download and patch the kernel. When it’s done, tap on Reboot and wait for your phone to reboot.
Step Four: Install OpeniBoot
Now launch Bootlace again, tap the OpeniBoot button, and tap Install, then Continue. OpeniBoot will download and install.
Step Five: Install iDroid
Once OpeniBoot is installed, tap the iDroid button, tap Install, OK, and then wait. iDroid—which is essentially the Android OS customized for your iPhone—will download and install. This will take a while, so be patient, and if your battery is low, you may want to plug in your phone before you start.
Step Six: Reboot and Play Around with Android
Now you’ve installed Android on your iPhone. Time to play around with it. Just tap on the QuickBoot button from inside Bootlace, tap the Android icon (the one of the little Android proudly holding an Apple), and confirm that you want to reboot into Android.
How Does It Work?
The first thing worth mentioning is that Android on iPhone isn’t close to ready to use as your full-time mobile operating system. That doesn’t mean it never will be, but at the moment, this is more something you’d want to do to fulfill your curiosity, wear as a geek badge, or just have a little fun and (maybe) support a really great project.
You can see how far they’ve come along with each phone on the iDroid status wiki . As I mentioned above, the iPhone 3G is the best supported iOS device (and currently only it and the 2G work with the method above, I believe). The biggest issue right now with the 3G is power management (PMU on the wiki), which isn’t fully functional. Most importantly, suspend isn’t yet working, so your battery won’t likely last long. It’s still come a long way from where it’s been in the past, though, and having followed this project excitedly for a while, the progress they’ve made in recent weeks has been really impressive.
Regarding a few nuts and bolts: Your iPhone’s lock button acts as the Android back button; the iPhone home button acts as the Android menu button; the iPhone’s volume down button acts as the Android home button; and the iPhone’s volume up button acts as. I’m not really sure what. To lock the screen, press the iPhone’s home and lock buttons at the same time. To power off, hold the lock and home buttons for a couple of seconds until the Power Off prompt appears. You can see a few other operating quirks by watching the video above.
As you can see in the video, performance isn’t perfect (it’s occasionally a little laggy), but again, with time, that could change significantly. Either way, the iDroid project—along with OpeniBoot and Bootlace—is something I remain extremely excited about. As a long-time iPhone user and recent Android switcher, the main thing that sets the two apart for me is the iPhone hardware, which always feels head and shoulders above whatever Android device I put my hands on. I know a lot of people (including myself) who’d kill to dual boot an iPhone 4 with iOS and Android. (In fact, if you really want to help out, you can donate to the iDroid Project by clicking the Donate button on the top right of the iDroid Project’s main page and maybe speed things along.)
If you’ve been playing around with Android on your iPhone, let’s hear about it in the comments.
Adam Pash is the editor-in-chief of Lifehacker and can’t resist a good hardware hack. You can follow his stuff every day at Lifehacker or follow @adampash on Twitter or become a fan on Facebook.
Источник
How to Install Android on Your iPhone
(Editor’s note: David Wang is an accomplished iPhone hacker and member of the iPhone Dev Team. Tinker with your gadgets at your own peril–we’re not responsible for what happens if you brick your iPhone, however unlikely that may be.)
Maybe you want to liberate your iPhone from Apple’s clutches. Maybe you just want to tinker with something new. Either way, you’ve seen Android running on the iPhone, and you want to try it for yourself.
Still a Work in Progress
 Graphic: Eliza Wee Although this port does everything that you expect your smartphone to be able to do, it isn’t usable for day-to-day activities just yet–I haven’t implemented any power-management functions, so a fully charged iPhone running Android will last only an hour or so.
A few bugs and performance issues remain, too, so while the phone will be usable, it won’t be fast. If you do something unexpected (such as forcing the iPhone off), there is a small chance that you may end up restoring your device. However, it is impossible for any bugs to brick or disable your iPhone permanently.
Finally, media syncing is not working, so loading your media onto your phone is kind of a pain. I’m working as hard as I can, though, and I expect to fix these issues soon.
Required Reading
Start by brushing up on the fundamentals of iPhone maintenance: how to get your iPhone into Recovery Mode, how to put it into DFU Mode, and how to perform a firmware restore from those modes.
The iPhone is a well-engineered device, and it is virtually impossible to brick if you know these techniques. If all else fails, remember that you can always restore using DFU Mode.
You’ll also need to be reasonably comfortable working in a command-line interface, and unless you’re confident in trying to compile your own binaries, you’ll need a PC running Linux (or a Linux virtual machine).
What You Need
1. A first-generation iPhone or an iPhone 3G with firmware versions between 2.0 and 3.1.2, jailbroken with Redsn0w, Blacksn0w, or PwnageTool. If you already updated your handset to 3.1.3 or to a 4.0 beta, you must use PwnageTool to create a jailbroken 3.1.2 .ipsw file to restore down to.
 Note that I am explicitly excluding the iPhone 3GS, all iPod Touch models, and the iPad. This hack will not work with those devices (yet). I am also explicitly excluding iPhone OS 3.1.3 and all of the 4.0 betas. It will not work with the Spirit jailbreak, either.
If you haven’t yet jailbroken your iPhone, don’t worry–it’s a simple process that consists mainly of pressing buttons on the device when prompted and clicking the next button in a wizard. I humbly recommend Redsn0w, since I wrote much of the code for that program.
2. A 32-bit Linux system or virtual machine (I recommend Ubuntu). See “How to Easily Install Ubuntu Linux on Any PC” for instructions if you don’t already have Ubuntu.
Although much of the process can be conducted on any machine, one of the tools involved (called ‘oibc’) has not yet been ported to Windows. In addition, the binaries I provide are compiled on a 32-bit Ubuntu machine.
All of the utilities compile for Linux and Mac, however, so if you’re feeling adventurous, compile the sources at github.com/planetbeing/iphonelinux and github.com/planetbeing/xpwn instead of using the binaries.
3. The prebuilt images and binaries; the exact files you use depend on whether you have a first-generation iPhone or an iPhone 3G.
4. The iPhone OS 3.1.2 .ipsw file for your device, namely either iPhone1,1_3.1.2_7D11_Restore.ipsw or iPhone1,2_3.1.2_7D11_Restore.ipsw. Chances are, you already have this file somewhere on your computer, but if you need it, you can download it.
5. The firmware for the Marvell WLAN chip inside the iPhone. Go to the URL, and on the right side of the page you should see a drop-down menu labeled ‘Choose your platform’. Select Linux 2.6 – Fedora from the drop-down menu and click the Search button underneath. Download the file labeled SD-8686-LINUX26-SYSKT-9.70.3.p24-26409.P45-GPL. You’ll get a file called SD-8686-LINUX26-SYSKT-9.70.3.p24-26409.P45-GPL.zip.
Android on iPhone, Step-by-Step
The first steps collect the multitouch and WLAN firmware for the iPhone. We cannot legally redistribute these binary blobs, so it is necessary for you to extract them from the .ipsw file and Marvell’s Website.
1. On the Linux machine, create a folder named firmware in your home directory.
2. Extract SD-8686-FEDORA26FC6-SYSKT-GPL-9.70.3.p24-26409.P45.tar from SD-8686-LINUX26-SYSKT-9.70.3.p24-26409.P45-GPL.zip to a temporary folder.
3. Extract FwImage/helper_sd.bin and FwImage/sd8686.bin from SD-8686-FEDORA26FC6-SYSKT-GPL-9.70.3.p24-26409.P45.tar and put them inside your ‘firmware’ folder.
4. Rename helper_sd.bin to sd8686_helper.bin.
You have your WLAN firmware at this point. Now for the multitouch firmware.
5. On the Linux machine, create a folder named idroid in your home directory and extract utils/dripwn from the prebuilt tarball (.tar archive) you downloaded into it.
6. Copy or move the 3.1.2 .ipsw file you obtained from Apple’s Website into the same ‘idroid’ folder as dripwn.
7. Start a command-line shell (Terminal under Ubuntu) and navigate to the ‘idroid’ folder you created. You can type cd
/idroid to do this.
8. Go to this page if you have an iPhone 3G or this page if you have an older iPhone. Copy the VFDecrypt key.
9. In the shell you started earlier, if you have a first-generation iPhone, type the following:
./dripwn iPhone1,1_3.1.2_7D11_Restore.ipsw [the VFDecrypt key you copied]
If you have a iPhone 3G, type the following:
./dripwn iPhone1,2_3.1.2_7D11_Restore.ipsw [the VFDecrypt key you copied]
 10. After a while, the command will finish and you will have zephyr_main.bin, zephyr_aspeed.bin, and zephyr2.bin in your ‘idroid’ folder. Move these files into the ‘firmware’ folder.
You now have all the files needed for Android, and you can begin installing it.
11. If you haven’t already, install the OpenSSH tool on your iPhone via Cydia.
 12. If you just installed OpenSSH, connect to your iPhone via SSH, log in as root with the password alpine, and type passwd root to change the password for root. Then, enter passwd mobile to change the password for the mobile user.
Don’t skip this step. All of the iPhone worms out there affect you only if you haven’t changed the SSH password from the default.
13. Extract prebuilt/android.img.gz, prebuilt/cache.img, prebuilt/ramdisk.img, prebuilt/system.img, prebuilt/userdata.img, and zImage from the prebuilt tarball.
 14. Use the ‘scp’ command or an SFTP client to upload all of these files into the /private/var folder on the iPhone.
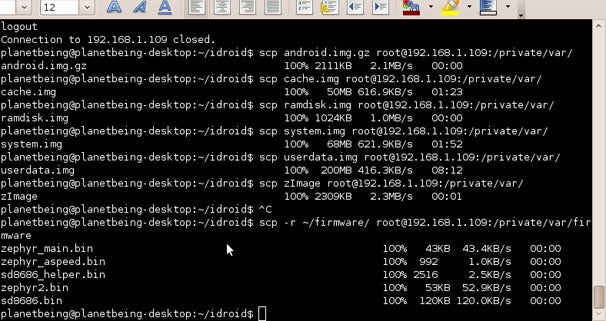
You can use these commands on Linux, if you wish to use scp instead of an SFTP graphical-interface client. Assuming you’re in the same folder as the files, enter:
scp android.img.gz root@[ip address of iPhone]:/private/var/ scp cache.img root@[ip address of iPhone]:/private/var/ scp ramdisk.img root@[ip address of iPhone]:/private/var/ scp system.img root@[ip address of iPhone]:/private/var/ scp userdata.img root@[ip address of iPhone]:/private/var/ scp zImage root@[ip address of iPhone]:/private/var/
15. Using the SFTP client or scp, create a folder called firmware in the /private/var folder on the iPhone; afterward, upload all the files from the ‘firmware’ folder you created earlier to it.
If the ‘firmware’ folder you created earlier is inside your home directory, you can use the following command:
/firmware/ root@[ip address of iPhone]:/private/var/firmware
Android on iPhone, Continued
16. Reboot your iPhone. As a safety precaution, check to make sure that the files are still present after the reboot and that they all have the right sizes. An incorrect file size is one that does not exactly match the source file size (for example, system.img is not 71327744 bytes, android.img.gz is not 2161556 bytes, or zImage is not 2364280 bytes on the 3G or not 2356044 bytes on the older iPhone).
Many people have trouble with this process because not all of the files reached their iPhone in one piece.
17. Extract utils/oibc, utils/loadibec, and prebuilt/openiboot.img3 from the prebuilt tarball into your ‘idroid’ folder.
18. Shut down the iPhone and place it into Recovery Mode: With the iPhone powered off and plugged into the computer via USB, push Hold and Home simultaneously, and then let go of Hold after the backlight turns on. Continue holding Home until the ‘Connect to iTunes’ image appears on the screen.
19. Run the following commands in Terminal (you’ll need to install libusb-0.1-4 with Synaptics or ‘apt-get’ if you haven’t already):
sudo ./loadibec openiboot.img3
If all goes well, the ‘openiboot’ boot menu should now appear!

20. Use either the volume-control buttons or the Hold button to select the second menu option, Console. Tap the Home button to launch it.
A text-mode console should start running on your screen, ending with a ‘Welcome to openiboot’ message.
21. Type sudo ./oibc in Terminal.
The same messages that appeared on the iPhone screen should now appear in Terminal. You should next make a backup of the NOR (the device on which the iPhone’s bootloader is stored) in case something goes wrong, so you don’t brick your iPhone.
22. Type nor_read 0x09000000 0x0 1048576 in Terminal/oibc. This will read the entire NOR into main memory.
23. Type
norbackup.bin@0x09000000:1048576 in Terminal/oibc. A file will appear in the ‘idroid’ folder called norbackup.bin. Keep this somewhere safe.
The command uploads the NOR to the computer. After you make this backup, you are now free to modify the NOR. The next step installs OpeniBoot onto the NOR, supplanting the existing Apple iBoot bootloader.
24. Type install in Terminal/oibc.
This process may take a few minutes. Wait until the installation-complete message appears.
25. Type reboot in Terminal/oibc and then exit out of it by pressing Ctrl-C.
The OpeniBoot menu should now come up whenever you boot your iPhone. Note that you can uninstall OpeniBoot from oibc with the ‘uninstall’ command. Type help for a list of all OpeniBoot commands.
You can still get into the iPhone OS’s recovery mode by holding down Home on the iPhone OS option in the menu until the ‘Connect to iTunes’ image appears (instead of just tapping Home).
 You should be finished! Use the OpeniBoot menu to boot Android by selecting that OS from the menu whenever you wish. Unfortunately, no good method to shut down Android exists yet, so the only way to turn it off is to hold down the Hold and Home buttons until you’ve forced the phone off.
Check out iDroidWiki for more tutorials and tips on what you can do with your new Android iPhone.
David Wang is a hobbyist hacker better known as “planetbeing.” For the latest developments, visit his blog, Linux on the iPhone.
Источник


