Android internet from windows
Windows Subsystem for Android (WSA) — позволяет запускать Android-приложения внутри среды Windows 11
Требуется 8гб Оперативной памяти
Сообщение отредактировал Lux Darkus — 16.11.21, 15:15
резерв под бэкап
Сообщение отредактировал Kodekс — 22.10.21, 22:35

дальше пишем adb start-server .
далее нажимаем 1, потом 2.

дальше adb connect 127.0.0.1:58526(у меня так может отличатся порт)
посмотреть можно так.

дальше установка самих апк.
adb install и дальше путь до файла.

Сообщение отредактировал Strelloc — 23.10.21, 01:42
Кто хочет пощупать Windows Subsystem for Android
(ваш CPU должен поддерживать виртуализацию и желательно иметь 8+Гб RAM)
1 — Включаем в компонентах «Платформу виртуальной машины» (Hyper-V/WSL не нужны)
Это можно сделать и руками
На всякий случай включаем «режим разработчика» в Конфиденциальность и безопасность — для разработчиков.
2 — Устанавливаем Windows Subsystem for Android 1.8.32822.0 — скачать MEGA
от админа руками ввести в папке с распакованным файлом PowerShell
или скачать WSA-install.ps1 положить рядом с файлом установки и запустить через правую мыши — выполнить с помощью PowerShell)
старая весрия Windows Subsystem for Android 1.7.32815.0 — скачать MEGA
от админа руками ввести в папке с распакованным файлом PowerShell
или скачать WSA-install.ps1 положить рядом с файлом установки и запустить через правую мыши — выполнить с помощью PowerShell)
(в установленном приложении ставим галку на developer чтобы можно было подключиться через ADB)
3 — Работаем с APK
Рабочее приложение для установки APK и не только.
Есть как инсталляция в систему так и портативная полнофункциональная версия.
После установки полной версии или распаковки портативной ассоциируйте APK файлы с приложением (WSA-pacman.exe).
Приложение после запуска показывает запущен ли WSA и позволяет зайти в настройки Android и установленных приложений.
WSATools наконец то допилили до рабочего состояния. Установить из магазина Мега
(Средство автоматизированной установки APK в WSL на базе UWP)
Установка APK с командной строки — или с помощью готовых bat файлов
Для автоматизации действий с apk качаем архив MEGA
APK_install_WSA.bat — перетаскиваем на него файл APK для установки
Push_File_to_WSA.bat — перетаскиваем файл который хотите послать в WSL папку Downloads
WSA_settings.bat — открыть внутренние настройки WSL
Для работы bat файлов — WSL должен быть запущен и включен режим разработчика + в самом WSL единоразово нажать и открыть окно «Файлы» для загрузки виртуальной машины
Вручную работаем с командной строкой — открываем cmd и вписываем две команды:
Источник
Получаем интернет по USB с компьютера на Android
Тут есть два способа:
- Встроенный USB Tether (у аппаратов с Sence и может быть каких еще
- USB Tether реализуемый сторонним софтом.
В данной статье я буду рассматривать второй способ, так как он более универсален.
И так, нам нужна программа Wired Tether, скачать которую можно, нажав на QR код, или же считав его с телефона:  (268 КБ)
После нажатия на экран в программе Wired Tether, в Windows появляется новое сетевое соединение с коммуникатором, и полученными по DHCP настройками: 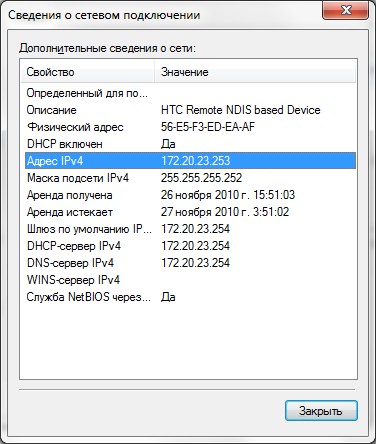
У меня к примеру, сеть коммуникатора — Android USB, а соединение с интернетом для общего доступа — Internet. В дальнейшем я буду использовать эти обозначения.
Отключаем соединение Internet, в свойствах подключения делаем его доступным для Android USB: 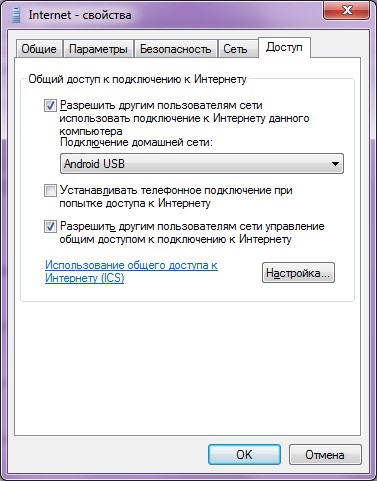
Идем в настройки Android USB и меняем его IP и маску на 172.20.23.253 / 255.255.255.252, а остальное делаем пустыми: 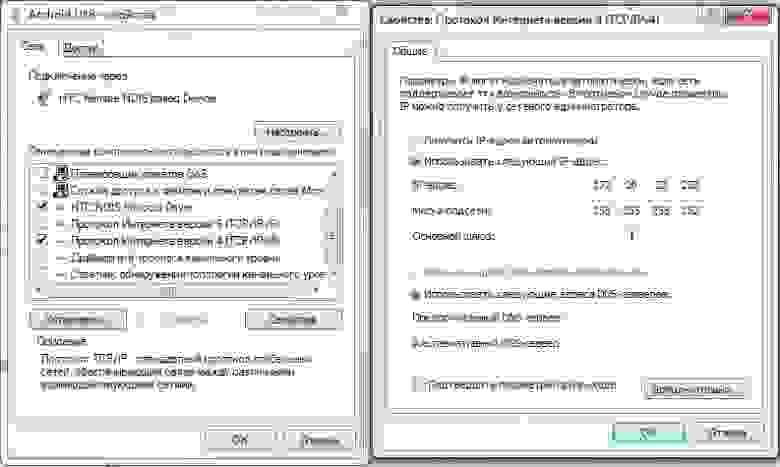
Цель ручного изменения IP адреса — это убрать шлюз по умолчанию.
Пробуем Ping коммуникатор (он под ip — 172.20.23.254)
C:\Users\MainNika>ping 172.20.23.254
Обмен пакетами с 172.20.23.254 по с 32 байтами данных:
Ответ от 172.20.23.254: число байт=32 время
Для удобства работы со скриптами, возьмем программу GScript Lite: (56.4 КБ)
Создаем в программе GScript Lite новый скрипт, с пишем туда:
ifconfig rmnet0 down
ifconfig usb0 up
route add default gw 172.20.23.253 dev usb0
setprop net.dns1 8.8.8.8
8.8.8.8 — это DNS сервер от google. Я люблю его использовать, поэтому использую его и тут. Использовать можно любой DNS сервер, который вы желаете.
Настройка закончена, можно тестировать:
- Подключаем USB
- Включаем программу Wired Tether, включаем соединение
- Включаем GScript Lite, выполняем созданный нами скрипт
- .
- PROFIT!
Ну и чтобы убедиться, зайдем на 2ip.ru:
Чтобы отключить, достаточно перезапустить мобильное подключение.
Все. Теперь можно вдоволь полазить в маркете, Скачать оттуда гору полезного и не только софта.
upd: Тем, кто не может совладать с настройкой роутинга на Windows, могу посоветовать WinRoute от Kerio. Через него тоже работает, и вся настройка его заключается в указании сети, подключенной к интернету. Скриншот
upd2: Переписал статью, стало универсально и без проблем. Спасибо «Corwin» за указание ошибки в скрипте, приводящей к «invalid argument»
Источник
Share Your Windows Internet With Your Android Phone VIA USB Cable
How To Share Your Windows Internet With Your Android Phone VIA USB Cable:- Wondering whether it’s possible to browse through the Internet without WiFi or Mobile data? Yes, it is possible. If your PC has an Internet connection, you can share it with your Android device just by using a USB port and USB cable. Sounds cool? Read on then, this post is for you.
STEP 1
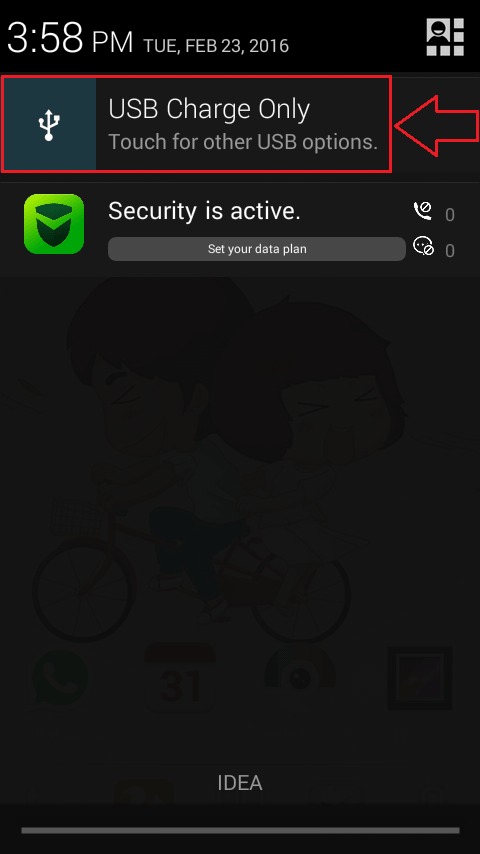
- First of all, connect your Android phone with your PC via the USB port. Your phone will be connected automatically in the USB Charge Only mode. Simply click on the notification as shown in the screenshot. This will open up other options for USB computer connection.
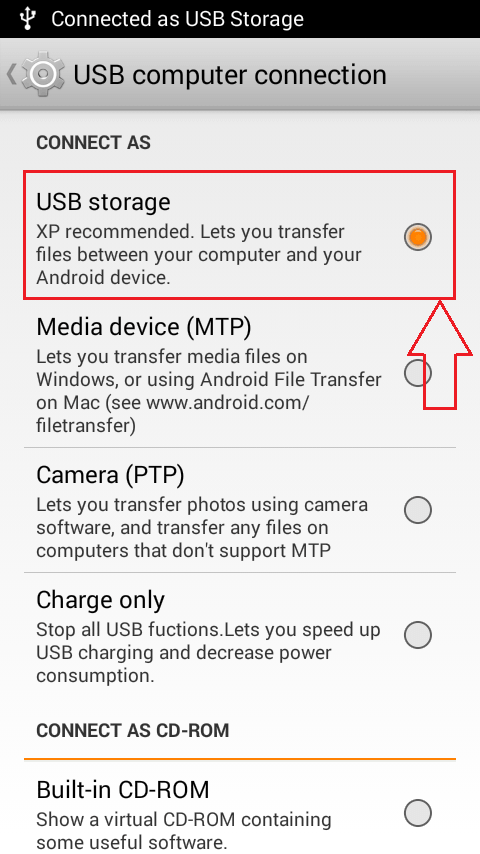
STEP 2
- Find the section named CONNECT AS under USB computer connection. Now check the radio button corresponding to USB storage option as shown in the screenshot.
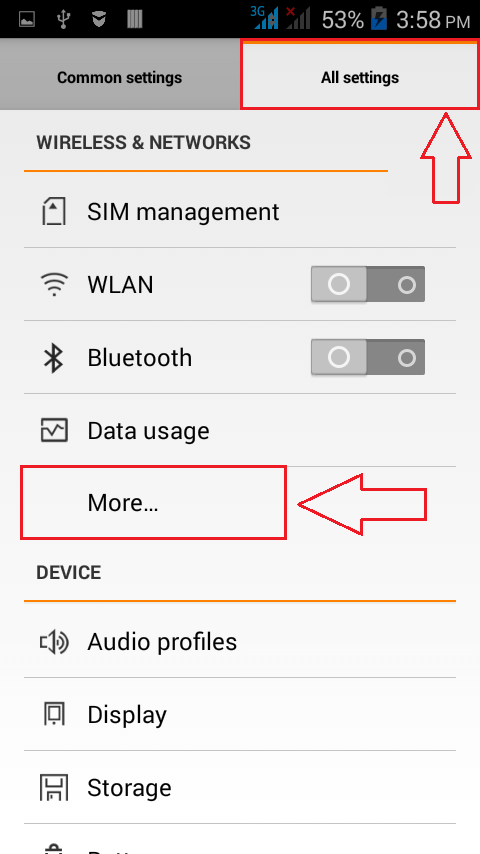
STEP 3
- Once you are done, launch the Settings screen in your Android phone. As next, click on the More option under the section WIRELESS & NETWORKS as shown.
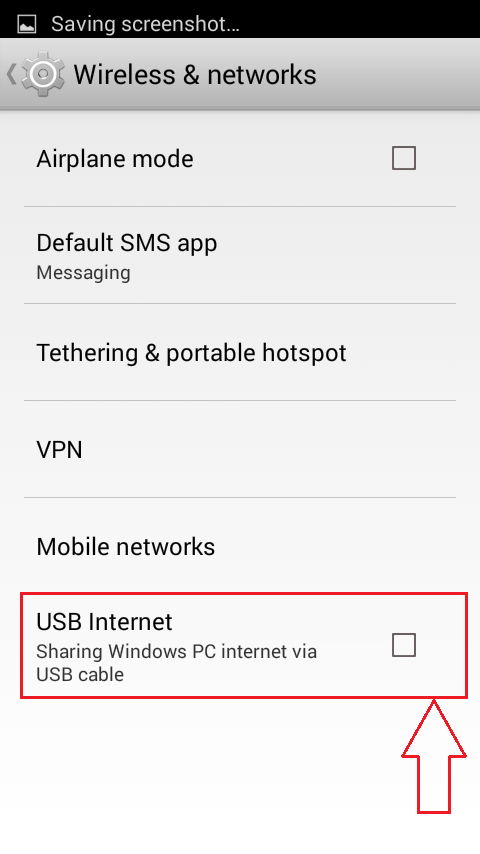
STEP 4
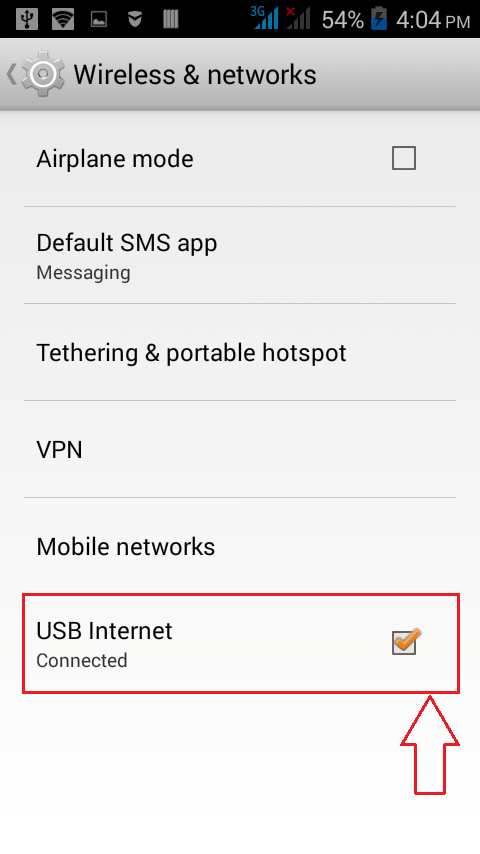
- Now find the option named USB Internet under the Wireless & networks section and click on it.
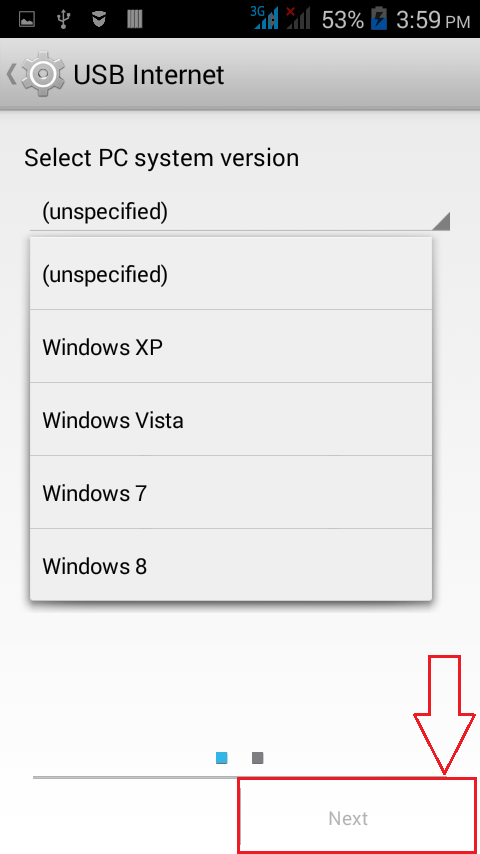
STEP 5
- Select your PC system version from the drop down menu. Once you are done, click on the Next button at the bottom of the screen.
STEP 6
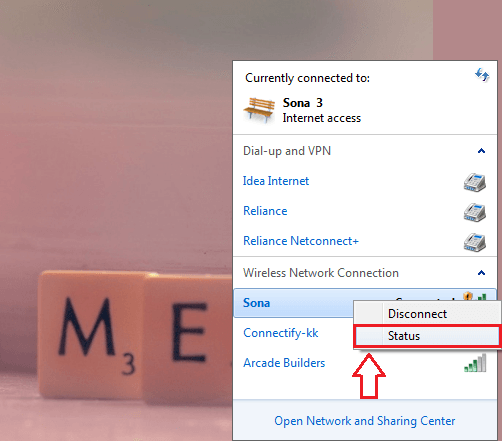
- Now you need to open up the Network center in your PC as shown in the screenshot. Locate and right click on the network that you want to share with your Android device via USB cable. From the options that gets expanded out, click on Status option or Properties option.
STEP 7
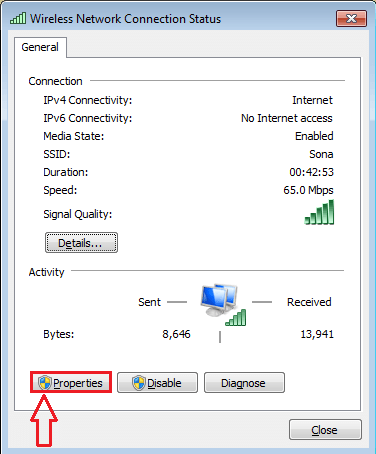
- A new window named Wireless Network Connection Status opens up. You need to locate and click on the button named Properties.
STEP 8
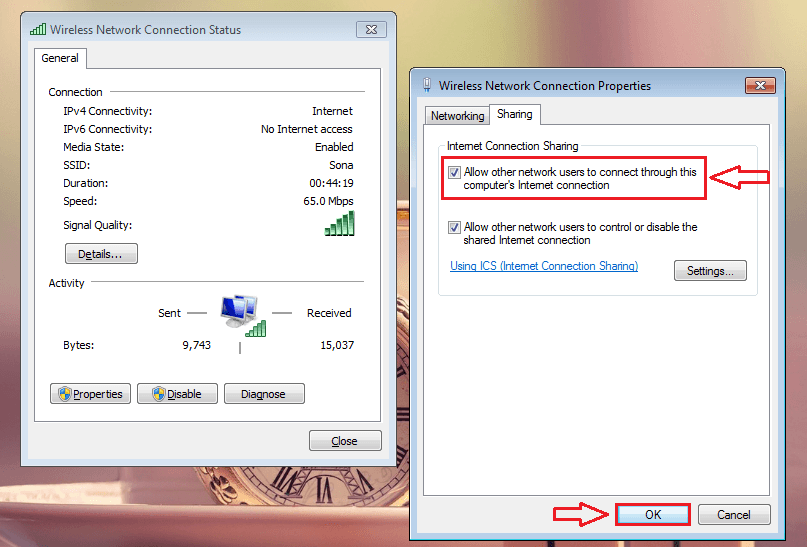
- When the Wireless Network Connection Properties window opens up, click on the Sharing tab and check the checkbox that says Allow other network users to connect through this computer’s Internet connection. Once you are done, simply click on the OK button.
STEP 9
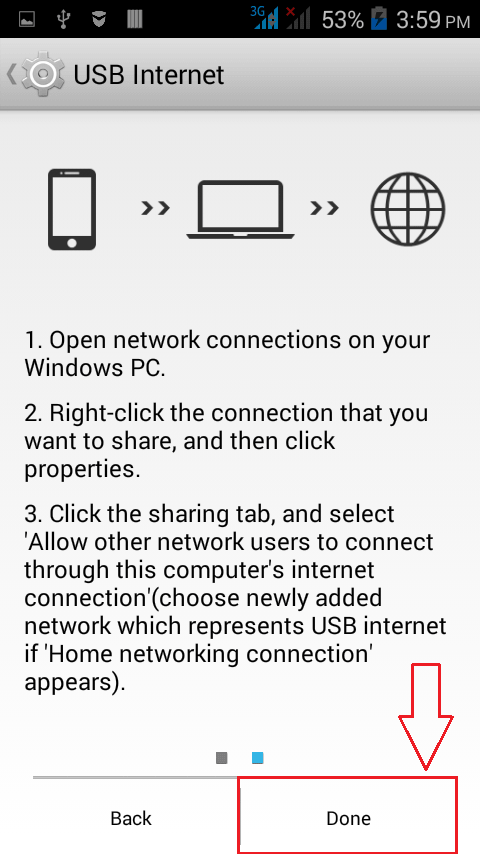
- Now let’s get back to your Android phone from where we left off. Just click on the Done button at the bottom of your phone screen.
STEP 10
- There you are! Your phone is now equipped to browse through the Internet using your PC’s Internet connection.
Try out this trick today itself. Just turn off your WiFi or Mobile data and access any web page via USB cable to amuse your friends. Hope you found the article useful.

Someone who is in love with writing and technical tricks & tips.
Источник
How to Share Internet from Windows, Mac or Linux to Android device
Most people are aware that Android devices can be used as a USB tether for sharing mobile data to a computer, but a nifty trick is the same procedure in reverse – that is, sharing a computer’s internet connection with the Android device. It’s known as “reverse tethering”, and it’s a fairly easy thing to setup.
There are different ways to achieve this depending on your operating system, so I will share methods for Windows, Mac, and Linux systems.
Windows:
- Download and install the Connectify Hotspot software on your computer, and proceed with the instructions on screen. Connectify Hotspot essentially creates a hotspot network through your computer’s WiFi antenna – of course, there’s a native Windows method of achieving this, but Connectify Hotspot is far less technical and more user-friendly.
- To configure Connectify Hotspot, you simply create a network by entering the desired name in the SSID field, and a password. Then you choose the connection you want to share, such as the Wi-Fi network your computer is connected to.
- In SSID type the connection name you want to give, this will be the wi-fi network name that you will see on your Android. Give your network a password if you want to use a secured network. Now select from the connection you want to share. i.e. This is the adapter which has the internet. Select the Wi-Fi network using which you will connect your Android Phone.
- Now enable your Android device’s WiFi, and click “Start Hotspot” in Connectify. You should be able to see the network on your phone’s list of available WiFi networks, so simply choose the SSID from Connectify, provide the password, and you’re all set.
Mac:
- First go to System Preferences > Sharing.
- Click on Internet Sharing, and under the dropdown box for “Share your connection from:”, choose the network your Mac is connected to, such as Ethernet or WiFi.
- Now in the box for “To computers using”, choose either Bluetooth PAN or AirPort, depending on your Mac OS/X version. However, if you’re sharing a Mac’s internet to a non-Apple device through AirPort, Mac absolutely requires a 5 or 13 letter WEP key. No more, no less.
- After you’re broadcasting the SSID from your Mac, go ahead and connect to it under your Android device’s WiFi settings.
Linux:
Please note this requires a rooted Android phone – you can search Appuals for Android root guides for your device.
You’ll also need ADB and Fastboot installed, which is easily obtained with:
sudo apt-get install android-tools-adb android-tools-fastboot
Finally, you should have a Terminal Emulator installed on your phone.
- If you meet those prerequisites, go ahead and connect your Android device to your PC over USB.
- Now launch a Linux terminal, and type the following commands:
Ifconfig
- This should display the network interface from the connected Android device, typically usb0 but in some cases it can be something else. In the commands I am giving, make sure to change usb0 to the actual network interface being used.
- So now type in the terminal:sudo ifconfig usb0 10.42.0.1 netmask 255.255.255.0
echo 1 | sudo tee /proc/sys/net/ipv4/ip_forward
sudo iptables -t nat -F
sudo iptables -t nat -A POSTROUTING -j MASQUERADE
- Now we have to type the next command on your Android’s terminal emulator :
adb shell busybox ifconfig
- After that last command, it should display a different network interface being used, for example So again, change the commands I am sharing to whatever is your actual network interface.
adb shell ifconfig rndis0 10.42.0.2 netmask 255.255.255.0
adb shell route add default gw 10.42.0.1 dev rndis0
- Now we can test the internet sharing by trying to send a ping from your phone’s Terminal Emulator, so type on your phone:
adb shell ping 8.8.8.8
If you get a successful ping, then you’re all set to go.
Источник


