- Бесконечная загрузка Android: почему она появляется и как её устранить?
- How to Fix Android is Starting Optimizing App
- Way 1. One Click to Fix Android Is Starting Optimizing App Stuck
- Way 2. Unplug Device Before Restart
- Way 3. Remove SD Card and Reinsert It
- Way 4. Boot the Device in Safe Mode
- Way 5. Wipe Cache Partition
- Conclusion
- Методы лечения различных ошибок в Android Studio при разработке проекта
- Stuck on ‘Android is upgrading. Starting Apps’. HELP
- Breadcrumb
- shencez
- shencez
- shencez
Бесконечная загрузка Android: почему она появляется и как её устранить?
Владельцы смартфонов и планшетов на базе Android иногда сталкиваются с проблемой «бутлупа» — из-за неё загрузка операционной системы на устройстве останавливается на начальном этапе. Самый главный признак бутлупа — на экране всё время показан логотип загрузки Android и больше ничего не происходит, устройство не запускается, и работать с ним нельзя. Почему так происходит и как можно устранить эту проблему?
Причины появления бутлупа могут быть разнообразные:
— Повреждение накопителя или сбой данных в операционной системе из-за программной ошибки.
— Физическое повреждение любого компонента устройства (например, водой или электрическим шоком)
— Ошибка при установке официального обновления Android.
— Ошибка при установке кастомной сборки Android.
— Вирус, проникший в область загрузчика или операционную систему.

Чаще всего бутлуп появляется из-за ошибок, возникающих при установке обновления операционной системы, но также бывает комбинированная проблема — к примеру, когда апдейт установился на повреждённый накопитель или вирус «сожрал» часть системных файлов, которые должны были установиться вместе с новой прошивкой.
К сожалению, не существует способа, который позволил бы определить, что вашему смартфону или планшету угрожает бутлуп — вы узнаете о том, что на нём были ошибки только после того, как это случится.
Как решить проблему бутлупа?
Если бутлуп появился на смартфоне после установки официального обновления, самый оптимальный вариант — отнести его в магазин и потребовать ремонт. Если гарантия ещё действует, это будет бесплатно, а если смартфон старый, то смартфон нужно нести в СЦ и ремонтировать за деньги.
Будьте готовы, что СЦ при восстановлении устройства сотрёт все ваши данные на нём, так что заранее позаботьтесь об их резервном хранении. Кроме того, СЦ может попросить у вас пароль от аккаунта Google. Предоставьте его только в том случае, если вы уверены, что к этому аккаунту не привязаны какие-либо «чувствительные» данные (банковские кабинеты, обнажённые фотографии и прочее).
Бутлуп, появившийся после установки кастомной прошивки, не покрывается гарантией, поэтому производитель не обязан бесплатно восстанавливать ваше устройство. В этом случае вы можете попытаться установить другую прошивку, следуя инструкции с того сайта, с которого вы её скачаете. Возможно, в первый раз вы скачали не те файлы (например, не для той модели или модификации устройства или не для той страны). Если у вас не получится самостоятельно восстановить операционную систему, обратитесь к знакомым, у которых есть опыт в подобных вещах, или опять же в сервисный центр.
Также учтите, что с бутлупом наверняка сталкивались другие пользователи той же модели устройства и наверняка на каком-нибудь сайте есть описание решения этой проблемы. Напишите в Google слово «brick» или «кирпич» и номер вашей модели. Как правило, процесс восстановления довольно прост: нужно зайти в рекавери и выполнить полный сброс операционной системы с затиранием разных областей операционной системы и загрузчика.
Источник
How to Fix Android is Starting Optimizing App
by Anna Sherry Updated on 2020-05-23 / Update for Fix Android
«I get this message every time I boot the phone as of last night. Android is starting. Optimizing app 1 of 1. This goes on for quite a while — I would say somewhere in the area of 15 minute. Anyone have any experience/fix with this?»
While Android devices are not too prone to technical issues, sometimes you do face issues on your devices that run the Android operating system. One issue that some users have recently been facing is Android is starting optimizing app problem. So, what basically happens is that you when you boot-up your Android device, you get a message on your screen that keeps on saying your phone is optimizing the apps on the device.
The message does not seem to go away and remains on your screen for hours. If you are one of those users and are struggling to get rid of the Android is starting stuck issue on your device, the following guide will help you fix the issue on your device.
The guide covers multiple methods to help you resolve the Android is starting optimizing app stuck issue on your phone so you can boot-up the phone and use it as you would normally do.
Way 1. One Click to Fix Android Is Starting Optimizing App Stuck
If your Android phone gets stuck on Starting Optimizing App and won’t get out, an an easy and straightforward solution to your issue is using a dedicated repair software to repair the issue with the Android operating system on your device. There is a nice software that does the job for you.
Meet ReiBoot for Android and it allows users like you to fix many of the issues including the Android is starting optimizing app 1 of 1 stuck issue on your Android device. All you need to do is click on an option in the software and it will fix all the issues you could ever face on your device.
The following shows how you use the software to fix the issue on your Android phone:
Step 1 First, you need to download and install the said program on your computer.

Step 2 Then, connect device to the computer using a USB cable, and launch the software on your computer and click on Repair Android System.

Step 3 Click on the Repair Now button on the following screen to begin the repair procedure. On the following screen, enter the details of your phone and then click on the Next button.
Step 4 Wait while the software downloads a firmware for your phone.
Step 5 When the firmware is downloaded, click on Repair Now in the software to start repairing your device. Follow the on-screen instructions and your phone will be repaired.
You are all set. The Android app optimization issue should now be gone from your device and your device should boot-up normally.
Way 2. Unplug Device Before Restart
If you are restarting your device and your phone is being charged, it is recommended that you disconnect your phone from charging before you restart it. Often while your device is in charging mode and you reboot it, you will get the app optimization issue on your device.
The simplest solution, as mentioned above, is to unplug your device from charging when you are rebooting your device. That should resolve the Android is starting starting apps stuck issue on your device.
Way 3. Remove SD Card and Reinsert It
To clear cache, head to Menu > Settings > Apps & notifications > [app-name] > Storage and tap on Clear Cache. Do it for all the apps you want to clear the cache files for.
The SD card on your device could also be a culprit and you are suggested to remove it from your device and put it back in again to see if that helps resolve the issue.
The above solution helps fix the issue many times and it should work for you, too.
Way 4. Boot the Device in Safe Mode
Safe mode allows you to troubleshoot issues on your Android device and you may reboot your device into safe mode to investigate the app optimization issue you are facing on your device.
To reboot into safe mode, tap and hold down on the Restart option and you will see the prompt to get into safe mode. Once you are there and you do not see the app optimization issue, it is likely one of the apps installed on your device is causing the issue. You may want to get rid of any unknown apps from your device to fix the issue.
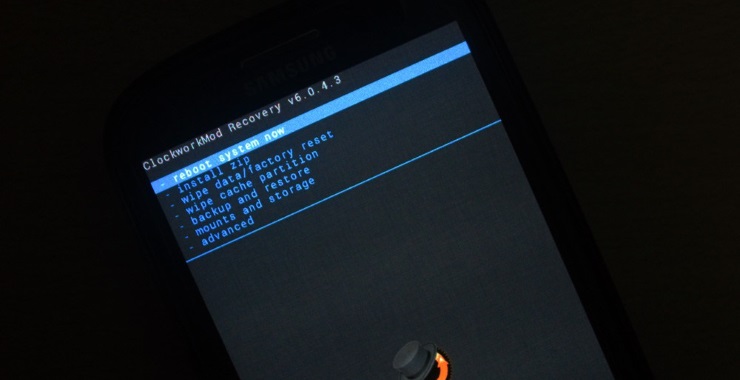
Way 5. Wipe Cache Partition
One of the easiest ways to remove all the cache files from your device is to do the task from the recovery mode. You can reboot your device into the recovery mode to then wipe off all the cache files from the device.
The steps to put your phone into the recovery mode varies with the type of device you have. If you do not want to get into the hassle of finding a way to reboot your device into the recovery mode, you may use a software like ReiBoot for Android that allows you to put your device into the recovery mode with a single click. All you need to do is press a button in the software and it will reboot your device into the recovery mode.
- Connect your device to your computer. Download and launch the software on your computer, click on the option that says One-Click to Enter Recovery Mode.
Once you are in the recovery mode, select the wipe cache partition option to remove all the cache files from your device. That should resolve the Android is upgrading optimizing app stuck issue on your Android device.
Conclusion
If you are sick of the app optimization issue on your Android device, you have five methods to get rid of the issue as shown in the above guide. We hope you can resolve the issue using any of the methods described in the above guide.
Updated on 2020-05-23 / Update for Fix Android
Источник
Методы лечения различных ошибок в Android Studio при разработке проекта
Сегодня хотел бы поделиться своим анализом и способами лечением разных ошибок при разработке своего продукта в Android Studio. Лично я, не раз сталкивался с различными проблемами и ошибками при компиляции и/или тестировании мобильного приложения. Данный процесс, всегда однообразный и в 99% случаев и всегда нужно тратить n-колличество времени на его устранение. Даже, когда ты уже сталкивался с данной проблемой, ты все равно идешь в поисковик и вспоминаешь, как же решить ту или иную ситуацию.
Я для себя завел файлик, в котором отметил самые частые ошибки — потратив на это несколько часов и перечислил самые популярные ошибки (в дальнейшем планирую просто их запомнить), чтоб сократить свое время в дальнейшем.
Итак, начну по порядку с самой распространенной проблемы и дальше буду перечислять их по мере появления:
1) Если подчеркивает красным код, где используются ресурсы: R. — попробовать (но вероятно не поможет): Build -> Clean Project.
В принципе на Build -> Clean Project можно не терять времени, а лучше всего — слева переключиться на Project, открыть каталог .idea, затем каталог libraries и из него удалить все содержимое. Затем нажать кнопку Sync Project. А затем (если все еще красное, но скорее всего уже будет все ок ) Build -> Clean Project.

2) После внезапного выключения компьютера, после перезапуска может быть во всех проектах весь код красным. Перед этим может быть ошибка: Unable to create Debug Bridge: Unable to start adb server: Unable to obtain result of ‘adb version’. Есть три решения — первое помогло, второе нет (но может быть для другого случая), а третье — не пробовал:
а) File — Invalidate Caches/Restart — Invalidate and Restart
б) Закрыть студию. В корне папки проекта удалить файл(ы) .iml и папку .idea. Вновь запустить студию и импортировать проект.
в) Нажать Ctrl-Alt-O и запустить оптимизацию импорта.
Кстати, adb сервер можно проверить на версию (и работоспособность) и затем перезапустить:
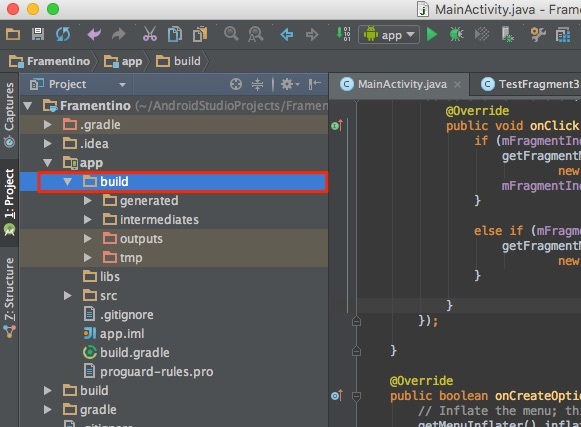
3) Если Android Studio выдает приблизительно такую ошибку: Error:Execution failed for task ‘:app:dexDebug’.
Надо слева переключиться на опцию Project, найти и удалить папку build которая лежит в папке app, т.е. по пути app/build. Затем перестроить весь проект заново: Build -> Rebuild Project.
Такое же решение если ошибка типа: «не могу удалить (создать) папку или файл» и указан путь, который в ведет в app/build. Тоже удаляем папку build и ребилдим проект.
4) В сообщении об ошибке упоминается heap — виртуальная память. А ошибка обычно вызвана ее нехваткой, т.е. невозможностью получить запрашиваемый объем. Поэтому этот запрашиваемый объем надо уменьшить, т.е. переписать дефолтное значение (обычно 2048 MB которое можно изменить в настройках), на меньшее 1024 MB.
В файле проекта gradle.properties пишем:

5) Android Studio пришет примерно такую ошибку: Plugin is too old, please update to a more recent version, or set ANDROID_DAILY_OVERRIDE environment variable to «83648b99316049d63656d7276cb19cc7e95d70a5»
Возможные причины (кроме необходимости регулярного обновления SDK):
а) Загруженный проект был скомпилирован с помощью уже несовместимого старого gradle плагина. В этом случае надо найти и подключить в своем build.gradle проекта этот более старый плагин. т.е. попробовать более старые версии, например: 1.1.3 (часто именно 1.1.x и подходит).
Найти все версии можно здесь.
б) Если в build.gradle проекта используется beta-версия плагина — это означает, что срок ее истек. Посмотреть последние релизы (продакшн и бета) можно также здесь:
6) Иногда при подключении сторонних библиотек могут дублироваться некоторые файлы (обычно связанные с лицензированием). В сообщении будет что-то содержащее слова: duplicate files. Решение — надо посмотреть в сообщении об ошибке или в документации подключенной сторонней библиотеки — какие именно файлы стали избыточными, и перечислить их в build.gradle модуля для исключения (exclude) из билда.
Это делается в директиве packagingOptions (которая, в свою очередь, находится в директиве android).
Источник
Stuck on ‘Android is upgrading. Starting Apps’. HELP
Breadcrumb

shencez
Member
Okay let me run through a couple of scenarios so that we can understand the main issue here. I flashed my i9250 GNEX phone with the linaro OMNI Metal’s new update. with a broken volume up button manually through CWM. Upon rebooting, the phone shows the starting logo and then gets to the updates eventually ending up with the: ‘Android is upgrading. Starting Apps’ screen. It’s stuck there and I do not know what to do next.
I went to the shop to try and fix the volume button but for some reason I could not get into the recovery by holding the vol up, vol down + pwr button. THEY MIGHT HAVE NOT FIXED IT, but then again. how we’re they going to test it anyways when the phone can’t even boot up right?
They told me to sideload adb and flash the original stock image using a micro usb (they have this microusb that gets the phone to the download screen) so get to the update/download screen -> but I do not have that USB that allows me to do that now.
Any ideas on how I can revive this phone?? It’s really a good phone and though I have the Nexus 5 now.. I still think about the Galaxy Nexus a lot. =/
Please help me T_T

Senior Member
I understand your frustration, this happened to me a couple months ago after doing a custom update. I don’t remember the exact solution, but I have some solid ideas. First we have to get into recovery.
Hold volume up + volume down + power to do this. (Using one volume and power just goes to Odin download mode / last resort of last resorts)
When you’re in recovery, do a nandroid backup since well be trying a bunch of stuff, permission fixing, formatting.
After a nandroid try:
-fix permissions through recovery
-wipe cache and dalvik cache through recovery
If those don’t boot you, try wiping data (NOT sdcard). If this doesn’t work the problem is what’s installed to /system..and we’ll go from here.
We need to get into recovery first and sequentially try the things I listed. Let me know if this is now possible.
shencez
Member
I understand your frustration, this happened to me a couple months ago after doing a custom update. I don’t remember the exact solution, but I have some solid ideas. First we have to get into recovery.
Hold volume up + volume down + power to do this. (Using one volume and power just goes to Odin download mode / last resort of last resorts)
When you’re in recovery, do a nandroid backup since well be trying a bunch of stuff, permission fixing, formatting.
After a nandroid try:
-fix permissions through recovery
-wipe cache and dalvik cache through recovery
If those don’t boot you, try wiping data (NOT sdcard). If this doesn’t work the problem is what’s installed to /system..and we’ll go from here.
We need to get into recovery first and sequentially try the things I listed. Let me know if this is now possible.
Sorry I forgot to mention that I can’t boot into recovery using [vol up, down + pwr button] (sorry i didn’t include vol down before) as my power up volume rocker is broken and not functioning. I just need to be able to get into recovery but not possible with the up rocker not functioning.
Is there any other way to get through to recovery by side loading? The phone can’t get past the android is upgrading screen. so, I’m lost.
Senior Member
Sorry I forgot to mention that I can’t boot into recovery using [vol up, down + pwr button] (sorry i didn’t include vol down before) as my power up volume rocker is broken and not functioning. I just need to be able to get into recovery but not possible with the up rocker not functioning.
Is there any other way to get through to recovery by side loading? The phone can’t get past the android is upgrading screen. so, I’m lost.
OK that makes sense, sorry I must have missed that. Have you tried booting the phone in safe mode? To do this, turn the phone off, then hold power to turn it on. Once you see the Google logo press and hold «volume down» until the phone has fully booted. Once the phone is booted, you will see the «safe mode» logo and can stop holding «volume down.» If one of your apps in /data is causing the boot issue, this will get you into Android.
I see in the first post that you don’t have a USB cable to attach to a computer? If this is true, we won’t be able to adb, fastboot, or Odin download to push a ROM to the phone. Most people have this cable since it also attaches to a usb wall charger. Without it, there’s maybe one last sketchy thing we can try, which would be to take the phone apart and electrically short the volume buttons to get into recovery. Even though the volume button is broken, the connection is still definitely there. The button just doesn’t work or is disconnected.
Let us know if the safe mode gets you booted and whether or not you have a USB cable to connect your phone to a computer. I just want to double check about the cable cause if you don’t have it. Our last resort attempt would be to short the broken volume button.
shencez
Member
OK that makes sense, sorry I must have missed that. Have you tried booting the phone in safe mode? To do this, turn the phone off, then hold power to turn it on. Once you see the Google logo press and hold «volume down» until the phone has fully booted. Once the phone is booted, you will see the «safe mode» logo and can stop holding «volume down.» If one of your apps in /data is causing the boot issue, this will get you into Android.
I see in the first post that you don’t have a USB cable to attach to a computer? If this is true, we won’t be able to adb, fastboot, or Odin download to push a ROM to the phone. Most people have this cable since it also attaches to a usb wall charger. Without it, there’s maybe one last sketchy thing we can try, which would be to take the phone apart and electrically short the volume buttons to get into recovery. Even though the volume button is broken, the connection is still definitely there. The button just doesn’t work or is disconnected.
Let us know if the safe mode gets you booted and whether or not you have a USB cable to connect your phone to a computer. I just want to double check about the cable cause if you don’t have it. Our last resort attempt would be to short the broken volume button.
Thanks for your reply once again, I tried what you said about holding the vol down button once I see the google logo. However, the animation screen just comes up and goes back to Android is upgrading. optimizing apps 1 of 1.. starting apps. then it stops there as usual.
The USB i was referring to was the USB dongle which is similar to the ones like the hdmi cable. I have the usb cable for connecting to pc and may have to try the adb way to resolve the issue. Any steps on what I could do at this point? I’ve never flashed via adb in this situation so I may need some guidance.
Once again, thanks for you help very much appreciated.
UPDATE: I tried ADB REBOOT RECOVERY and I ended up with this error message. Attached is the photo to see it. ‘error: device unauthorized. Please check the confirmation dialog n your device.’

This thread. I finally found what I need. a USB JIG. Where can I find these.
Источник


