- Полный список
- How to open Android Settings programmatically with Java
- Show system settings
- Access specific settings areas
- Constants of android.provider.Settings
- Add the permissions if required
- How to Code a Settings Screen in an Android App
- Prerequisites
- 1. Create an Android Studio Project
- 2. Creating a PreferenceFragment
- 3. Creating Our Preferences
- Switch Preference
- EditText Preference
- List Preference
- MultiSelect List Preference
- Ringtone Preference
- 4. Creating Setting Groups
- 6. Binding the Preference Summary to the Value Selected
- 7. Retrieving Preference Values
- 8. Bonus: Using Android Studio Templates
- Conclusion
Полный список
— используем Preferences для работы с настройками приложения
Мы уже проходили Preferences, использовали их для хранения своих данных, знаем механизм. Теперь посмотрим, как они используются для хранения настроек приложения. Android предоставляет специальное Activity для работы с настройками – PreferenceActivity. Оно умеет читать определенные xml-файлы и создавать из них экран с настройками.
Создадим простое приложение. На первом экране будем читать и отображать настройки приложения, а на втором будем их задавать с помощью PreferenceActivity.
Надо придумать какие-нибудь настройки. Пусть это будут настройки неких уведомлений, а именно возможность включить/выключить уведомления (чекбокс) и возможность прописать адрес получателя (поле для ввода текста).
Project name: P0711_PreferencesSimple
Build Target: Android 2.3.3
Application name: PreferencesSimple
Package name: ru.startandroid.develop.p0711preferencessimple
Create Activity: MainActivity
Сначала создадим xml-файл с описанием настроек. В папке res создаем папку xml, а в ней создаем файл pref.xml:
Здесь мы указали, что наш экран настроек (PreferenceScreen) будет содержать чекбокс (CheckBoxPreference) и поле (EditTextPreference) для ввода значения. Параметры: key – ключ для сохранения/чтения, summary – текст-пояснение, title – заголовок. Далее увидим, что и где используется.
Создаем Activity для настроек. PrefActivity.java:
Вместо setContentView используется метод addPreferencesFromResource, который берет файл pref.xml и по нему создает экран настроек.
Не забудьте добавить это Activity в манифест. Тут никаких особенностей, все как обычно.
Рисуем экран main.xml:
Одно TextView, которое будет читать и отображать настройки приложения.
В onCreate мы находим TextView и получаем объект для работы с настройками — SharedPreferences. Он нам знаком, мы с ним работали ранее в уроке про Preferences. Далее идет закоментированный код полной очистки настроек приложения. Мы его не используем, я на всякий случай указал, может кому понадобится.
В onResume мы читаем из SharedPreferences настройки и выводим их в TextView. При чтении используем те самые ключи, которые прописывали в xml-файле в атрибутах key.
В onCreateOptionsMenu просто настраиваем меню для вызова окна настроек. Мы создаем пункт меню и вешаем на него Intent — в итоге при нажатии вызовется Activity.
На всякий случай уточню, почему для вывода инфы на экран здесь использую onResume, а не onCreate. Потому что, когда мы будем возвращаться с экрана настроек в главное окно, то onCreate главного окна не сработает (т.к. окно уже создано и висит в памяти) и изменения мы не увидим. А onResume точно сработает.
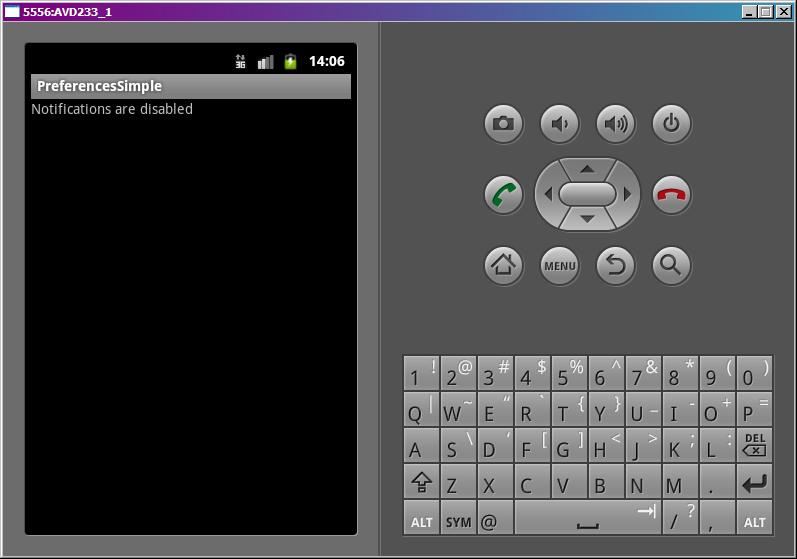
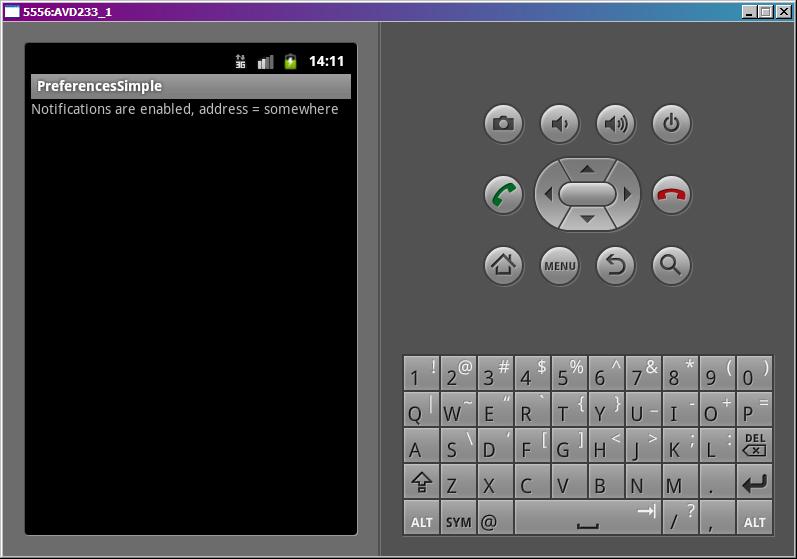
Все сохраняем и запускаем приложение. Видим такой экран:
По умолчанию, если настройки еще не заданы, мы получаем false и пустую строку, как и указывали в методах getBoolean и getString в onResume.
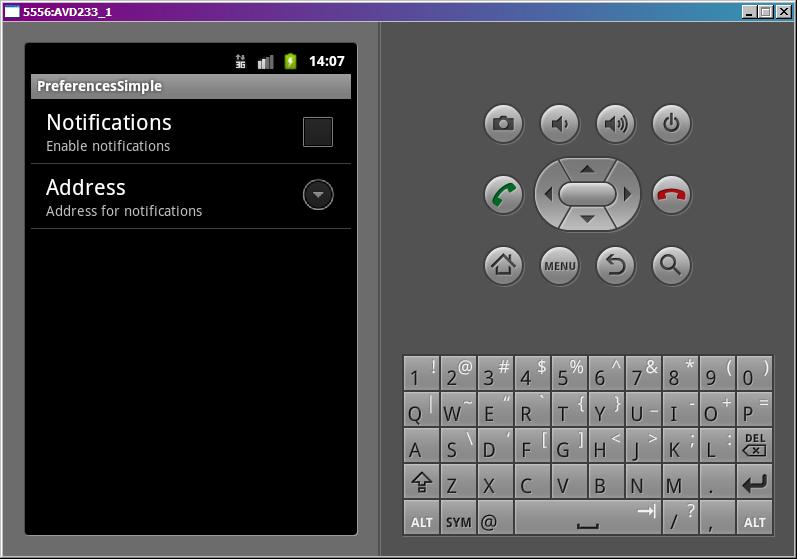
Жмем menu и переходим к настройкам.
То, что мы указывали в pref.xml система прочитала и сама создала экран настроек. Теперь мы можем здесь указывать нужные нам значения и они сразу же будут сохраняться без всяких кнопок Save. Впрочем, это стандартное поведение Android-настроек. Думаю, каждый из вас когда-нить копался в настройках и знает это.
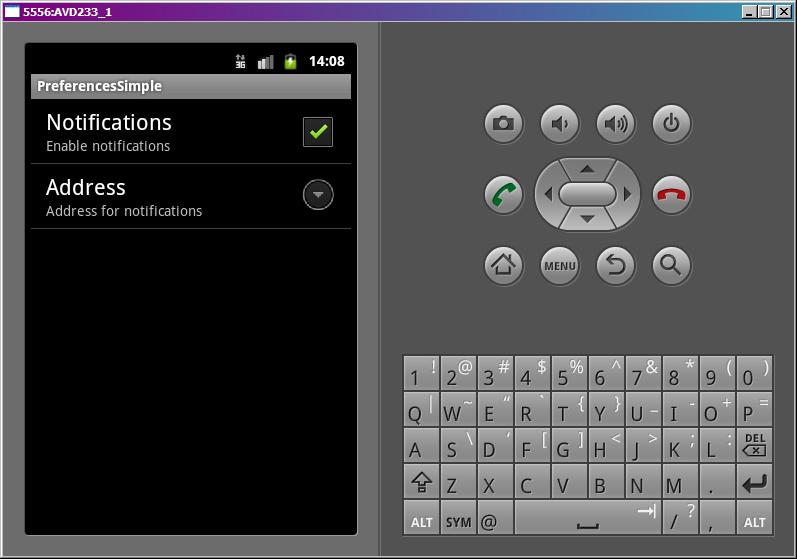
Давайте включим наши уведомления
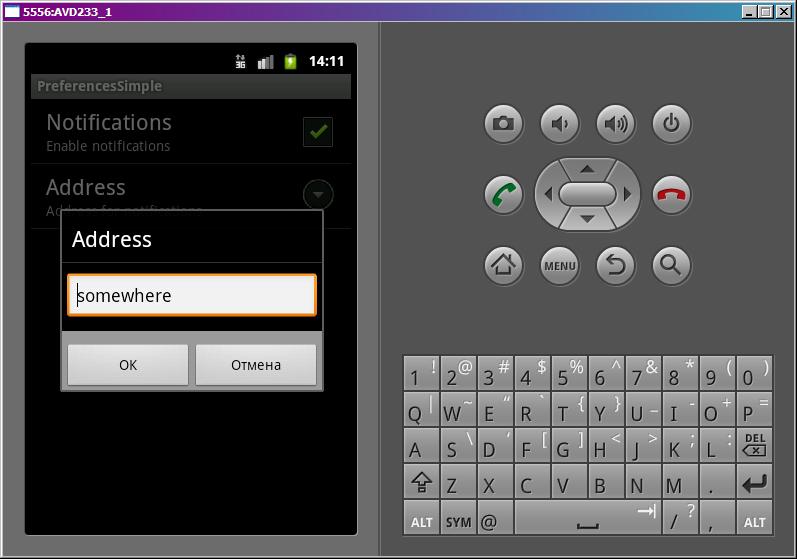
и пропишем адрес
Жмем кнопку назад, попадаем на главный экран
который в onResume прочел свежие настройки и отобразил их.
На следующем уроке:
— используем в настройках список
— группируем настройки по экранам и категориям
Присоединяйтесь к нам в Telegram:
— в канале StartAndroid публикуются ссылки на новые статьи с сайта startandroid.ru и интересные материалы с хабра, medium.com и т.п.
— в чатах решаем возникающие вопросы и проблемы по различным темам: Android, Kotlin, RxJava, Dagger, Тестирование
— ну и если просто хочется поговорить с коллегами по разработке, то есть чат Флудильня
— новый чат Performance для обсуждения проблем производительности и для ваших пожеланий по содержанию курса по этой теме
Источник
How to open Android Settings programmatically with Java
Carlos Delgado
Learn how to open dinamically the settings of Android in your app easily
In case your app needs that your user make some changes in the Settings menu i.e to set a default app to open a specific type of files etc, you may like to make this task easier for your user by starting the Settings menu of Android dinamically from your app.
Show system settings
To display the Settings page programmatically, you can use the startActivityForResult method with an Intent object and a constant of the Settings, the following example should open the general settings menu of Android:
The usage of the ACTION_SETTINGS constant with startActivityForResult will show system settings. The Settings provider contains global system-level device preferences.
Access specific settings areas
The following list contains all the constants that provide access to different areas of the settings menu:
Note: not all the constants are available on every Android version. In case you need more information visit the official documentation here.
Constants of android.provider.Settings
Activity Action: Show settings for accessibility modules.
Activity Action: Show add account screen for creating a new account.
Activity Action: Show settings to allow entering/exiting airplane mode.
Activity Action: Show settings to allow configuration of APNs.
Activity Action: Show screen of details about a particular application.
Activity Action: Show settings to allow configuration of application development-related settings.
Activity Action: Show settings to allow configuration of application-related settings.
Activity Action: Show battery saver settings.
Activity Action: Show settings to allow configuration of Bluetooth.
Activity Action: Show settings for video captioning.
Activity Action: Show settings to allow configuration of cast endpoints.
Activity Action: Show settings for selection of 2G/3G.
Activity Action: Show settings to allow configuration of date and time.
Activity Action: Show general device information settings (serial number, software version, phone number, etc.).
Activity Action: Show settings to allow configuration of display.
Activity Action: Show Daydream settings.
Activity Action: Show settings to configure the hardware keyboard.
Activity Action: Show Home selection settings.
Activity Action: Show screen for controlling background data restrictions for a particular application.
Activity Action: Show screen for controlling which apps can ignore battery optimizations.
Activity Action: Show settings to configure input methods, in particular allowing the user to enable input methods.
Activity Action: Show settings to enable/disable input method subtypes.
Activity Action: Show settings for internal storage.
Activity Action: Show settings to allow configuration of locale.
Activity Action: Show settings to allow configuration of current location sources.
Activity Action: Show settings to manage all applications.
Activity Action: Show settings to manage installed applications.
Activity Action: Show Default apps settings.
Activity Action: Show screen for controlling which apps can draw on top of other apps.
Activity Action: Show screen for controlling which apps are allowed to write/modify system settings.
Activity Action: Show settings for memory card storage.
Activity Action: Show settings for selecting the network operator.
Activity Action: Show NFC Sharing settings.
Activity Action: Show NFC Tap & Pay settings
This shows UI that allows the user to configure Tap&Pay settings.
Activity Action: Show NFC settings.
Activity Action: Show Notification listener settings.
Activity Action: Show Do Not Disturb access settings.
Activity Action: Show the top level print settings.
Activity Action: Show settings to allow configuration of privacy options.
Activity Action: Show settings to allow configuration of quick launch shortcuts.
Activity Action: Ask the user to allow an app to ignore battery optimizations (that is, put them on the whitelist of apps shown by ACTION_IGNORE_BATTERY_OPTIMIZATION_SETTINGS ).
Activity Action: Show settings for global search.
Activity Action: Show settings to allow configuration of security and location privacy.
Activity Action: Show system settings.
Activity Action: Show the regulatory information screen for the device.
Activity Action: Show settings to allow configuration of sound and volume.
Activity Action: Show settings to allow configuration of sync settings.
Activity Action: Show settings to control access to usage information.
Activity Action: Show settings to manage the user input dictionary.
Activity Action: Modify Airplane mode settings using a voice command.
Activity Action: Modify Battery Saver mode setting using a voice command.
Activity Action: Modify do not disturb mode settings.
Activity Action: Show settings to configure input methods, in particular allowing the user to enable input methods.
Activity Action: Show settings to allow configuration of VPN.
Activity Action: Show VR listener settings.
Activity Action: Allows user to select current webview implementation.
Activity Action: Show settings to allow configuration of a static IP address for Wi-Fi.
Activity Action: Show settings to allow configuration of Wi-Fi.
Activity Action: Show settings to allow configuration of wireless controls such as Wi-Fi, Bluetooth and Mobile networks.
Activity Extra: Limit available options in launched activity based on the given account types.
Activity Extra: Enable or disable Airplane Mode.
Activity Extra: Limit available options in launched activity based on the given authority.
Activity Extra: Enable or disable Battery saver mode.
Activity Extra: Enable or disable Do Not Disturb mode.
Activity Extra: How many minutes to enable do not disturb mode for.
Activity Category: Show application settings related to usage access.
Metadata key: Reason for needing usage access.
For example, you can open directly the Language Settings of the device (to change language) executing:
With the introduction of new Android APIs, there will be more settings available areas with different constants, read the official documentation of android provider settings here.
Add the permissions if required
For some special areas of the Android Settings, you will need permissions. For example, to open the bluetooth settings you’ll need to add the following bluetooth permissions in your app manifest:
And then you’ll be able to open the bluetooth settings:
Otherwise you’ll get the following exception:
Источник
How to Code a Settings Screen in an Android App
The material design team at Google gives a clear definition of what settings in your Android app should do:
App settings let users indicate preferences for how an app should behave.
Google also states that your users should navigate to the app settings either from the side navigation or toolbar menu—with an item labeled Settings.
Including settings in your app gives your users the power to control some of the functionality of your app. This makes your users happy instead of angry—because they are now in control of how the app behaves.
It’s highly recommended to give access to app settings. This will provide a better user experience for your users, which leads to a better review on the Google Play store, which then eventually gives rise to a higher number of app downloads (which boost revenue).
I assume you must have interacted with an app’s settings on your device, for example by selecting a default ringtone, or by controlling your privacy on the app. Almost all of the most popular apps you’ve downloaded or will download on the Google Play store include a settings screen for you to control the behaviour of the application.
An example of a popular app that has a settings screen is the Chrome Android app from Google. In this app’s settings screen, users can choose the default search engine, change the notification behaviour, control user privacy, etc. You can see this yourself by downloading the Chrome app from the Google Play store (if you don’t already have it on your device). The following screenshot is from the Chrome app, displaying the app’s settings screen.

In this post, you’ll learn how to create an app settings screen from scratch and also how to read the values the user has selected from the app settings. For an additional bonus, you’ll also learn how to use the Android Studio templates feature to quickly bootstrap your project with a settings screen.
A sample project (in Kotlin) for this tutorial can be found on our GitHub repo so you can easily follow along.
Prerequisites
To be able to follow this tutorial, you’ll need:
- A basic understanding of some Android APIs (such as SharedPreferences )
- Android Studio 3.0 or higher
- Kotlin plugin 1.1.51 or higher
1. Create an Android Studio Project
Fire up Android Studio and create a new project (you can name it SettingsScreenDemo ) with an empty activity called SettingsActivity . Make sure to also check the Include Kotlin support check box.

2. Creating a PreferenceFragment
To support API Level 11 (Honeycomb) and above, we can use the PreferenceFragment . This class is simply a Fragment that shows a hierarchy of Preference objects as lists.
In the code above, we created a nested class SettingsFragment inside SettingsActivity (because the SetttingsFragment class is so small). Note that our class SettingsFragment extends the PreferenceFragment superclass and has a method addPrerenceFromResource inside onCreate() . In this method, we gave it a resource ID R.xml.preference of the preference XML to launch—when the Fragment is loaded. Finally, we host the Fragment to the activity by simply using the FragmentTransaction to add it to the UI—inside onCreate() of SettingsActivity .
3. Creating Our Preferences
Create an XML file and name it preferences.xml. Save this file inside the res/xml directory in your app project. Note that you can give this file any name, but it’s highly recommended to stick with the conventional name «preferences». Also, you typically should have only one such file in an app project.
The root node for our preferences.xml file should be a 
Other attributes you can add to a CheckBoxPreference are:
- android:summaryOff : sets the summary for the Preference in a preference screen when it’s unchecked.
- android:summaryOn : sets the summary for the Preference in a preference screen when it’s checked.
- android:disableDependentsState : The state (true for on, or false for off) that causes dependents to be disabled. May be a boolean value, such as «true» or «false».
Switch Preference
SwitchPreference performs similar functionality to the CheckBoxPreference . It provides a two-state («on» or «off») toggleable option. This uses a Switch widget that allows the user to slide left («off») and right («on»). This Preference also includes the attributes described for the CheckBoxPreference above. In addition, it has the following attributes:
- android:switchTextOff : sets the text used on the switch itself when in the «off» state.
- android:switchTextOn : sets the text used on the switch itself when in the «on» state.
EditText Preference
This Preference , when clicked, shows a dialog for the user to enter an input text. It uses the EditText widget—including all the attributes of that widget that you’re already familiar with.
Note that the value stored in the SharedPreferences is a string.

List Preference
This kind of Preference will display a list of entries in a dialog when tapped. Here, you can specify a pair of string-array resources in your preference XML. This string-array resource simply contains a collection of strings. This resource is located at res/values/arrays.xml .
Here is our sample ListPreference using this resource.
We set the entries and entry values using the android:entries and android:entryValues attributes respectively.
- android:entries : the human-readable array to present as a list.
- android:entryValues : the array to find the value to save for a preference when an entry from entries is selected.
For example, if we use the number of minutes in each duration as the entry values, when the user picks a time duration (e.g. 30 minutes), the corresponding integer value will be stored in SharedPreferences (e.g. 30).
MultiSelect List Preference
This one is similar to ListPreference but instead of having radio buttons, we have check boxes. In other words, the user can select multiple items in the dialog. Note that the result is stored in a “string set” in the SharedPreferences . This can be retrieved using getStringSet() .
Ringtone Preference
When a RingtonePreference is tapped, a dialog is shown containing the list of available ringtones on the device or emulator.
- android:showDefault : whether the Default ringtone option will be shown.
- android:showSilent : whether a Silent option will be shown in the list. The user can select this option if they don’t want to play any ringtone.
Note that the value stored in the SharedPreferences for this preference is a special string. This special string is a URI which points to a ContentProvider .
4. Creating Setting Groups
It becomes a problem when you have a long list of preferences or settings, because users may have some trouble scanning or understanding them. To solve this problem, we can group our preferences. Take a look at the screenshot of the Chrome app I showed you in the beginning again—notice it grouped the preferences into two categories: Basics and Advanced. This makes it easier for the user to understand the preferences and to not make the list seem too overwhelming.
Let’s now look at how simple it is to perform this task.
We simply surround the preferences we want to group in a
Here, we added a element inside the
6. Binding the Preference Summary to the Value Selected
Let’s now see how to update the preference summary with the value selected by the user.
In this class, we created a helper method called bindPreferenceSummaryToValue() , which is inside our companion object, to update the preference summary text with the value the user has selected. We passed it a Preference object as an argument. The findPreference() will return a Preference using the Preference ‘s key.
We have a variable sBindPreferenceSummaryToValueListener that is an instance of Preference.OnPreferenceChangeListener . This is simply a preference change listener that will help us update the preference summary to the value the user has selected. We check for special cases, like when the selected preference is a RingtonePreference or a ListPreference . For those preference types, we do some special handling to get the summary string. If the preference is neither (like an EditTextPreference ), we just set the summary to the preference’s string value.
Inside the bindPreferenceSummaryToValue() , we set the preference change listener by calling onPreferenceChangeListener (in Java, it’s setOnPreferenceChangeListener instead) on the Preference object.
Now run the project again to see how it all works!

7. Retrieving Preference Values
To start getting preference values for the settings screen, we call getDefaultSharedPreference() which is inside the PreferenceManager class—passing it a Context object of the preferences whose values are wanted. Note that we get the values from the default SharedPreferences for our application.
You call the corresponding getter method for the type we want to retrieve the value from in SharedPreferences . You pass it the key as the first argument, and the default value is the second argument.
8. Bonus: Using Android Studio Templates
Now that you have learnt about the APIs involved to create a settings screen from scratch in Android, I’ll show you a shortcut that will make it quicker next time. You can choose to use a template instead of coding a settings screen from scratch.
Android Studio provides code templates that follow the Android design and development best practices. These existing code templates (available in Java and Kotlin) can help you quickly kick-start your project. One such template can be used to create a settings screen.
To use this handy feature for a new project, first fire up Android Studio.

Enter the application name and click the Next button. You can leave the defaults as they are in the Target Android Devices dialog.
Click the Next button again.

In the Add an Activity to Mobile dialog, scroll down and select Settings Activity. Click the Next button after that.

In the last dialog, you can rename the Activity name, layout name or title if you want. Finally, click the Finish button to accept all configurations.
Android Studio has now helped us to create a project with a settings activity. Really cool! You are strongly advised to explore the code generated.
You can use templates for an already existing Android Studio project too. Simply go to File > New > Activity > Settings Activity.

Note that the templates that come included with Android Studio are good for simple layouts and making basic apps, but if you want to really kick-start your app, you might consider some of the app templates available from Envato Market.
They’re a huge time saver for experienced developers, helping them to cut through the slog of creating an app from scratch and focus their talents instead on the unique and customised parts of creating a new app
Conclusion
In this tutorial, you learned how to create app settings in Android from scratch. We also explored how to easily and quickly use the Android Studio templates to create app settings.
I highly recommend checking out the official material design guidelines for settings to learn more about how to properly design and use settings in Android. Also, check out the official API guide to learn more about other APIs for creating a settings activity.
To learn more about coding for Android, check out some of our other courses and tutorials here on Envato Tuts+!
Источник
