- Полный список
- Media Player. Set Data Source Method
- Definition
- Overloads
- SetDataSource(AssetFileDescriptor)
- Parameters
- Remarks
- Applies to
- SetDataSource(MediaDataSource)
- Parameters
- Remarks
- Applies to
- SetDataSource(FileDescriptor)
- Parameters
- Exceptions
- Remarks
- Applies to
- SetDataSource(String)
- Parameters
- Exceptions
- Remarks
- MediaPlayer overview
- The basics
- Manifest declarations
- Using MediaPlayer
- Kotlin
- Kotlin
- Kotlin
- Asynchronous preparation
- Managing state
- Releasing the MediaPlayer
- Kotlin
- Using MediaPlayer in a service
- Running asynchronously
- Kotlin
- Handling asynchronous errors
- Kotlin
- Using wake locks
- Kotlin
- Kotlin
- Kotlin
- Performing cleanup
- Kotlin
- Digital Rights Management (DRM)
- Kotlin
- Running prepareDrm() asynchronously
- Setting up DRM asynchronously
- Kotlin
- Handling encrypted media
- Retrieving media from a ContentResolver
- Kotlin
Полный список
MediaPlayer – класс, который позволит вам проигрывать аудио/видео файлы с возможностью сделать паузу и перемотать в нужную позицию. MediaPlayer умеет работать с различными источниками, это может быть: путь к файлу (на SD или в инете), адрес потока, Uri или файл из папки res/raw.
Напишем небольшое приложение аудио-плеер и используем в нем все эти возможности.
Project name: P1261_MediaPlayer
Build Target: Android 2.3.3
Application name: MediaPlayer
Package name: ru.startandroid.develop.p1261mediaplayer
Create Activity: MainActivity
Добавляем строки в strings.xml:
Так это выглядит на экране
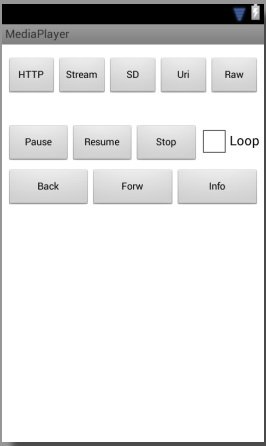
Кнопки верхнего ряда запускают проигрывание треков из различных источников. Кнопки среднего ряда – это пауза, возобновление, стоп и чекбокс повторения трека. А в нижнем ряду кнопки перемотки назад/вперед и вывод в лог текущей информации.
Создайте папку res/raw и положите в нее какой-нить звуковой файл с именем explosion.mp3. Например, его можно скачать здесь — http://dl.dropboxusercontent.com/u/6197740/explosion.mp3.
Разбираемся. Сначала создаем константы-пути, которые будет использовать проигрыватель. Это файл в инете (DATA_HTTP), поток в инете (DATA_STREAM), файл на флэшке (DATA_SD) и Uri на мелодию из системы (DATA_URI). Для SD и Uri укажите ваши значения, чтобы такие файлы существовали. (По получению Uri в конце урока есть вспомогательный код)
В onCreate получаем AudioManager, находим на экране чекбокс и настраиваем так, чтобы он включал/выключал режим повтора для плеера.
onClickStart – метод для обработки нажатий на кнопки верхнего ряда. Сначала мы освобождаем ресурсы текущего проигрывателя. Затем в зависимости от нажатой кнопки стартуем проигрывание. Какие методы для этого используются?
setDataSource – задает источник данных для проигрывания
setAudioStreamType – задает аудио-поток, который будет использован для проигрывания. Их существует несколько: STREAM_MUSIC, STREAM_NOTIFICATION и п. Подробнее их можно посмотреть в доках по AudioManager. Предполагаю, что созданы они для того, чтобы можно было задавать разные уровни громкости, например, играм, звонкам и уведомлениям. Этот метод можно и пропустить, если вам не надо явно указывать какой-то поток. Насколько я понял, по умолчанию используется STREAM_MUSIC.
Далее используется метод prepare или prepareAsync (в паре с OnPreparedListener). Эти методы подготавливают плеер к проигрыванию. И, как понятно из названия, prepareAsync делает это асинхронно, и, когда все сделает, сообщит об этом слушателю из метода setOnPreparedListener. А метод prepare работает синхронно. Соотвественно, если хотим прослушать файл из инета, то используем prepareAsync, иначе наше приложение повесится, т.к. заблокируется основной поток, который обслуживает UI.
Ну и метод start запускает проигрывание.
В случае с raw-файлом мы используем метод create. В нем уже будет выполнен метод prepare и нам остается только выполнить start.
Далее мы для плеера включаем/выключаем повтор (setLooping) в зависимости от текущего значения чекбокса. И вешаем слушателя (setOnCompletionListener), который получит уведомление, когда проигрывание закончится.
В методе releaseMP мы выполняем метод release. Он освобождает используемые проигрывателем ресурсы, его рекомендуется вызывать когда вы закончили работу с плеером. Более того, хелп рекомендует вызывать этот метод и при onPause/onStop, если нет острой необходимости держать объект.
В методе onClick мы обрабатываем нажатия на кнопки управления проигрывателем. Какие здесь используются методы?
start – возобновляет проигрывание
seekTo – переход к определенной позиции трека (в милисекундах)
getCurrentPosition – получить текущую позицию (в милисекундах)
getDuration – общая продолжительность трека
isLooping – включен ли режим повтора
getStreamVolume – получить уровень громкости указанного потока
Далее идут методы
onPrepared – метод слушателя OnPreparedListener. Вызывается, когда плеер готов к проигрыванию.
onCompletion – метод слушателя OnCompletionListener. Вызывается, когда достигнут конец проигрываемого содержимого.
В методе onDestroy обязательно освобождаем ресурсы проигрывателя.
В манифесте добавляем права на интернет — android.permission.INTERNET.
Все сохраняем, запускаем приложение. Дизайн получившегося плеера, конечно, не ахти какой :), но нас сейчас интересует функционал.
Еще раз перечислю возможные действия. Нажимая верхние кнопки, мы запускаем проигрывание из различных источников. Кнопки среднего ряда позволят нам поставить паузу, возобновить/остановить проигрывание и включить режим повтора. Кнопки нижнего ряда перематывают назад/вперед на 3 сек (3000 мсек) и выводят инфу в лог.
Я включу проигрывание файла с SD и выведу инфу в лог (кнопка Info).
start SD
Playing true
Time 4702 / 170588
Looping false
Volume 10
Проигрывание идет, текущая позиция – 4-я секунда из 170, режим повтора выключен, громкость — 10.
Уменьшу громкость (кнопками устройства или эмулятора), включу режим повтора (чекбокс Loop), поставлю паузу (кнопка Pause) и снова выведу инфу в лог:
Playing false
Time 46237 / 170588
Looping true
Volume 6
Видим, что проигрывание остановилось, текущая позиция уже 46 секунд, режим повтора включен, а громкость уменьшилась до 6.
Теперь включу проигрывание потока (кнопка Stream). Смотрим лог:
08:49:13.799: D/myLogs(18805): start Stream
08:49:13.809: D/myLogs(18805): prepareAsync
08:49:27.589: D/myLogs(18805): onPrepared
Обратите внимание, сколько прошло времени с начала (prepareAsync) до завершения (onPrepared) подготовки проигрывателя – 14 секунд. Если бы мы использовали метод prepare, а не prepareAsync, то наше приложение было бы недоступно все это время.
Расскажу еще про несколько методов, которые я не использовал в примере, но о которых стоит знать.
Метод reset – сбрасывает плеер в начальное состояние, после него необходимо снова вызвать setDataSource и prepare. Похож на onRelease, но позволяет продолжить работу с этим же объектом. А вот после onRelease надо создавать новый объект MediaPlayer.
Метод setOnBufferingUpdateListener устанавливает слушателя буферизации проигрываемого потока. По идее слушатель будет получать процент буферизации, но у меня оно как-то странно работает — показывает или 0 или 100.
Метод setOnErrorListener устанавливает слушателя для получения ошибок. Особенно это полезно при методe prepareAsync. Если в ходе этого метода возникнут ошибки, то их можно поймать только так.
Метод setWakeMode позволяет ставить стандартную (PowerManager.WakeLock) блокировку на время проигрывания, указав тип блокировки. Не забудьте в манифесте добавить права на WAKE_LOCK.
По поводу видео. Метод setDisplay позволяет указать плееру, куда выводить изображение. Размещаете на экране компонент SurfaceView (вкладка Advanced), вызываете его метод getHolder и полученный объект передаете в setDisplay. Плеер выведет изображение на этот компонент.
Чтобы узнать размер проигрываемого изображения можно использовать методы getVideoHeight и getVideoWidth.
В хелпе класса MediaPlayer есть хорошая схема состояний плеера. Она кажется запутанной, но если посидеть и поразбираться, то вполне можно все понять. Схема полезная, советую вникнуть.
А здесь можно посмотреть какие форматы поддерживаются системой.
Также хелп любезно предоставляет нам код, который позволит просмотреть существующие медиа-файлы в системе:
На следующем уроке:
— работаем с SoundPool
Присоединяйтесь к нам в Telegram:
— в канале StartAndroid публикуются ссылки на новые статьи с сайта startandroid.ru и интересные материалы с хабра, medium.com и т.п.
— в чатах решаем возникающие вопросы и проблемы по различным темам: Android, Kotlin, RxJava, Dagger, Тестирование
— ну и если просто хочется поговорить с коллегами по разработке, то есть чат Флудильня
— новый чат Performance для обсуждения проблем производительности и для ваших пожеланий по содержанию курса по этой теме
Источник
Media Player. Set Data Source Method
Definition
Some information relates to prerelease product that may be substantially modified before it’s released. Microsoft makes no warranties, express or implied, with respect to the information provided here.
Overloads
Sets the data source as a content Uri.
Sets the data source as a content Uri.
Sets the data source as a content Uri.
Sets the data source as a content Uri.
Sets the data source as a content Uri.
Sets the data source as a content Uri.
Sets the data source as a content Uri.
Sets the data source as a content Uri.
SetDataSource(AssetFileDescriptor)
Sets the data source as a content Uri.
Parameters
Remarks
Portions of this page are modifications based on work created andВ shared by the Android Open Source Project and used according to terms described in the Creative Commons 2.5 Attribution License.
Applies to
SetDataSource(MediaDataSource)
Sets the data source as a content Uri.
Parameters
Remarks
Portions of this page are modifications based on work created andВ shared by the Android Open Source Project and used according to terms described in the Creative Commons 2.5 Attribution License.
Applies to
SetDataSource(FileDescriptor)
Sets the data source as a content Uri.
Parameters
the FileDescriptor for the file you want to play
Exceptions
if it is called in an invalid state
Remarks
Portions of this page are modifications based on work created andВ shared by the Android Open Source Project and used according to terms described in the Creative Commons 2.5 Attribution License.
Applies to
SetDataSource(String)
Sets the data source as a content Uri.
Parameters
the path of the file, or the http/rtsp URL of the stream you want to play
Exceptions
if it is called in an invalid state
When path refers to a local file, the file may actually be opened by a process other than the calling application. This implies that the pathname should be an absolute path (as any other process runs with unspecified current working directory), and that the pathname should reference a world-readable file. As an alternative, the application could first open the file for reading, and then use the file descriptor form SetDataSource(FileDescriptor).
Remarks
Portions of this page are modifications based on work created andВ shared by the Android Open Source Project and used according to terms described in the Creative Commons 2.5 Attribution License.
Источник
MediaPlayer overview
The Android multimedia framework includes support for playing variety of common media types, so that you can easily integrate audio, video and images into your applications. You can play audio or video from media files stored in your application’s resources (raw resources), from standalone files in the filesystem, or from a data stream arriving over a network connection, all using MediaPlayer APIs.
This document shows you how to use MediaPlayer to write a media-playing application that interacts with the user and the system in order to obtain good performance and a pleasant user experience. Alternatively, you might want to use ExoPlayer, which is a customizable open source library that supports high-performance features not available in MediaPlayer
Note: You can play back the audio data only to the standard output device. Currently, that is the mobile device speaker or a Bluetooth headset. You cannot play sound files in the conversation audio during a call.
The basics
The following classes are used to play sound and video in the Android framework:
MediaPlayer This class is the primary API for playing sound and video. AudioManager This class manages audio sources and audio output on a device.
Manifest declarations
Before starting development on your application using MediaPlayer, make sure your manifest has the appropriate declarations to allow use of related features.
- Internet Permission — If you are using MediaPlayer to stream network-based content, your application must request network access.
- Wake Lock Permission — If your player application needs to keep the screen from dimming or the processor from sleeping, or uses the MediaPlayer.setScreenOnWhilePlaying() or MediaPlayer.setWakeMode() methods, you must request this permission.
Using MediaPlayer
One of the most important components of the media framework is the MediaPlayer class. An object of this class can fetch, decode, and play both audio and video with minimal setup. It supports several different media sources such as:
- Local resources
- Internal URIs, such as one you might obtain from a Content Resolver
- External URLs (streaming)
For a list of media formats that Android supports, see the Supported Media Formats page.
Here is an example of how to play audio that’s available as a local raw resource (saved in your application’s res/raw/ directory):
Kotlin
In this case, a «raw» resource is a file that the system does not try to parse in any particular way. However, the content of this resource should not be raw audio. It should be a properly encoded and formatted media file in one of the supported formats.
And here is how you might play from a URI available locally in the system (that you obtained through a Content Resolver, for instance):
Kotlin
Playing from a remote URL via HTTP streaming looks like this:
Kotlin
Note: If you’re passing a URL to stream an online media file, the file must be capable of progressive download.
Caution: You must either catch or pass IllegalArgumentException and IOException when using setDataSource() , because the file you are referencing might not exist.
Asynchronous preparation
Using MediaPlayer can be straightforward in principle. However, it’s important to keep in mind that a few more things are necessary to integrate it correctly with a typical Android application. For example, the call to prepare() can take a long time to execute, because it might involve fetching and decoding media data. So, as is the case with any method that may take long to execute, you should never call it from your application’s UI thread. Doing that causes the UI to hang until the method returns, which is a very bad user experience and can cause an ANR (Application Not Responding) error. Even if you expect your resource to load quickly, remember that anything that takes more than a tenth of a second to respond in the UI causes a noticeable pause and gives the user the impression that your application is slow.
To avoid hanging your UI thread, spawn another thread to prepare the MediaPlayer and notify the main thread when done. However, while you could write the threading logic yourself, this pattern is so common when using MediaPlayer that the framework supplies a convenient way to accomplish this task by using the prepareAsync() method. This method starts preparing the media in the background and returns immediately. When the media is done preparing, the onPrepared() method of the MediaPlayer.OnPreparedListener , configured through setOnPreparedListener() is called.
Managing state
Another aspect of a MediaPlayer that you should keep in mind is that it’s state-based. That is, the MediaPlayer has an internal state that you must always be aware of when writing your code, because certain operations are only valid when the player is in specific states. If you perform an operation while in the wrong state, the system may throw an exception or cause other undesirable behaviors.
The documentation in the MediaPlayer class shows a complete state diagram, that clarifies which methods move the MediaPlayer from one state to another. For example, when you create a new MediaPlayer , it is in the Idle state. At that point, you should initialize it by calling setDataSource() , bringing it to the Initialized state. After that, you have to prepare it using either the prepare() or prepareAsync() method. When the MediaPlayer is done preparing, it enters the Prepared state, which means you can call start() to make it play the media. At that point, as the diagram illustrates, you can move between the Started, Paused and PlaybackCompleted states by calling such methods as start() , pause() , and seekTo() , amongst others. When you call stop() , however, notice that you cannot call start() again until you prepare the MediaPlayer again.
Always keep the state diagram in mind when writing code that interacts with a MediaPlayer object, because calling its methods from the wrong state is a common cause of bugs.
Releasing the MediaPlayer
A MediaPlayer can consume valuable system resources. Therefore, you should always take extra precautions to make sure you are not hanging on to a MediaPlayer instance longer than necessary. When you are done with it, you should always call release() to make sure any system resources allocated to it are properly released. For example, if you are using a MediaPlayer and your activity receives a call to onStop() , you must release the MediaPlayer , because it makes little sense to hold on to it while your activity is not interacting with the user (unless you are playing media in the background, which is discussed in the next section). When your activity is resumed or restarted, of course, you need to create a new MediaPlayer and prepare it again before resuming playback.
Here’s how you should release and then nullify your MediaPlayer :
Kotlin
As an example, consider the problems that could happen if you forgot to release the MediaPlayer when your activity is stopped, but create a new one when the activity starts again. As you may know, when the user changes the screen orientation (or changes the device configuration in another way), the system handles that by restarting the activity (by default), so you might quickly consume all of the system resources as the user rotates the device back and forth between portrait and landscape, because at each orientation change, you create a new MediaPlayer that you never release. (For more information about runtime restarts, see Handling Runtime Changes.)
You may be wondering what happens if you want to continue playing «background media» even when the user leaves your activity, much in the same way that the built-in Music application behaves. In this case, what you need is a MediaPlayer controlled by a Service, as discussed in the next section
Using MediaPlayer in a service
If you want your media to play in the background even when your application is not onscreen—that is, you want it to continue playing while the user is interacting with other applications—then you must start a Service and control the MediaPlayer instance from there. You need to embed the MediaPlayer in a MediaBrowserServiceCompat service and have it interact with a MediaBrowserCompat in another activity.
You should be careful about this client/server setup. There are expectations about how a player running in a background service interacts with the rest of the system. If your application does not fulfill those expectations, the user may have a bad experience. Read Building an Audio App for the full details.
This section describes special instructions for managing a MediaPlayer when it is implemented inside a service.
Running asynchronously
First of all, like an Activity , all work in a Service is done in a single thread by default—in fact, if you’re running an activity and a service from the same application, they use the same thread (the «main thread») by default. Therefore, services need to process incoming intents quickly and never perform lengthy computations when responding to them. If any heavy work or blocking calls are expected, you must do those tasks asynchronously: either from another thread you implement yourself, or using the framework’s many facilities for asynchronous processing.
For instance, when using a MediaPlayer from your main thread, you should call prepareAsync() rather than prepare() , and implement a MediaPlayer.OnPreparedListener in order to be notified when the preparation is complete and you can start playing. For example:
Kotlin
Handling asynchronous errors
On synchronous operations, errors would normally be signaled with an exception or an error code, but whenever you use asynchronous resources, you should make sure your application is notified of errors appropriately. In the case of a MediaPlayer , you can accomplish this by implementing a MediaPlayer.OnErrorListener and setting it in your MediaPlayer instance:
Kotlin
It’s important to remember that when an error occurs, the MediaPlayer moves to the Error state (see the documentation for the MediaPlayer class for the full state diagram) and you must reset it before you can use it again.
Using wake locks
When designing applications that play media in the background, the device may go to sleep while your service is running. Because the Android system tries to conserve battery while the device is sleeping, the system tries to shut off any of the phone’s features that are not necessary, including the CPU and the WiFi hardware. However, if your service is playing or streaming music, you want to prevent the system from interfering with your playback.
In order to ensure that your service continues to run under those conditions, you have to use «wake locks.» A wake lock is a way to signal to the system that your application is using some feature that should stay available even if the phone is idle.
Notice: You should always use wake locks sparingly and hold them only for as long as truly necessary, because they significantly reduce the battery life of the device.
To ensure that the CPU continues running while your MediaPlayer is playing, call the setWakeMode() method when initializing your MediaPlayer . Once you do, the MediaPlayer holds the specified lock while playing and releases the lock when paused or stopped:
Kotlin
However, the wake lock acquired in this example guarantees only that the CPU remains awake. If you are streaming media over the network and you are using Wi-Fi, you probably want to hold a WifiLock as well, which you must acquire and release manually. So, when you start preparing the MediaPlayer with the remote URL, you should create and acquire the Wi-Fi lock. For example:
Kotlin
When you pause or stop your media, or when you no longer need the network, you should release the lock:
Kotlin
Performing cleanup
As mentioned earlier, a MediaPlayer object can consume a significant amount of system resources, so you should keep it only for as long as you need and call release() when you are done with it. It’s important to call this cleanup method explicitly rather than rely on system garbage collection because it might take some time before the garbage collector reclaims the MediaPlayer , as it’s only sensitive to memory needs and not to shortage of other media-related resources. So, in the case when you’re using a service, you should always override the onDestroy() method to make sure you are releasing the MediaPlayer :
Kotlin
You should always look for other opportunities to release your MediaPlayer as well, apart from releasing it when being shut down. For example, if you expect not to be able to play media for an extended period of time (after losing audio focus, for example), you should definitely release your existing MediaPlayer and create it again later. On the other hand, if you only expect to stop playback for a very short time, you should probably hold on to your MediaPlayer to avoid the overhead of creating and preparing it again.
Digital Rights Management (DRM)
Starting with Android 8.0 (API level 26), MediaPlayer includes APIs that support the playback of DRM-protected material. They are similar to the low-level API provided by MediaDrm , but they operate at a higher level and do not expose the underlying extractor, drm, and crypto objects.
Although the MediaPlayer DRM API does not provide the full functionality of MediaDrm , it supports the most common use cases. The current implementation can handle the following content types:
- Widevine-protected local media files
- Widevine-protected remote/streaming media files
The following code snippet demonstrates how to use the new DRM MediaPlayer methods in a simple synchronous implementation.
To manage DRM-controlled media, you need to include the new methods alongside the usual flow of MediaPlayer calls, as shown below:
Kotlin
Start by initializing the MediaPlayer object and setting its source using setDataSource() , as usual. Then, to use DRM, perform these steps:
- If you want your app to perform custom configuration, define an OnDrmConfigHelper interface, and attach it to the player using setOnDrmConfigHelper() .
- Call prepare() .
- Call getDrmInfo() . If the source has DRM content, the method returns a non-null MediaPlayer.DrmInfo value.
- Examine the map of available UUIDs and choose one.
- Prepare the DRM configuration for the current source by calling prepareDrm() .
- If you created and registered an OnDrmConfigHelper callback, it is called while prepareDrm() is executing. This lets you perform custom configuration of the DRM properties before opening the DRM session. The callback is called synchronously in the thread that called prepareDrm() . To access the DRM properties, call getDrmPropertyString() and setDrmPropertyString() . Avoid performing lengthy operations.
- If the device has not yet been provisioned, prepareDrm() also accesses the provisioning server to provision the device. This can take a variable amount of time, depending on the network connectivity.
- To get an opaque key request byte array to send to a license server, call )»>getKeyRequest() .
- To inform the DRM engine about the key response received from the license server, call provideKeyResponse() . The result depends on the type of key request:
- If the response is for an offline key request, the result is a key-set identifier. You can use this key-set identifier with restoreKeys() to restore the keys to a new session.
- If the response is for a streaming or release request, the result is null.
Running prepareDrm() asynchronously
By default, prepareDrm() runs synchronously, blocking until preparation is finished. However, the very first DRM preparation on a new device may also require provisioning, which is handled internally by prepareDrm() , and may take some time to finish due to the network operation involved. You can avoid blocking on prepareDrm() by defining and setting a MediaPlayer.OnDrmPreparedListener .
When you set an OnDrmPreparedListener , prepareDrm() performs the provisioning (if needed) and preparation in the background. When provisioning and preparation have finished, the listener is called. You should not make any assumption about the calling sequence or the thread in which the listener runs (unless the listener is registered with a handler thread). The listener can be called before or after prepareDrm() returns.
Setting up DRM asynchronously
You can initialize the DRM asynchronously by creating and registering the MediaPlayer.OnDrmInfoListener for DRM preparation and the MediaPlayer.OnDrmPreparedListener to start the player. They work in conjunction with prepareAsync() , as shown below:
Kotlin
Handling encrypted media
Starting with Android 8.0 (API level 26) MediaPlayer can also decrypt Common Encryption Scheme (CENC) and HLS sample-level encrypted media (METHOD=SAMPLE-AES) for the elementary stream types H.264, and AAC. Full-segment encrypted media (METHOD=AES-128) was previously supported.
Retrieving media from a ContentResolver
Another feature that may be useful in a media player application is the ability to retrieve music that the user has on the device. You can do that by querying the ContentResolver for external media:
Kotlin
To use this with the MediaPlayer , you can do this:
Источник


