- Share Image and Text using android Intent
- How intent opens share intent?
- Share text using intent
- Share image using intent
- Sharing a File
- This lesson teaches you to
- You should also read
- Receive File Requests
- Create a File Selection Activity
- Define the file selection Activity in code
- Respond to a File Selection
- Grant Permissions for the File
- Share the File with the Requesting App
- Android java share file
- Android Share Text and Images Using Share Intent
- Example
- Video Demo
- Android Share Intent Example for URL, Text or Image
- Android Share Intent Example Step by Step
- Step 1: Prepare XML Layout, we’ll have activity_main.xml
- Step 2: Inside the onCreate method of MainActivity.java, put the buttons and OnClickListener handlers.
- Step 3: As you’ve noticed, we have shareTextUrl() method that will be triggered every time the user clicks on the “Share Text or URL” button.
- Step 4: We also have shareImage() method for sharing images. It is triggered when the user clicks on the “Share Image” button.
- Complete MainActivity.java code:
- Today’s code output screenshots
- How to Share Image of Your App with Another App in Android?
- Step by Step Implementation
Share Image and Text using android Intent

Aminullah Taj Muhammad
Nov 21, 2019 · 2 min read
In this article, we will learn how to share your required data using android intent. This article is part of the “Today I Learnt” category.
How intent opens share intent?
The intent is a class that helps to perform different actions like open ACTION_VIEW, ACTION_WEB_SEARCH, ACTION_SEARCH, etc. In this article, we’ll see about the action ACTION_SEND.
The ACTION_SEND helps to open the share intent where you will share your required data. Now we’ll learn how we share text and image using android Intent with the help of share intent. So, Let’s started.
Share text using intent
So, In this s e ction, we’ll share a simple text using intent. So follow this below code.
Share image using intent
A few days ago I had a task where I wanted to share the image with other apps. I searched many solutions on StackOverflow but those were not cases I wanted. So, I did it by in my own way using Picasso library. Here are the steps to do this.
Step 01: Add Picasso dependency in build.gradle(app)
Step 02: Add below code in onCreate() method.
Before Android 7.0 there were no restriction to share data on other apps but after Android 7.0 Google made some restrictions on data sharing. So, these lines will remove the sharing restrictions.
Step 03: After that, call this function on click listener.
So, this method will share the image on different apps. It takes the path/url of image and load into Bitmap. Picasso converts it into the bitmap and then we create a method that returns URI from the bitmap. So, the below method returns the URI from a bitmap.
For complete code click here
Fewwwwwwww finally done 😃.
Thanks for reading if you want any help then follow me on Github, Twitter.
Источник
Sharing a File
This lesson teaches you to
You should also read
Once you have set up your app to share files using content URIs, you can respond to other apps’ requests for those files. One way to respond to these requests is to provide a file selection interface from the server app that other applications can invoke. This approach allows a client application to let users select a file from the server app and then receive the selected file’s content URI.
This lesson shows you how to create a file selection Activity in your app that responds to requests for files.
Receive File Requests
To receive requests for files from client apps and respond with a content URI, your app should provide a file selection Activity . Client apps start this Activity by calling startActivityForResult() with an Intent containing the action ACTION_PICK . When the client app calls startActivityForResult() , your app can return a result to the client app, in the form of a content URI for the file the user selected.
To learn how to implement a request for a file in a client app, see the lesson Requesting a Shared File.
Create a File Selection Activity
To set up the file selection Activity , start by specifying the Activity in your manifest, along with an intent filter that matches the action ACTION_PICK and the categories CATEGORY_DEFAULT and CATEGORY_OPENABLE . Also add MIME type filters for the files your app serves to other apps. The following snippet shows you how to specify the new Activity and intent filter:
Define the file selection Activity in code
Next, define an Activity subclass that displays the files available from your app’s files/images/ directory in internal storage and allows the user to pick the desired file. The following snippet demonstrates how to define this Activity and respond to the user’s selection:
Respond to a File Selection
Once a user selects a shared file, your application must determine what file was selected and then generate a content URI for the file. Since the Activity displays the list of available files in a ListView , when the user clicks a file name the system calls the method , android.view.View, int, long)»>onItemClick() , in which you can get the selected file.
In , android.view.View, int, long)»>onItemClick() , get a File object for the file name of the selected file and pass it as an argument to getUriForFile() , along with the authority that you specified in the
element for the FileProvider . The resulting content URI contains the authority, a path segment corresponding to the file’s directory (as specified in the XML meta-data), and the name of the file including its extension. How FileProvider maps directories to path segments based on XML meta-data is described in the section Specify Sharable Directories.
The following snippet shows you how to detect the selected file and get a content URI for it:
Remember that you can only generate content URIs for files that reside in a directory you’ve specified in the meta-data file that contains the
element, as described in the section Specify Sharable Directories. If you call getUriForFile() for a File in a path that you haven’t specified, you receive an IllegalArgumentException .
Grant Permissions for the File
Now that you have a content URI for the file you want to share with another app, you need to allow the client app to access the file. To allow access, grant permissions to the client app by adding the content URI to an Intent and then setting permission flags on the Intent . The permissions you grant are temporary and expire automatically when the receiving app’s task stack is finished.
The following code snippet shows you how to set read permission for the file:
Caution: Calling setFlags() is the only way to securely grant access to your files using temporary access permissions. Avoid calling Context.grantUriPermission() method for a file’s content URI, since this method grants access that you can only revoke by calling Context.revokeUriPermission() .
Share the File with the Requesting App
To share the file with the app that requested it, pass the Intent containing the content URI and permissions to setResult() . When the Activity you have just defined is finished, the system sends the Intent containing the content URI to the client app. The following code snippet shows you how to do this:
Provide users with an way to return immediately to the client app once they have chosen a file. One way to do this is to provide a checkmark or Done button. Associate a method with the button using the button’s android:onClick attribute. In the method, call finish() . For example:
Источник
Android java share file
Android Share Text and Images Using Share Intent
Android provide us an Intent by which we can use to share image, video, audio, text, etc. to other installed apps like WhatsApp, Facebook, Twitter, etc. We had seen many apps has functionality of sharing image and text to other app and also they have functionality to make other apps share their text and image to the app like WhatsApp from which we can share text and image and also we can share text and image to WhatsApp.
For more information about this Sharing Intent you can read over here.
Today we are going to create an app that share text and image to other app and also the other app can share their image and text to this app.
Example
In this tutorial, we are going to learn how to share image and text to other apps and help other apps to share image and text to our app.
Video Demo
1. Create a new project in Eclipse by navigating to File ⇒ New Android ⇒ Application Project and fill required details. By default my activity is ShareActivity.java.
2. Open res ⇒ values ⇒ strings.xml and add below string values. These are some strings that we are going to use in our project.
3. Now, create an xml layout naming share_activity.xml for ShareActivity.java. In this layout i had taken ImageView to display the selected image from gallery and share button for image and one edittext for user input to share the text.
4. For sharing image we have to follow some steps :
- ACTION_SEND – This intent will start the Send Activity.
- setType(“image/*”) – We have to set type of send data i.e. for image it is” image/*”.
- putExtra(Intent.EXTRA_STREAM, imagePath) – Put extra will put the extra stream with the path name of image that we are sharing.
- startActivity(Intent.createChooser(sharingIntent, “Share Image Using”)) – Now start chooser activity with title name.
For sharing text also we have to follow some steps :
Источник
Android Share Intent Example for URL, Text or Image
Today I’m going to give you an android share intent example that you can use to enable your app to share contents such as URL or text and Image to other apps installed in your Android device like Facebook, Twitter, Messaging, Instagram, Evernote, etc.. Example uses of this code include:
You are building an app that browses a certain website or URL.
Your app generates an image that a user can share.

Android Share Intent Example Step by Step
Step 1: Prepare XML Layout, we’ll have activity_main.xml
Step 2: Inside the onCreate method of MainActivity.java, put the buttons and OnClickListener handlers.
Step 3: As you’ve noticed, we have shareTextUrl() method that will be triggered every time the user clicks on the “Share Text or URL” button.
Step 4: We also have shareImage() method for sharing images. It is triggered when the user clicks on the “Share Image” button.
Complete MainActivity.java code:
Please note that when you use the setType() method, you are enabling Android to filter what apps can share your content. For example, you are sharing a text or URL, the appropriate apps to be shown can be Facebook, Messaging or Email. If you are sharing an image, proper apps can be Instagram, Snapseed or Picasa.
Today’s code output screenshots

Share Text or URL button was touched. Take note of the apps on the list.

User chose to share to Facebook

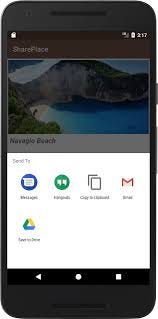
“Share Image” button was touched. Apps was different on the list.

User chose to share with Gmail. Our image was attached.

User chose to share to Snapseed.
If you have any suggestions to improve this post, please drop it in the comments section below! I’ll be glad to update this post for further improvement. Thanks for reading our Android Share Intent Example!
Источник
How to Share Image of Your App with Another App in Android?
Most of the time while using an app we want to share images from the app to another app. While using Many Social Media Platforms we find this feature to be very useful when we want to share information from one app to another. The Android Intent resolver is used when sending data to another app as part of a well-defined task flow. To use the Android intent resolver, create an intent and add extras. Here we are going to understand how to do that.
Note: If you want to share the Text of Your App with Another App in Android then please refer to this .
Attention reader! Don’t stop learning now. Get hold of all the important Java Foundation and Collections concepts with the Fundamentals of Java and Java Collections Course at a student-friendly price and become industry ready. To complete your preparation from learning a language to DS Algo and many more, please refer Complete Interview Preparation Course.
Step by Step Implementation
Step 1: Create a new Project
To create a new project in Android Studio please refer to How to Create/Start a New Project in Android Studio. Note that select Java as the programming language.
Step 2: Working with the AndroidManifest.xml file
Add the following permission to the AndroidManifest.xml file
Add the following lines inside the tag and after the tag.
Источник


