- 5 tips for preparing for Multi-Window in Android N
- Pro-tip 1: Use the right Context
- Pro-tip 2: Handle configuration changes correctly
- Pro-tip 3: Handle all orientations
- Pro-tip 4: Build a responsive UI for all screen sizes
- Pro-tip 5: Activities started by other apps must always support multi-window
- Test all the things!
- Split Screen using Multiple Layout
- How to Split Screen Layout in Android
- To Remove the Action Bar
- Android N quick-tip: How to activate split-screen multitasking mode
- Method 1 – Drag and Drop
- Method 2 – Swipe up
- Method 3
- Adjusting, Swapping apps and Deactivating
5 tips for preparing for Multi-Window in Android N

If you’ve been digging through What’s New in Android N, you probably stumbled across multi-window support.
With split-screen multi-window, two apps will be visible side-by-side. Excited to see how this works, I know I immediately scanned through the documentation, looking for what new APIs made this sorcery work.
Turns out, there aren’t many new APIs. A few XML attributes for customizing whether you support multi-window at all and a few Activity methods to check whether you are currently in multi-window mode. So where’s the magic? The magic has been there all along.
And by magic, we mean Android’s resource system. One of the most powerful parts of the resource system is the ability to provide alternate resources — change dimensions, layouts, drawables, menus, etc. based on different qualifiers.
Multi-window takes advantage of the resource system by adjusting the configuration based on the size of your window — screen size is the obvious one, but the smallest width (i.e., the minimum of the width or height) and the orientation are also updated when resizing.
This takes us to the first tip.
Pro-tip 1: Use the right Context
Loading the proper resources requires the proper Context. If you’re using the Activity context for inflating your layouts, retrieving resources, etc, then you’re good to go.
However, if you’re using your Application context for anything UI related, you’ll find that the resources that are loaded are blissfully unaware of multi-window. Besides issues with not using your Activity’s theme, you may be loading the wrong resources entirely! Best to keep your UI stuff with the Activity Context.
Pro-tip 2: Handle configuration changes correctly
With the correct context in hand, you’ll be sure to get the right resources given the size of your window (whether it is full screen as before or split between your app and another). The process for reloading those resources is based on how you handle runtime changes.
The default case is that your whole activity is destroyed and recreated, restoring any state you saved in onSaveInstanceState() and reloading all of the resources/layouts. This has the nice property that you know everything is consistent with the new configuration and that every type of configuration is handled.
It should go without saying that each configuration change should be fast and seamless. Make sure you aren’t doing a lot of work in onResume() and consider using loaders to ensure your data survives configuration changes.
You can still handle the configuration change yourself in which case your Activity (and Fragments) will receive a callback to onConfigurationChanged() instead of being destroyed and recreated and you will need to manually update your views, reload resources, etc.
To catch the multi-window related configuration changes, you’d need to add an android:configChanges attribute to your manifest with at least these values:
Make sure you’re handling every resource that might be changing (as is your responsibility when you take on handling configuration changes yourself).
This includes reloading resources that might have been considered a constant before. Consider the case where you had a dimension in values and in values-sw600dp. In the non-multi-window world, you’d never switch between these two at runtime as the smallest width would never change (it would always be the smallest width of your device). However, with multi-window, you can and will have to switch between these resources as your app resizes.
Pro-tip 3: Handle all orientations
Remember way back in the intro where we talked about the orientation changing while the window resizes? That’s right: even if the device is in landscape, your app might be in ‘portrait’ orientation.
Turns out: “portrait” really just means the height is greater than the width and “landscape” means the width is greater than the height. So it certainly makes sense, with that definition in mind, that your app could transition from one to the other while being resized.
That also means that transitions between orientations should be as smooth as possible. Quoting the split screen material design specs:
Changing a device’s orientation should not cause the UI to change unexpectedly. For example, an app displaying a video in one of the split screens (in portrait mode) should not begin playback in full-screen if the device rotates to landscape mode.
Note: if you’d still want this type of functionality when your app is fullscreen, you’ll be able to use the inMultiWindowMode() method to check exactly which case you’re in.
Locking your screen orientation by using android:screenOrientation is also affected by multi-window. For apps not targeting Android N, adding android:screenOrientation means you will not support multi-window at all — you’ll always force the user out of multi-window mode. Things change a little when you target N — instead of not supporting multi-window at all, any orientation you set via android:screenOrientation is ignored when in multi-window mode.
Keep in mind that locking your orientation at runtime using setRequestedOrientation() will have no effect in multi-window mode, whether you target N or not.
Adding the android:immersive attribute to your Activity’s manifest also disables multi-window on apps not targeting N, with the same rules as android:screenOrientation above.
Pro-tip 4: Build a responsive UI for all screen sizes
Orientation isn’t the only thing that goes into designing for split screen. Multi-window is the first time your tablet UI (you have a tablet UI right? After all, 12.5% of 1.4 billion devices is a lot of devices…) is going to be shrunk down to a miniature size.
If you’ve been building a responsive UI that reacts to the available space and has relatively similar phone and tablet layouts, you’ll find you’ll be well prepared for multi-window. As suggested, scaling the UI down to 220dp wide/tall and building up from that size to the fullscreen size is a something you can do now.

However, if your mobile and tablet UIs are vastly different, don’t overwhelm users by switching between the two — stick with the tablet UI and work on scaling it down. There’s a number of responsive UI patterns you might consider employing to make resizing a seamless experience for your users — again, no N APIs needed.
Pro-tip 5: Activities started by other apps must always support multi-window
In the multi-window world, your whole task is represented by a single window. That’s why if you want to launch an adjacent activity you need to start a new task — new task, new window.
It also means the reverse is true, quoting that same page:
If you launch an activity within a task stack, the activity replaces the activity on the screen, inheriting all of its multi-window properties.
That means if you have an Activity that can be started by other apps, your activity will inherit the same multi-window properties as the calling Activity. This includes attributes such as minimal size. In cases of startActivityForResult(), your Activity must be part of the same task stack and even in the case of an implicit intent, you can’t guarantee that they’ll also include a FLAG_ACTIVITY_NEW_TASK.
Therefore every one of those activities (and any activities started by that Activity) must support multi-window, all the way down the smallest size. Test thoroughly!
Test all the things!
The best way to prepare for multi-window is to test your app. Even without any code changes or going through the process of setting up the Android N SDK, installing your existing app on an Android N device or emulator is a fantastic first step and an easy way to catch low hanging fruit and #BuildBetterApps.
Источник
Split Screen using Multiple Layout
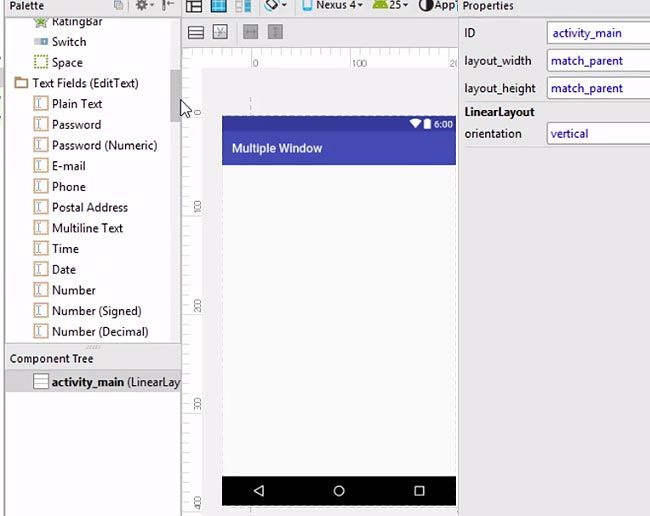
How to Split Screen Layout in Android
Please follow the steps below in order to use split screen layout in Android App:
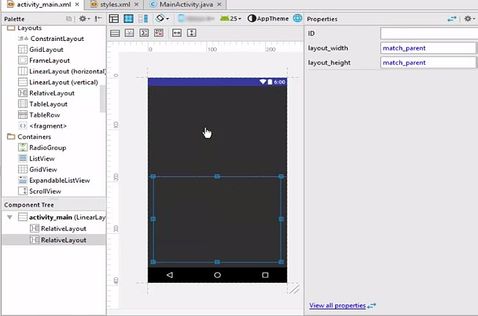
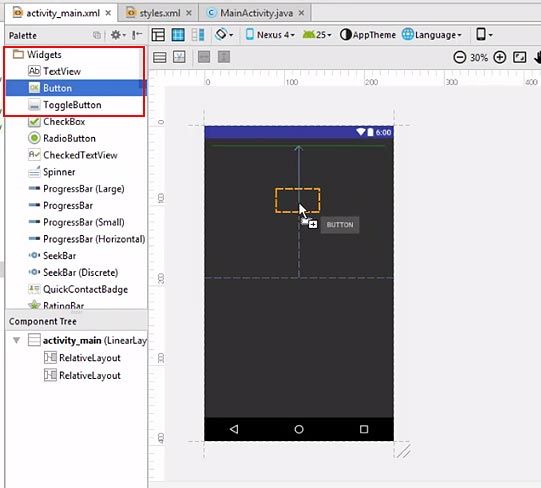
1.Splitting the screen using multiple layouts in a single activity
2.Start a new project
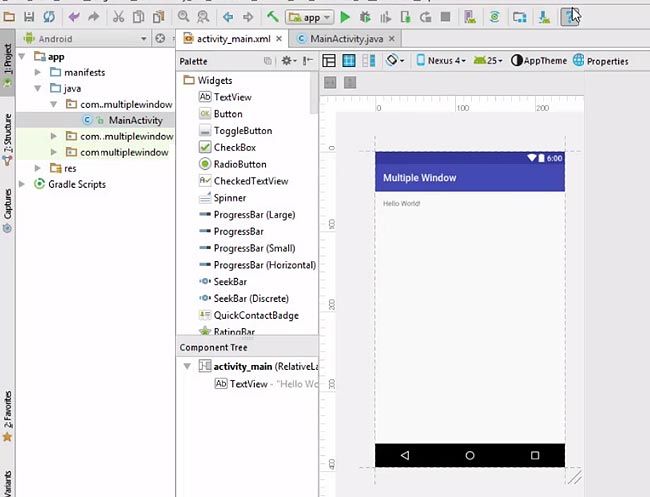
3.Remove the ‘Hello world’ text.
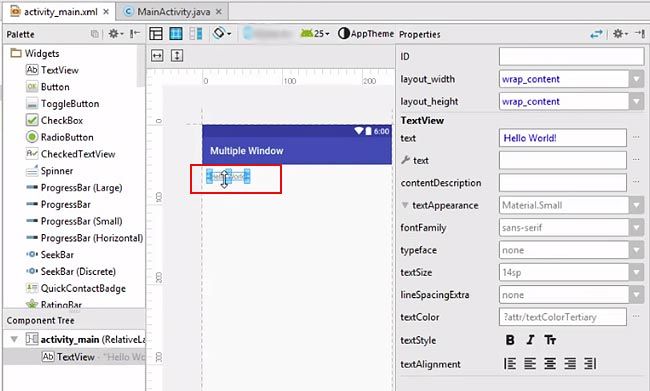
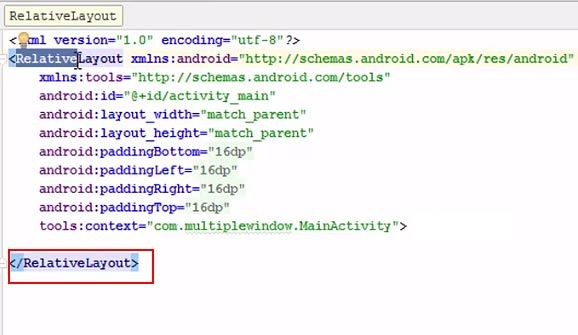
4.Click on the text tab.
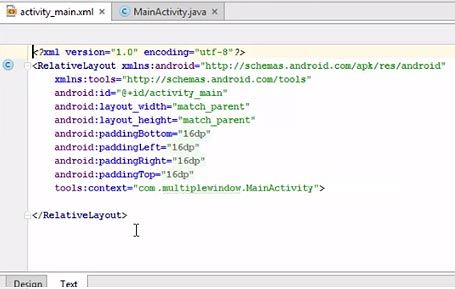
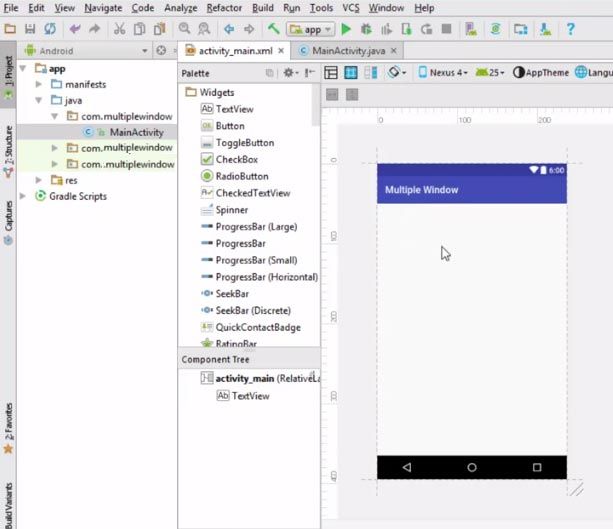
5.Change Relative layout to Linear layout.
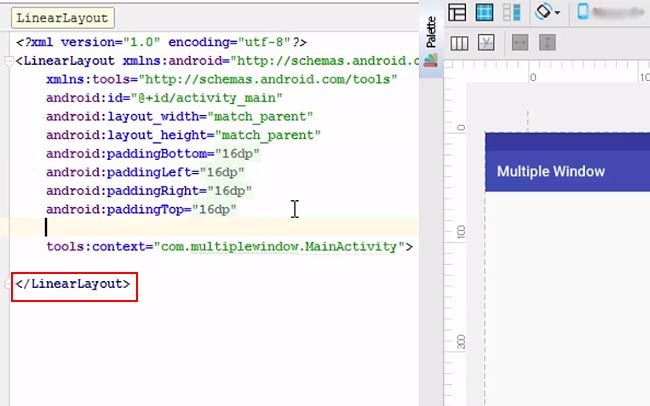
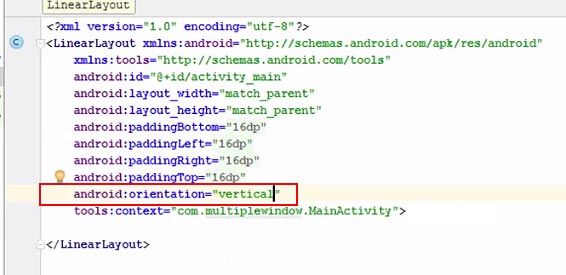
6.Add android: orientation = ‘vertical’
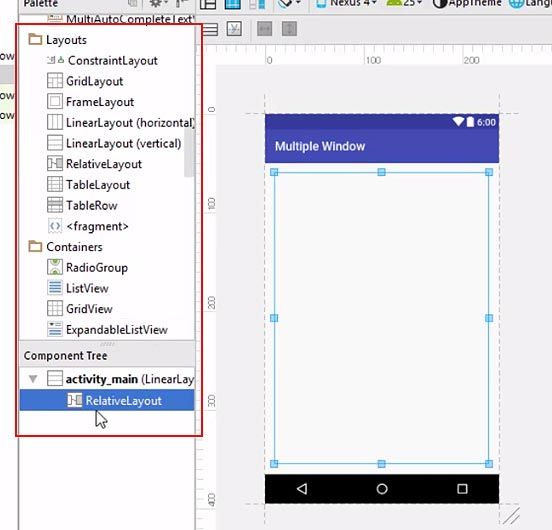
7.Go to the Design tab.
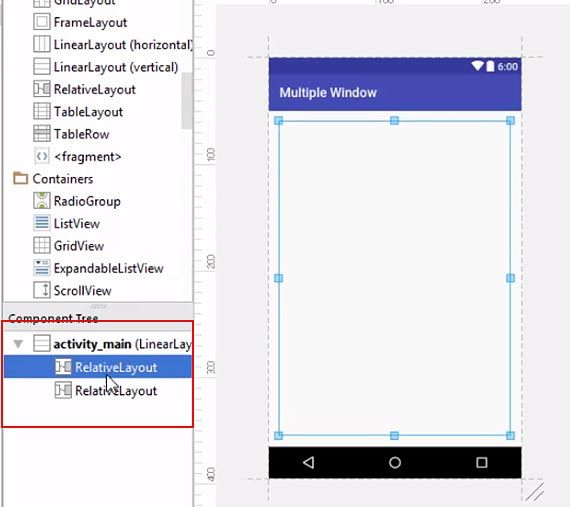
8.Go to Layout > relative layout. Drag relative layout under the component tree. Add another relative layout under the component tree.
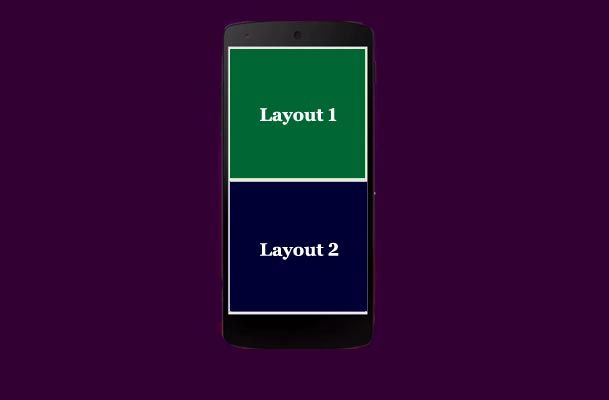
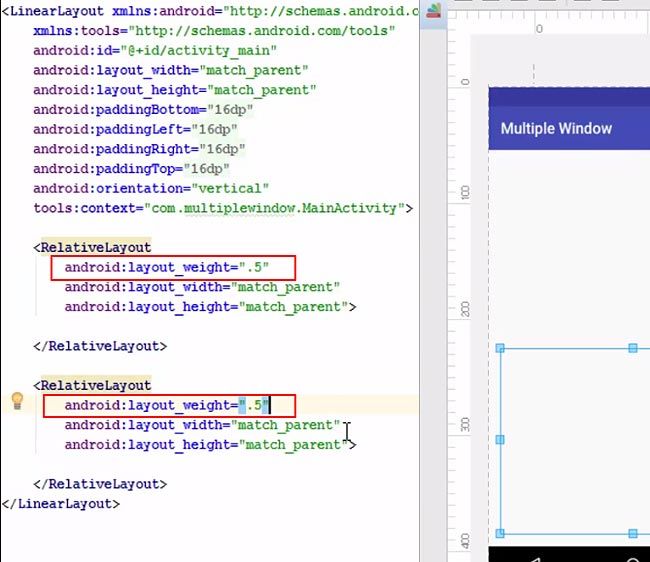
9.Go to the Text tab. Add a line android:layout_weight=’.5′. You can notice the size on the adjoining screen.
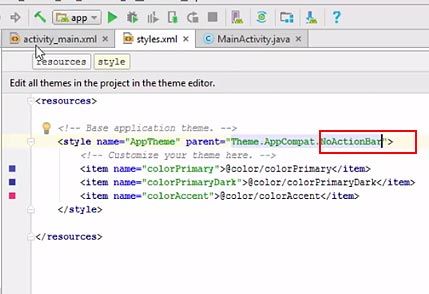
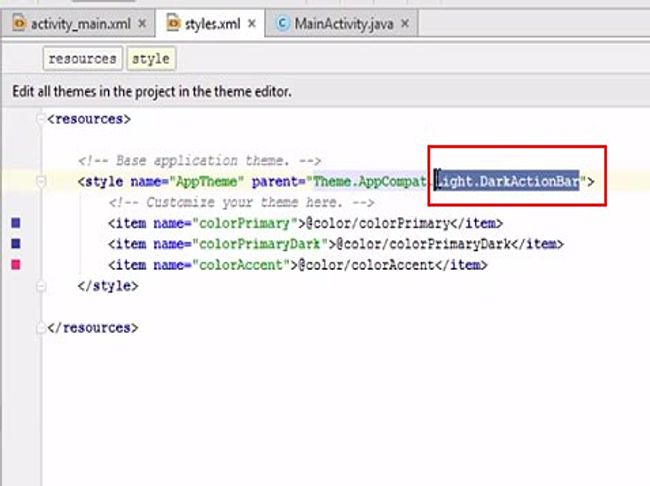
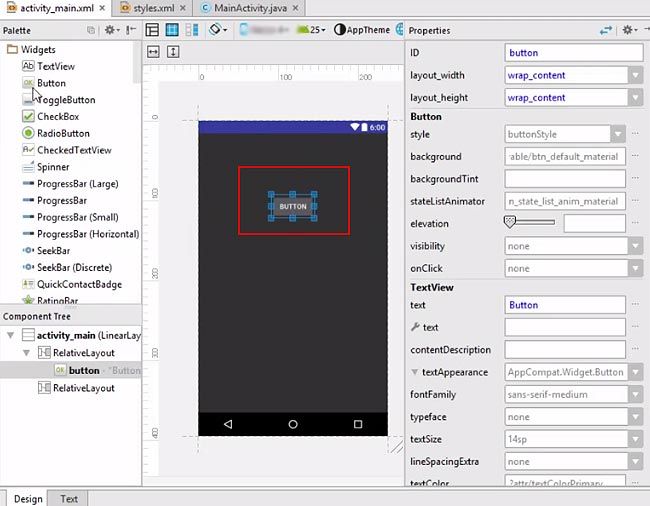
To Remove the Action Bar
10.Go to res > values > styles.xml
11.Replace Light.DarkActionBar with NoActionBar.
12.Go to activity.xml, then the Design tab. You will notice that the action bar has disappeared from the screen.
13.Go to Widgets > Button. Drag the button to the center of the screen.
14.Click on the WebView and drag it on the bottom portion of the window.
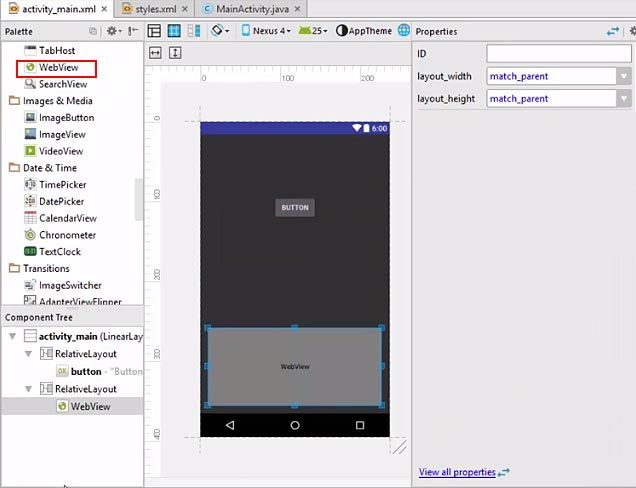
15.Go the Text tab. Remove the unwanted code highlighted in blue.
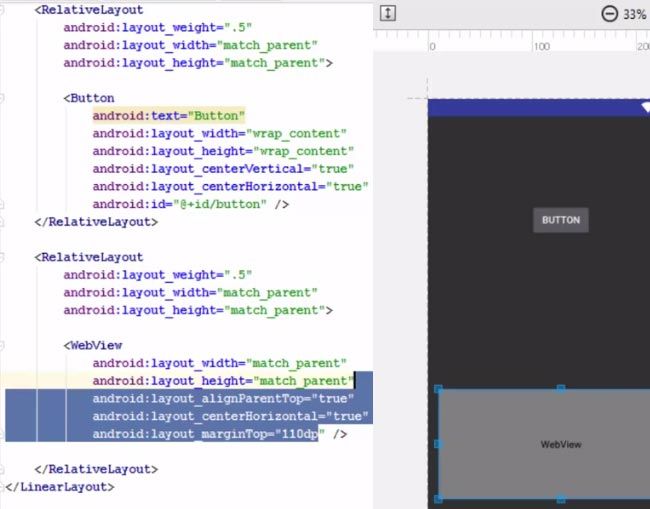
16.Replace wrap content with match parent.
Источник
Android N quick-tip: How to activate split-screen multitasking mode
— May. 4th 2016 3:06 pm PT
Android N has been available in the form of a Developer Preview now for a few weeks and is already in to its second preview. Part of this upcoming major software update is the baked-in ability to have two apps side-by-side on the screen, otherwise known as split-screen multitasking. Here’s how you use it…
It’s important to note that, because this is beta software for now, the methods and exact UI may change over time, but we’ll be sure to update this guide with any changes if they’re going to impact you by the time the software is available as a public release.
It’s also worth noting that apps need to have split-screen compatibility. While many apps will support the feature once it’s a publicly available OS, there are plenty of third party apps that simply don’t support it at time of writing.
As of right now, there are a couple of methods for activating split screen.
Method 1 – Drag and Drop
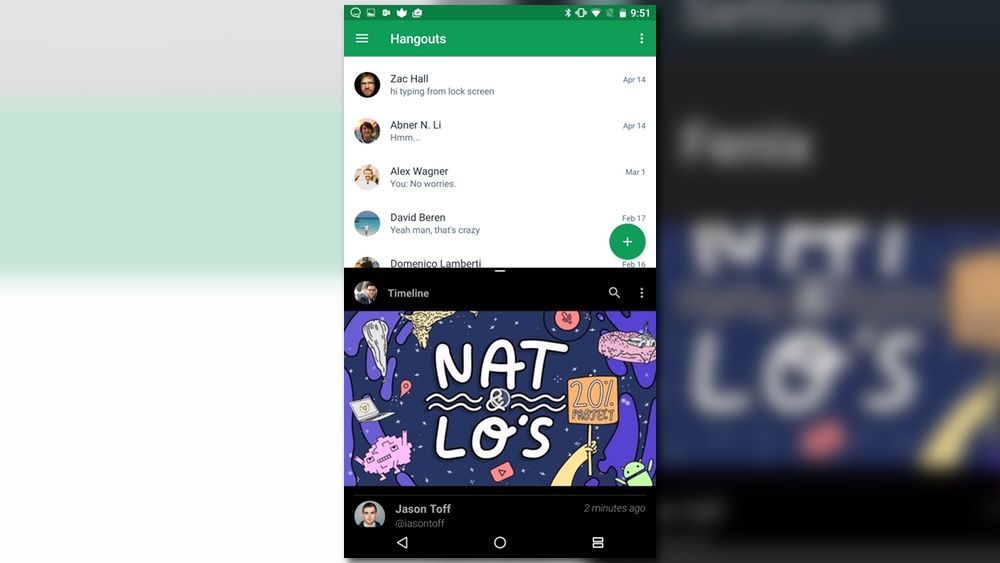
Within Android N, when using any app, or even on the home screen, tap the app-switcher icon (that’s the square one on the bottom right of the screen in most phones). This launches the familiar card-based multitasking window.

Tap and hold one of the apps that you’d like to have onscreen, then drag it up to the top of the screen. Once you’ve done that, the app will take up the top half of your display (assuming you’re holding it in portrait and not landscape mode). The bottom half will show the app-switching screen.
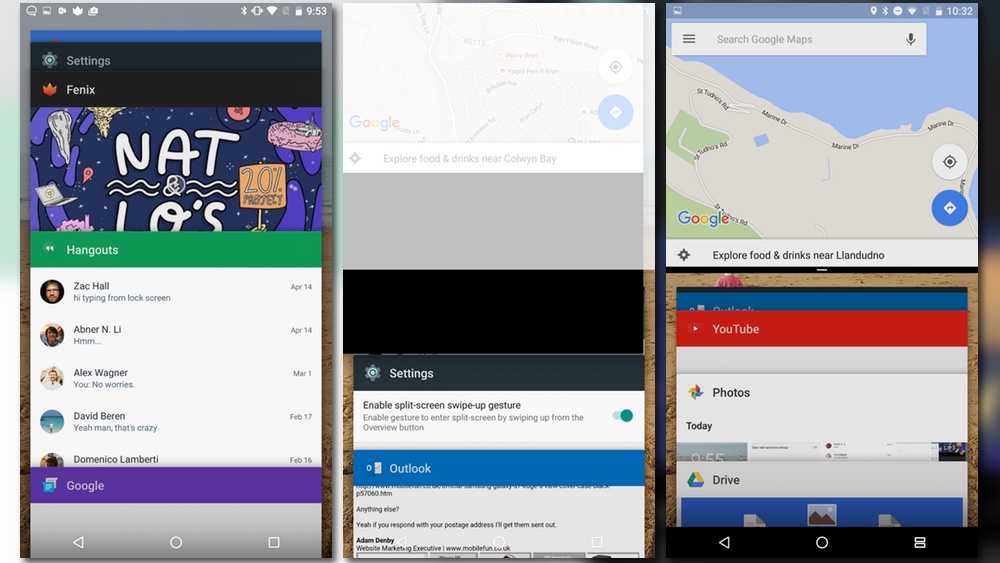
Tap on the second app you’d like to have onscreen, then you’ll have two apps running side-by-side on the same screen.
Method 2 – Swipe up
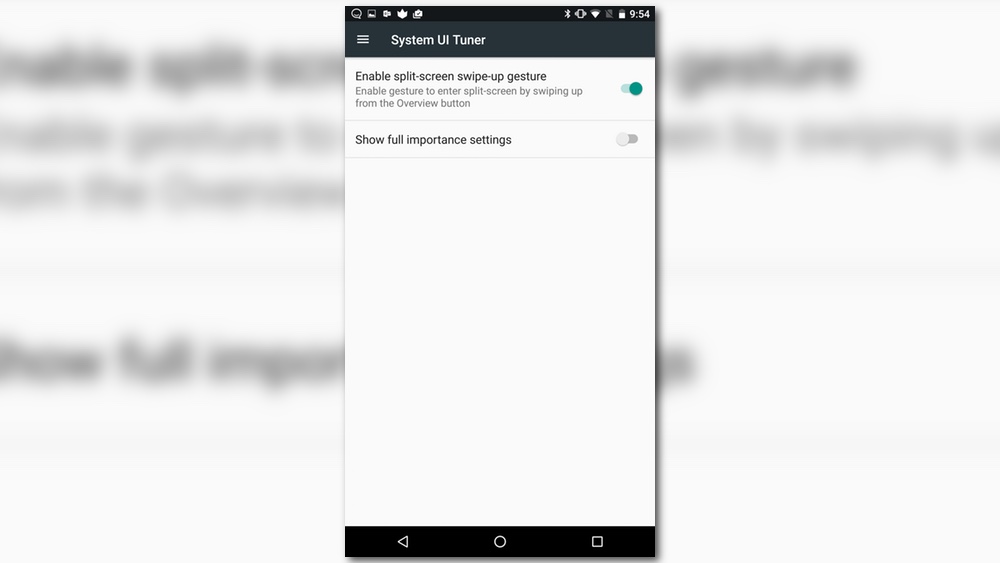
The second method is much easier, once it’s been activated. To do that, you first have to enable System UI Tuner in settings. This means you need to swipe down from the top of your screen until the full notification shade and quick settings screen are on display.
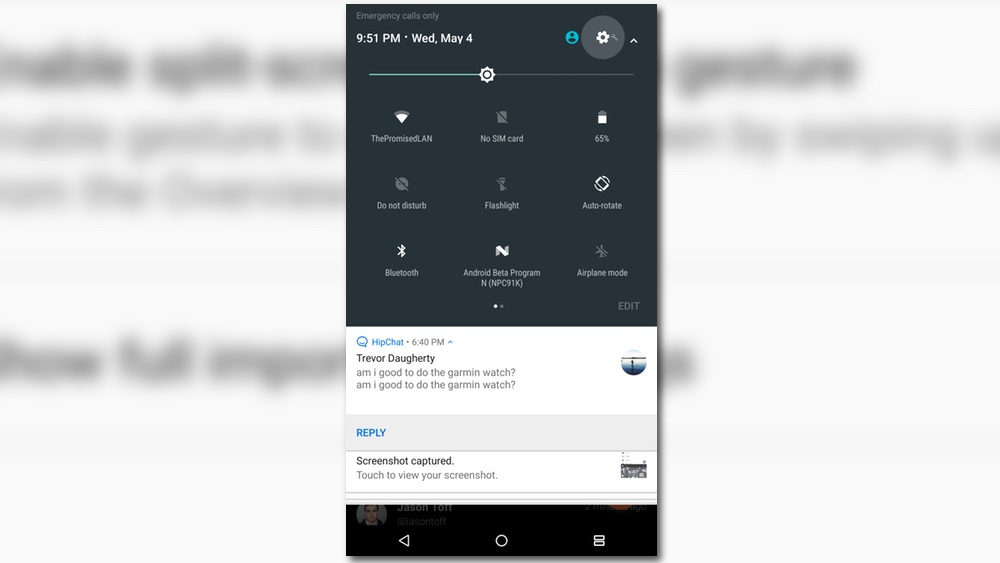
You’ll notice a settings cog in the top right corner*. Press and hold this icon for a few seconds until it starts spinning. Let go, and you’ll see a pop up alert onscreen for a short while telling you System UI Tuner has been added to your settings options.
Once System UI Tuner is active, go to Settings>System UI Tuner>Other, then tap the toggle to ‘Enable split-screen swipe-up gesture’.
*If pressing and holding the cog doesn’t work, head to Settings>About phone and find ‘Build number’ at the bottom of the screen. Tap it multiple times until it says “Congratulations, you are now a developer”, then try pressing and holding the settings cog in the drop-down window again.
Once active you can simply swipe up from the app-switching button (that square one again) when you’re using any app and it’ll launch the split-screen mode.
Method 3
Just press and hold the app switching button.
Adjusting, Swapping apps and Deactivating
While the apps each take up an equal portion of the screen with a split right in the middle as default, you can adjust where you want the split to be by touching and holding the middle split and moving it where ever you want.
What’s more, as hinted at previously, this works in portrait or landscape mode. Rotate your phone so that it’s horizontal, and the split-screen apps arrange themselves side-by-side instead of being stacked vertically.
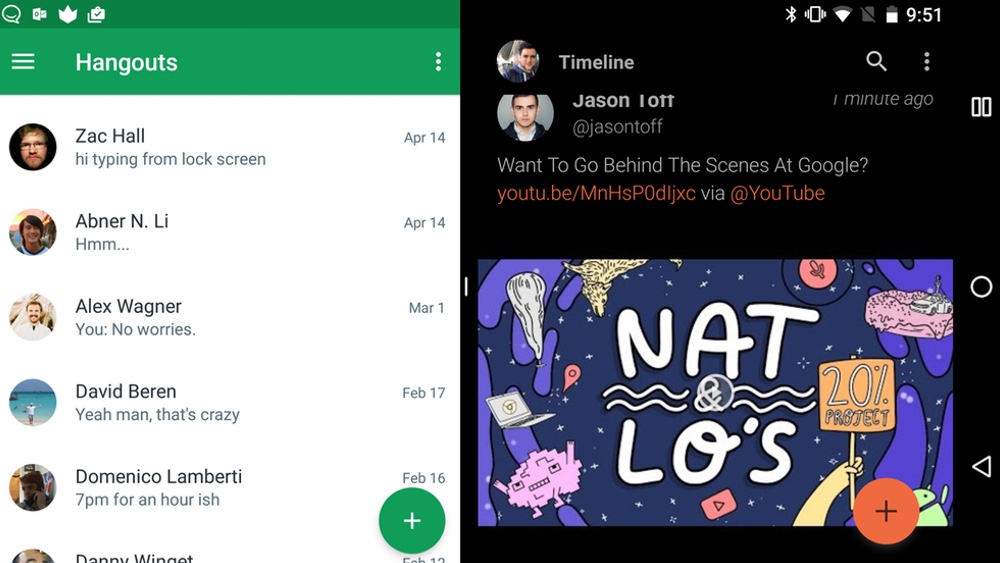
With the split-screen activated, you’ll notice that the app-switching single square icon has turned in to two parallel rectangles.

When active, you can hide the apps to view your home screen by pressing the home button (the round one in the middle). This is also useful if the app you want to launch isn’t already active, or you want to chose an alternative secondary app. The running apps simply push off the screen and you can go look for the app you want, and it’ll launch as the secondary application.
![]()
There are a couple of methods of cancelling split-screen mode. First of all, you can press and hold the split-screen app-switching (those two rectangles). Second, you can just drag the app-splitter until it’s right at the top or at the bottom of the screen, filling your display with a single app.
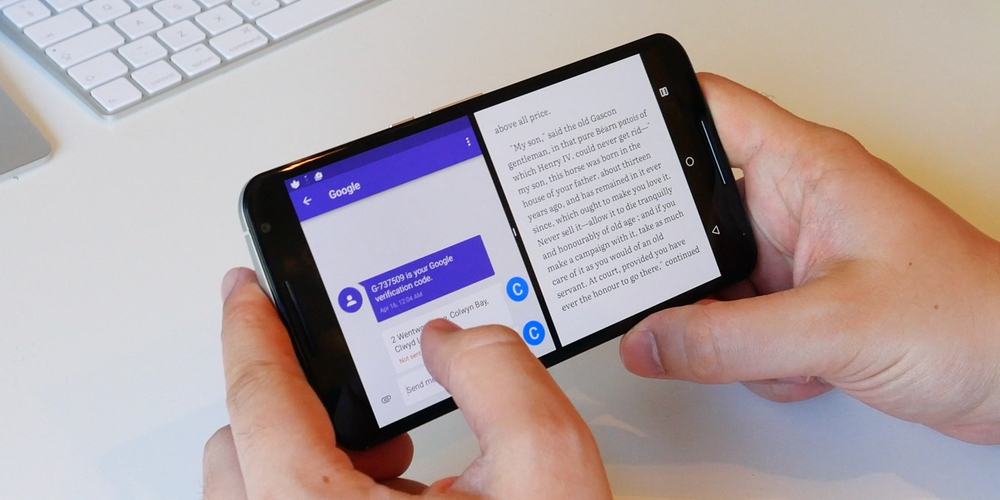
That’s pretty much all there is to it for now. Once split-screen mode is active, you can use it to copy and paste information quickly between apps without having to keep switching between individual full-screen apps. You can search for directions in Maps while chatting to a friend on Hangouts, or Messenger. You can even read a book while looking up a definition online or using a thesaurus/dictionary to find synonyms and descriptions. Of course, it’s built specifically with tablets in mind, but for those of us with large-screened phones, it’s a great tool to have.
If you have a Nexus 6P, Nexus 5X or Nexus 6 phone, Pixel C or Nexus 9 tablet, the factory images are available to download right now. If you haven’t tried Android Developer Preview yet, you can sign up to join the beta program really easily by visiting google.com/android/beta, and have the software delivered to your phone without any complicated manual flashing.
FTC: We use income earning auto affiliate links. More.
Источник


