- Android job scheduler пример
- Android Job Scheduler Example
- JobService
- Scheduling Job
- Creating JobInfo
- JobScheduler Example
- Android JobSchedulers & Usages
- Creating a JobService
- Adding to Manifest
- Creating JobInfo object
- Планирование задач в Андроид
- Проблемы с сервисами
- Запланированный задачи во время жизненного цикла приложения
- Запланированные задачи при выключенном приложении
- Alarm Manager
- Job Scheduler
- GCM Network Manager
- Firebase Job Dispatcher
- Sync Adapter
- Упражнение
- Создание Job Service
- Создать объект JobInfo
- Запланированная задача
- Заключение
- Scheduling of tasks with the Android JobScheduler — Tutorial
- 1. Scheduling tasks
- 1.1. Options for scheduling
- 1.2. The job scheduler API
- 1.3. Advantages of the job scheduler API
- 1.4. Create a Job
Android job scheduler пример
Android Job Scheduler Example
For scheduling background tasks, Android provides JobScheduler. It allows you to specify conditions for running work. Job schedule is part of android platform and maintains background jobs of all application installed on the device at one place allowing for optimal usage of device resources. JobSchedule can be used to run short and long running tasks such as downloading data, cleaning cache, processing of data, etc.
Now let’s see how you can create and schedule a job using JobScheduler.
JobService
JobService is an android service component with callback methods which the JobSchedule calls when a job needs to be run. That means your background job code needs to be added to callback methods of JobService. To create JobService, you need to extend JobService class and implement its methods onStartJob and onStopJob.
These callback methods are passed JobParameters as an argument by the JobScheduler. JobParameters contains parameters that are set when job is scheduled. These call back methods return boolean value, false indicates that the job is complete and true tells that job is still running in the background, in this case you need to call jobFinished method to inform job scheduler about the finished state after the job is complete.
Since job service is an android component, it runs on main thread. That’s why the tasks which are in job service callback methods needs to be run on background thread.
Since it is a service, you need to define it in the manifest xml file and it needs to be protected with android.permission.BIND_JOB_SERVICE permission.
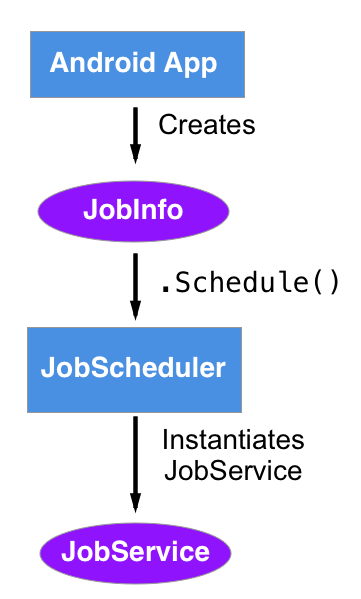
Scheduling Job
To schedule a job, first you need to get JobScheduler instance by calling getSystemService on the context object passing JOB_SCHEDULER_SERVICE argument to it.
Then you need to instantiate ComponentName object by passing context and job service class that you created.
Then you can create JobInfo object using JobInfo.Builder and setting various configuration parameters. JobInfo.Builder has various setter methods which allow you to define your Job. See the following sections for more details.
Then finally, call schedule() on job scheduler object passing job info object to it.
Creating JobInfo
As shown above JobInfo is created using JobInfo.Builder class by using its setter methods, following are the details.
To create a job that runs every time after elapsing of a specified time, you can use setPeriodic method passing time in milliseconds.
To create a job that needs to be rerun if it fails, you need to use setBackOffCriteria() method passing time interval for the first time retry and retry policy which is used to calculate time interval for retries after first retry.
You can make a job delayed by specified amount of time by setting minimum latency and you can also specify maximum delay by calling setOverrideDeadline. These two setting are applicable for only non-periodic jobs.
To create a job that stays as scheduled even after device reboots, you need call setPersisted() method on JobInfo.Builder passing true as value to it. This setting requires RECEIVE_BOOT_COMPLETED permission.
If your job needs network connection and you want to run the job when network of specified kind is used, then you need to specify required network type by calling setRequiredNetworkType() method passing network type.
You can configure your job to run when the device is charging and idle by calling setRequiresCharging and setRequiresDeviceIdle methods respectively or you can ask the scheduler to not run the job when battery is low by calling setRequiresBatteryNotLow() method and passing true.
Similarly, you can schedule a job to run only when storage is not low by calling setRequiresStorageNotLow() method and setting it to true.
To pass data to JobService, you need to set extras by creating PersistableBundle object. JobScheduler passes PersistableBundle object to JobService call back methods.
JobScheduler Example
I’ll show you how to use JobScheduler in android app with an example. The example job reads latest data from Firebase firestore database, updates device local database with new data and deletes expired data from local database. For local database access, Room persistency library is used.
Источник
Android JobSchedulers & Usages

You’ve seen that you can trigger events based on the real-time clock, or the elapsed time since boot using the AlarmManager class. Most tasks, however, do not require an exact time but should be scheduled based on a combination of system and user requirements.
For example, a news app might like to update the news in the morning but could wait until the device is charging and connected to wifi to update the news, to preserve the user’s data and system resources.
The JobScheduler class is meant for this kind of schedule; it allows you to set the conditions or parameters of running your task. Given these conditions, the JobScheduler calculates the best time to schedule the execution of the job. Some examples of these parameters are the persistence of the job across reboots, the interval that the job should run at, whether or not the device is plugged in, or whether or not the device is idle.
Here is an example when you would use this job scheduler:
1.Tasks that should be done once the device is connected to a power supply
2.Tasks that require network access or a Wi-Fi connection.
3.The task that is not critical or user-facing
4.Tasks that should be running on a regular basis as batch where the timing is not critical
JobScheduler is pretty straightforward. JobScheduler is only available on devices running API 21+.
There are only three things you need to do:
- Create a Job Service to handle your job
- Add that JobService to the manifest
- Schedule your job using a JobInfo object to define your conditions
Creating a JobService
JobService is a specialized Service (i.e. extends Service) with a couple of methods to help us handle our job.
To create a Job Service, start by extending the JobService class and overriding ‘ onStartJob’ and ‘ onStopJob’.

Also, when your job is finished (has been completed or canceled) you’re responsible for calling the job finished method. The jobFinished method tells Android that your job is done and lets it release the wakelock for your app. If you don’t call the jobFinished method your app could be responsible for draining your user’s battery!
Adding to Manifest
The new JobService must be registered in the Android manifest with the BIND_JOB_SERVICE permission.
Creating JobInfo object
All conditions for job scheduler through the JobInfo object .
To build that JobInfo object, you need two things every time
job number: to help you distinguish which job this is &
JobService.
There are many conditions & based on requirement we can set job info objects.
Источник
Планирование задач в Андроид
Привет Хабр! Предлагаю вашему вниманию свободный перевод статьи «Schedule tasks and jobs intelligently in Android» от Ankit Sinhal.
В современной разработке приложений очень часто выполняются задачи асинхронно, и их объем выходит за пределы жизненного цикла приложения. В некоторых ситуациях мы также должны выполнять некоторые работы, но это не обязательно делать прямо сейчас. Чтобы запланировать фоновые работы, Android представила несколько API, которые мы можем грамотно использовать в наших приложениях.
Выбор подходящего планировщика может улучшить производительность приложений и время автономной работы устройства.
Для планирования задач на Android доступно несколько API:
- Alarm Manager
- Job Scheduler
- GCM Network Manager
- Firebase Job Dispatcher
- Sync Adapter
Проблемы с сервисами
Сервисы позволяют выполнять длительные операции в фоновом режиме. Запуск сервисов в фоновом режиме очень негативно влияет на заряд батареии.
Сервисы особенно вредны, когда они постоянно использует ресурсы устройства, даже если не выполняет полезные задачи.
Запланированный задачи во время жизненного цикла приложения
Когда приложение запущено, и мы хотим запланировать или запустить задачу в определенное время, рекомендуется использовать класс Handler вместе с Timer и Thread.
Запланированные задачи при выключенном приложении
Alarm Manager
AlarmManager обеспечивает доступ к службам уведомлений. Это дает возможность выполнять любые операции за пределами жизненного цикла вашего приложения. Таким образом, вы можете инициировать события или действия, даже если ваше приложение не запущено. AlarmManager может запустить сервис в будущем.
Мы должны использовать API AlarmManager только для задач, которые должны выполняться в определенное время
Пример использования: предположим, что мы хотим выполнить задачу через 1 час или каждый час. В этом случае AlarmManager нам поможет.
Job Scheduler
Это главный из всех упомянутых вариантов планирования и очень эффективный с фоновыми работами. JobScheduler API, который был представлен в Android 5.0 (API уровня 21).
Этот API позволяет выполнять задания, когда у устройства больше доступных ресурсов или при соблюдении правильных условий. Все условия могут быть определены при создании задания. Когда объявленные критерии будут выполнены, система выполнит это задание в JobService вашего приложения. JobScheduler также отменяет выполнение, если необходимо, чтобы соблюдать ограничения режима Doze и App Standby.
GCM Network Manager
GCM (Google Cloud Messaging) Network Manager имеет все функции расписания из JobScheduler. GCM Network Manager также предназначен для выполнения многократной или одноразовой, неминуемой работы при сохранении времени автономной работы.
Он используется для поддержки обратной совместимости и может также использоваться под Android 5.0 (API уровня 21). Начиная с уровня API 23 или выше, GCM Network Manager использует JobScheduler для платформы. GCM Network Manager использует механизм планирования в службах Google Play, поэтому этот класс будет работать только в том случае, если на устройстве установлены сервисы Google Play.
Google настоятельно рекомендовал пользователям GCM перейти на FCM и вместо этого использовать диспетчер заданий Firebase для планирования любых задач.
Firebase Job Dispatcher
Firebase JobDispatcher также является библиотекой для планирования фоновых заданий. Он также используется для поддержки обратной совместимости (ниже API 21) и работает во всех последних версиях Android (API 9+).
Эта библиотека также будет работать, если на устройстве нет установленных сервисов Google Play. В этом состоянии эта библиотека внутренне использует AlarmManager. Если на устройстве доступно приложение Google Play, он использует механизм планирования в службах Google Play.
Sync Adapter
Sync adapters разработаны специально для синхронизации данных между устройством и облаком. Он должен использоваться только для этого типа задач. Синхронизация может быть вызвана изменениями данных в облаке или на устройстве или по истекшему времени.
Система будет пытаться синхронизировать только тогда, когда устройство подключено к сети.
Упражнение
Мы обсудили достаточно теории, поэтому теперь посмотрим, как использовать планировщик заданий Android.
Создание Job Service
Создайте JobSchedulerService extends JobService, который требует, чтобы были созданы два метода onStartJob (параметры JobParameters) и onStopJob (параметры JobParameters).
Метод onStartJob вызывается, когда JobScheduler решает запустить вашу работу. JobService работает в основном потоке, поэтому любая логика должна выполняться в отдельном потоке. Метод onStopJob вызывается, если система решила, что вы должны прекратить выполнение своей работы. Метод вызывается до jobFinished (JobParameters, boolean).
Вам также необходимо зарегистрировать свою службу в AndroidManifest.
Создать объект JobInfo
Чтобы построить объект JobInfo, передайте JobService в JobInfo.Builder (), как показано ниже. Этот конструктор заданий позволяет установить множество различных параметров управления при выполнении задания.
Запланированная задача
Теперь у нас есть JobInfo и JobService, поэтому пришло время планировать нашу работу. Все, что нам нужно сделать, это запланировать работу с требуемой JobInfo, как показано ниже:
Заключение
При планировании задания вам нужно тщательно подумать о том, когда и что должно вызвать вашу задачу, и что должно произойти, если она по какой-то причине не сработает. Вы должны быть очень осторожны с производительностью вашего приложения, а также с другими аспектами, такими как заряд батареи.
JobScheduler легко реализуется и обрабатывает большую часть за вас. При использовании JobScheduler наши запланированные задания сохраняются, даже если система перезагружается. В настоящий момент единственным недостатком JobScheduler является то, что он доступен только для 21 уровня api (Android 5.0).
Источник
Scheduling of tasks with the Android JobScheduler — Tutorial
This tutorial describes how to schedule tasks in Android with the JobScheduler API.
1. Scheduling tasks
1.1. Options for scheduling
If you have a repetitive task in your Android app, you need to consider that activities and services can be terminated by the Android system to free up resources. Therefore you can not rely on standard Java schedule like the TimerTasks class.
The Android system currently has two main means to schedule tasks:
the (outdated) AlarmManager
the JobScheduler API.
Modern Android applications should use the JobScheduler API. Apps can schedule jobs while letting the system optimize based on memory, power, and connectivity conditions.
1.2. The job scheduler API
The Android 5.0 Lollipop (API 21) release introduces a job scheduler API via the JobScheduler class. This API allows to batch jobs when the device has more resources available. In general this API can be used to schedule everything that is not time critical for the user.
1.3. Advantages of the job scheduler API
Compared to a custom SyncAdapter or the alarm manager , the JobScheduler supports batch scheduling of jobs. The Android system can combine jobs so that battery consumption is reduced. JobManager makes handling uploads easier as it handles automatically the unreliability of the network. It also survives application restarts. Here are example when you would use this job scheduler:
Tasks that should be done once the device is connect to a power supply
Tasks that require network access or a Wi-Fi connection.
Task that are not critical or user facing
Tasks that should be running on a regular basis as batch where the timing is not critical
1.4. Create a Job
A unit of work is encapsulated by a JobInfo object. This object specifies the scheduling criteria. The job scheduler allows to consider the state of the device, e.g., if it is idle or if network is available at the moment. Use the JobInfo.Builder class to configure how the scheduled task should run. You can schedule the task to run under specific conditions, such as:
Device is charging
Device is connected to an unmetered network
Start before a certain deadline
Start within a predefined time window, e.g., within the next hour
Start after a minimal delay, e.g., wait a minimum of 10 minutes
These constraints can be combined. For example, you can schedule a job every 20 minutes, whenever the device is connected to an unmetered network. Deadline is a hard constraint, if that expires the job is always scheduled.
To implement a Job, extend the JobService class and implement the onStartJob and onStopJob . If the job fails for some reason, return true from on the onStopJob to restart the job. The onStartJob is performed in the main thread, if you start asynchronous processing in this method, return true otherwise false .
The new JobService must be registered in the Android manifest with the BIND_JOB_SERVICE permission.
Источник


