- Cancellation in coroutines
- Cancellation and Exceptions in Coroutines (Part 2)
- Coroutines: First things first
- Cancellation and Exceptions in Coroutines (Part 1)
- Calling cancel
- Why isn’t my coroutine work stopping?
- Making your coroutine work cancellable
- Checking for job’s active state
- Let other work happen using yield()
- Job.join vs Deferred.await cancellation
- Handling cancellation side effects
- Check for !isActive
- Try catch finally
- suspendCancellableCoroutine and invokeOnCancellation
- Android JobSchedulers & Usages
- Creating a JobService
- Adding to Manifest
- Creating JobInfo object
- Coroutines: first things first
- Cancellation and Exceptions in Coroutines (Part 1)
- CoroutineScope
- CoroutineContext
- Job lifecycle
- Parent CoroutineContext explained
Cancellation in coroutines
Cancellation and Exceptions in Coroutines (Part 2)

In development, as in life, we know it’s important to avoid doing more work than needed as it can waste memory and energy. This principle applies to coroutines as well. You need to make sure that you control the life of the coroutine and cancel it when it’s no longer needed — this is what structured concurrency represents. Read on to find out the ins and outs of coroutine cancellation.
If you prefer to see a video on this check out the talk Manuel Vivo and I gave at KotlinConf’19 on coroutines cancellation and exceptions:
⚠️ In order to follow the rest of the article without any problems, reading and understanding Part I of the series is required.
Coroutines: First things first
Cancellation and Exceptions in Coroutines (Part 1)
Calling cancel
When launching multiple coroutines, it can be a pain to keep track of them or cancel each individually. Rather, we can rely on cancelling the entire scope coroutines are launched into as this will cancel all of the child coroutines created:
Cancelling the scope cancels its children
Sometimes you might need to cancel only one coroutine, maybe as a reaction to a user input. Calling job1.cancel ensures that only that specific coroutine gets cancelled and all the other siblings are not affected:
A cancelled child doesn’t affect other siblings
Coroutines handle cancellation by throwing a special exception: CancellationException . If you want to provide more details on the cancellation reason you can provide an instance of CancellationException when calling .cancel as this is the full method signature:
If you don’t provide your own CancellationException instance, a default CancellationException will be created (full code here):
Because CancellationException is thrown, then you will be able to use this mechanism to handle the coroutine cancellation. More about how to do this in the Handling cancellation side effects section below.
Under the hood, the child job notifies its parent about the cancellation via the exception. The parent uses the cause of the cancellation to determine whether it needs to handle the exception. If the child was cancelled due to CancellationException , then no other action is required for the parent.
⚠️Once you cancel a scope, you won’t be able to launch new coroutines in the cancelled scope.
If you’re using the androidx KTX libraries in most cases you don’t create your own scopes and therefore you’re not responsible for cancelling them. If you’re working in the scope of a ViewModel , using viewModelScope or, if you want to launch coroutines tied to a lifecycle scope, you would use the lifecycleScope . Both viewModelScope and lifecycleScope are CoroutineScope objects that get cancelled at the right time. For example, when the ViewModel is cleared, it cancels the coroutines launched in its scope.
Why isn’t my coroutine work stopping?
If we just call cancel , it doesn’t mean that the coroutine work will just stop. If you’re performing some relatively heavy computation, like reading from multiple files, there’s nothing that automatically stops your code from running.
Let’s take a more simple example and see what happens. Let’s say that we need to print “Hello” twice a second using coroutines. We’re going to let the coroutine run for a second and then cancel it. One version of the implementation can look like this:
Let’s see what happens step by step. When calling launch , we’re creating a new coroutine in the active state. We’re letting the coroutine run for 1000ms. So now we see printed:
Once job.cancel is called, our coroutine moves to Cancelling state. But then, we see that Hello 3 and Hello 4 are printed to the terminal. Only after the work is done, the coroutine moves to Cancelled state.
The coroutine work doesn’t just stop when cancel is called. Rather, we need to modify our code and check if the coroutine is active periodically.
Cancellation of coroutine code needs to be cooperative!
Making your coroutine work cancellable
You need to make sure that all the coroutine work you’re implementing is cooperative with cancellation, therefore you need to check for cancellation periodically or before beginning any long running work. For example, if you’re reading multiple files from disk, before you start reading each file, check whether the coroutine was cancelled or not. Like this you avoid doing CPU intensive work when it’s not needed anymore.
All suspend functions from kotlinx.coroutines are cancellable: withContext , delay etc. So if you’re using any of them you don’t need to check for cancellation and stop execution or throw a CancellationException . But, if you’re not using them, to make your coroutine code cooperative we have two options:
- Checking job.isActive or ensureActive()
- Let other work happen using yield()
Checking for job’s active state
One option is in our while(i to add another check for the coroutine state:
This means that our work should only be executed while the coroutine is active. This also means that once we’re out of the while, if we want to do some other action, like logging if the job was cancelled, we can add a check for !isActive and do our action there.
The Coroutines library provides another helpful method — ensureActive() . Its implementation is:
Because this method instantaneously throws if the job is not active, we can make this the first thing we do in our while loop:
By using ensureActive , you avoid implementing the if statement required by isActive yourself, decreasing the amount of boilerplate code you need to write, but lose the flexibility to perform any other action like logging.
Let other work happen using yield()
If the work you’re doing is 1) CPU heavy, 2) may exhaust the thread pool and 3) you want to allow the thread to do other work without having to add more threads to the pool, then use yield() . The first operation done by yield will be checking for completion and exit the coroutine by throwing CancellationException if the job is already completed. yield can be the first function called in the periodic check, like ensureActive() mentioned above.
Job.join vs Deferred.await cancellation
There are two ways to wait for a result from a coroutine: jobs returned from launch can call join and Deferred (a type of Job ) returned from async can be await ’d.
Job.join suspends a coroutine until the work is completed. Together with job.cancel it behaves as you’d expect:
- If you’re calling job.cancel then job.join , the coroutine will suspend until the job is completed.
- Calling job.cancel after job.join has no effect, as the job is already completed.
You use a Deferred when you are interested in the result of the coroutine. This result is returned by Deferred.await when the coroutine is completed. Deferred is a type of Job , and it can also be cancelled.
Calling await on a deferred that was cancel led throws a JobCancellationException .
Here’s why we get the exception: the role of await is to suspend the coroutine until the result is computed; since the coroutine is cancelled, the result cannot be computed. Therefore, calling await after cancel leads to JobCancellationException: Job was cancelled .
On the other hand, if you’re calling deferred.cancel after deferred.await nothing happens, as the coroutine is already completed.
Handling cancellation side effects
Let’s say that you want to execute a specific action when a coroutine is cancelled: closing any resources you might be using, logging the cancellation or some other cleanup code you want to execute. There are several ways we can do this:
Check for !isActive
If you’re periodically checking for isActive , then once you’re out of the while loop, you can clean up the resources. Our code above could be updated to:
See it in action here.
So now, when the coroutine is no longer active, the while will break and we can do our cleanup.
Try catch finally
Since a CancellationException is thrown when a coroutine is cancelled, then we can wrap our suspending work in try/catch and in the finally block, we can implement our clean up work.
But, if the cleanup work we need to execute is suspending, the code above won’t work anymore, as once the coroutine is in Cancelling state, it can’t suspend anymore. See the full code here.
A coroutine in the cancelling state is not able to suspend!
To be able to call suspend functions when a coroutine is cancelled, we will need to switch the cleanup work we need to do in a NonCancellable CoroutineContext . This will allow the code to suspend and will keep the coroutine in the Cancelling state until the work is done.
Check out how this works in practice here.
suspendCancellableCoroutine and invokeOnCancellation
If you converted callbacks to coroutines by using the suspendCoroutine method, then prefer using suspendCancellableCoroutine instead. The work to be done on cancellation can be implemented using continuation.invokeOnCancellation :
To realise the benefits of structured concurrency and ensure that we’re not doing unnecessary work you need to make sure that you’re also making your code cancellable.
Use the CoroutineScopes defined in Jetpack: viewModelScope or lifecycleScope that cancels their work when their scope completes. If you’re creating your own CoroutineScope , make sure you’re tying it to a job and calling cancel when needed.
The cancellation of coroutine code needs to be cooperative so make sure you update your code to check for cancellation to be lazy and avoid doing more work than necessary.
Find out more about patterns for work that shouldn’t be cancelled from this post:
Источник
Android JobSchedulers & Usages

You’ve seen that you can trigger events based on the real-time clock, or the elapsed time since boot using the AlarmManager class. Most tasks, however, do not require an exact time but should be scheduled based on a combination of system and user requirements.
For example, a news app might like to update the news in the morning but could wait until the device is charging and connected to wifi to update the news, to preserve the user’s data and system resources.
The JobScheduler class is meant for this kind of schedule; it allows you to set the conditions or parameters of running your task. Given these conditions, the JobScheduler calculates the best time to schedule the execution of the job. Some examples of these parameters are the persistence of the job across reboots, the interval that the job should run at, whether or not the device is plugged in, or whether or not the device is idle.
Here is an example when you would use this job scheduler:
1.Tasks that should be done once the device is connected to a power supply
2.Tasks that require network access or a Wi-Fi connection.
3.The task that is not critical or user-facing
4.Tasks that should be running on a regular basis as batch where the timing is not critical
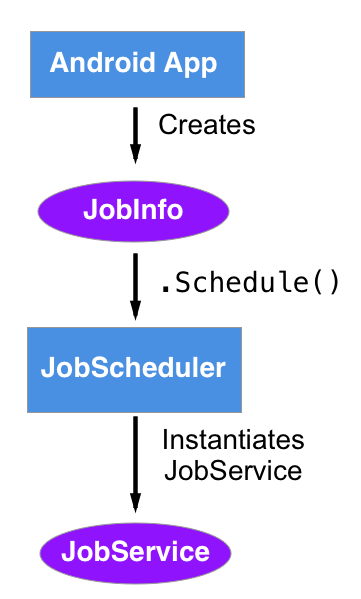
JobScheduler is pretty straightforward. JobScheduler is only available on devices running API 21+.
There are only three things you need to do:
- Create a Job Service to handle your job
- Add that JobService to the manifest
- Schedule your job using a JobInfo object to define your conditions
Creating a JobService
JobService is a specialized Service (i.e. extends Service) with a couple of methods to help us handle our job.
To create a Job Service, start by extending the JobService class and overriding ‘ onStartJob’ and ‘ onStopJob’.

Also, when your job is finished (has been completed or canceled) you’re responsible for calling the job finished method. The jobFinished method tells Android that your job is done and lets it release the wakelock for your app. If you don’t call the jobFinished method your app could be responsible for draining your user’s battery!
Adding to Manifest
The new JobService must be registered in the Android manifest with the BIND_JOB_SERVICE permission.
Creating JobInfo object
All conditions for job scheduler through the JobInfo object .
To build that JobInfo object, you need two things every time
job number: to help you distinguish which job this is &
JobService.
There are many conditions & based on requirement we can set job info objects.
Источник
Coroutines: first things first
Cancellation and Exceptions in Coroutines (Part 1)

This series of blog posts goes in-depth into cancellation and exceptions in Coroutines. Cancellation is important for avoiding doing more work than needed which can waste memory and battery life; proper exception handling is key to a great user experience. As the foundation for the other 2 parts of the series (part 2: cancellation, part 3: exceptions), it’s important to define some core coroutine concepts such as CoroutineScope , Job and CoroutineContext so that we all are on the same page.
If you prefer video, check out this talk from KotlinConf’19 by Florina Muntenescu and I:
CoroutineScope
A CoroutineScope keeps track of any coroutine you create using launch or async (these are extension functions on CoroutineScope ). The ongoing work (running coroutines) can be canceled by calling scope.cancel() at any point in time.
You should create a CoroutineScope whenever you want to start and control the lifecycle of coroutines in a particular layer of your app. In some platforms like Android, there are KTX libraries that already provide a CoroutineScope in certain lifecycle classes such as viewModelScope and lifecycleScope .
When creating a CoroutineScope it takes a CoroutineContext as a parameter to its constructor. You can create a new scope & coroutine with the following code:
A Job is a handle to a coroutine. For every coroutine that you create (by launch or async ), it returns a Job instance that uniquely identifies the coroutine and manages its lifecycle. As we saw above, you can also pass a Job to a CoroutineScope to keep a handle on its lifecycle.
CoroutineContext
The CoroutineContext is a set of elements that define the behavior of a coroutine. It’s made of:
- Job — controls the lifecycle of the coroutine.
- CoroutineDispatcher — dispatches work to the appropriate thread.
- CoroutineName — name of the coroutine, useful for debugging.
- CoroutineExceptionHandler — handles uncaught exceptions, will be covered in Part 3 of the series.
What’s the CoroutineContext of a new coroutine? We already know that a new instance of Job will be created, allowing us to control its lifecycle. The rest of the elements will be inherited from the CoroutineContext of its parent (either another coroutine or the CoroutineScope where it was created).
Since a CoroutineScope can create coroutines and you can create more coroutines inside a coroutine, an implicit task hierarchy is created. In the following code snippet, apart from creating a new coroutine using the CoroutineScope , see how you can create more coroutines inside a coroutine:
The root of that hierarchy is usually the CoroutineScope . We could visualise that hierarchy as follows:
Job lifecycle
A Job can go through a set of states: New, Active, Completing, Completed, Cancelling and Cancelled. While we don’t have access to the states themselves, we can access properties of a Job: isActive , isCancelled and isCompleted .
If the coroutine is in an active state, the failure of the coroutine or calling job.cancel() will move the job in the Cancelling state ( isActive = false , isCancelled = true ). Once all children have completed their work the coroutine will go in the Cancelled state and isCompleted = true .
Parent CoroutineContext explained
In the task hierarchy, each coroutine has a parent that can be either a CoroutineScope or another coroutine. However, the resulting parent CoroutineContext of a coroutine can be different from the CoroutineContext of the parent since it’s calculated based on this formula:
Parent context = Defaults + inherited CoroutineContext + arguments
- Some elements have default values: Dispatchers.Default is the default of CoroutineDispatcher and “coroutine” the default of CoroutineName .
- The inherited CoroutineContext is the CoroutineContext of the CoroutineScope or coroutine that created it.
- Arguments passed in the coroutine builder will take precedence over those elements in the inherited context.
Note: CoroutineContext s can be combined using the + operator. As the CoroutineContext is a set of elements, a new CoroutineContext will be created with the elements on the right side of the plus overriding those on the left. E.g. (Dispatchers.Main, “name”) + (Dispatchers.IO) = (Dispatchers.IO, “name”)
Now that we know what’s the parent CoroutineContext of a new coroutine, its actual CoroutineContext will be:
New coroutine context = parent CoroutineContext + Job()
If with the CoroutineScope shown in the image above we create a new coroutine like this:
What’s the parent CoroutineContext of that coroutine and its actual CoroutineContext ? See the solution in the image below!
The resulting parent CoroutineContext has Dispatchers.IO instead of the scope’s CoroutineDispatcher since it was overridden by the argument of the coroutine builder. Also, check that the Job in the parent CoroutineContext is the instance of the scope’s Job (red color), and a new instance of Job (green color) has been assigned to the actual CoroutineContext of the new coroutine.
As we will see in Part 3 of the series, a CoroutineScope can have a different implementation of Job called SupervisorJob in its CoroutineContext that changes how the CoroutineScope deals with exceptions. Therefore, a new coroutine created with that scope can have SupervisorJob as a parent Job . However, when the parent of a coroutine is another coroutine, the parent Job will always be of type Job .
Now that you know the basics of coroutines, start learning more about cancellation and exceptions in coroutines with Part II and Part III of this series:
Источник


