JSON stands for JavaScript Object Notation.It is an independent data exchange format and is the best alternative for XML. This chapter explains how to parse the JSON file and extract necessary information from it.
Android provides four different classes to manipulate JSON data. These classes are JSONArray,JSONObject,JSONStringer and JSONTokenizer.
The first step is to identify the fields in the JSON data in which you are interested in. For example. In the JSON given below we interested in getting temperature only.
JSON — Elements
An JSON file consist of many components. Here is the table defining the components of an JSON file and their description −
Sr.No
Component & description
1
In a JSON file , square bracket ([) represents a JSON array
In a JSON file, curly bracket (<) represents a JSON object
A JSON object contains a key that is just a string. Pairs of key/value make up a JSON object
Each key has a value that could be string , integer or double e.t.c
JSON — Parsing
For parsing a JSON object, we will create an object of class JSONObject and specify a string containing JSON data to it. Its syntax is −
The last step is to parse the JSON. A JSON file consist of different object with different key/value pair e.t.c. So JSONObject has a separate function for parsing each of the component of JSON file. Its syntax is given below −
The method getJSONObject returns the JSON object. The method getString returns the string value of the specified key.
Apart from the these methods , there are other methods provided by this class for better parsing JSON files. These methods are listed below −
Sr.No
Method & description
1
This method just Returns the value but in the form of Object type
This method returns the boolean value specified by the key
This method returns the double value specified by the key
4
getInt(String name)
This method returns the integer value specified by the key
This method returns the long value specified by the key
This method returns the number of name/value mappings in this object..
This method returns an array containing the string names in this object.
Example
To experiment with this example , you can run this on an actual device or in an emulator.
Steps
Description
1
You will use Android studio to create an Android application.
2
Modify src/MainActivity.java file to add necessary code.
3
Modify the res/layout/activity_main to add respective XML components
4
Modify the res/values/string.xml to add necessary string components
5
Run the application and choose a running android device and install the application on it and verify the results
Following is the content of the modified main activity file src/MainActivity.java.
Following is the modified content of the xml HttpHandler.java.
Following is the modified content of the xml res/layout/activity_main.xml.
Following is the modified content of the xml res/layout/list_item.xml.
Following is the content of AndroidManifest.xml file.
Let’s try to run our application we just modified. I assume you had created your AVD while doing environment setup. To run the app from Android studio, open one of your project’s activity files and click Run icon from the toolbar. Android studio installs the app on your AVD and starts it and if everything is fine with your setup and application, it will display following Emulator window −
Above Example showing the data from string json,The data has contained employer details as well as salary information.
Источник
Android — JSON Parser
JSON stands for JavaScript Object Notation.It is an independent data exchange format and is the best alternative for XML. This chapter explains how to parse the JSON file and extract necessary information from it.
Android provides four different classes to manipulate JSON data. These classes are JSONArray,JSONObject,JSONStringer and JSONTokenizer.
The first step is to identify the fields in the JSON data in which you are interested in. For example. In the JSON given below we interested in getting temperature only.
JSON — Elements
An JSON file consist of many components. Here is the table defining the components of an JSON file and their description −
Sr.No
Component & description
1
In a JSON file , square bracket ([) represents a JSON array
In a JSON file, curly bracket (<) represents a JSON object
A JSON object contains a key that is just a string. Pairs of key/value make up a JSON object
Each key has a value that could be string , integer or double e.t.c
JSON — Parsing
For parsing a JSON object, we will create an object of class JSONObject and specify a string containing JSON data to it. Its syntax is −
The last step is to parse the JSON. A JSON file consist of different object with different key/value pair e.t.c. So JSONObject has a separate function for parsing each of the component of JSON file. Its syntax is given below −
The method getJSONObject returns the JSON object. The method getString returns the string value of the specified key.
Apart from the these methods , there are other methods provided by this class for better parsing JSON files. These methods are listed below −
Sr.No
Method & description
1
This method just Returns the value but in the form of Object type
This method returns the boolean value specified by the key
This method returns the double value specified by the key
4
getInt(String name)
This method returns the integer value specified by the key
This method returns the long value specified by the key
This method returns the number of name/value mappings in this object..
This method returns an array containing the string names in this object.
Example
To experiment with this example , you can run this on an actual device or in an emulator.
Steps
Description
1
You will use Android studio to create an Android application.
2
Modify src/MainActivity.java file to add necessary code.
3
Modify the res/layout/activity_main to add respective XML components
4
Modify the res/values/string.xml to add necessary string components
5
Run the application and choose a running android device and install the application on it and verify the results
Following is the content of the modified main activity file src/MainActivity.java.
Following is the modified content of the xml HttpHandler.java.
Following is the modified content of the xml res/layout/activity_main.xml.
Following is the modified content of the xml res/layout/list_item.xml.
Following is the content of AndroidManifest.xml file.
Let’s try to run our application we just modified. I assume you had created your AVD while doing environment setup. To run the app from Android studio, open one of your project’s activity files and click Run icon from the toolbar. Android studio installs the app on your AVD and starts it and if everything is fine with your setup and application, it will display following Emulator window −
Above Example showing the data from string json,The data has contained employer details as well as salary information.
Источник
How to convert HashMap to json Array in android?
I want to convert HashMap to json array my code is as follow:
I have tried this but it didn’t work. Any solution?
5 Answers 5
Creates a new JSONObject by copying all name/value mappings from the given map.
Parameters copyFrom a map whose keys are of type String and whose values are of supported types.
Throws NullPointerException if any of the map’s keys are null.
get the json array from the JSONObject
Edit:
Edit:(If found Exception then You can change as mention in comment by @krb686)
Since androiad API Lvl 19, you can simply do new JSONObject(new HashMap()) . But on older API lvls you get ugly result(simple apply toString to each non-primitive value).
I collected methods from JSONObject and JSONArray for simplify and beautifully result. You can use my solution class:
Then if you apply mapToJson() method to your Map, you can get result like this:
A map consists of key / value pairs, i.e. two objects for each entry, whereas a list only has a single object for each entry. What you can do is to extract all Map.Entry and then put them in the array:
Alternatively, sometimes it is useful to extract the keys or the values to a collection:
Note: If you choose to use the keys as entries, the order is not guaranteed (the keySet() method returns a Set ). That is because the Map interface does not specify any order (unless the Map happens to be a SortedMap ).
Источник
Convert Json Array to normal Java list
Is there a way to convert JSON Array to normal Java Array for android ListView data binding?
16 Answers 16
If you don’t already have a JSONArray object, call
Then simply loop through that, building your own array. This code assumes it’s an array of strings, it shouldn’t be hard to modify to suit your particular array structure.
Instead of using bundled-in org.json library, try using Jackson or GSON, where this is a one-liner. With Jackson, f.ex:
Maybe it’s only a workaround (not very efficient) but you could do something like this:
Obviously you can change the ‘ , ‘ separator with anything you like (I had a JSONArray of email addresses)
Using Java Streams you can just use an IntStream mapping the objects:
Use can use a String[] instead of an ArrayList :
It will reduce the memory overhead that an ArrayList has
I know that question is about JSONArray but here’s example I’ve found useful where you don’t need to use JSONArray to extract objects from JSONObject.
Works also with array of strings
Here is a better way of doing it: if you are getting the data from API. Then PARSE the JSON and loading it onto your listview:
we starting from conversion [ JSONArray -> List ]
next create generic version replacing array.getJSONObject(i++) with POJO
You can use a String[] instead of an ArrayList :
We can simply convert the JSON into readable string, and split it using «split» method of String class.
To improve Pentium10s Post:
I just put the elements of the JSON array into the list with a foreach loop. This way the code is more clear.
You can use iterator:
I know that the question was for Java . But I want to share a possible solution for Kotlin because I think it is useful.
With Kotlin you can write an extension function which converts a JSONArray into an native (Kotlin) array:
Now you can call asArray() directly on a JSONArray instance.
Источник
Android — JSON Parser
JSON означает JavaScript Object Notation. Это независимый формат обмена данными и лучшая альтернатива XML. В этой главе объясняется, как анализировать файл JSON и извлекать из него необходимую информацию.
Android предоставляет четыре различных класса для управления данными JSON. Это классы JSONArray, JSONObject, JSONStringer и JSONTokenizer.
Первым шагом является определение полей в данных JSON, в которых вы заинтересованы. Например. В приведенном ниже JSON мы заинтересованы только в получении температуры.
JSON — Элементы
Файл JSON состоит из множества компонентов. Вот таблица, определяющая компоненты файла JSON и их описание —
Sr.No
Компонент и описание
1
В файле JSON квадратная скобка ([) представляет массив JSON
В файле JSON фигурная скобка (<) представляет объект JSON
Объект JSON содержит ключ, который является просто строкой. Пары ключ / значение составляют объект JSON
Каждый ключ имеет значение, которое может быть строковым, целым или двойным и т.д.
JSON — Парсинг
Для анализа объекта JSON мы создадим объект класса JSONObject и укажем для него строку, содержащую данные JSON. Его синтаксис —
Последний шаг — это разбор JSON. Файл JSON состоит из другого объекта с другой парой ключ / значение и т. Д. Таким образом, JSONObject имеет отдельную функцию для анализа каждого компонента файла JSON. Его синтаксис приведен ниже —
Метод getJSONObject возвращает объект JSON. Метод getString возвращает строковое значение указанного ключа.
Помимо этих методов, есть другие методы, предоставляемые этим классом для лучшего анализа файлов JSON. Эти методы перечислены ниже —
Sr.No
Метод и описание
1
получить (строковое имя)
Этот метод просто возвращает значение, но в форме типа объекта
getBoolean (имя строки)
Этот метод возвращает логическое значение, указанное ключом
getDouble (имя строки)
Этот метод возвращает двойное значение, указанное ключом
4
getInt (Строковое имя)
Этот метод возвращает целочисленное значение, указанное ключом
getLong (имя строки)
Этот метод возвращает длинное значение, указанное ключом
Этот метод возвращает количество отображений имени / значения в этом объекте.
Этот метод возвращает массив, содержащий имена строк в этом объекте.
получить (строковое имя)
Этот метод просто возвращает значение, но в форме типа объекта
getBoolean (имя строки)
Этот метод возвращает логическое значение, указанное ключом
getDouble (имя строки)
Этот метод возвращает двойное значение, указанное ключом
Этот метод возвращает целочисленное значение, указанное ключом
getLong (имя строки)
Этот метод возвращает длинное значение, указанное ключом
Этот метод возвращает количество отображений имени / значения в этом объекте.
Этот метод возвращает массив, содержащий имена строк в этом объекте.
пример
Чтобы поэкспериментировать с этим примером, вы можете запустить его на реальном устройстве или в эмуляторе.
меры
Описание
1
Вы будете использовать Android studio для создания приложения Android.
2
Измените файл src / MainActivity.java, чтобы добавить необходимый код.
3
Измените res / layout / activity_main, чтобы добавить соответствующие компоненты XML
4
Измените файл res / values / string.xml, чтобы добавить необходимые строковые компоненты
5
Запустите приложение и выберите работающее устройство Android, установите на него приложение и проверьте результаты.
Ниже приводится содержимое измененного основного файла активности src / MainActivity.java .
Ниже приведено измененное содержимое XML- файла HttpHandler.java .
Ниже приводится измененное содержимое файла xml res / layout / activity_main.xml .
Ниже приведено измененное содержимое xml res / layout / list_item.xml .
Ниже приводится содержимое файла AndroidManifest.xml .
Давайте попробуем запустить наше приложение, которое мы только что изменили. Я предполагаю, что вы создали свой AVD во время настройки среды. Чтобы запустить приложение из студии Android, откройте один из файлов деятельности вашего проекта и нажмите «Выполнить». значок с панели инструментов. Android-студия устанавливает приложение на AVD и запускает его, и, если все в порядке с настройками и приложением, оно отобразится в следующем окне эмулятора —
Приведенный выше пример, показывающий данные из строки json, содержит данные работодателя, а также информацию о зарплате.
 icon from the toolbar. Android studio installs the app on your AVD and starts it and if everything is fine with your setup and application, it will display following Emulator window −
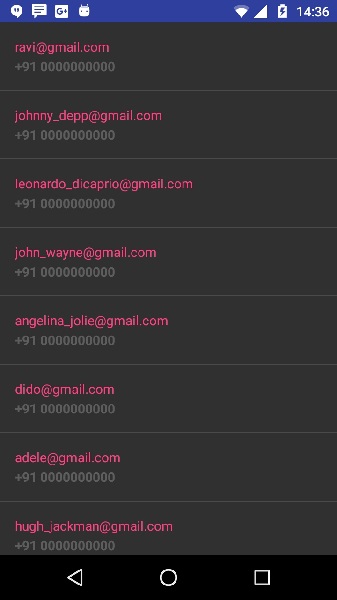


 значок с панели инструментов. Android-студия устанавливает приложение на AVD и запускает его, и, если все в порядке с настройками и приложением, оно отобразится в следующем окне эмулятора —


