- JSON Parsing in Android
- Step by Step Implementation
- Android JSON Parsing with Examples
- JSON Parsing in Android
- Android JSON Parsing Example
- activity_main.xml
- list_row.xml
- MainActivity.java
- Output of Android JSON Parsing Example
- Android — JSON Parser
- JSON — Elements
- JSON — Parsing
- Example
- Android JSON Parsing with Gson Tutorial
JSON Parsing in Android
JSON (JavaScript Object Notation) is a straightforward data exchange format to interchange the server’s data, and it is a better alternative for XML. This is because JSON is a lightweight and structured language. Android supports all the JSON classes such as JSONStringer, JSONObject, JSONArray, and all other forms to parse the JSON data and fetch the required information by the program. JSON’s main advantage is that it is a language-independent, and the JSON object will contain data like a key/value pair. In general, JSON nodes will start with a square bracket ([) or with a curly bracket (<). The square and curly bracket’s primary difference is that the square bracket ([) represents the beginning of a JSONArray node. Whereas, the curly bracket ( <)represents a JSONObject. So one needs to call the appropriate method to get the data. Sometimes JSON data start with [. We then need to use the getJSONArray() method to get the data. Similarly, if it starts with <, then we need to use the getJSONobject() method. The syntax of the JSON file is as following:
In this article, we are going to parse a JSON file in Android. Note that we are going to implement this project using the Kotlin language.
Step by Step Implementation
To parse a JSON file in Android, follow the following steps:
Step 1: Create a New Project
To create a new project in Android Studio please refer to How to Create/Start a New Project in Android Studio. Note that select Kotlin as the programming language.
Источник
Android JSON Parsing with Examples
Generally, JSON (JavaScript Object Notation) is one of the simplest data exchange formats to interchange the data from the server and it’s the best alternative for XML. In simple words, we can say that JSON is a lightweight and structured language.
Android provides support for all JSON classes such as JSONObject, JSONArray, JSONStringer, etc. to parse the JSON data to get the required information in android applications.
The main advantage of JSON is, it’s a language independent and the JSON object will contain data like key/value pair.
Following is the sample structure of JSON data in android applications.
» name » : «Suresh Dasari» ,
» designation » : «Team Leader» ,
» name » : «Rohini Alavala» ,
» designation » : «Agricultural Officer» ,
In case, if JSON data starts with [, then we need to use getJSONArray() method to get the data, same way if it starts with <, then we need to use getJSONObject() method.
JSON Parsing in Android
To parse the JSON data in android, we need to create an instance of JSONObject and JSONArray objects with a string that contains JSON data in it.
Following is the code snippet of parsing the JSON data in android using JSONObject and JSONArray objects to get the required information from JSON objects.
JSONObject jObj = new JSONObject(jsonStr);
JSONArray jsonArry = jObj.getJSONArray( «users» );
for ( int i= 0 ;i user = new HashMap<>();
JSONObject obj = jsonArry.getJSONObject(i);
user.put( «name» ,obj.getString( «name» ));
user.put( «designation» ,obj.getString( «designation» ));
user.put( «location» ,obj.getString( «location» ));
userList.add(user);
>
If you observe above code snippet, we used JSONObject and JSONArray objects to parse the data to get required information from a string that contain a JSON data.
Now we will see how to parse JSON string and bind the parsed JSON to Listview in android application with examples.
Android JSON Parsing Example
Following is the example of parsing the JSON string and get the required information from it using JSON classes in android applications.
Create a new android application using android studio and give names as JsonParserExample. In case if you are not aware of creating an app in android studio check this article Android Hello World App.
Now open activity_main.xml file from your \res\layout folder path and write the code like as shown below.
activity_main.xml
xml version= «1.0» encoding= «utf-8» ?>
LinearLayout xmlns: android = «http://schemas.android.com/apk/res/android»
android :layout_width= «fill_parent»
android :layout_height= «fill_parent»
android :orientation= «vertical» >
ListView
android :id= «@+id/user_list»
android :layout_width= «fill_parent»
android :layout_height= «wrap_content»
android :dividerHeight= «1dp»/>
LinearLayout >
After that create an another layout file (list_row.xml) in /res/layout folder to show the data in listview, for that right click on layout folder à add new Layout resource file à Give name as list_row.xml and write the code like as shown below.
list_row.xml
xml version= «1.0» encoding= «utf-8» ?>
RelativeLayout xmlns: android = «http://schemas.android.com/apk/res/android»
android :layout_width= «fill_parent»
android :layout_height= «wrap_content»
android :orientation= «horizontal»
android :padding= «5dip» >
TextView
android :id= «@+id/name»
android :layout_width= «wrap_content»
android :layout_height= «wrap_content»
android :textStyle= «bold»
android :textSize= «17dp»/>
TextView
android :id= «@+id/designation»
android :layout_width= «wrap_content»
android :layout_height= «wrap_content»
android :layout_below= «@id/name»
android :layout_marginTop= «7dp»
android :textColor= «#343434»
android :textSize= «14dp»/>
TextView
android :id= «@+id/location»
android :layout_width= «wrap_content»
android :layout_height= «wrap_content»
android :layout_alignBaseline= «@+id/designation»
android :layout_alignBottom= «@+id/designation»
android :layout_alignParentRight= «true»
android :textColor= «#343434»
android :textSize= «14dp»/>
RelativeLayout >
Now open your main activity file MainActivity.java from \java\com.tutlane.jsonparserexample path and write the code like as shown below
MainActivity.java
package com.tutlane.jsonparserexample;
import android.support.v7.app.AppCompatActivity;
import android.os.Bundle;
import android.util.Log;
import android.widget.ListAdapter;
import android.widget.ListView;
import android.widget.SimpleAdapter;
import org.json.JSONArray;
import org.json.JSONException;
import org.json.JSONObject;
import java.util.ArrayList;
import java.util.HashMap;
public class MainActivity extends AppCompatActivity <
@Override
protected void onCreate(Bundle savedInstanceState) <
super .onCreate(savedInstanceState);
setContentView(R.layout. activity_main );
String jsonStr = getListData();
try <
ArrayList > userList = new ArrayList<>();
ListView lv = (ListView) findViewById(R.id. user_list );
JSONObject jObj = new JSONObject(jsonStr);
JSONArray jsonArry = jObj.getJSONArray( «users» );
for ( int i= 0 ;i user = new HashMap<>();
JSONObject obj = jsonArry.getJSONObject(i);
user.put( «name» ,obj.getString( «name» ));
user.put( «designation» ,obj.getString( «designation» ));
user.put( «location» ,obj.getString( «location» ));
userList.add(user);
>
ListAdapter adapter = new SimpleAdapter(MainActivity. this , userList, R.layout. list_row , new String[]< "name" , "designation" , "location" >, new int []
lv.setAdapter(adapter);
>
catch (JSONException ex) <
Log.e( «JsonParser Example» , «unexpected JSON exception» , ex);
>
>
private String getListData() <
String jsonStr = » < \" users \" :[" +
«< \" name \" : \" Suresh Dasari \" , \" designation \" : \" Team Leader \" , \" location \" : \" Hyderabad \" >» +
«,< \" name \" : \" Rohini Alavala \" , \" designation \" : \" Agricultural Officer \" , \" location \" : \" Guntur \" >» +
«,< \" name \" : \" Trishika Dasari \" , \" designation \" : \" Charted Accountant \" , \" location \" : \" Guntur \" >] >» ;
return jsonStr;
>
>
If you observe above code, we used JSONObject and JSONArray objects to parse and get the required data from JSON string based on our requirements.
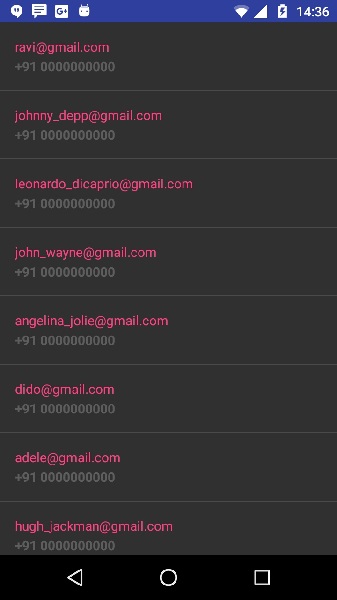
Output of Android JSON Parsing Example
When we run above program in android studio we will get the result like as shown below.

This is how we can parse JSON data in android applications to get the required information based on our requirements.
Источник
Android — JSON Parser
JSON stands for JavaScript Object Notation.It is an independent data exchange format and is the best alternative for XML. This chapter explains how to parse the JSON file and extract necessary information from it.
Android provides four different classes to manipulate JSON data. These classes are JSONArray,JSONObject,JSONStringer and JSONTokenizer.
The first step is to identify the fields in the JSON data in which you are interested in. For example. In the JSON given below we interested in getting temperature only.
JSON — Elements
An JSON file consist of many components. Here is the table defining the components of an JSON file and their description −
| Sr.No | Component & description | ||||||||||||||||
|---|---|---|---|---|---|---|---|---|---|---|---|---|---|---|---|---|---|
| 1 |
| Sr.No | Method & description | ||||||||||||
|---|---|---|---|---|---|---|---|---|---|---|---|---|---|
| 1 | |||||||||||||
| 4 | getInt(String name) This method returns the integer value specified by the key This method returns the long value specified by the key This method returns the number of name/value mappings in this object.. This method returns an array containing the string names in this object. ExampleTo experiment with this example , you can run this on an actual device or in an emulator.
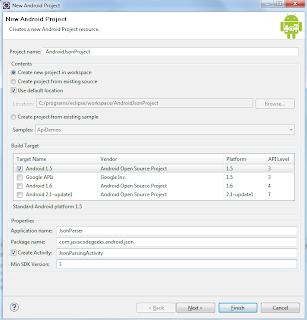
Following is the content of the modified main activity file src/MainActivity.java. Following is the modified content of the xml HttpHandler.java. Following is the modified content of the xml res/layout/activity_main.xml. Following is the modified content of the xml res/layout/list_item.xml. Following is the content of AndroidManifest.xml file. Let’s try to run our application we just modified. I assume you had created your AVD while doing environment setup. To run the app from Android studio, open one of your project’s activity files and click Run Above Example showing the data from string json,The data has contained employer details as well as salary information. Источник Android JSON Parsing with Gson TutorialPosted by: Ilias Tsagklis in Android Core January 29th, 2011 38 Comments Views Apart from XML, JSON is a very common format used in API responses. Its simplicity has helped to gain quite the adoption in favor of the more verbose XML. Additionally, JSON can easily be combined with REST producing clear and easy to use APIs. Android includes support for JSON in its SDK as someone can find in the JSON package summary. However, using those classes, a developer has to deal with low level JSON parsing, which in my opinion is tedious and boring. For this reason, in this tutorial, I am going to show you how to perform automatic JSON parsing.For this purpose we are going to use the Google Gson library. From the official site: Gson is a Java library that can be used to convert Java Objects into their JSON representation. It can also be used to convert a JSON string to an equivalent Java object. Gson can work with arbitrary Java objects including pre-existing objects that you do not have source-code of. Excellent, exactly what we need. Before delving into code, you might want to take a look at the Gson User Guide and bookmark the Gson API Javadocs. Let’s get started by downloading Gson, with the current version being 1.6. We need the gson-1.6.jar from the distribution. Let’s proceed with creating an Eclipse project named “AndroidJsonProject” as follows:
Add the Gson JAR to your project’s classpath. To illustrate how to use Gson for JSON parsing we are going to parse a JSON response from the Twitter API. Check the Twitter API Documentation for more info. We are going to use the Search API method for performing ad-hoc searches. For example, for searching Twitter about JavaCodeGeeks and retrieving the results in JSON format, here is the corresponding URL: This will give a one line JSON response containing all the relevant info. This one liner is quite hard to read, so a JSON editor would be quite handy. I use the Eclipse Json Editor plugin and works really well. Here is how the response looks formatted in my Eclipse IDE:
As you can see, we have a number of results and after that we have some other fields, such as “max_id”, “since_id”, “query” etc. Thus, our main model object, named “SearchResponse” will be as follows: We provide the various public fields (getter/setters with private fields can also be used) and in those case that the field name does not match the JSON response, we annotate with the SerializedName annotation. Note that we also have a list of results, with the corresponding model class being: Finally, we have one more class named “Metadata”: Let’s now see how all these get wired using Gson. Here is our Activity: First, we perform an HTTP GET request and retrieve the resource as a stream (if you need more details on this, check my previous tutorial Android Full App, Part 2: Using the HTTP API). We create a Gson instance and use it to perform the JSON parsing and retrieve our model object with all its fields populated. Edit your Android manifest XML file and grant permissions for Internet access and then launch the Eclipse configuration. You shall see notifications of the latest Twitter users that have tweeted about JavaCodeGeeks. That’s all guys, quick JSON parsing in Android with Gson. As always, you can download the Eclipse project created for this tutorial. Happy mobile coding! Don’t forget to share! Источник  Когда к мобильному устройству присоединены наушники  ОС Google Android развивается, и по всему видимому |
 icon from the toolbar. Android studio installs the app on your AVD and starts it and if everything is fine with your setup and application, it will display following Emulator window −