- Converting JSONObject to HashMap<>
- References
- Encrypt / Decrypt Strings in Android
- August 17, 2018
- IntDef and StringDef in Android
- May 5, 2018
- How to Convert Map to JSON to HashMap in Java?
- Преобразование строки JSON в HashMap
- 15 ответов
- GsonParser.java
- FileLoader.java
- Creating Realm Objects from JSON in Android (Using String , HashMap and JSON File)
- Repository
- What Will I Learn?
- Requirements
- Resources
- Difficulty
- Tutorial Content
- Dependecies used
- Create Realm from JSON File and insert realmObjects from String and HashMap
- Complete MainActivity.java class
Converting JSONObject to HashMap<>
Today, I had a huge Json in my app and I wanted to fetch all these values in a general way. I also wanted to parse Json for only one time to avoid try/catch each time I access any value. So, first thing I had in mind was to convert the JSONObject in the HashMap or Map<> etc.
So if you are using Gson in your apps for json mapping, then you can use this one line code for conversion.
This will give you a Map object and you can access the values using this code.
References
If you liked this article, you can read my new articles below:
Encrypt / Decrypt Strings in Android
Encrypt Strings Please copy the AESUtils class in your project first and then you can use it like this. String encrypted = «»; String sourceStr = «This is any source string»; try < encrypted = AESUtils.
August 17, 2018
IntDef and StringDef in Android
We often use View’s visibility in our apps to show and hide them. We use void setVisibility(int visibility) method for that purpose. But have you ever thought that why this method always takes VISIBLE, INVISIBLE and GONE rather than any int value like 0 or 1 etc.
May 5, 2018


7 years experience. 💻 Creator of various Open Source libraries on Android . 📝 Author of two technical books and 100+ articles on Android. 🎤 A passionate Public Speaker giving talks all over the world.
Источник
How to Convert Map to JSON to HashMap in Java?
JSON is an open standard file format, and easier data interchange format helpful for humans to transmit data. Most of the apps display JSON data and hence nowadays JSON has become the mandatory media to transmit data. Here we will get to know how to convert Map to JSON and for Map, let us take HashMap as an input set of data.
Attention reader! Don’t stop learning now. Get hold of all the important Java Foundation and Collections concepts with the Fundamentals of Java and Java Collections Course at a student-friendly price and become industry ready. To complete your preparation from learning a language to DS Algo and many more, please refer Complete Interview Preparation Course.
Installation:
Step 1: For console-related Java parts, we need the jar downloads from the links provided below. Download the jars, extract them and place the jars in the build path of a project
Step 2(A): For Maven projects, the following dependency is needed in the ‘pom.xml file.’
Step 2(B): For Gradle projects, it is as follows:
Implementation:
Let us see an example of HashMap of data. HashMap advantage is storing the data in key, value pairs in an unsynchronized way.
We are going to have studentId,studentFirstName,studentLastName,studentStream and studentMarks as the key elements of HashMap. Using com.fasterxml.jackson.databind.ObjectMapper, we are converting the HashMap into JSON. Let us see a simple Java application. ObjectMapper is the main essential class in the Jackson library that helps for reading and writing JSON, either to and from basic POJO’s (Plain Old Java Objects) or from HashMap containing key/value pairs.
Here we will be using a method named ‘writeValueAsString()’ in the code and that can be used to serialize any Java value as a String. Here we are passing HashMap of data as objects, and it serializes them as strings. As ObjectMapper is used, it writes JSON string.
Источник
Преобразование строки JSON в HashMap
Я использую Java, и у меня есть строка, которая является JSON:
тогда моя карта на Java:
Я хочу сохранить все данные из JSONObject в этом HashMap.
может ли кто-нибудь предоставить код для этого? Я хочу использовать org.json библиотека.
15 ответов
Я написал этот код несколько дней назад рекурсия.
С помощью GSon, вы можете сделать следующее:
надеюсь, что это сработает, попробуйте следующее:
str, ваша строка JSON
Так Просто, как это, если вы хотите emailid,
вот код Викаса, портированный на JSR 353:
преобразование строки JSON в Map
преобразование массива JSON в List
отображение JSON любого формата
вы также можете использовать Jackson API для этого:
вы можете конвертировать любые JSON to map С помощью Джексон библиотека как показано ниже:
зависимости Maven для Джексон :
надеюсь, это поможет. Счастливое кодирование:)
попробуйте этот код :
представьте, что у вас есть список электронной почты, как показано ниже. не ограничен никаким языком программирования,
теперь ниже приведен код JAVA-для преобразования json в map
вы можете использовать библиотеку google gson для преобразования объекта json.
другие библиотеки, такие как Джексон, также доступны.
Это не преобразует его в карту. Но ты можешь делать все, что захочешь.
кратко и полезно:
следующий парсер считывает файл, анализирует его в общий JsonElement , используя Google JsonParser.parse метод, а затем преобразует все элементы в сгенерированном JSON в собственный Java List или Map .
Примечание: приведенный ниже код на основе Викас Гупта ‘ s ответ.
GsonParser.java
FileLoader.java
С помощью json-простой вы можете конвертировать данные JSON в карту и карту в JSON.
Источник
Creating Realm Objects from JSON in Android (Using String , HashMap and JSON File)

Repository
What Will I Learn?
- How to create a Realm Objects and save to it using JSON File
- How to use the lambok plugin.
- How to use the RealmRecyclerViewAdapter and its subclasses.
- How to use the InputStream to read from raw files.
- How to create realm objects from Strings and HashMaps.
Requirements
- An Integrated Development Environment(IDE) for building Android Application(e.g Anroid Studio, IntelliJ)
- An Android Device or a Virtual Device.
- Java Programming Experience.
- Of course, willingness to learn
Resources
- Retrofit Website. https://realm.io/
- Retrofit Github. — https://github.com/realm
- Retrofit License — Apache License
- Lombok Project — https://projectlombok.org
Difficulty
Tutorial Duration — 25 — 30Mins
Tutorial Content
Definition of Terms
In computing, JavaScript Object Notation or JSON is an open-standard file format that uses human-readable text to transmit data objects consisting of attribute–value pairs and array data types (or any other serializable value). It is a very common data format used for asynchronous browser–server communication, including as a replacement for XML in some AJAX-style systems.
HashMap
A HashMap is a structure allowing one to store (key,value) items. A hash function pairs each key to an array index where the value will be stored. Android structures are composed of two arrays: ArrayMap uses a sorted array for the key hashes and the other one for the (key,value) items stored in the same order than the corresponding hash. SparseArray keeps the keys sorted in its first array and the values in the second one.
In todays tutorial, we are going to learn how to not only create a realm database from JSON file but also how to add realm objects from Strings and HashMaps and to illustrate this, we are going to be creating an Android application which shows a list of Song Albums using a recyclerview that will be show the Album Image, the Artist and also the year it was released.
Outline
- We add our dependencies into our gradle files.
- Include RecyclerView into MainActivity xml file.
- Create Single View for each album List.
- Create Album Model and use the Lombok Library.
- Create custom Adapter extending RealmRecyclerView.
- Create Albums JSON File.
- Create Realm from JSON File and insert realmObjects from String and HashMap.
- Link Adapter to RecyclerView in MainActivity java class file.
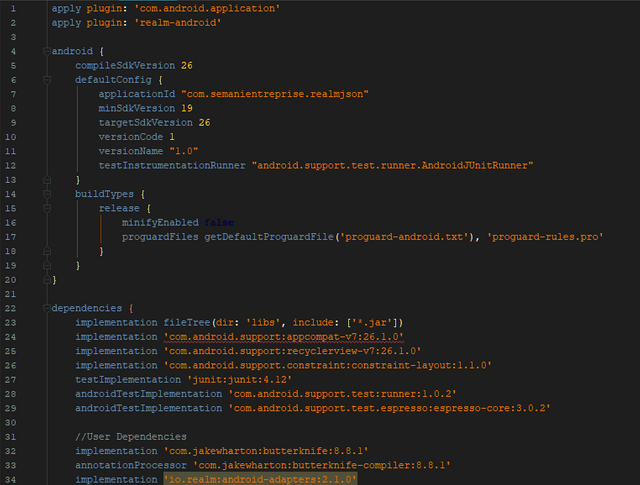
Dependecies used
- implementation ‘com.jakewharton:butterknife:8.8.1’
annotationProcessor ‘com.jakewharton:butterknife-compiler:8.8.1’
The ButterKnife dependency should be placed in your application level gradle file — «build.gradle» which will make the injection of views (e.g ImageView, TextView) as easy as possible which we will be seeing in this tutorial.
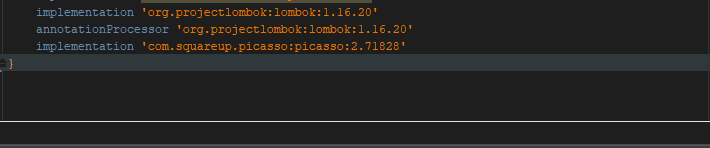
- implementation ‘org.projectlombok:lombok:1.16.20’
annotationProcessor ‘org.projectlombok:lombok:1.16.20’
The lombok dependency also is placed in the application level gradle file which makes the generator of getter and setter methods for our model classes by just adding the annotations @Getter for getters and @Setter for the setter methods.
The picasso dependency is used to load images into our ImageView and should be included in our application level gradle file also.
Since we will be using the RealmRecyclerViewAdapter instead of the usual RecyclerViewAdapter , this plugin will have to be inserted into our application level gradle file — build.gradle
Realm dependency
Steps
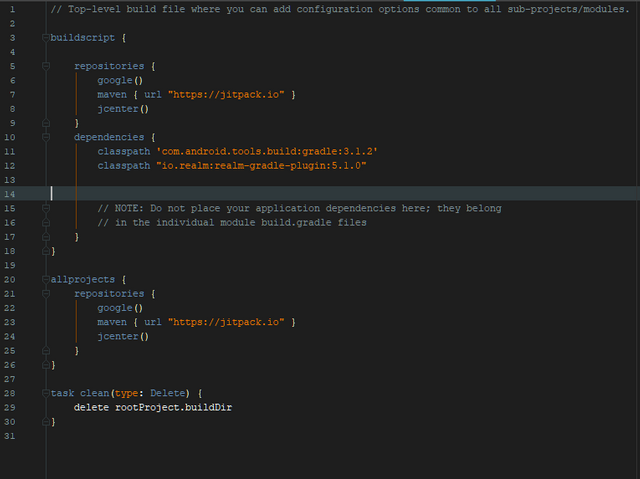
Head to your project level gradle file and add the classpath dependency:
classpath «io.realm:realm-gradle-plugin:5.1.0»
Next, head to your application level Gradle file «build.gradle» and add the realm-android plugin to the top of the file.
Finally, refresh your Gradle dependencies.
After you have added the necessary dependencies, your application level Gradle file should look like this —
and your project level Gradle file should look like this
Including a RecyclerView element to our Activity layout file.
We add the following code above to include our recyclerview into our activity layout file which will be used to be displayed the list of the albums which we will be displaying by getting the results from our realm database. What we need to note here is the id of the recycler view which is albumsRecView .
Create Single View for each album List
Inorder to display all the albums correctly, we must create a layout file that will be used to as a template to display as the album list.
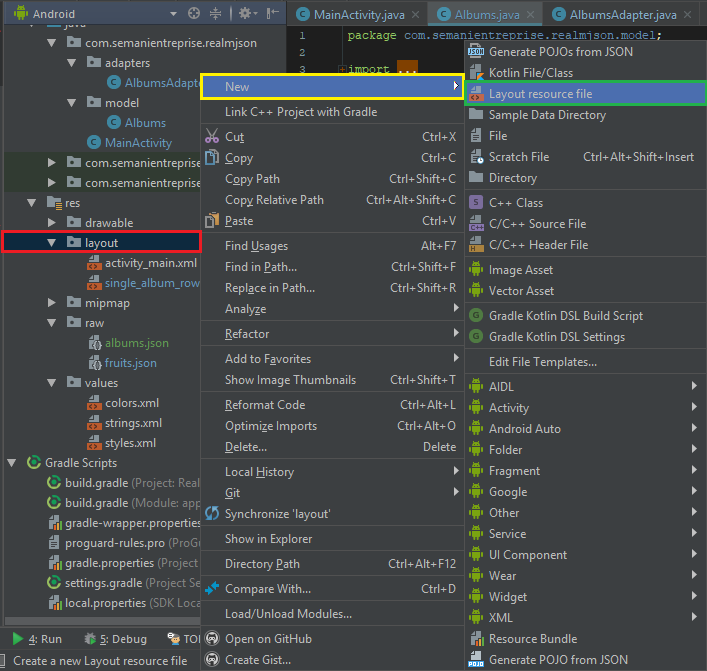
Create a new layout file:
- right click on the res folder => New => Layout resource file as shown in the image below.
Code Explanation
The above code creates a layout as below:
The ImageView with the id — fruit_img is placed to the right of the parent view which we will use in our adapter to display the album Pictures and then two textViews with the ids — album_name and album_year are used to display the albums name and year respectively.
Create Album Model
We will need to create a model class which will have both getter and setter methods for the respective fields (Name, Image, Year)which we will be needing in our recyclerview to set the details of each row.
To create the single row layout, right click on the layout folder located under the res folder, select New and then click Layout resource file as instructed in the image below.
To reduce boilerplate code, we will be using the lombok library (https://projectlombok.org) to set the getter and setter methods of the three fields by adding the @Getter and @Setter annotation to the respective fields.
Your model class must extend realmObject as shown in the code below.
Create custom Adapter
In today’s tutorial, we will not be using the normal RecyclerViewAdpater class but the RealmRecyclerViewAdapter which makes binding of realm objects easier.
Firstly, create a new java clas file AlbumsAdapter and extend the RealmRecyclerViewAdapter .
Code Explanation
onCreateViewHolder()
In this method, we inflate the layout view with our single layout file — single_album_row file with the line — View view = LayoutInflater.from(parent.getContext()).inflate(R.layout.single_album_row,parent,false); and then we return the view.
onBindViewHolder()
Here, we have to set the properties of the fields of each album.
We set the details of each albums by using the setter methods gottern from our model class ( albums.getName() , albums.getYear() , albums.getImage() ).
We use the Picasso dependency to load the image of each album and then use the resize() method to resize it and use the centerCrop() method to make the image display in the center of the ImageView.
The AlbumsViewHolder class uses ButterKnife injection to inject the views from the single_album_row layout.
Create Albums JSON File
Next, for us to be able to create a realm database from a JSON file, we are going to have to create a json file which will have four(4) objects that will represent four rows of album details.
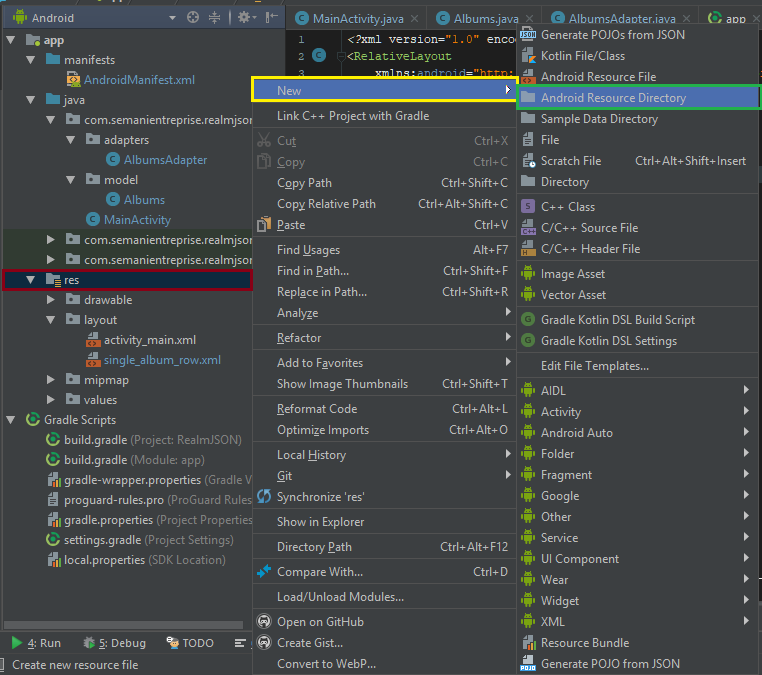
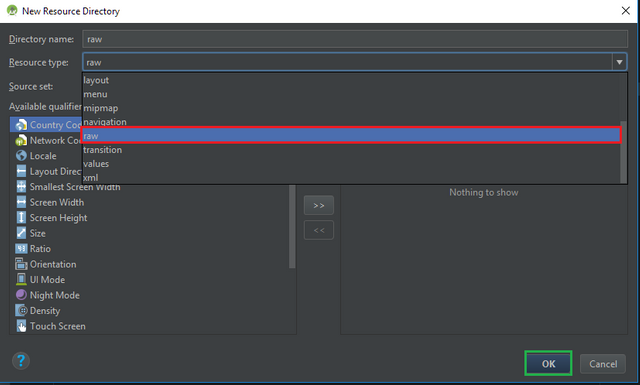
To do that, right click on your res folder, click on New => Android Resource Repository, from the Resource type drop down, select raw and then click okay.
NB: See Image for more details.
Next, click on the newly created raw folder => New => File and name the file albums.json .
In this file, we will have four json objects inside an array, and this objects will have three fields — Name , Image and Year .
Create Realm from JSON File
Next, we head over to our MainActivity.java class file, create a Realm variable — private Realm realm; .
In the onCreate() method, we have to initialize realm and also get a realm instance :
We then call a method — fillUpDatabase() that will be responsible for creating the database and also using an InputStream to populate the realm database with the json objects in our albums.json file.
Create Realm from JSON File and insert realmObjects from String and HashMap
fillUpDatabase()
We execute a realm transaction on the realm variable by calling the executeTransaction() method and override the execute() method.
We use an InputStream object — inputStream to get the json file resource by calling the getResources() method and then calling the openRawResource() method with the albums json file as an argument.
realm.createAllFromJson(Albums.class,inputStream); creates a realm database of Albums class and gets its values from the inputStream .
createRealmObjectFromString()
The next method call is the createRealmObjectFromString() which creates a realm object from a String.
We declear a final String variable called json which has the format of a json object (e.g <>), we set the Name, Image and Year of the album in the string variable and then execute a transaction on the realm variable realm.executeTransaction() and then we then create a realm object of the Albums class with the json String variable as the second type with the line realm.createObjectFromJson(Albums.class, json); .
createRealmObjectFromHashMap()
In this method, we create a new Map object and indicate that it’s of type .
Next, we use the put method to insert key-value pairs of an album object, we then create a new JSONObject variable with the album map — final JSONObject json = new JSONObject(album); .
Lastly, we execute a transaction on our realm variable and then create a realm object with the Album class and the json object — json as the second argument — realm.createObjectFromJson(Albums.class, json);
Link Adapter to RecyclerView in MainActivity java class file
Next, we need to get all the objects in the Album realm database and then set it as an argument for our adapter and also set the adapter for our recycler view and lastly include a layout manager for the recyclerview.
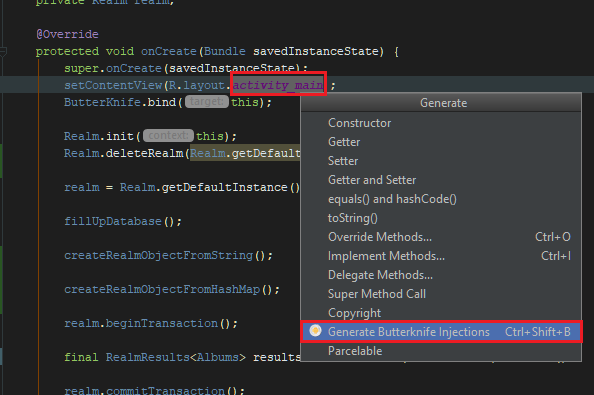
We have to inject the recyclerview in our activity_main layout file by placing our cursor on the layout file name located on this line — `setContentView(R.layout.activity_main);’ => alt + ins => Generate ButterKnife Injection, then check the check box to the left of our recycler view view.
NB: See Image for Steps.
We then have to use begin a realm transaction to get the objects of the Albums class, store it in a RealmResults variable — results and then finally commit the transaction —
Finally, we have to set a vertical LinearLayoutManager as the layoutManager of the recyclerView — albumsRecView ,
we set the recyclerview to have a fixed size — albumsRecView.setHasFixedSize(true); and we set the Adapter of the recyclerview by calling the setAdapter() method and passing the resuls variable which now holds all the realm objects of type Albums — albumsRecView.setAdapter(new AlbumsAdapter(results));
Complete MainActivity.java class
In order for this application to fully work, we must include the permission in the Manifest file .
Источник


