- Избавляемся от рутины RecyclerView.Adapter с помощью DataBinding
- ViewHolder
- ViewModelAdapter
- Using RecyclerView with ViewBinding in Android via Kotlin
- Dependencies
- Working with ViewBinding in Android using Kotlin
- Aayush Gupta ・ Jan 28 ・ 3 min read
- Implementation
- How to use View Binding in Android using Kotlin
- Enabling View Binding
- Using View Binding in Activities
- Using View Binding in Fragments
- • Inflate method
- • Bind method
- Using View Binding in RecyclerView Adapter
- Android — Kotlin
- Databinding in RecyclerView — Android — Kotlin
- Prerequisite:
- Implementation:
- AdapterClass:
- Comments
- RecyclerView With Data Binding in Android Kotlin: Example With Kotlin
- How RecyclerView works: RecyclerView With Data Binding in Android Kotlin
- Lets start creating RecyclerView
Избавляемся от рутины RecyclerView.Adapter с помощью DataBinding

RecyclerView — основной UI элемент практически любого приложения. Написание адаптеров и ViewHolder’ов зачастую слишком рутинная работа и содержит достаточно boilerplate кода. В этой статье я хочу показать как с использованием DataBinding и паттерна MVVM можно написать абстрактный адаптер и напрочь забыть про ViewHolder’ы, inflate, ручной биндинг и прочую рутину.
ViewHolder
Мы все привыкли писать отдельный ViewHolder под каждый тип ячеек в таблице для хранения ссылок на отдельные вьюшки и связывания данных.
Можно сказать что DataBinding генерирует на лету тот код, что вы обычно пишите в ViewHolder’ах, поэтому надобность в них отпадает и мы легко можем использовать одну реализацию, хранящую в себе объект готового биндинга:
ViewDataBinding это базовый абстрактный класс для всех сгенерированных классов DataBinding’а и хоть мы и передаем его параметром шаблона для метода bind, DataBindingUtil сам поймет какой layout мы используем и какую реализацию в итоге использовать.
ViewModelAdapter
Разобравшись с ViewHolder’ом надо определиться чего мы хотим от нашего базового адаптера в итоге. Все, что мне требуется от адаптера в пределах MVVM архитектуры — отдать список объектов (ViewModel’ей), сказать какую разметку я хочу использовать для данных в этом списке классов и совершенно не беспокоиться о необходимой для этого логике.
Логику привязки данных на себя берет DataBinding, но это уже совершенно другая статья, коих в интернете уже достаточно.
Напишем логику для конфигурации нашего адаптера:
Для каждого класса объектов таблицы будем хранить пару layoutId и bindingId.
- layoutId — как понятно из имени и аннотации @LayoutRes это соответствующая разметка ячейки.
- bindingId — это сгенерированный идентификатор переменной, используемый в соответствующей разметке. Он нам понадобится для того, чтобы забиндить объект таблицы в написанный ранее ViewHolder, а точнее в ViewDataBinding.
Остается лишь реализовать абстрактные функции RecyclerView.Adapter:
- getItemViewType — так как layoutId уникален для разных ячеек мы с легкостью можем использовать его как viewType.
- onCreateViewHolder — не забываем что viewType это наш layoutId.
- onBindViewHolder — все что требуется для привязки данных объекта к разметке — сообщить DataBinding’у о том, что в данной ячейке теперь новый объект, всю остальную логику он возьмет на себя.
На этом вся основная логика ViewModelAdapter описана, однако остается одна проблема — обработка кликов по ячейкам. Обычно эту логику описывают в Activity, но я не любитель транслировать логику вверх по иерархии, если без этого ну никак не обойтись, поэтому реализую ее прямо в адаптере, но вы можете реализовывать ее там где вам удобно.
Для реализации обработки кликов добавим в ViewModelAdapter такое понятие как sharedObject, объект который будет биндится на все ячейки таблицы (не обязательно, если в разметке не найдет variable с данным bindingID ничего не упадет).
Теперь рассмотрим как это все в итоге работает:
Как пример я реализовал адаптер для бокового меню (используйте NavigationView из стандартной библиотеки если у вас нет необходимости отойти от Material Design).
И как пример layout: cell_navigation_item.xml
Как видите все достаточно просто, нет никакой лишней логики. Мы можем объявлять сколько угодно типов ячеек вызовом 1 функции. Мы можем позабыть о ручном связывании данных для UI.
Данный адаптер успешно проходит боевые испытания на протяжении полугода в нескольких крупных проектах.
С удовольствием отвечу на ваши вопросы в комментариях.
Источник
Using RecyclerView with ViewBinding in Android via Kotlin
RecyclerView is one of the most used libraries in Android. In this article, I will show you how you can use it in conjunction with ViewBinding to make the most of it.
Dependencies
Here are the required dependencies:
- ViewBinding enabled in build.gradle file of the module,
- RecyclerView widget added to your host Fragment/Activity, and
- A XML layout that will be used by RecyclerView’s Adapter class to inflate the host Fragment/Activity.
In case you are unfamiliar with the topic of ViewBinding, you can check out my article on it.

Working with ViewBinding in Android using Kotlin
Aayush Gupta ・ Jan 28 ・ 3 min read
Implementation
We will create a class for our Adapter and extend it to RecyclerView.Adapter class while instantiating it.
This requires us to create a custom ViewHolder class that extends to RecyclerView.ViewHolder and will take our layout’s binding as an argument used to get the root of the layout file while at it.
Exit fullscreen mode
In the above example code, I am accepting a list as the class constructor. This list is supposed to have multiple elements of type Example which will have text as a key which we will use later.
Notice how the inner class’s constructor is of type RVExampleBinding . You need to make sure that you use the layout resource you created earlier to be consumed by the Adapter class.
Now, we need to override the class functions in order to complete the Adapter setup.
The first method we will override is onCreateViewHolder . This function will return an instance of the ViewHolder class we created above. As the class constructor requires us to pass the required Binding , we will use pass the same while inflating the layout.
Exit fullscreen mode
The second method we will override is getItemCount . This function will return the size of the list we accepted as an argument in the Adapter class.
Exit fullscreen mode
The third and the last method we will override is onBindViewHolder . In this method, we will use the holder variable which we accepted as an argument to access the GUI components using binding. position argument will help us to access the element at the specific position in the list.
Exit fullscreen mode
Here is how my Adapter class RVExample.kt looks like:
Exit fullscreen mode
and that’s it. Now you can use RecyclerView with ViewBinding and take the benefit of null and type safety offered by ViewBinding.
Источник
How to use View Binding in Android using Kotlin
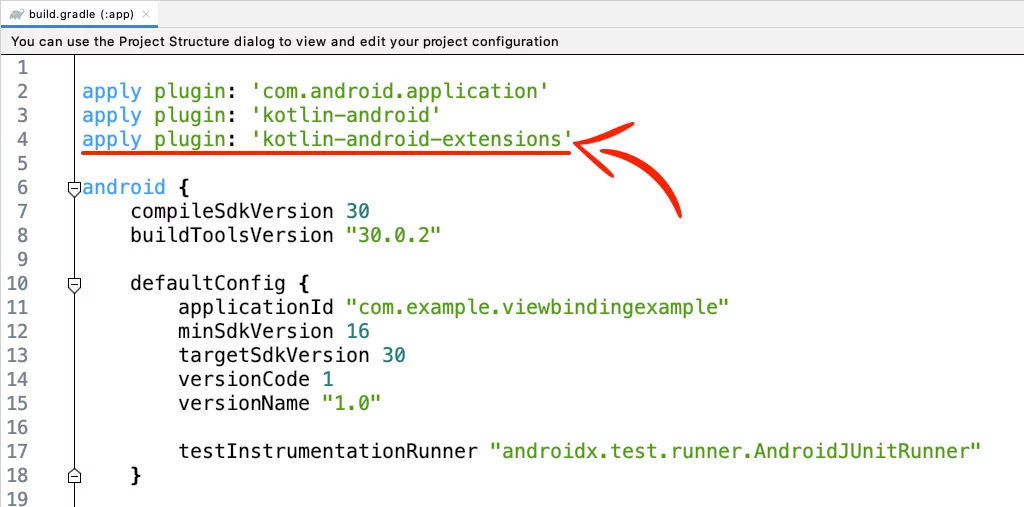
In Android Studio 4.1+, when you create a new Kotlin project and try to connect an XML layout file with your .kt file using Kotlinx synthetic, you’ll see you can’t do it anymore.
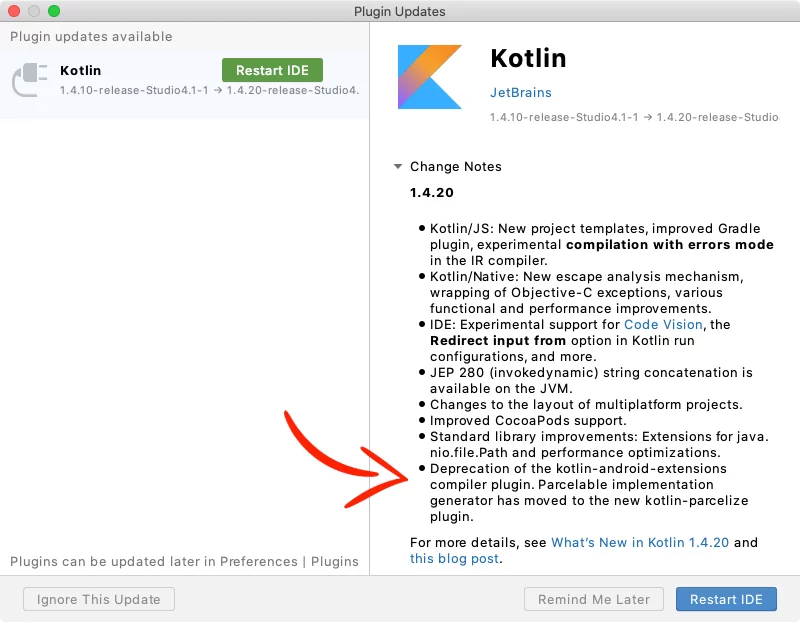
This is because they removed the plugin ‘Kotlin Android Extensions‘ as JetBrains deprecated it in the 1.4.20 version of Kotlin.
Now, the alternatives are:
- ButterKnife
- findViewById()
- View Binding
In this tutorial, I’ll show you how to implement View Binding in:
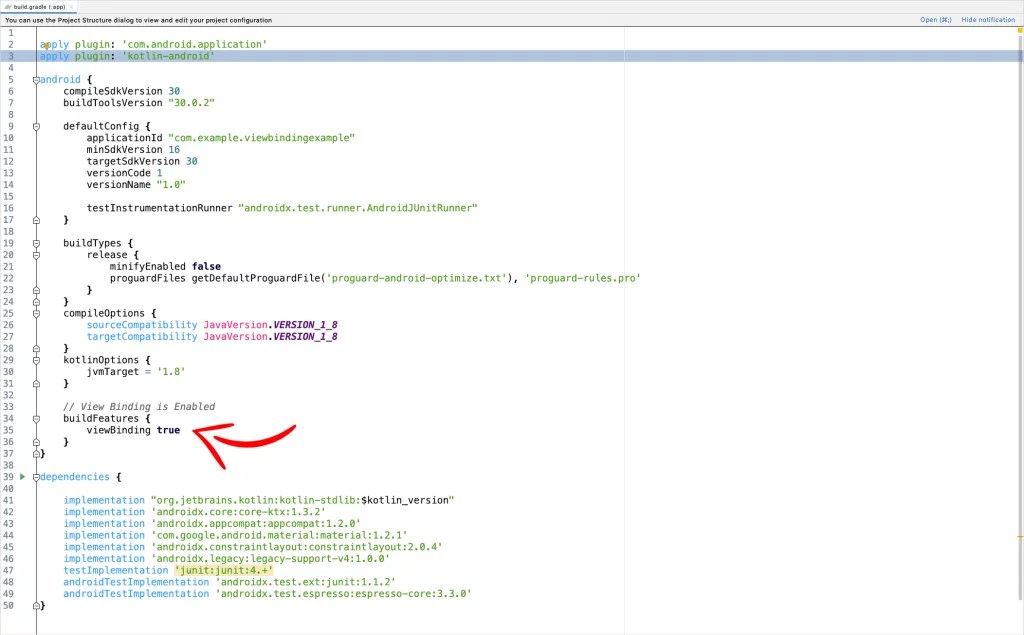
Enabling View Binding
In your module-level build.gradle file, add the following code to enable view binding.
This automatically will create binding classes for each XML file present in that module.
For example, if an XML file name is activity_main.xml, the generated binding class will have the name of this file in Pascal case and the word ‘Binding‘ at the end.
So the binding class will be ActivityMainBinding
If you don’t want to generate a binding class for a specific XML file, add the attribute tools:viewBindingIgnore=»true» in the root layout like that:
Using View Binding in Activities
To use View Binding in Activity, create an instance of the binding class, get the root view, and pass it to setContentView().
Now, you can reference your views like that:
Using View Binding in Fragments
There are two methods to use View Binding in Fragments:
• Inflate: You do the layout inflation and the binding inside the onCreateView method.
• Bind: You use an alternative Fragment() constructor that inflates the layout, and you do the binding inside the onViewCreated method
• Inflate method
In the onCreateView method, inflate your layout file and create the binding instance:
Because Fragments continue to live after the View has gone, it’s good to remove any references to the binding class instance:
• Bind method
At the top of your file, in the Fragment() constructor add your XML layout file, and create the binding inside the onViewCreated method (NOT the onCreateView):
Like I said before in the Inflate method, remove any references in the fragment’s onDestroyView() method:
Using View Binding in RecyclerView Adapter
To use View Binding in your RecyclerView adapter, add the binding class in your ItemViewHolder, and set the root layout:
Next, in the onCreateViewHolder method, do the layout inflation and return the ItemViewHolder with the binding.
And at the end, on the onBindViewHolder, you can reference any of the views through the binding of the holder:
If you have any questions, please feel free to leave a comment below
Источник
Android — Kotlin
A blog to explore things in Android App Development using Kotlin.
Databinding in RecyclerView — Android — Kotlin
- Get link
- Other Apps
Already we have seen the basics of Databinding and how to use it in previous post.
Now let’s see how to use Databinding in RecyclerView. And Its gonna be a short post. 😉
You can find the Project in GitHub.
Prerequisite:
build.gradle
First, we have enable dataBinding in app-level build.gradle
Next, we have add the following plugin.
apply plugin: ‘kotlin-kapt’
Next, we have to include dependency for databinding, (Not needed, if using Android Studio 3.2 or above, since its already bundled)
Implementation:
RecyclerActivity.kt
Lets create data for RecyclerView and then set the layoutManager and the data to it. Then lets set an adapter for that RecyclerView.
AdapterClass:
Next, ViewHolder have to be created as follows:
Here,
BR — generated class ;
BR.model — ‘model’ is variable name declared in layout ;
Then, we have to bind the data according to its position.

- Get link
- Other Apps
Comments
Thanks a lot, this is hard to find on the internet.
Nice one ..Got a brief idea. Thanking for the knowlege ..Keep sharing
.
Thanks for sharing. It would be great if you can share github repo.
Appsinvo was founded in 2015 and it is india-based company. Appsinvo is a Top Mobile App Development Company in India, USA and UK that develops unique, easy to use, high functionality and seamless operation that makes your web and mobile app more innovative. Since 2015, we have been delivering our services for the last 5 years in 120 countries and we have developed more than 300 mobile apps that makes more than 150 clients happy and satisfied with our services.
Mobile App development company in Asia
Top Mobile App Development Company
Top Mobile App Development Company in Noida
Mobile App Development Company in Delhi
Top Mobile App Development Companies in Australia
Top Mobile App Development Company in Qatar
Top Mobile App Development Company in kuwait
Top Mobile App Development Companies in Sydney
Mobile App Development Company in Europe
Mobile App Development Company in Dubai
Источник
RecyclerView With Data Binding in Android Kotlin: Example With Kotlin
RecyclerView is an advanced and flexible version of a ListView. We use RecyclerView when we have to display a large number of elements in one activity. If you don’t know how many views you have to load into the list, then RecyclerView is the best option for you. So, in this example, we will learn how to create RecyclerView With Data Binding in Android using Kotlin.
RecyclerView is better than a ListView because it saves a lot of memory because it reuses the Views when you scroll the activity rather than creating the views at the beginning of the Activity. When all the views are loaded in the beginning it wastes memory because there are many views that are loaded but cannot be seen on the screen. So, this wastes the memory and makes the app heavier in size.
In Application development, the memory cost feature is of great importance. Android system runs lots of apps so if your app is really heavy in size then it will not respond timely.
 RecyclerView With Data Binding in Android Kotlin
How RecyclerView works: RecyclerView With Data Binding in Android Kotlin
RecyclerView works in three parts.
- The Layout
- ViewHolder
- Adapter
The layout is created for each and every item to be loaded in the RecyclerView.
To save the memory ViewHolder is used because it caches the views.
The adapter fills the ViewHolders with data and returns the information of the data.
Lets start creating RecyclerView
In this example I will be showing a list of countries into a RecyclerView.
1- First of all create a new Android Studio Project with an empty Activity. Select KOTLIN as the default language for the project.
2- Name your project with “RecyclerViewKotlin” or you can name it whatever you want.
Источник


