- RecyclerView Item Click Listener the Right Way
- Example Scenario
- Project Creation
- Data model
- Recyclerview Adapter and view holder
- Item Click the bad way
- Let us fix it
- Kotlin Recyclerview Tutorial With Example CardView Item Click Image Text
- Step 1. Updating build.gradle(Module:app)
- Step 2. Downloading Images
- Step 3: Coding cardview.xml
- Step 4. Making Row Item File
- Step 5. Making Model Class
- Step 6. Custom Adapter
- Step 7. Updating Main Activity
- Explaining MainActivity.kt
- RecyclerView itemClickListener в Котлине
- RecyclerView itemClickListener в Котлине
- 12 ответов
- 1: создайте файл RecyclerItemClickListener
- 2: Создание / добавление расширений для RecyclerView:
- 3: и, наконец, использование (Я полагаю, вы используете kotlinx)
- Android RecyclerView Tutorial with Kotlin
- Version
- Getting Started
- Obtaining The API Keys
- RecyclerView 101
- Why Use a RecyclerView?
- RecyclerView and Layouts
- Creating the RecyclerView
- Laying Out RecyclerView Items
- Adapters for RecyclerView
- Keeping Hold of Your Views
- Assembling The Pieces
- Hooking up the Adapter and RecyclerView
- Adding Scrolling Support
- Layout Changes
- Using ItemTouchHelper
- Where to Go From Here?
RecyclerView Item Click Listener the Right Way


Some Android developers wonder why Google created a view like Recyclerview without a click listener(given the fact that the deprecated ListView has an item click listener).
Because there is no standard way of setting a click listener, new developers tend to confuse on the right way of doing it. In this article, I will show you how to do it in a proper way using an example scenario.
Example Scenario
- There is a Recyclerview adapter with a Recyclerview with a list of items(Users in this case).
- What we want is that when an item is clicked, we get the item’s model(User) information and may be pass it to a second activity.
Project Creation
From Android Studio, create an empty android project(Select the Kotlin support option) and name your activity, MainActivity.
- Delete the default ‘Hello World’ TextView in activity_main.xml .
- Add recyclerview and cardview dependencies in app level build.gradle file as shown below.

Add recyclerview in activity_main.xml where you removed the textview as shown below.
Ok we are good to go. The assumption is that you have worked with the recyclerview(in Java) before and know how to create a recyclerview adapter.. Next, we create the model class containing username and phone.
Data model
Sweet Kotlin. Just the above line of code gives us access to a setter and getter under the hood and other methods like toString. Check more at https://kotlinlang.org/docs/reference/data-classes.html .
Next, we create our view holder and adapter. Pay attention here because it is the most important part of what this article addresses.
Recyclerview Adapter and view holder
- Create a new Kotlin file called RecyclerAdapter.kt
- Next we create our item_user.xml layout as follows
The item_user has two textviews which holds the name and phone.
Next we create our view holder. As usual, our view holder has a constructor with an itemView as parameter and we get a reference to our views from item_user layout .
Then we create our adapter with the list of users as a parameter. An adapter contains the list of users
Item Click the bad way
Note that in onBindView, we can have access to the the current clicked item and thus open a new activity from here and pass our data..
This will work perfectly but it is a bad practice because
- It is not a good practice opening an Activity from a viewholder context
- Note that onBindViewHolder is called as your views are populated during scrolling. Thus you will have numerous calls to setOnClickListener.
Let us fix it
The way that you should do is that you create an ItemClickListener interface with one method ontemClicked with parameter User.
- We then pass modify the Adapter’s constructor to take the users list and an OnItemClickListener interface
- We also modify the the ViewHolder to have a bind function which takes a user and itemClick interface as follows.
This is all we have to do. We just have to implement the interface in our MainActivity .
Источник
Kotlin Recyclerview Tutorial With Example CardView Item Click Image Text

Kotlin RecyclerView Tutorial With Example will be covered here.
RecyclerView is developed with kotlin for your next awesome android app.
This tutorial will guide you how to make a RecyclerView With CardView, Image and Text in Android Kotlin.
You will also learn to implement onClick, onItemClickListener, onItemTouchListener of RecyclerView.
We will use material design to implement RecyclerView and CardView.
RecyclerView and Kotlin both are updated items for android app development. Kotlin is updated from Java and RecyclerView is updated from Listview.
So this tutorial can be handy helpful for you to update with latest trends in android app development.
First, check the output of RecyclerView Android tutorial then follow all the steps.
Step 1. Updating build.gradle(Module:app)
Very first thing is to add two lines in build.gradle(Module:app) file as per below code
Full source code can be look like
Step 2. Downloading Images
We need some images to demonstrate in RecyclerView.
You should learn here how to add images in drawable folder in the step 2 of circular progressbar example android. (No need to create xml file in drawable, just copy and paste images in drawable).
Step 3: Coding cardview.xml
Create a new file into drawable folder
Give it a name cardview.xml
Copy below source code into it.
This file makes designs how the cardview should look.
You change colors, corner size etc. things in this file.
Step 4. Making Row Item File
Prepare a new layout xml file and give it a name rv_item.xml
This file is the core structure of how single row of recyclerview will be look a like.
It contains ImageView and TextView.
Step 5. Making Model Class
Make a new kotlin class named “Model.kt”
Add below source code into it
Step 6. Custom Adapter
Now we will make a custom adapter. For this, create a new class named Adapter.kt
Write below source code in Adapter class.
Step 7. Updating Main Activity
We need to change both activity_main.xml and MainActivity.kt files
Replace source code of activity_main.xml with below one
Now replace code of MainActivity.kt class
Explaining MainActivity.kt
The below code is required to get click position of RecyclerView.
To get click position, we need create one interface and one class.
Interface is created with following code
The required class is made with below source code
So it was all about making RecyclerView With CardView, Material Design ,Image And Text in Kotlin for android app.
Do not hesitate to use comment section for any queries or reviews.
Please LIKE and SHARE this kotlin recyclerview tutorial with your other buddies to help them as well as us!
Источник
RecyclerView itemClickListener в Котлине
Я пишу свое первое приложение в Kotlin после 3-летнего опыта работы с Android.
Просто запутался, как использовать itemClickListener с RecyclerView в Котлине.
Я пробовал подход (edit: now interface), очень похожий на Java
Это казалось очень избыточным, поэтому я попытался использовать внутренний класс:
А затем просто настройте прослушиватель кликов адаптера следующим образом:
Но я все еще не удовлетворен этим, потому что думаю, что может быть лучший, более чистый способ. Я пытаюсь добиться чего-то вроде этого:
RecyclerView onClick
Закончено с изменением одобренного ответа
Определена функция в активности:
Передача самой функции на адаптер так:
Функция расширения с помощью Loop в утверждённом ниже ответе.
У меня есть немного другой подход. Вы можете создать расширение для своего ViewHolder
Затем используйте его в адаптере, как это
Я работаю с коллегами по библиотеке, предоставляя такие расширения.
Мое решение похоже на сочетание предыдущих с супер чистым вызовом из активности.
ContactAdapter:
ContactActivity:
В случае, если кто-либо ищет более беззаботный ответ, я попробовал следующее: это очень похоже на решение от AfzalivE:
В моем классе адаптера я передал clickListener в качестве параметра. В onBindViewHolder я использовал setOnClickListener для вызова clickListener и обработки события click.
MyAdapter.kt
Примечание. Мне нужна ссылка из моего контейнера элементов списка (корневой вид), который в этом случае равен containerView
Затем я передал свой объект как параметр без необходимости повторного поиска его в списке и обработал его непосредственно в моем классе Activity в момент установки адаптера:
MyActivity.kt
Обновление
Если вам нужно получить позицию щелкнутого элемента, просто определите его как параметр в обратном вызове, а затем отправьте его позже. Обратите внимание на val clickListener: (MyObject, Int) -> Unit ниже:
MyAdapter.kt
Затем на onBindViewHolder() вы передаете позицию при вызове метода обратного вызова:
Источник
RecyclerView itemClickListener в Котлине
Я пишу свое первое приложение в Котлине после 3 лет опыта работы с Android. Просто запутался, как использовать itemClickListener с RecyclerView в Котлине.
Я пробовал подход к черте (edit: now interface), очень похожий на Java
это казалось очень избыточным, поэтому я попробовал подход внутреннего класса:
а затем просто установите прослушиватель щелчка адаптера следующим образом:
но я все еще не удовлетворен с этим, потому что я думаю, что может быть лучший, более чистый способ. Я пытаюсь достичь чего-то подобного.: RecyclerView onClick
в конечном итоге происходит с изменением утвержденного ответа
определена функция в действии:
передал саму функцию на адаптер следующим образом:
функция расширения петлей в утвержденном ответе под.
12 ответов
у меня немного другой подход. Вы можете создать расширение для своего ViewHolder
затем используйте его в адаптере, как это
Я работаю с моими коллегами на библиотека обеспечение такого расширения.
мое решение похоже на комбинацию предыдущих с супер чистым вызовом из действия.
ContactAdapter:
ContactActivity:
в случае, если кто-то ищет более без излишеств ответ, я попробовал следующее — что очень похоже на решение от AfzalivE:
в моем классе адаптера я прошел clickListener в качестве параметра. On onBindViewHolder , я использовал setOnClickListener называть clickListener и обрабатывать событие click.
MyAdapter.kt:
Примечание: мне нужна ссылка из контейнера моего элемента списка (корень view), который в этом случае является containerView
затем я передал свой объект как параметр без необходимости искать его в списке снова и обрабатывать его непосредственно на моем Activity класс, в момент установки адаптера:
MyActivity.kt:
обновление
Если вам нужно получить положение щелкнутого элемента, просто определите его как параметр на обратном вызове, а затем отправьте его позже. Обратите внимание на val clickListener: (MyObject, Int) -> Unit ниже:
MyAdapter.kt
затем на onBindViewHolder() вы передаете позицию при вызове метода обратного вызова:
и MyActivity.kt, вам придется изменить способ установки адаптера, чтобы вы могли получить позицию. Вот так:
вы можете попробовать что-то вроде:
и Sam convertion просто работает как в Java 8, поэтому просто используйте лямбда:
Я думаю, что самое элегантное решение-дать эту ответственность recyclerView, а не просматривать или даже адаптировать его.
для этого нам понадобится:
1: создайте файл RecyclerItemClickListener
2: Создание / добавление расширений для RecyclerView:
3: и, наконец, использование (Я полагаю, вы используете kotlinx)
Источник
Android RecyclerView Tutorial with Kotlin
In this Android RecyclerView tutorial, learn how to use Kotlin to display datasets of a large or unknown size!

Version
- Kotlin 1.3, Android 8.1, Android Studio 3

Update note: Kevin Moore updated this tutorial for Kotlin, Android 28 (Pie) and Android Studio 3.3. Darryl Bayliss wrote the original and Rod Biresch provided the original update.
Recycling is good for the planet. It’s a way to make sure we’re not buried in our own rubbish or lacking resources in the future. Applying this concept to development, Android engineers realized recycling can also make an OS run efficiently. The result? Recycling enthusiasts and developers alike rejoiced at the release of the RecyclerView widget for Android Lollipop. :]
Google announced a support library to make this clean, green recycling machine backwards compatible all the way to Android Eclair (2.2), released in 2010. More celebration!
In this tutorial, you’ll experience the power of RecyclerView in action and learn:
- The purpose and components of RecyclerView
- How to change the layout of RecyclerView
- How to add animations to RecyclerView
For this tutorial, you’ll use the sample app Galacticon to build out a feed of astronomy photos from a public NASA API. Ready to blast off?
Prerequisite note: You’ll need Android Studio 3.0 or greater and a working knowledge of developing for Android with Kotlin before starting this tutorial. Review our introductory tutorials for a refresher!
Getting Started
Get the starter project using the Download Materials at the top or bottom of this tutorial and open it in Android Studio. Click the Run app button at the top and you’ll see this:
![]()
It’s empty! Before adding NASA’s amazing astrophotography, you need to do some set up.
Obtaining The API Keys
To use the Astronomy Picture of the Day API, one of NASA’s most popular web services, you need an API key.
To get a key, put your name and email address into api.nasa.gov and copy the API key that appears on the screen or in your email.
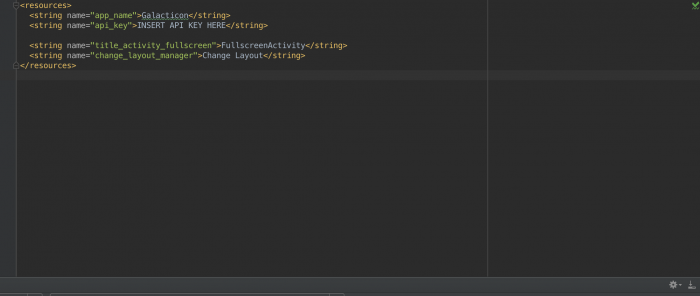
Next, copy the API key and open the strings.xml file in your project. Paste the API key into the api_key string resource, replacing INSERT API KEY HERE :
RecyclerView 101
You’re about to explore the vastness of RecyclerViews, and no competent commander heads into the unknown without preparation. Consider the next section your mission brief.
Android used to use ListView or GridView classes for displaying lists. A RecyclerView can be thought of as a combination of a ListView and a GridView. However, in a RecyclerView, there are features that separate your code into maintainable components even as they enforce memory-efficient design patterns.
How could it be better than the tried and tested ListView and GridView? The answers are in the details.
Why Use a RecyclerView?
Imagine you’re creating a ListView with complicated custom items.
You create a row layout for the items and use that layout inside your adapter. You inflate your item layout in getView() , referencing each view with the unique ID you provided in XML to customize and add view logic. You pass that to the ListView, and it’s ready to be drawn on the screen. Or is it?
ListViews and GridViews only do half the job of achieving true memory efficiency. They recycle the item layout, but don’t keep references to the layout children, forcing you to call findViewById() for every child of your item layout every time you call getView() .
All this calling around can become processor-intensive, especially for complicated layouts. Furthermore, the situation can cause your ListView scrolling to become jerky or nonresponsive as it tries to grab view references.

Android initially provided a solution to this problem on the Android Developers site with smooth scrolling via the power of the View Holder pattern.
With this pattern, a class becomes an in-memory reference to all the views needed to fill your layout. You set the references once and reuse them, working around the performance hit that comes with repeatedly calling findViewById() .
Take note: This is an optional pattern for a ListView or GridView. If you’re unaware of this detail, then you may wonder why your ListViews and GridViews are so slow.
RecyclerView and Layouts
The arrival of the RecyclerView changed everything. It still uses an Adapter to act as a data source; however, you have to create ViewHolders to keep references in memory.
To provide a new view, RecyclerView either creates a new ViewHolder object to inflate the layout and hold those references, or it recycles one from the existing stack.
Now you know why it’s called a RecyclerView!
Another perk of using RecyclerViews is that they come with default animations that you don’t have to create or add yourself.
Because it requires a ViewHolder, the RecyclerView knows which animation to apply to which item and adds them as required. You can also create your own animations and apply them as needed.
The last and most interesting component of a RecyclerView is its LayoutManager. This object positions the RecyclerView’s items and tells it when to recycle items that have transitioned off-screen. The ListView used to do this work alone. The RecyclerView has broken out this functionality to allow for different kinds of layouts: Vertical, horizontal, grid, staggered or your own!
Layout Managers offer three choices by default:
- LinearLayoutManager positions items to look like a standard ListView
- GridLayoutManager positions items in a grid format similar to a GridView
- StaggeredGridLayoutManager positions tems in a staggered grid format.
Create your own LayoutManagers to use with a RecyclerView if you want extra customization.
Those are the basics of RecyclerView. Now, on to the mission!
Creating the RecyclerView
To create the RecyclerView, break the work into four parts:
- Declare the RecyclerView in an activity layout and reference it in the activity Kotlin file.
- Create a custom item XML layout for RecyclerView for its items.
- Create the view holder for view items, connect the data source of the RecyclerView and handle the view logic by creating a RecyclerView Adapter.
- Attach the adapter to the RecyclerView.
Step one should be familiar. Open up the activity_main.xml layout file and add the following as a child of the LinearLayout:
Here, you’re setting up the layout and telling the RecyclerView to match its parent.
Note: You’re using the v7 support library for backwards compatibility with older devices. The starter project already adds the RecyclerView Support Library as a dependency in your app’s build.gradle file. If you want more information on how to do it yourself, check out the Android developer website.
Open MainActivity.kt and declare the following property at the top of the class:
In onCreate() , add the following lines after setContentView :
Android Studio should prompt you to import kotlinx.android.synthetic.main.activity_main.* for recyclerView .
The recyclerView is now an extension property for Activity , and it has the same type as declared in activity_main.xml . The plugin removes a lot of boilerplate code and reduces the risk of potential bugs.
Phase one is complete! You’ve declared and allocated memory for two parts of the puzzle that RecyclerViews need to work: The RecyclerView and its Layout Manager.
Laying Out RecyclerView Items
Phase two involves creating a custom layout for the item you want the RecyclerView to use. It works the same way as creating a custom layout for a ListView or Gridview.
Go to your layout folder and create a new layout with the name recyclerview_item_row , making sure the root element is a ConstraintLayout .
Note: ConstraintLayout is Android’s latest layout and is an ultra-uber Layout. It’s similar to a RelativeLayout but can have chained items, gridlines and barriers. Check out more about ConstraintLayouts.
In your new layout, change the ConstraintLayout to look like this:
Add the following XML elements as children of the ConstraintLayout:
No rocket science here: You declared a few views as children of your layout. Now you can use them in your adapter.
Adapters for RecyclerView
Right-click on the com.raywenderlich.galacticon folder, select New ‣ Kotlin File ‣ Class, name it RecyclerAdapter and select Class for Kind.
Make the class extend RecyclerView.Adapter as in the following:
Android Studio will prompt you to import the RecyclerView class. Click on RecylerView and press Option-Return (or Alt-Enter on a PC) and choose Import. Since you’re extending a class that has required methods, Android Studio will underline your class declaration with a red squiggle.
To resolve this, click on the line of code to insert your cursor and press Option-Return (or Alt-Enter on a PC) to bring up a context menu. Select Implement Methods:

Select all three methods and press OK to implement the suggested methods:

These methods are the driving force behind your RecyclerView adapter. Note there is still a compiler error for the moment. That’s because your adapter and the required methods are defined using your ViewHolder class, PhotoHolder , which doesn’t exist just yet. You’ll get to define your ViewHolder and see what each required method does soon. Hang tight!
As with every adapter, provide the corresponding view a means of populating items and deciding how many items there should be.
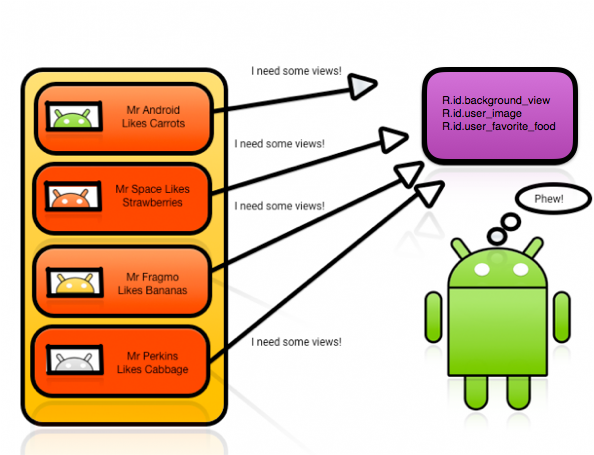
Previously, a ListView’s or GridView’s onItemClickListener managed item clicks. A RecyclerView doesn’t provide methods like this because its focus is ensuring the position and management of the items within.
The job of listening for actions is now the responsibility of the RecyclerView item and its children. This may seem like more overhead, but in return, you get fine-grained control over how your item’s children can act.
At the top of your RecyclerAdapter class, add a variable photos in the primary constructor to hold your photos:
So it looks like:
Nice job, Commander! Your adapter now knows where to look for data. Soon you’ll have an ArrayList of photos filled with the finest astrophotography!
Next, populate the stubbed methods that Android Studio added.
The first method, getItemCount() , should be familiar if you’ve worked with ListViews or GridViews.
The adapter will work out how many items to display. In this case, you want the adapter to show every photo you’ve downloaded from NASA’s API. Add update getItemCount() to the following:
Next, you’re going to exploit the ViewHolder pattern to make an object that holds all your view references.
Keeping Hold of Your Views
To create a PhotoHolder for your view references, you’ll create a nested class in your adapter. You’ll add it here rather than in a separate class because its behavior is tightly coupled with the adapter.
Add the following code at the bottom of the RecyclerAdapter class:
Here’s what the code above does:
- Make the class extend RecyclerView.ViewHolder, allowing the adapter to use it as as a ViewHolder.
- Add a reference to the view you’ve inflated to allow the ViewHolder to access the ImageView and TextView as an extension property. Kotlin Android Extensions plugin adds hidden caching functions and fields to prevent the constant querying of views.
- Initialize the View.OnClickListener .
- Implement the required method for View.OnClickListener since ViewHolders are responsible for their own event handling.
- Add a key for easy reference to the item launching the RecyclerView.
You should still have a compiler errors with onBindViewHolder and onCreateViewHolder . Change the p0 argument on onBindViewHolder to holder and the p1 to position .
Then change the p0 argument on onCreateViewHolder to parent and the p1 to be viewType .
Build and run the app again. It’ll look nearly the same because you haven’t told the RecyclerView how to associate the PhotoHolder with a view.
Assembling The Pieces
Sometimes there are no ViewHolders available. In this scenario, RecylerView will ask onCreateViewHolder() from RecyclerAdapter to make a new one. You’ll use the item layout — PhotoHolder — to create a view for the ViewHolder.
You could add the inflate code to onCreateViewHolder() . However, this is a nice opportunity to show a cool Kotlin feature called Extensions.
First, add a new Kotlin file named Extensions.kt to the project and add the following new extension function to the new file:
Replace the TODO(«not implemented») line between the curly braces in onCreateViewHolder() with the following:
Here you inflate the view from its layout and pass it in to a PhotoHolder. The parent.inflate(R.layout.recyclerview_item_row, false) method will execute the new ViewGroup.inflate(. ) extension function to inflate the layout.
Now the object holds onto those references while it’s recycled, but there are still more pieces to put together before launching your rocket.
Start a new activity by replacing the log in PhotoHolder’s onClick with this code:
This grabs the current context of your item view and creates an intent to show a new activity on the screen, passing the photo object you want to show. Passing the context object into the intent allows the app to know what activity it’s leaving.
Next, add this method inside PhotoHolder :
This binds the photo to the PhotoHolder, giving your item the data it needs to work out what it should show.
It also adds the suggested Picasso import, which is a library that makes it simpler to get images from a given URL.
The last piece of the PhotoHolder assembly will tell it how to show the right photo at the right moment. It’s the RecyclerAdapter’s onBindViewHolder , and it lets you know a new item will be available on screen and the holder needs some data.
Add the following code inside the onBindViewHolder() method:
Here, you’re passing in a copy of your ViewHolder and the position where the item will show in your RecyclerView, and calling bindPhoto(. ) .
That takes care of the assembly. Use the position where your ViewHolder will appear to grab the photo out of your list and then pass it to your ViewHolder.
Step three is complete! Now for the final stage before blast off.
Hooking up the Adapter and RecyclerView
This is the moment you’ve been waiting for. Connect your adapter to your RecyclerView and make sure it retrieves photos when created so you can explore outer space — in pictures.
Open MainActivity.kt, and add this property at the top:
Next, underneath the assignment of recyclerView.layoutManager , add the following:
Here you’re creating the adapter, passing in the constructors it needs and setting it as the adapter for your RecyclerView.
Although you connected the adapter, there’s one more thing to do to make sure you don’t have an empty screen.
In onStart() , underneath the call to super , add this code:
This adds a check to see if your list is empty, and if yes, it requests a photo.
Next, in receivedNewPhoto() , add the following after photosList.add:
So it looks like the following:
Here, you inform the recycler adapter that you added an item after updating the list of photos.
Run the app, load up the emulator and before long, Galacticon should look something like this:

That’s not all. Tap on the photo, and you should see a new activity that brings that item into focus:

That’s still not all! Try rotating your device or emulator (Function-Control-F11 or F12) and you’ll see the image in full screen glory!

Depending on the size of the image and your device screen it may look a little distorted, but don’t worry about that.

Congratulations! You have a working RecyclerView. Take a journey amongst the stars!
Adding Scrolling Support
If you head back to MainActivity on your device and try to scroll down, you’ll notice something is amiss — your RecyclerView isn’t retrieving any new photos.

Your RecyclerView is doing as it’s told by showing the contents of photosList . The problem is the app will only retrieve one photo. It has no idea when or how to grab more.
To remedy this, retrieve the number of the photos and the last visible photo index while scrolling. Then you’ll check to see that the last photo is visible and there are no photos already on request. If these are both true, then your app downloads more pretty photos!
This patch will require a spacewalk, so break out your spacesuit and get ready for a zero-gravity experience.
In MainActivity.kt, add this property with custom accessor below to MainActivity:
This uses your RecyclerView’s LinearLayoutManager to get the index of the last visible item on the screen.
Next, add a method inside of MainActivity that inserts an onScrollListener to your RecyclerView, so it can get a callback when the user scrolls:
This function gives the RecyclerView a scroll listener triggered by scrolling. While scrolling, the listener retrieves the count of the items in its LayoutManager and calculates the last visible photo index. Once done, it compares these numbers, incrementing the index by one because the index begins at zero while the count begins at one. If they match and there are no photos already on request, you request a new photo.
Finally, hook everything to the RecyclerView by calling this method from onCreate beneath where you set your RecyclerView Adapter:
Build and run the app again. Scroll down, and you should see quite an improvement!

Excellent work! Your RecyclerView now updates to show the latest photo requested by your app. The great thing is that receivedNewPhoto() handles most of the work because you told it to notify your adapter about new items.
That earns an intergalactic thumbs up for upcycling code!
Layout Changes
Now that your RecyclerView is up and running, it’s time to trick out your spaceship.
Wouldn’t it be cool if your RecyclerView could change its layout? Good news: RecyclerView’s item positioning is separated into a layout manager.
Add a property for a GridLayoutManager to the top of MainActivity.kt:
Note that GridLayoutManager is built-in, but you can easily customize it.
In onCreate() , initialize the LayoutManager below the existing LinearLayoutManager:
As with the previous LayoutManager, pass in the context the manager will appear in. Unlike the former, it takes an integer parameter. In this case, set the number of columns the grid will have.
Add this method to MainActivity:
This code checks to see what LayoutManager your RecyclerView is using, and then:
- If it’s using the LinearLayoutManager, it swaps in the GridLayoutManager.
- It requests a new photo if your grid layout only has one photo to show.
- If it’s using the GridLayoutManager, it swaps in the LinearLayoutManager.
Next, make some changes to lastVisibleItemPosition to help it handle the new LayoutManager. Make it look like the following:
Here, you ask the RecyclerView to tell you what its LayoutManager is. Then you ask that LayoutManager to tell you the position of the last visible item.
To use the grid layout, make use of the Options menu button that is already available in the app. Add the following code underneath onStart() :
This checks the ID of the item tapped in the menu and then determines what to do about it. In this case, there should only be one ID that will match up, effectively telling the app to go away and rearrange the RecyclerView’s LayoutManager.
You’re ready to go! Load the app and tap the button at the top right of the screen. You’ll begin to see the stars shift:

Using ItemTouchHelper
Sometimes you’ll see things you just don’t like, such as a galaxy far, far away that has fallen to the dark side or a planet that is prime for destruction. How could you go about killing it with a swipe?
Luckily, Android has provided the ItemTouchHelper class, which allows for easy swipe behavior. Creating and attaching this to a RecyclerView requires just a few lines of code.
In MainActivity.kt, underneath setRecyclerViewScrollListener() add the following method:
Here’s the breakdown, step by step:
- Create the callback and tell it what events to listen for. It takes two parameters: One for drag directions and one for swipe directions. You’re only interested in swipe. Pass 0 to inform the callback not to respond to drag events.
- Return false in onMove . You don’t want to perform any special behavior here.
- Call onSwiped when you swipe an item in the direction specified in the ItemTouchHelper . Here, you request the viewHolder parameter passed for the position of the item view, and then you remove that item from your list of photos. Finally, you inform the RecyclerView adapter that an item has been removed at a specific position.
- Initialize ItemTouchHelper with the callback behavior you defined, and then attach it to the RecyclerView.
Add the method to the activity’s onCreate() underneath setRecyclerViewScrollListener() :
This will attach the ItemTouchListener to the RecyclerView using the code you just wrote.
Run the app once more and swipe across one of your items. You should see it begin to move. If you swipe the item far enough, you should see it animate and vanish. If other items are visible, they will reorganize themselves to cover the empty space. How cool is that?

Where to Go From Here?
Nice job, Commander! Now it’s time to head back to Earth and think about what you’ve learned. In this tutorial, you:
- Created a RecyclerView and all its necessary components, such as a LayoutManager, an Adapter and a ViewHolder.
- Updated and removed items from an Adapter.
- Added some cool features like changing layouts and adding swipe functionality.
Above all, you’ve now experienced how separating components — a key attribute of RecyclerViews — provides so much functionality with such ease. For flexible, exciting collections, look no further than the all-powerful RecyclerView.
Get the final project by using the Download Materials button at the top or bottom of this tutorial.
To learn more about RecyclerViews, check out the Android documentation. Take a look at the support library for RecyclerViews to learn how to use it on older devices. To make them fit with the material design spec, check out the list component design specification.
Join us in the forums to discuss this tutorial and share your findings as you work with RecyclerViews!
Источник


