- Android Networking в 2019 — Retrofit с Kotlin Coroutines
- Вкратце об Android Networking
- Начнем
- Скрытие ключа API в Version Control (Не обязательное, но рекомендуемое действие)
- Установка проекта
- Создание сервиса TmdbAPI
- Поиск по API Tmdb
- Выполнение сетевого вызова
- Sealed Result Class
- Построение BaseRepository для обработки safeApiCall
- Построение MovieRepository
- Создание View Model для получения данных
- Использование ViewModel в Activity для обновления UI
- Опыт применения Coroutines и Retrofit2
- Что это?
- Зачем?
- Пример
- Делаем лучше
- MVVM with Kotlin Coroutines and Retrofit [Example]
- Suspend Function
- Launch and Async
- Coroutine Scope
- Coroutines in your Android Project
- Making it work with Retrofit?
- Declaring our interface.
- Building Retrofit Service
- ViewModel with Coroutines
- Coroutines and LiveData
- Exception Handling in Kotlin Coroutines
- Kotlin Coroutines With Retrofit Example
- Required Dependencies
Android Networking в 2019 — Retrofit с Kotlin Coroutines

Mar 18, 2019 · 5 min read
В 2018 году произошли серьезные изменения мира Android, особенно касательно Android Networking. Многие перешли от использования RxJava к Kotlin Coroutines, для обработки многопоточности в Android.
Поговорим о том, как выполнить вызов Android Networking API с помощью Retrofit2 и Kotlin Coroutines, и сделаем сетевой вызов API TMDB для получения популярных фильмов.

Вкратце об Android Networking
В сущности, android networking, как и любой другой networking, работает следующим образом:
- Request — Выполнение HTTP-запроса к URL-адресу (конечной точке — endpoint) с соответствующими заголовками. При необходимости используется ключ авторизации.
- Response — Запрос возвращает ответ, содержащий error или success. В случае успешного завершения запроса, ответ содержит содержимое endpoint (обычно в формате JSON)
- Parse & Store — Парсинг JSON, получение необходимых значений и размещение их в классе данных.
В Android используются:
- Okhttp — Для создания HTTP-запроса с соответствующими заголовками.
- Retrofit — Для создания запроса
- Moshi / GSON — Для парсинга данных JSON
- Kotlin Coroutines — Для создания сетевых запросов, не блокирующих основной поток.
- Picasso / Glide —Для скачивания и установки изображения в ImageView.
Начнем
В API TMDb (The Movie Database) находится список всех популярных, недавно вышедших, а также готовящихся к выпуску фильмов и сериалов. Это один из самых популярных API для различных экспериментов.
Для со з дания запросов в API TMDB требуется ключ API. Для этого нужно:
Скрытие ключа API в Version Control (Не обязательное, но рекомендуемое действие)
После получения ключа API выполните следующие действия, чтобы скрыть его в VCS.
- Добавьте ключ в local.properties, находящийся в корневой папке (root folder).
- Получите доступ к ключу в build.gradle с помощью программы.
- Ключ будет доступен в программе через BuildConfig.
Установка проекта
Для установки проекта добавляем необходимые зависимости в build.gradle (Module: app):
Создание сервиса TmdbAPI
Рассмотрим наши действия в ApiFactory.kt.
- Сначала создаем Network Interceptor, чтобы добавить api_key во все запросы в качестве authInterceptor.
- Затем создаем сетевого клиента с помощью OkHttp и добавляем authInterceptor.
- Теперь соединяем все вместе, чтобы создать строителя (builder) и обработчика (handler) HTTP-запроса с помощью Retrofit. Здесь добавляем ранее созданного сетевого клиента, базовый URL, а также конвертер и адаптер.
MoshiConverter участвует в парсинге JSON и конвертирует ответ JSON в класс данных Kotlin, при необходимости используя селективный парсинг.
CoroutineCallAdaptor — это CallAdapter.Factory Retrofit2 для значения Deferred Kotlin coroutine. - Наконец создаем tmdbApi, передав ссылку на класс TmdbApi (Создание с следующем пункте) к ранее созданному классу retrofit.
Поиск по API Tmdb
Получаем следующий ответ для endpoint /movie/popular. Ответ возвращает результаты — массив объекта movie. Именно он нам и нужен.
Теперь создаем класс данных Movie и класс MovieResponse в соответствии с json.
После создания класса данных, мы создаем интерфейс TmdbApi. Ссылка на него находится в строителе retrofit. В интерфейс TmdbApi добавляем требуемые вызовы API и при необходимости параметры запроса. К примеру, чтобы получить фильм по id нужно добавить следующий метод в интерфейс:
Выполнение сетевого вызова
Для получения необходимых данных выполняем сетевой вызов в DataRepository или в ViewModel или прямо в Activity.
Sealed Result Class
Класс, который используется для обработки ответа сети. Он может иметь значение Success с необходимыми данными или Error с исключением.
Построение BaseRepository для обработки safeApiCall
Построение MovieRepository
Создание View Model для получения данных
Использование ViewModel в Activity для обновления UI
Мы рассмотрели базовый полнофункциональный вызов API для Android. Больше примеров вы найдете здесь.
Источник
Опыт применения Coroutines и Retrofit2
Что это?
Кто еще не читал документацию — настоятельно рекомендую к ознакомлению.
Что пишет джетбрейнс:
Сопрограммы упрощают асинхронное программирование, оставив все осложнения внутри библиотек. Логика программы может быть выражена последовательно в сопрограммах, а базовая библиотека будет её реализовывать асинхронно для нас. Библиотека может обернуть соответствующие части кода пользователя в обратные вызовы (callbacks), подписывающиеся на соответствующие события, и диспетчировать исполнение на различные потоки (или даже на разные машины!). Код при этом останется столь же простой, как если бы исполнялся строго последовательно.
Если говорить простыми словами — это библиотека для синхронного \ асинхронного выполнения кода.
Зачем?
Потому что RxJava уже не в моде (шутка).
Во-первых, хотелось попробовать что-то новое, во-вторых, я наткнулся на статью — сравнение скорости работы корутин и других способов.
Пример
Например, нужно выполнить операцию в фоне.
Для начала — добавим в наш build.gradle зависимость от корутин:
Используем в нашем коде метод:
Где в context — мы указываем необходимый нам thread pool — в простых случаях это IO, Main и Default
IO — для простых операций с API, операциями с БД, shared preferencies и тд.
Main — UI тред, откуда мы можем получать доступ к вью
Default — для тяжелых операций с высокой нагрузкой на CPU
(Подробнее в этой статье )
Block — лямбда которую мы хотим выполнить
В принципе на этом все, мы получаем результат cуммы квадратов от 1 до 1000 и при этом не блокируем main thread что означает — никаких ANR
Однако, если наша корутина выполняется 20 секунд и за это время мы совершили 2 поворота девайса то мы будем иметь 3 одновременно выполняющихся block. Упс.
А если мы передали в block ссылку на activity — утечка и отсутствие возможности в старых блоках выполнить операции с view. Дважды упс.
Таки что делать?
Делаем лучше
Таким образом мы получили возможность останавливать выполнение нашего кода в потоке, например, при повороте экрана.
CoroutineScope сделал возможным объединить scope всех вложенных корутин и при вызове job.cancel() — останавливать их выполнение
Если планируется повторное использование scope после остановки выполнения — нужно использовать job.cancelChildren() вместо job.cancel() спасибо Neikist за комментарий
При этом у нас остается возможность управлять потоками:
Источник
MVVM with Kotlin Coroutines and Retrofit [Example]


Coroutines are a neat new feature of the Kotlin language that allow us to write asynchronous code in a more idiomatic way. — This also means you can write asynchronous code the same way you would normally write synchronous code in your project.
Already, I have explained about MVVM in detail in my another post. Please check that for better understanding of MVVM. in this post, I am focusing on coroutines and retrofit working together.
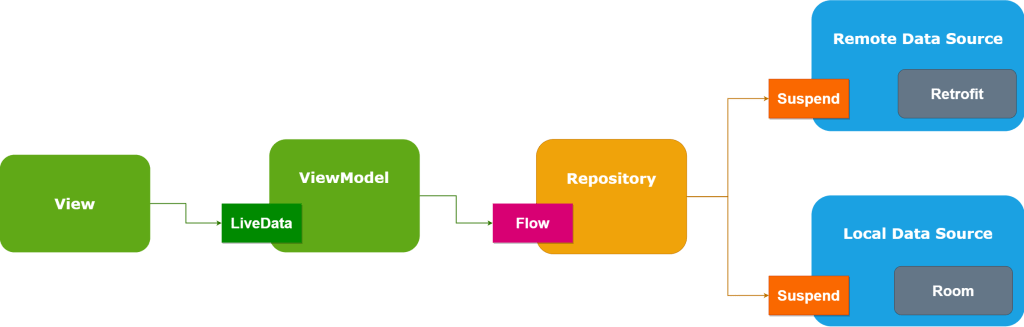
The flow diagram for the coroutines with retrofit in viewModel.
Coroutines are helpful in two main problems,
- A long-running task that can block the main thread
- Main safety allows you to ensure that any suspend function can be called from the main thread
According to the Kotlin docs it is stated that coroutines are a lightweight alternative to threads.
“Coroutines provide a way to avoid blocking a thread and replace it with a cheaper and more controllable operation”
Before we begin I would like to briefly address the concept and the commonly used functions in Coroutine.
Coroutines build upon regular functions by adding two new operations. In addition to invoke (or call) and return, coroutines add suspend and resume.
- suspend — pause the execution of the current coroutine, saving all local variables
- resume — continue a suspended coroutine from the place it was paused
Suspend Function
A suspending function is just a regular Kotlin function with an additional suspend modifier which indicates that the function can suspend the execution of a coroutine.
You can only call suspend functions from other suspend functions, or by using a coroutine builder like launch to start a new coroutine.
We use call back functions when we get response from our Async task. Suspend and resume work together to replace callbacks.
To understand suspend functions, we should also know about provided dispatchers by Kotlin.
To specify where the coroutines should run, Kotlin provides three dispatchers that you can use:
- Dispatchers.Main — Use this dispatcher to run a coroutine on the main Android thread. This should be used only for interacting with the UI and performing quick work. Examples include calling suspend functions, running Android UI framework operations, and updating LiveData objects.
- Dispatchers.IO — This dispatcher is optimized to perform disk or network I/O outside of the main thread. Examples include using the Room component, reading from or writing to files, and running any network operations.
- Dispatchers.Default — This dispatcher is optimized to perform CPU-intensive work outside of the main thread. Example use cases include sorting a list and parsing JSON.
Lets, see this with an example -> We are calling our api through coroutines. So, we use Dispatchers.IO.
When we call getAllMovies() suspend method, then it suspends our coroutine. The coroutine on the main thread will be resumed with the result as soon as the withContext block is complete.
Note: Using suspend doesn’t tell Kotlin to run a function on a background thread. It’s normal for suspend functions to operate on the main thread.
Launch and Async
launch and async are the most commonly used Coroutine builder.
launch – Launches new coroutine without blocking current thread and returns a reference to the coroutine as a Job . The coroutine is canceled when the resulting job is cancelled .
async – Creates new coroutine and returns its future result as an implementation of Deferred . The running coroutine is canceled when the resulting object is cancelled .
Take a look at this piece of code as an example.
From the example, the difference between launch and async is that async can return the future result which has a type of Deferred , and we can call await() function to the Deferred variable to get the result of the Coroutine while launch only executes the code in the block without returning the result.
Coroutine Scope
Coroutine Scope defines a scope for coroutines. Every coroutine builder (like launch, async, etc) is an extension on CoroutineScope. When the scope dies, the Coroutines inside will be out of the picture too. Fortunately, the Android lifecycle-viewmodel-ktx provides a really easy way to get a Coroutine Scope in the ViewModel. I will show you how to do so later.
Coroutines in your Android Project
To begin add the following library to your build.gradle file dependencies:
Note : You’ll also need to be on kotlin version 1.3 or better.
Making it work with Retrofit?
Retrofit is a type-safe HTTP client for Android and Java.
Starting from Retrofit 2.6.0 you no longer require the Call Adapter as Retrofit now includes built-in support for Kotlin suspend modifier on functions.
In order to begin, let’s add the retrofit dependencies into our app level build.gradle file:
Declaring our interface.
For this example I am using https://howtodoandroid.com/movielist.json api to get list of movies.
Observe the below snippet for our interface:
You may notice that instead of Call , we now have a function with the suspend modifier defined in our interface function.
According to Retrofit documentation this function will, behind the scenes behave as a normal Call.enqueue operation.
Also we wrap our response in a Response object to get metadata about our request response e.g. information like response code.
We no longer have to await() anymore as this is handled automatically! As with all networking on Android its done on the background. And this is a very clean way of doing so!
Building Retrofit Service
Our Retrofit instance will look like the following code snippet:
ViewModel with Coroutines
A CoroutineScope keeps track of all coroutines it creates. Therefore, if you cancel a scope, you cancel all coroutines it created. This is particularly important if you’re running coroutines in a ViewModel.
If your ViewModel is getting destroyed, all the asynchronous work that it might be doing must be stopped. Otherwise, you’ll waste resources and potentially leaking memory. If you consider that certain asynchronous work should persist after ViewModel destruction, it is because it should be done in a lower layer of your app’s architecture.
Add a CoroutineScope to your ViewModel by creating a new scope with a SupervisorJob that you cancel in onCleared() method. The coroutines created with that scope will live as long as the ViewModel is being used.
Coroutines and LiveData
LiveData is an observable value holder for UI and we are expected to be able to access the value from the main thread. With the release of livedata-2.1.0-alpha1, google provided the interoperability between LiveData and Coroutines.
Exception Handling in Kotlin Coroutines
If you consider the above example, you can see we are wrapping our code inside a try-catch exception. But, when we are working with coroutines we can handle an exception using a global coroutine exception handler called CoroutineExceptionHandler.
To use it, first, we create an exception handler in our ViewModel,
and then we attach the handler to the ViewModelScope.
So, our code looks like,
Kotlin Coroutines With Retrofit Example
Now, lets see the example of list movies using kotlin coroutines and retrofit.
Required Dependencies
Here are the things you need to add to your build.gradle
First, setup the retrofit service.
Next step is to setup the repository.
Setup the ViewModel,
Finally, in our MainActivity setup the viewmodel and call the getAllMovies() method of the viewModel.

Thanks for reading. checkout this example in GITHUB.
Источник


