- Add a splash screen to a React Native app
- Splash screen assets
- Install and configure react-native-splash-screen
- Add a splash screen to an iOS app
- Как добавить AppIcon и LaunchScreen в приложение на React Native
- Создаем React Native приложение
- Добавление AppIcon
- На iOS
- На Android
- Добавление LaunchScreen
- На iOS
- На Android
- Building a splash screen in React Native
- What is a splash screen?
- React Native splash screen example
- Why image size matters
- We made a custom demo for . No really. Click here to check it out .
- How to build a splash screen in React Native
- Android
- Conclusion
- LogRocket: Instantly recreate issues in your React Native apps.
Add a splash screen to a React Native app

Aug 26, 2019 · 8 min read

I always struggle to remember the steps required in order to add a splash screen to a React Native app, and some tutorials out there are a bit outdated, so here is my take on the subject.
This tutorial will explain how to create a simple, seamless transition splash screen. No bells and whistles, only a simple logo centered on a plain background.
I used react-native init rn_splashscreen_tutorial to instanciate my project, using React-Native 0.60+.
The final code is available on github.
Note: if you are using Expo or Create React Native App you don’t need to go through all of this, this tutorial is for people that have either ejected their project or created it the good old way, using `react-native init`.
Also note that I ’ m not an iOS nor Android developer, so some steps may surely be improved. I’ll be happy to read how you would do it in the comments!
Splash screen assets
For this tutorial we will use the React logo. We need three sizes, to better match all the devices screen sizes (300px, 600px @x2, 900px @x3).
You can get those images from github.

Install and configure react-native-splash-screen
Step 1: install react-native-splash-screen :
Depending on your package manager of choice.
WARNING: since React Native 0.60 we don’t need to link the libraries anymore, so don’t run react-native link. If you still are on 0.59 or before though, do run it: react-native link react-native-splash-screen
Step 2: update cocoa pods (mandatory for React Native 0.60+ or if you are using pods on your project):
Step 3: update App.js
- Open App.js
- Add import SplashScreen from ‘react-native-splash-screen’ with the other imports
- Also import from react
- Add a useEffect hook in the component that calls SplashScreen.hide()
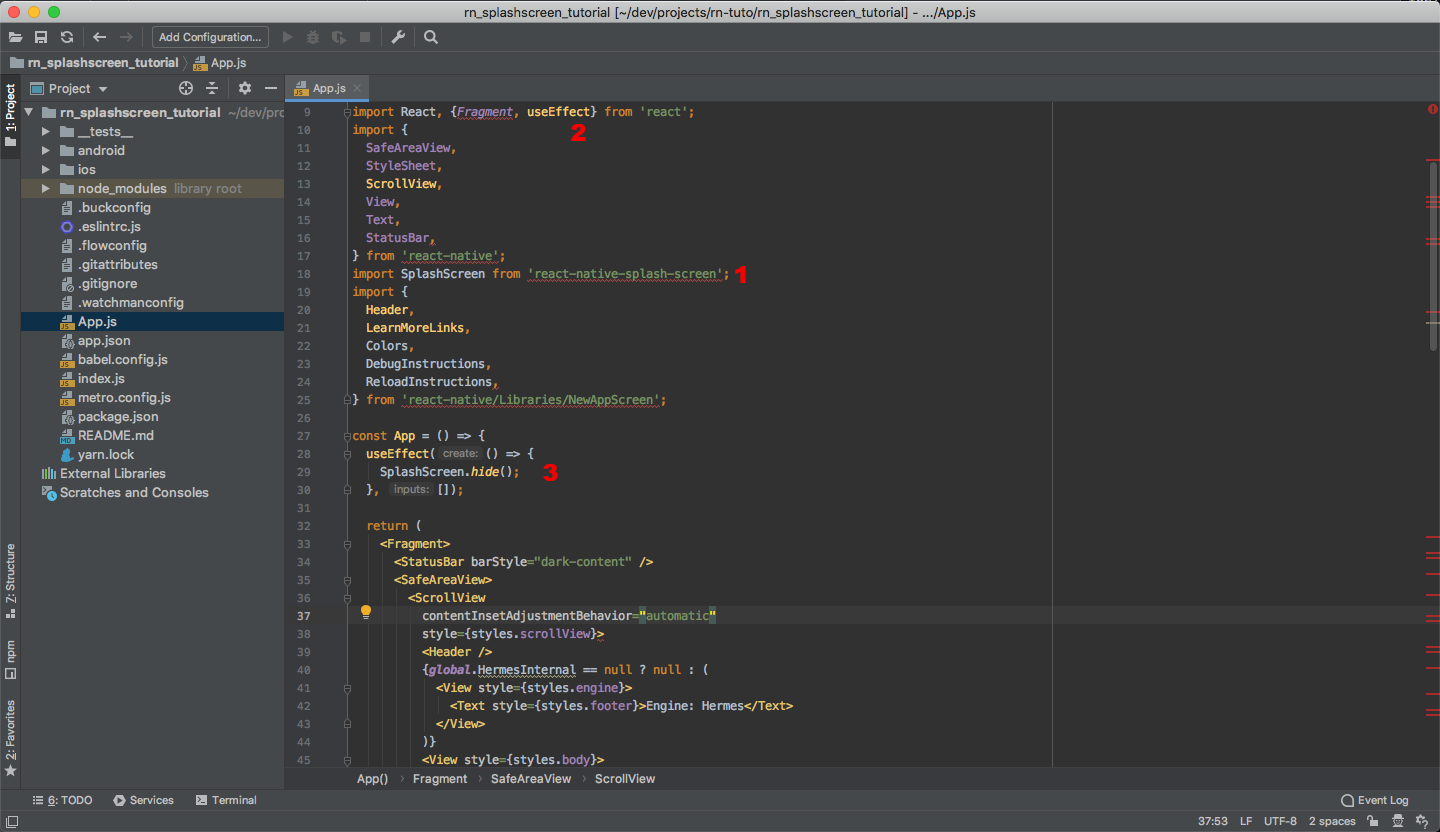
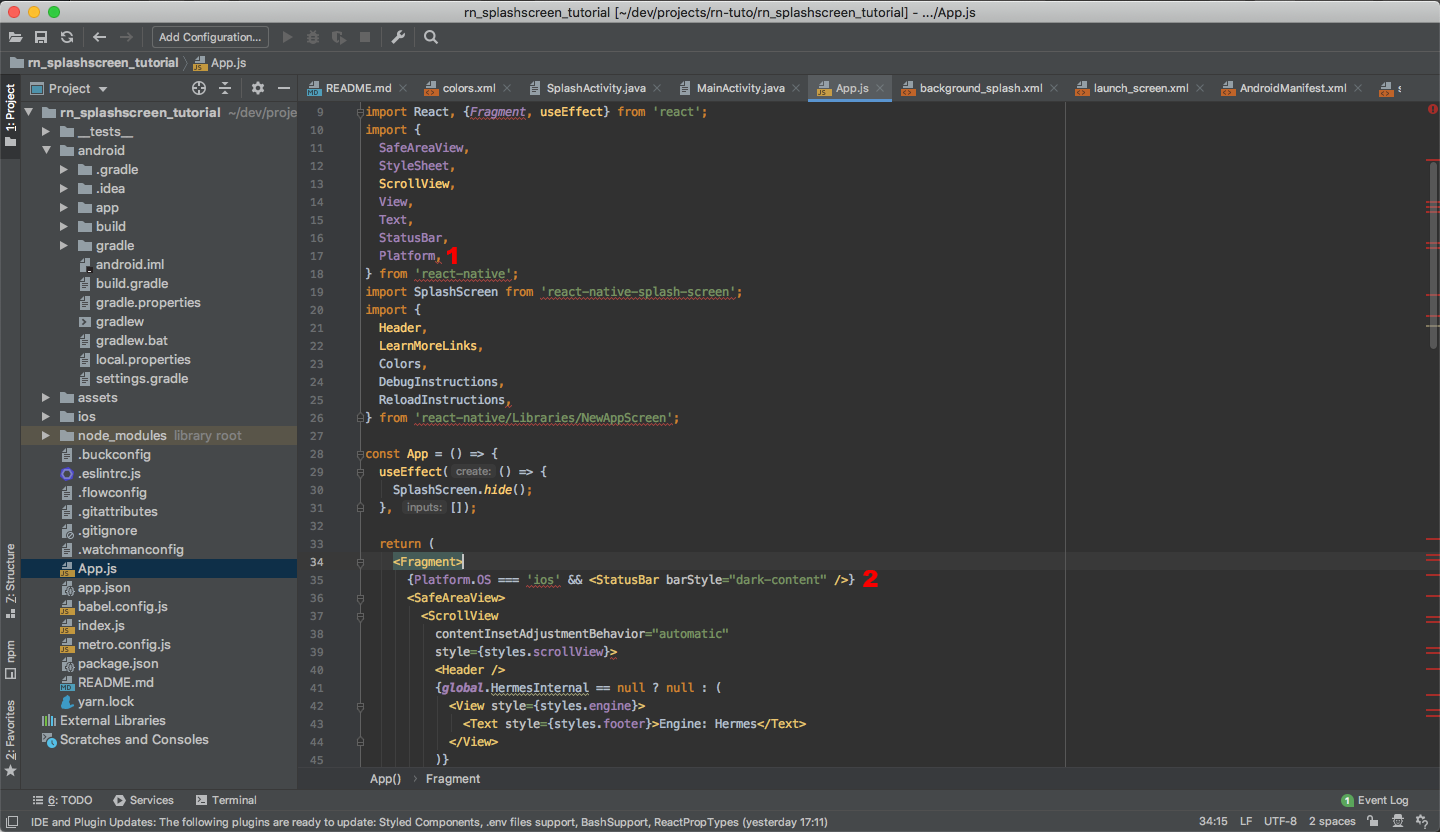
This step really depends on what you want to do with the status bar.
For the purpose of this tutorial I want to have a dark status bar on Android (I will define it in the Android code) but I want to keep the default behavior for iOS, thus the added condition.
Add a splash screen to an iOS app
First, open the project in Xcode.
Open a command line and from the project root and run
open ios/[project_name].xcworkspace
Note: Starting React Native 0.60, the iOS project uses cocoapods, so you have to open [project_name].xcworkspace and not [project_name].xcodeproj.
Источник
Как добавить AppIcon и LaunchScreen в приложение на React Native
Не занимаясь никогда ранее нативной разработкой под мобильные платформы, и в этот раз решил пойти «легким путем» — освоить React Native. Наибольшей трудностью стало добавление иконки приложения(AppIcon) и экрана загрузки (Launch Screen). О чем и хочу рассказать в данной статье тем, кто осваивает React Native.
На момент написания статьи актуальная версия React Native 41.0, XCode 8.2 (эти данные указаны по той причине, что в более поздних версиях может что-то измениться и данный мануал не будет применим).
Создаем React Native приложение
Добавление AppIcon
На iOS
Идем в папку с iOS-частью приложения
и открываем там файл XCode-проекта habr.xcodeproj.
Далее, щелкаем по следующим кнопкам:
В поле 4 добавляем иконки путем перетаскивания их в пустые ячейки. Под ячейками указан размер иконки(в pt).
Получается примерно так:
Важно: картинка иконки должна быть квадратная и, в идеале, их должно быть несколько версий разного размера(под каждую ячейку — свой размер). Если не охота возиться с созданием иконок разного размера — добавьте одну, размером 120x120px, в ячейку для iPhone 7-10:
Если добавить иконки не правильного размера, то получите ошибку «Images.xcassets: The app icon set named “AppIcon” did not have any applicable content.»
Полезно знать: иконки для ios удобнее всего создавать в программе Sketch(доступна только под OS X), поскольку в ней есть шаблоны нужных размеров, которые затем можно экспортировать в png-формат (File → Export. ):
Запускаем сборку ios-версии из корневой папки проекта:

(hit: для «сворачивания» приложения в эмуляторе нужно дважды нажать Cmd+Shift+H)
На Android
Из папки проекта идем в папку с Android-частью приложения, в место хранения ресурсов:
и видим здесь папки:
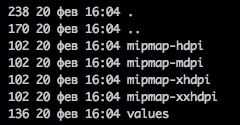
Заходим в каждую из них и в каждой видим файл ic_launcher.png. Заменяем каждый файл на свой, с таким же именем и такого же размера (в px).
Запускаем сборку Android-версии из корневой папки проекта:

С иконками закончили, переходим к экрану загрузки.
Добавление LaunchScreen
На iOS
Существует по крайней мере 2 способа добавить LaunchScreen на iOS. Опишу тот, который сработал у меня.
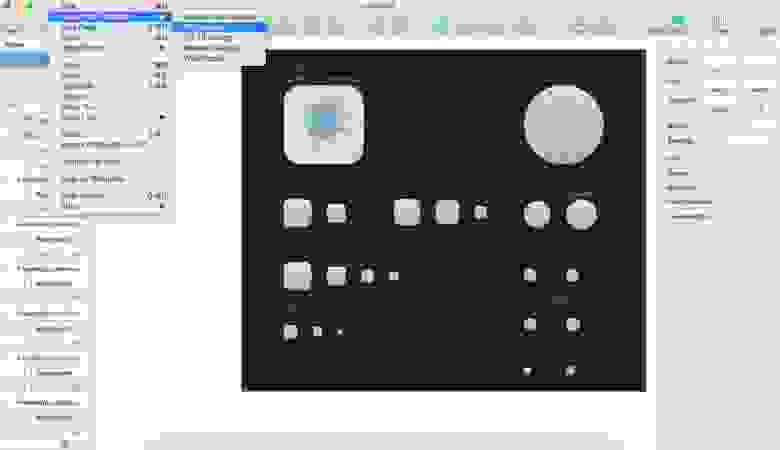
Первым делом, идем снова в XCode, по тому же маршруту, который показан на самом первом изображении в этой статье, но вместо папки Images.xcassets, выбираем файл LaunchScreen.xib.
При этом XCode спросит, для какой версии какого устройства отобразить содержимое данного файла. Выбираем любой iPhone.
Далее, щелкаем по кнопкам под номером 3 и 4 на данном скриншоте:

Затем перетаскиваем элемент 5 (Image View) на рабочее поле 6. Имеющиеся в рабочем поле 6 элементы (текстовые надписи) можно удалить.
Следующим шагом добавляем в наш проект нужное нам файл с изображением(для начинающих маководов — контекстное меню вызывается прикосновением к тачпаду двумя пальцами одновременно).
Далее, щелкаем по элементу UIImageView в рабочей зоне и настраиваем его свойства:

В меню под номером 1 (на скриншоте) выбираем добавленную в предыдущем шаге картинку(если выпадающий список пуст, то щелкните в левой панели(там где выбирали файл LaunchScreen.xib по любому другому файлу, а затем снова вернитесь к файлу LaunchScreen.xib — файл появится в выпадающем списке. Это мелкий баг XCode).
В меню под номером 2 выберите «Aspect Fit», чтобы картинка масштабировалась пропорционально, независимо от размера экрана устройства, на котором будет запущено приложение.
Чтобы картинка располагалась строго по центру, щелкните самой картинке(на рабочей области) и нажмите на кнопку 1, как показано на следующем скриншоте:

В каждом из четырех полей «Add new constrains» установите значение 0.
Запускаем сборку ios-версии из корневой папки проекта:
На Android
Из папки проекта идем в папку с Android-частью приложения, в место хранения ресурсов:
Добавляем здесь папку drawable. Создаем в ней файл splash_screen.xml такого содержания
Этот файл описывает новый «ресурс» приложения, и путь к внешним файлам ресурса(в нашем случае — к файлу с изображением для стартового экрана).
эта часть кода указывает расположение ресурса на экране. А эта:
путь к файлу ресурса, относительно папки res.
Создает фоновую подложку к экрану загрузки, а строка
указывает цвет фона. Значение цвета фона берется из файла colors.xml, который пока не существует и который вам нужно создать и расположить по адресу:
Содержимое файла может быть таким:
Здесь каждая строчка вроде
содержит цветовую константу. Задать цветовое значение фона напрямую(в файле splash_screen.xml) мне не удалось, поэтому добавил такой файл, как советовалось в одной из инструкций в Сети.
Далее, в папку drawable добавляем файл ic_launcher.png, представляющий собой изображение на стартовом экране.
Затем идем в папку
и редактируем файл styles.xml так, чтобы он выглядел следующим образом
Этим действием мы добавляем новую «тему оформления» для «активности»(activity).
«Активность»(Activity) в Android-приложениях представляет собой «экран» или «страницу». По умолчанию в React Native есть лишь одна «активность», мы же добавляем ещё одну.
Для этого переходим в папку с java-кодом:
(путь после /java/ в вашем проекте будет другим) и делаем следующее:
- переименовываем MainActivity.java в MainActivity2.java
- редактируем файл MainActivity2.java — меняем название класса в 6 строке с «MainActivity» на «MainActivity2»:
Создаем файл MainActivity.java, в который пишем такой код:
Смысл перечисленных выше 3-х шагов прост: мы меняем стартовый загрузочный экран(«активность») на наш экран(«активность) SplashScreen.
(В этом абзаце вы могли заметить, что LaunchScreen переименовался в SplashScreen. В Android-разработке(и не только) принято называть загрузочный экран SplashScreen’ом.)
Теперь осталось зарегистрировать нашу «активность» в файле-манифесте Android-приложения, чтобы она была доступна для вызова в коде.
Открываем файл AndroidManifest.xml, который находится по адресу
(относительно корневой директории проекта)
И приводим его к такому виду:
В итоге, в файле AndroidManifest.xml мы имеем 2 активности, причем в одной из них указано, что именно она — та, с которой начнется запуск Android-приложения. Это делается добавлением таких параметров:
в тело «активности».
С приготовлениями закончено. Запускаем билд android-версии из корневой папки проекта:

Полный код проекта можно найти здесь.
Источник
Building a splash screen in React Native
March 16, 2021 5 min read 1519

In this tutorial, we’ll demonstrate how to build and show a splash screen in React Native. We’ll walk you through how to build stunning welcome displays for both iOS and Android apps using react-native-splash-screen .
Here’s what we’ll cover:
What is a splash screen?
The splash screen is the first screen that appears before the user accesses the rest of your app’s functionalities. A splash screen is arguably the best way to make your mobile application’s brand name and icon stick in the user’s subconscious.
In web applications, we use preloaders to inform animations to keep users entertained while server operations are being processed. As straightforward as this sounds, it’s a critical tool to build and retain your user base.
There are many benefits to creating a splash screen in React Native. Imagine, for example, that you’re preloading data from an API. You’ll want to show a loader while the user is waiting; showing a loader as soon as the app starts helps you present an organized, well-designed display to your user while they wait for the app to initialize.
React Native splash screen example
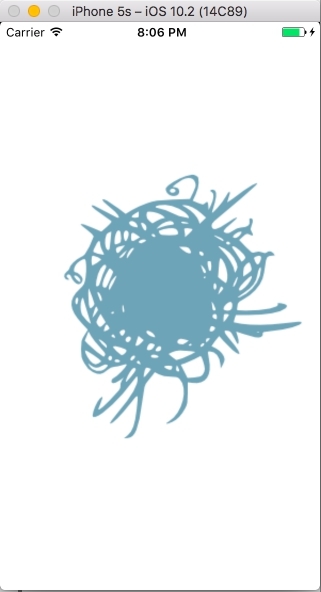
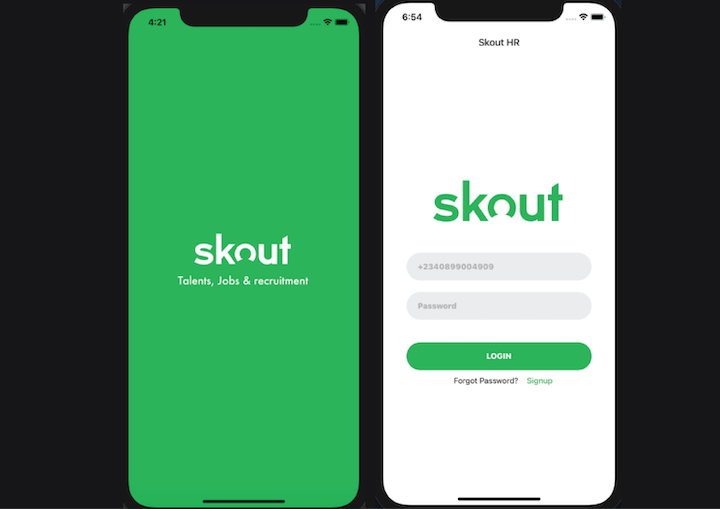
For this react-native-splash-screen demo, we’ll build a splash screen for both Android and iOS. The tutorial will walk you through how to prepare the right image sizes, update the necessary files, and hide the splash screen on app load. The finished app will look like the screenshot below:
To follow along with this React Native splash screen tutorial you should have:
- Familiarity with CSS, HTML, Javascript (ES6)
- Node.js and Watchman installed on your development machine
- iOS Simulator or Android Emulator for testing
- A code editor installed in your development machine (e.g., VS Code)
- A basic understanding of React/React Native
Let’s get started!
Why image size matters
Creating a splash screen for a mobile application is a bit tricky and you don’t want to risk having display issues on some devices due to inconsistencies in your splash screen resolutions. For instance, the android device’s requirements are totally different from that of iOS. Most experienced designers can create the required splash screen resolutions for both devices from scratch.
We made a custom demo for .
No really. Click here to check it out .
However, there are lots of available third-party tools that can help you create a splash screen for both Android and iOS. In this tutorial, we will be using the App Icon Generator, an online platform for creating icons and images for Android and iOS apps.
Before you proceed, make sure you have a high-definition, 2,000-by-3,000px (72 PPI) image ready. You can clone the starter file for these tutorials on GitHub.
How to build a splash screen in React Native
First, head over to Appicon. Drag your image on the box provided, select 4x as your base size, select iOS and Android, and click generate. This process should take approximately two minutes to complete, depending on your internet speed.
Next, extract the downloaded file and copy the iOS and Android folder to the image folder located in the assets directory of the starter project you cloned.

Building a splash screen in React Native requires some fine-tuning. To begin, if you’re using a Mac, run npm i react-native-splash-screen —save on your terminal (run command prompt if you’re using Windows). cd into the iOS directory and run pod install . Then, cd back to the root directory of the project.
Open AppDelegate.m and replace the code with the code below:
Here, we made two significant changes to the AppDeligate file. First, we imported the RNSplashScreen we installed earlier into the AppDeligate.m . Next, we set the RNSplashScreen to show by default with the code [RNSplashScreen show] .
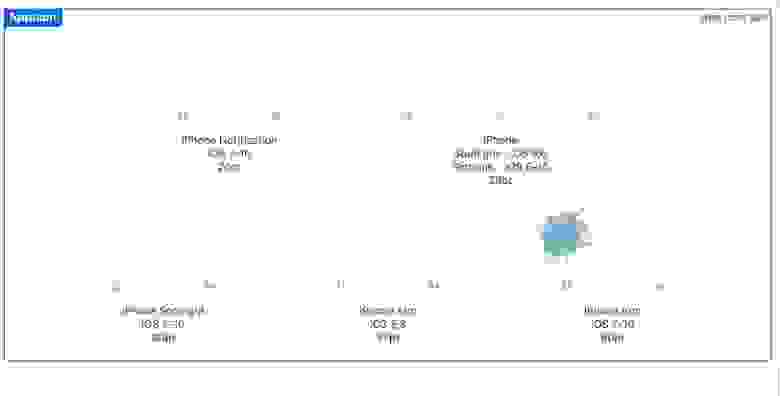
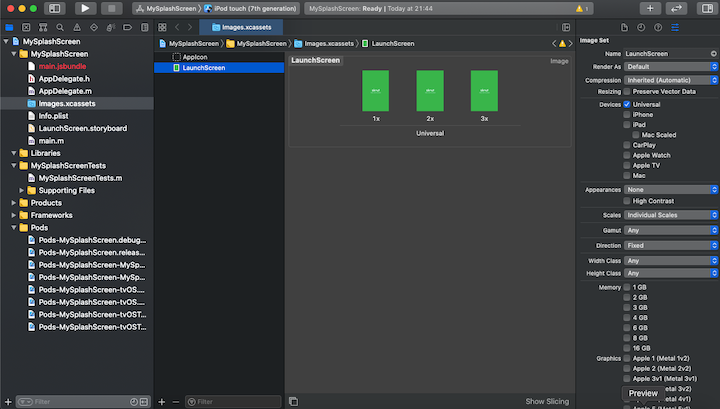
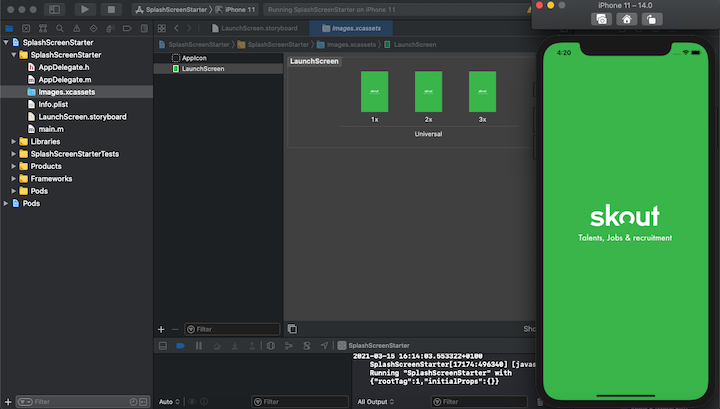
Open the project workspace in Xcode , click images.xcassets , right-click below Appicon , and choose your image. Set the image name to LaunchScreen , open the assets folder, navigate to the Images folder, and open the iOS folder. Inside the splash folder, drag the three images over the three boxes on Xcode named 1x, 2x, 3x :
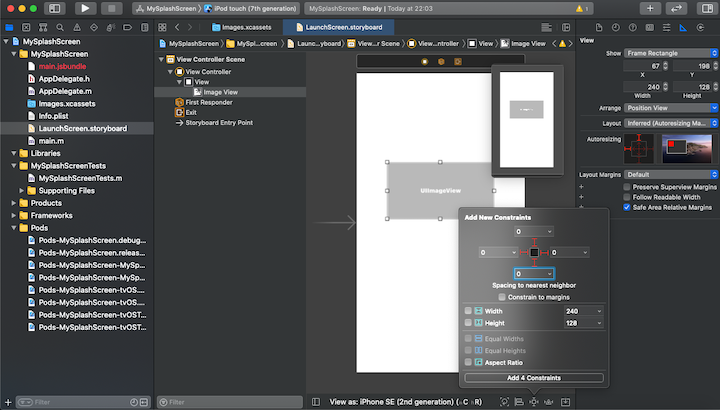
Next, select LaunchScreen.storyboard . Under View, select the labels SplashScreen and “Powered by React Native,” and press delete on your keyboard. Select view and click the ruler icon. Uncheck “Safe Area Layout Guide,” then click the plus icon + to search for an image. Drag the image view to the view. Finally, click on the constraints icon and set all the constraints to 0 :
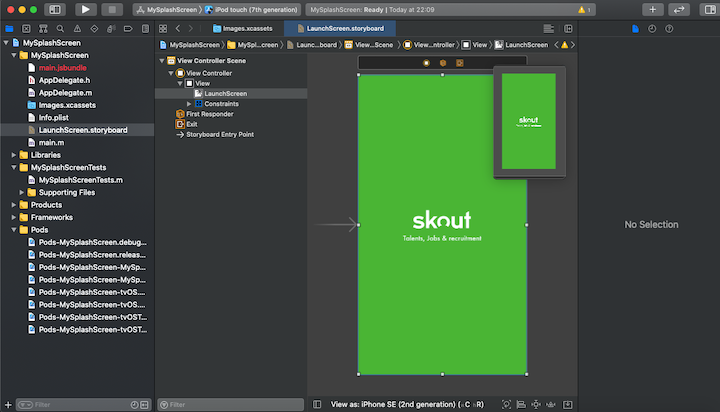
Now that we have our image view setup, click the image property icon and change the image to LaunchScreen . Set the content mod to aspect fill , as shown below:
To confirm your application can run successfully, run a build from Xcode . You should see something like this:
Android
Now let’s demonstrate how to build a splash screen for Android in React Native.
Navigate into the Android folder, select app , src, main , java , and open MainActivity.java . Update MainActivity.java to use react-native-splash-screen with the code below:
Next, create a file called launch_screen.xml in app/src/main/res/layout (create the layout -folder if it doesn’t exist). Add the code below to the launch_screen.xml :
Note: The android:src=»https://blog.logrocket.com/building-a-splash-screen-in-react-native/@drawable/launch_screen» is equivalent to in HTML so be sure to replace the launch_screen with the actual name of the image you generated from Appicon .
Copy all the assets for Android into the res folder. Create colors.xml in the values folder and add a color called primary_dark in app/src/main/res/values/colors.xml .
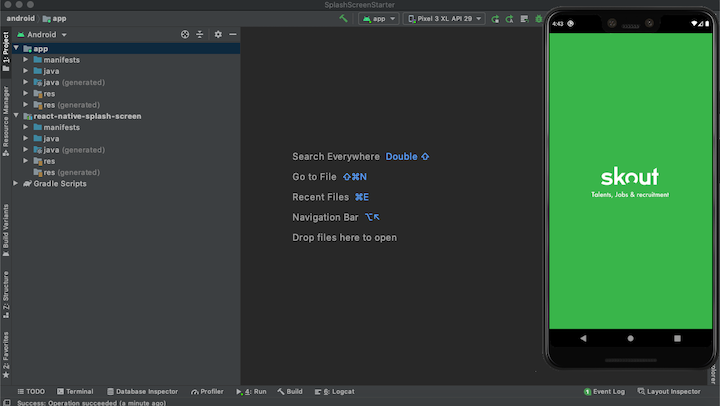
Open the Android folder in Android Studio , open AVD , and run your application as shown below. If everything is set up correctly, you should see a result similar to the following screenshot:
Lastly, to hide the splash screen on app load, you’ll need to do two things:
- Import the react-native-splash-screen package into the root component ( App.js ) of your React Native app
- Use React.useEffect() to hide the splash screen with the code below:
As noted above, I’m using @react-navigation/native to navigate from one screen to the other. For example, after login, you may wish to display the dashboard or home screen. @react-navigation/native is one of React Native’s core package for navigation. For a deeper dive, check out our comprehensive guide to using React Navigation.
Conclusion
Virtually any mobile application needs a splash screen. Knowing how to build a splash screen for cross-platform apps is a foundational skill that can help you take a step forward in your mobile development career.
LogRocket: Instantly recreate issues in your React Native apps.

LogRocket is a React Native monitoring solution that helps you reproduce issues instantly, prioritize bugs, and understand performance in your React Native apps.
LogRocket also helps you increase conversion rates and product usage by showing you exactly how users are interacting with your app. LogRocket’s product analytics features surface the reasons why users don’t complete a particular flow or don’t adopt a new feature.
Start proactively monitoring your React Native apps — try LogRocket for free.
Источник


