- Software testing tutorials and automation
- Pages
- Find Launcher Activity And Package Name Of Android App
- 1 comment:
- Read the package name of an Android APK
- 24 Answers 24
- A Programmatic Answer
- Requirements
- Solution 1
- Solution 2
- Solution 3
- How to build a custom launcher in Android Studio — Part One
- The game plan
- The Android manifest
- How to launch apps
- How to create an app drawer
- The next steps
Software testing tutorials and automation
A blog on Selenium tutorial, Selenium webdriver tutorial, Selenium IDE tutorial, Appium Tutorial, Selenium Grid Tutorial, Jmeter Tutorial.
Pages
Find Launcher Activity And Package Name Of Android App
- Right click on .apk file of APK Info app(or any other .apk file for which you wants to know package and activity name).
- Select Open with ->WinRAR archiver option from right click context menu.


- Open AndroidManifest.xml file in notepad.
- Now find keyword «p a c k a g e» In notepad. It will show you package name of your app as shown in bellow image.

- Package name for my APK Info app is : com.intelloware.apkinfo
- Find keyword «a c t i v i t y» In notepad. It will show you activity name of your app as shown in bellow image.

- Activity name for my APK Info app is display: .MainActivity. Here you need to append package name ahead of activity name so full activity name is : com.intelloware.apkinfo.MainActivity
Method 5 : Using hierarchyviewer of SDK
- Android SDK should be installed and configured as described HERE.
- Android emulator should be created as described HERE.
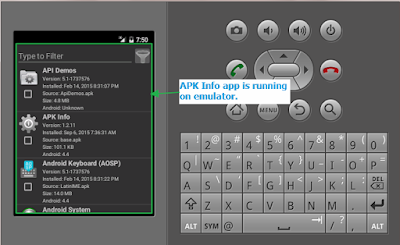
- .apk should be installed in emulator as described HERE. I will use APK Info app in this example so i have installed it in my emulator.
- Launch android emulator and open APK Info app in emulator.
- Open hierarchyviewer.bat file from tools folder of SDK.

- It will show hierarchyviewer interface. It will show you package and activity name of you app as shown in bellow image.

1 comment:
I am just learning how to utiluize Appium and when launching the script through Eclipse I get the following write error:
Exception in thread «main» org.openqa.selenium.SessionNotCreatedException: Unable to create a new remote session. Please check the server log for more details. Original error: An unknown server-side error occurred while processing the command. Original error: The application at ‘C:\Users\mpmor_000\AppData\Roaming\npm\node_modules\appium\node_modules\appium-uiautomator2-server\apks\appium-uiautomator2-server-debug-androidTest.apk’ is not writeable. Please grant write permissions to this file or to its parent folder ‘C:\Users\mpmor_000\AppData\Roaming\npm\node_modules\appium\node_modules\appium-uiautomator2-server\apks’ for the Appium process, so it could sign the application
Build info: version: ‘3.141.59’, revision: ‘e82be7d358’, time: ‘2018-11-14T08:17:03’
I was on the phone for several hours with windows support and they could find nothing wrong with the permissions setup. The file is open for write. Any suggestions would be welcome!
Источник
Read the package name of an Android APK
I need to get the package name of an Android APK. I have tried to unzip the APK and read contents of AndroidManifest.xml , but seems it’s not a text file.
How can I extract the APK’s package name?

24 Answers 24

| grep package:\ name
| findstr -i «package: name» or aapt dump badging
You can install the apk on your phone, then
connect using adb, you can launch adb shell and execute pm list packages -f, which shows the package name for each installed apk.
Based on @hackbod answer . but related to windows.
aapt command is located on Android\SDK\build-tools\version . If you need more info about what is appt command (Android Asset Packaging Tool) read this https://stackoverflow.com/a/28234956/812915
The dump sub-command of aapt is used to display the values of individual elements or parts of a package:
aapt dump badging
If you want see only the line with package: name info, use findstr
aapt dump badging
| findstr -n «package: name» | findstr «1:»
Hope it help other windows user!

If you are looking at google play and want to know its package name then you can look at url or address bar. You will get package name. Here com.landshark.yaum is the package name
The following bash script will display the package name and the main activity name:
apk_package.sh

If you open the AndroidManifest.xml using MS Notepad, search for phrase package and you’ll find following:
where xxx.xxxxxxx.xxxxxxx is your package name, just written with a space after each character.
It’s useful way when you don’t have any specific tools installed.

A Programmatic Answer
If you need to do this programmatically, it’s a little more involved than just getting the answer into your brain. I have a script that I use to sign all of our apps, but each use a different key. Here are 2 ways to get just the Package Name as output so you can put it in a variable or do whatever you need with it.
Example output: com.example.appname (and nothing more)
Requirements
aapt — Android Asset Packaging Tool, part of the SDK Tools download
Solution 1
Using awk specify ‘ as the Field Separator, search for a line with package: name= , and print only the 2nd «field» in the line:
A weakness of this method is that it relies on aapt to output the package information fields in the same order:
We have no commitments from the developers to maintain this format.
Solution 2
Using awk specify » as the Field Separator, search for a line with package= , and print only the 2nd «field» in the line:
A weakness of this method is that it relies on aapt to output package= only in the Android Manifest: section of the output. We have no commitments from the developers to maintain this format.
Solution 3
Expand the apk file with apktool d and read the AndroidManifest.xml.
This would be the best method, but the AndroidManifest.xml is a binary file and all the SO answers I see for converting it to text do not work. (Using apktool d instead of a simple unzip is supposed to do this for you, but it does not.) Please comment if you have an solution to this issue
A simple solution would be Open Android Studio -> Build -> Analyze Apk. browse and select the APK now you can find the package name and pretty much you can read.

Since its mentioned in Android documentation that AAPT has been deprecated, getting the package name using AAPT2 command in Linux is as follows:
./aapt2 dump packagename
Since I am using an older version of Gradle build, I had to download a newer version of AAPT2 as mentioned here :
Using the build-tools in my sdk — 25.0.3, 26.0.1 and 27.0.3, executing the aapt2 command shows an error: Unable to open ‘packagename’: No such file or directory. That’s why I went for the newer versions of AAPT2.
I used 3.3.0-5013011 for linux.
If you don’t have the Android SDK installed, like in some test scenarios, you can get the package name using the following bash method:
Tested on a mac. ‘strings’ and ‘unzip’ are standard on most linux’s, so should work on linux too.
If you just want to know package name, run adb logcat, launch the activity you want , you will get a hint on the package name.
Another solution is to use aapt list and use sed to parse through that:
aapt list -a $PATH_TO_YOUR_APK | sed -n «/^Package Group[^s]/s/.*name=//p»
I think the best and simplest way to extract only the package name in Linux is
- AAPT extracts the APK information
- Grep «package» to keep only the line about the package information
- Make sed replace the whole line with the package name only using the following regex: package: name='([a-z0-9.]*)’.* and replacing with the first (and only) matching group.

There’s a very simple way if you got your APK allready on your Smartphone. Just use one of these APPs:

A very simple method is to use apkanalyzer.
You can use Analyze APK. from the Build menu in Android Studio, it will display the package name at the top of new window.
Way 1:
Way 2:
You can get the package name programmatically by :
To use this in batch scripting it’s handy to have the script return just the package name (e.g. for uninstalling an app when you have the APK).
Here’s the script I use:
So you could write:
adb uninstall `./getPackageName.sh file.apk`
You can extract AndroidManifest.xml from the APK, remove all NULL bytes, skip everything until after the string ‘manifest’, and then you are at a length byte followed by the package name (and what comes after it). For the difficult task I use the great GEMA tool, so the command looks like this:
Of course, you can use any other tool to do the filtering.
you can instal Package_Name_Viewer.apk on your emulator and next you can see package name of all instaled app on your emulator.

I also tried the de-compilation thing, it works but recently I found the easiest way:
Download and install Appium from Appium website
Open Appium->Android setting, choose the target apk file. And then you get everything you want, the package info, activity info.
For Windows following worked for me:
Note
Please edit the paths of adb, aapt, APKPath according to the paths of adb, aapt, and the apk location in your system.
Working:
- Here I have added the apk in a folder on Desktop «\Desktop\APK\Instant_Instal\».
- The command %adb% install %apk% installs the application if the device is connected.
- This %aapt% dump badging %APKFullPath% | FIND «package: name=» > temp.txt fetches package name and a few other details like version etc. of the apk and stores in a temp.txt file in same location as that of the apk.
- FOR /F «tokens=2 delims='» %%s IN (temp.txt) DO SET pkgName=%%s extracts the package name and assigns to pkgName` variable
- Finally %adb% shell monkey -p %pkgName% -c android.intent.category.LAUNCHER 1 launches the app.
In essence the above code installs the apk from given location in desktop «Desktop\APK\Instant_Instal\» to the device and launches the application.
Источник
How to build a custom launcher in Android Studio — Part One

When it comes to Android customization, the launcher is the holy grail. This is where it’s at. It’s the trump card Android has always had over iOS. It’s what makes Android the most customizable operating system on pretty much any platform.
How might you go about creating your own Android launcher? Read this post — and the upcoming part two — that’s how!
The game plan
Creating an Android launcher is obviously a rather in-depth project with a lot of factors. It is almost always running, so it needs to be as perfectly bug-free as possible.
It would be too large an undertaking to do a completely start-to-finish tutorial here. Instead, I’m going to go over all the crucial features you need to turn any app into a launcher and I’ll leave it to you to put them all together and add your own personal spin. (part two will include the full source for a very basic skeleton of a launcher!)
You’ll need some background knowledge before taking on this project. To that end, I recommend this post on creating your first app from Gary Sims.
What does an app need in order to become a launcher?
- It needs to be mapped to the home button and launch when your device starts up.
- It needs to display custom wallpapers.
- It needs to show and launch apps from the homescreen and from an app drawer.
- It needs multiple screens through which you can scroll.
- It needs widgets.
There’s more, but if you can get these basics down then you’ll be well on your way. Let’s dive in and get creating out homescreen launcher!
Create a new project with an empty activity and then follow these steps.
The Android manifest
The first item on our agenda is to make our app into a launcher. That means making sure the Android system identifies it as such, loads it up when the system first boots, and shows it whenever you hit the “home” button.
This is simple — you just need to add the following two lines to your Android manifest file inside the activity tag:
Now you’ll have the option to select this application as your launcher. Which technically means it is a launcher.

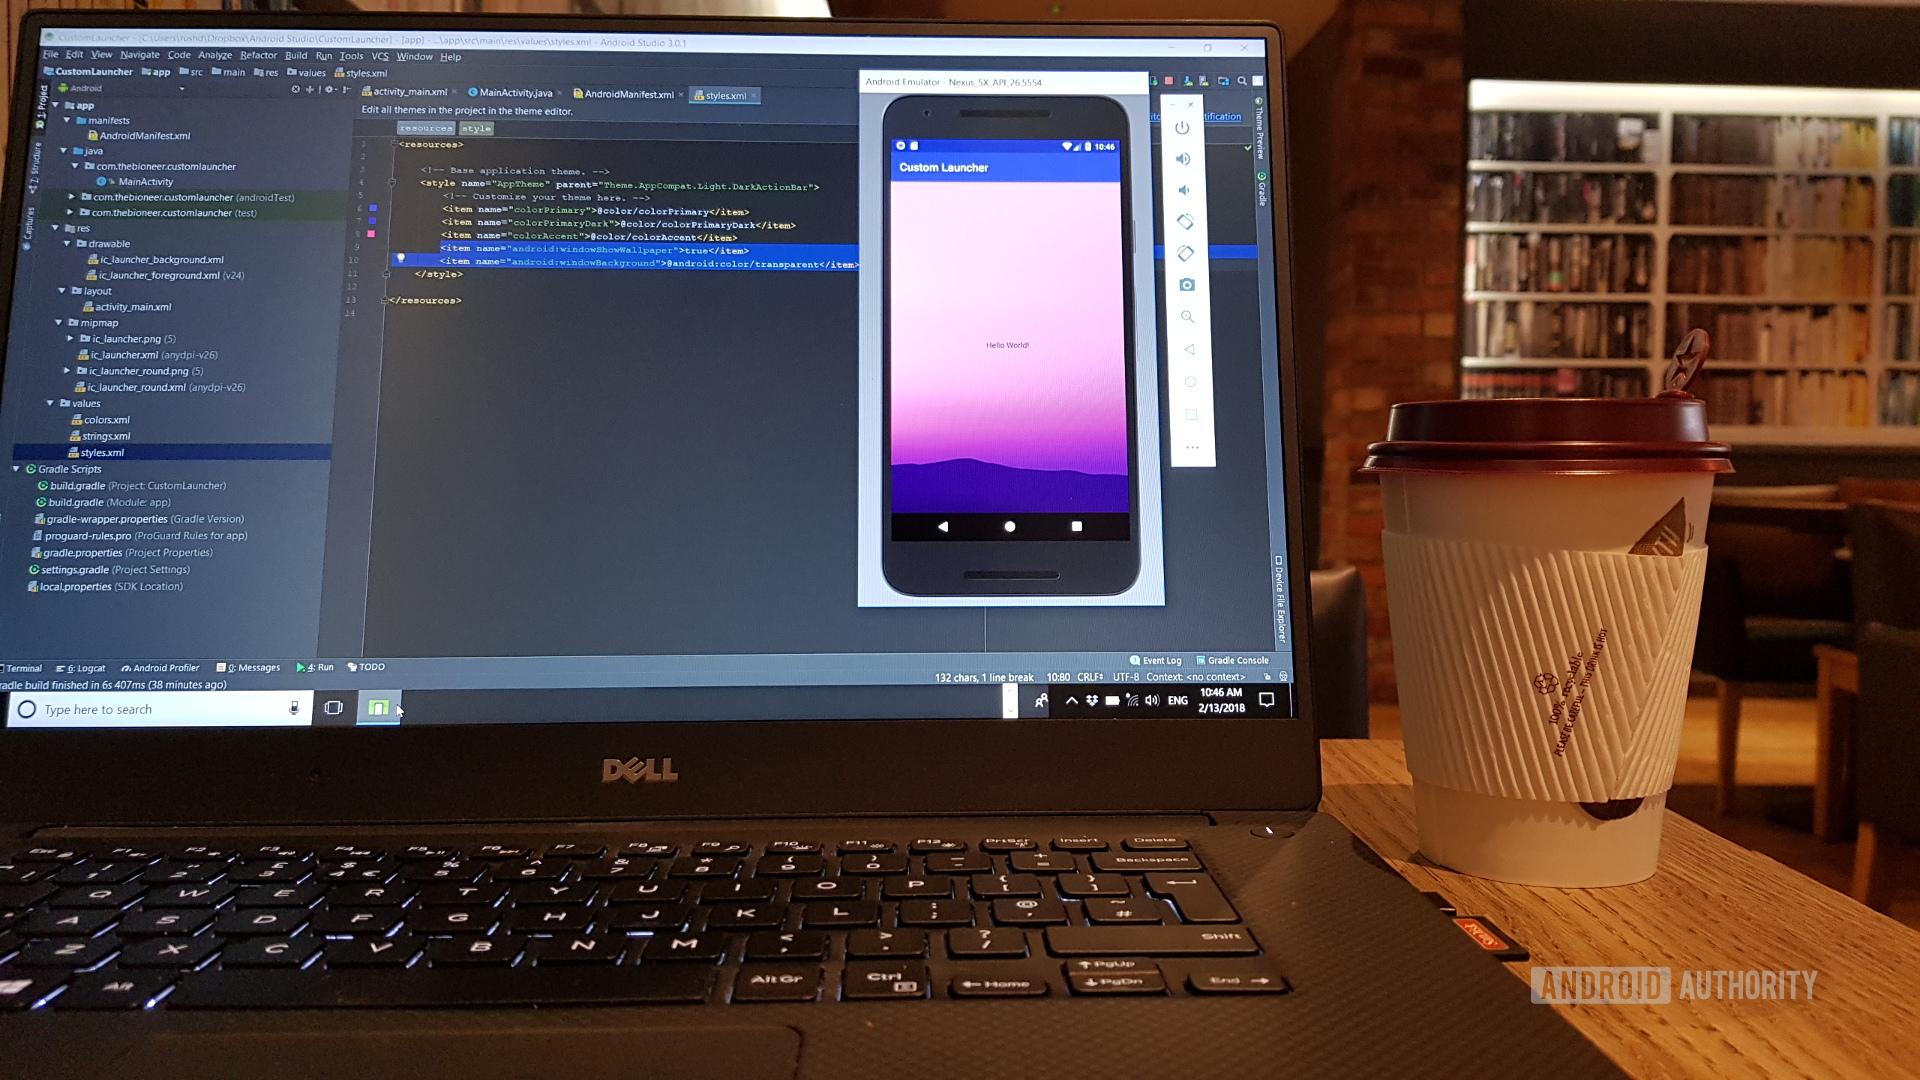
Right now, it doesn’t look like much of a launcher, and so the next thing to do is add a custom wallpaper. This is also pretty simple. You just have to add the following code to your styles.xml file in the resources folder.
Just a couple of lines added and we’ve got something that looks and behaves like a launcher. I’d say that’s a good start!

How to launch apps
Launching apps is a simple matter of using intents. Intents allow us to launch activities, apps, functions, and more. In this case, we’re going to launch Google Chrome using its package name, which is com.android.chrome.
To do that, you simply need this code:
Remember to import the Intent class (select it and press alt + return when it’s underlined). We could add a button instead of the TextView in our layout XML and set it to launch Chrome. We could also use this as a cool way to easily set any app as our default “home.” Place this in the onCreate method or onResume and any time you press home, you’ll launch Chrome or the app of your choosing!
But that’s probably not what most would want to do. So instead, let’s do the button thing. We’ll use an ImageView and give it the ID chromeButton. Choose any image for now. I picked a star.
Now add an onClick:
Wouldn’t it be nicer if we could use the correct icon? Surprise! we can.

To do this you’ll need to reverse-engineer a handy method to grab the icon from any app and return it as a drawable:
After that, we can simply set the icon as we like it in onCreate():
When using this method, you need both the package name and the activity name. I’m using an app called Package Names Viewer to get these. We’ll get to how to do this dynamically in a moment.
I’ve used a public static method so it’s accessible from other classes without creating multiple instances of our MainActivity. This method will likely prove to be a useful one.
You’ve already built enough of an app here to do something useful. You could very easily create a launcher simply showing your favorite apps in a line, for example. Most people will want to be a little more ambitious.
How to create an app drawer
Now that we can show and launch one app, we should be able to show and launch all apps. We just need to get a list of all the package names on the device, cycle through it, and load the icons into a recycler view.

Create a new activity in your project and call the java and xml files AppsDrawer.java and apps_drawer.xml respectively. Make sure you have some way for the user to launch this second activity too. I added a small menu button at the bottom of the screen.
In here, we’re going to display a list (recycler view) that will simply show all our icons and allow our user to select them in order to launch the app of their choice. Add a recycler view to apps_drawer.xml and give it the ID appsList.
Adding a recycler view is a whole other thing, so I won’t get into that now. Instead, check out this tutorial on recycler views and use the same names for my resource files and views as I did there. There is a method to this madness after all!
Create a separate XML file for the layout of the items in your row, and a new adapter class to populate the recycler view. You also need to create one more class, called appInfo and will have the simplest interface imaginable:
As you might have guessed, we’ll just be using this to store information about the apps in our list.
Now create your adapter class and add the following code:
Remember to import all classes as necessary. Check the comments for a bit more information on what everything does. I highly recommend reading through that Recycler View post if you’re not already familiar.
This is the main unique bit:
This simply loops through our runnable installed apps and grabs the necessary details, icons, and more from there.
Of course, row.xml includes an image view (img) and a text view (textView) which become our icon and our app label.

Meanwhile, the onClickListener added to the view holder allows us to run the app when clicked — just like a real launcher!
The next steps
At this point the end is in sight and you’re getting close to having a fully functional launcher! But there is still a bit left to do.
In part two, we’ll be populating our recycler view in an separate thread to keep things snappy. After that, we’ll add multiple homescreens to swipe through using fragments and take a quick look at how to host widgets.
Stay tuned for part two and be sure to post your questions down below!
Источник


