- How to build a custom launcher in Android Studio — Part One
- The game plan
- The Android manifest
- How to launch apps
- How to create an app drawer
- The next steps
- Android launcher source code
- Rootless Pixel Launcher 3.9.1
- Assets
- Rootless Pixel Launcher 3.9
- Assets
- Rootless Pixel Launcher 3.8.3
- Assets
- Rootless Pixel Launcher 3.8.1
- Assets
- Rootless Pixel Launcher 3.8
- Assets
- Rootless Pixel Launcher 3.7
- Assets
- Rootless Pixel Launcher 3.6
- Assets
- Rootless Pixel Launcher 3.5
- Make Your Own Custom Android Launcher using Flutter
- Today i am going to discuss about how to nake your Android Launcher !
- Lets create a flutter application
- Interact with the Applications installed in Phone
How to build a custom launcher in Android Studio — Part One

When it comes to Android customization, the launcher is the holy grail. This is where it’s at. It’s the trump card Android has always had over iOS. It’s what makes Android the most customizable operating system on pretty much any platform.
How might you go about creating your own Android launcher? Read this post — and the upcoming part two — that’s how!
The game plan
Creating an Android launcher is obviously a rather in-depth project with a lot of factors. It is almost always running, so it needs to be as perfectly bug-free as possible.
It would be too large an undertaking to do a completely start-to-finish tutorial here. Instead, I’m going to go over all the crucial features you need to turn any app into a launcher and I’ll leave it to you to put them all together and add your own personal spin. (part two will include the full source for a very basic skeleton of a launcher!)
You’ll need some background knowledge before taking on this project. To that end, I recommend this post on creating your first app from Gary Sims.
What does an app need in order to become a launcher?
- It needs to be mapped to the home button and launch when your device starts up.
- It needs to display custom wallpapers.
- It needs to show and launch apps from the homescreen and from an app drawer.
- It needs multiple screens through which you can scroll.
- It needs widgets.
There’s more, but if you can get these basics down then you’ll be well on your way. Let’s dive in and get creating out homescreen launcher!
Create a new project with an empty activity and then follow these steps.
The Android manifest
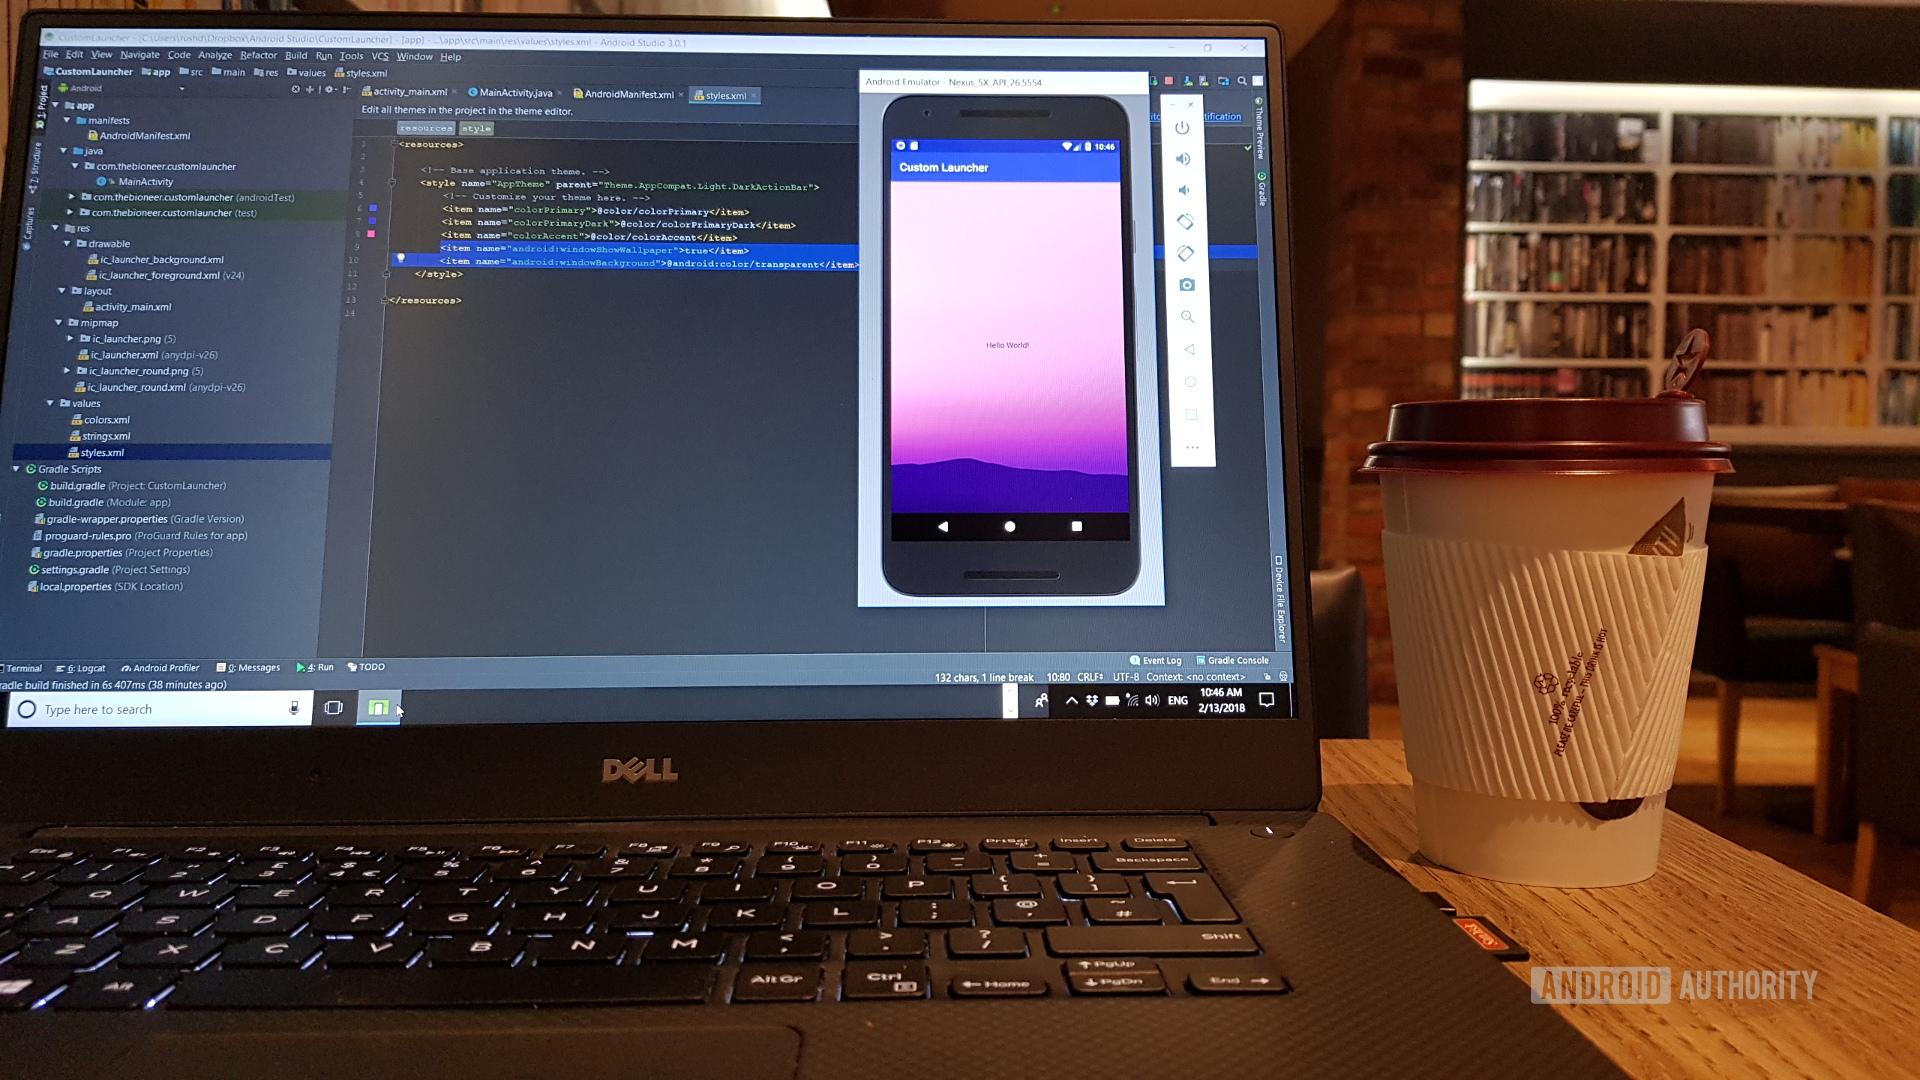
The first item on our agenda is to make our app into a launcher. That means making sure the Android system identifies it as such, loads it up when the system first boots, and shows it whenever you hit the “home” button.
This is simple — you just need to add the following two lines to your Android manifest file inside the activity tag:
Now you’ll have the option to select this application as your launcher. Which technically means it is a launcher.

Right now, it doesn’t look like much of a launcher, and so the next thing to do is add a custom wallpaper. This is also pretty simple. You just have to add the following code to your styles.xml file in the resources folder.
Just a couple of lines added and we’ve got something that looks and behaves like a launcher. I’d say that’s a good start!

How to launch apps
Launching apps is a simple matter of using intents. Intents allow us to launch activities, apps, functions, and more. In this case, we’re going to launch Google Chrome using its package name, which is com.android.chrome.
To do that, you simply need this code:
Remember to import the Intent class (select it and press alt + return when it’s underlined). We could add a button instead of the TextView in our layout XML and set it to launch Chrome. We could also use this as a cool way to easily set any app as our default “home.” Place this in the onCreate method or onResume and any time you press home, you’ll launch Chrome or the app of your choosing!
But that’s probably not what most would want to do. So instead, let’s do the button thing. We’ll use an ImageView and give it the ID chromeButton. Choose any image for now. I picked a star.
Now add an onClick:
Wouldn’t it be nicer if we could use the correct icon? Surprise! we can.

To do this you’ll need to reverse-engineer a handy method to grab the icon from any app and return it as a drawable:
After that, we can simply set the icon as we like it in onCreate():
When using this method, you need both the package name and the activity name. I’m using an app called Package Names Viewer to get these. We’ll get to how to do this dynamically in a moment.
I’ve used a public static method so it’s accessible from other classes without creating multiple instances of our MainActivity. This method will likely prove to be a useful one.
You’ve already built enough of an app here to do something useful. You could very easily create a launcher simply showing your favorite apps in a line, for example. Most people will want to be a little more ambitious.
How to create an app drawer
Now that we can show and launch one app, we should be able to show and launch all apps. We just need to get a list of all the package names on the device, cycle through it, and load the icons into a recycler view.

Create a new activity in your project and call the java and xml files AppsDrawer.java and apps_drawer.xml respectively. Make sure you have some way for the user to launch this second activity too. I added a small menu button at the bottom of the screen.
In here, we’re going to display a list (recycler view) that will simply show all our icons and allow our user to select them in order to launch the app of their choice. Add a recycler view to apps_drawer.xml and give it the ID appsList.
Adding a recycler view is a whole other thing, so I won’t get into that now. Instead, check out this tutorial on recycler views and use the same names for my resource files and views as I did there. There is a method to this madness after all!
Create a separate XML file for the layout of the items in your row, and a new adapter class to populate the recycler view. You also need to create one more class, called appInfo and will have the simplest interface imaginable:
As you might have guessed, we’ll just be using this to store information about the apps in our list.
Now create your adapter class and add the following code:
Remember to import all classes as necessary. Check the comments for a bit more information on what everything does. I highly recommend reading through that Recycler View post if you’re not already familiar.
This is the main unique bit:
This simply loops through our runnable installed apps and grabs the necessary details, icons, and more from there.
Of course, row.xml includes an image view (img) and a text view (textView) which become our icon and our app label.

Meanwhile, the onClickListener added to the view holder allows us to run the app when clicked — just like a real launcher!
The next steps
At this point the end is in sight and you’re getting close to having a fully functional launcher! But there is still a bit left to do.
In part two, we’ll be populating our recycler view in an separate thread to keep things snappy. After that, we’ll add multiple homescreens to swipe through using fragments and take a quick look at how to host widgets.
Stay tuned for part two and be sure to post your questions down below!
Источник
Android launcher source code
This is an open source launcher project for Android devices that has been built completely from scratch. The main goal of this launcher is to find a healthy medium between customization and simplicity. At this point in time it implements most features required in a typical launcher but could benefit greatly from some general polish. If you would like to help out feel free to submit issues or ask about submitting a pull request with a feature you want to see in the launcher.
![]()
![]()
If your instance is crashing frequently please update the app and reset the data and settings before creating an issue. This project is not actively developed at the moment since all of the main contributors either started working on other projects or find the current state of the launcher sufficient for daily use. If you would like to see a change please realize that it may not get added at all unless someone decides to write the functionality. Pull requests are welcome from anyone! Please ask about large features first, we can help navigate the codebase and talk about where best to add the functionality.
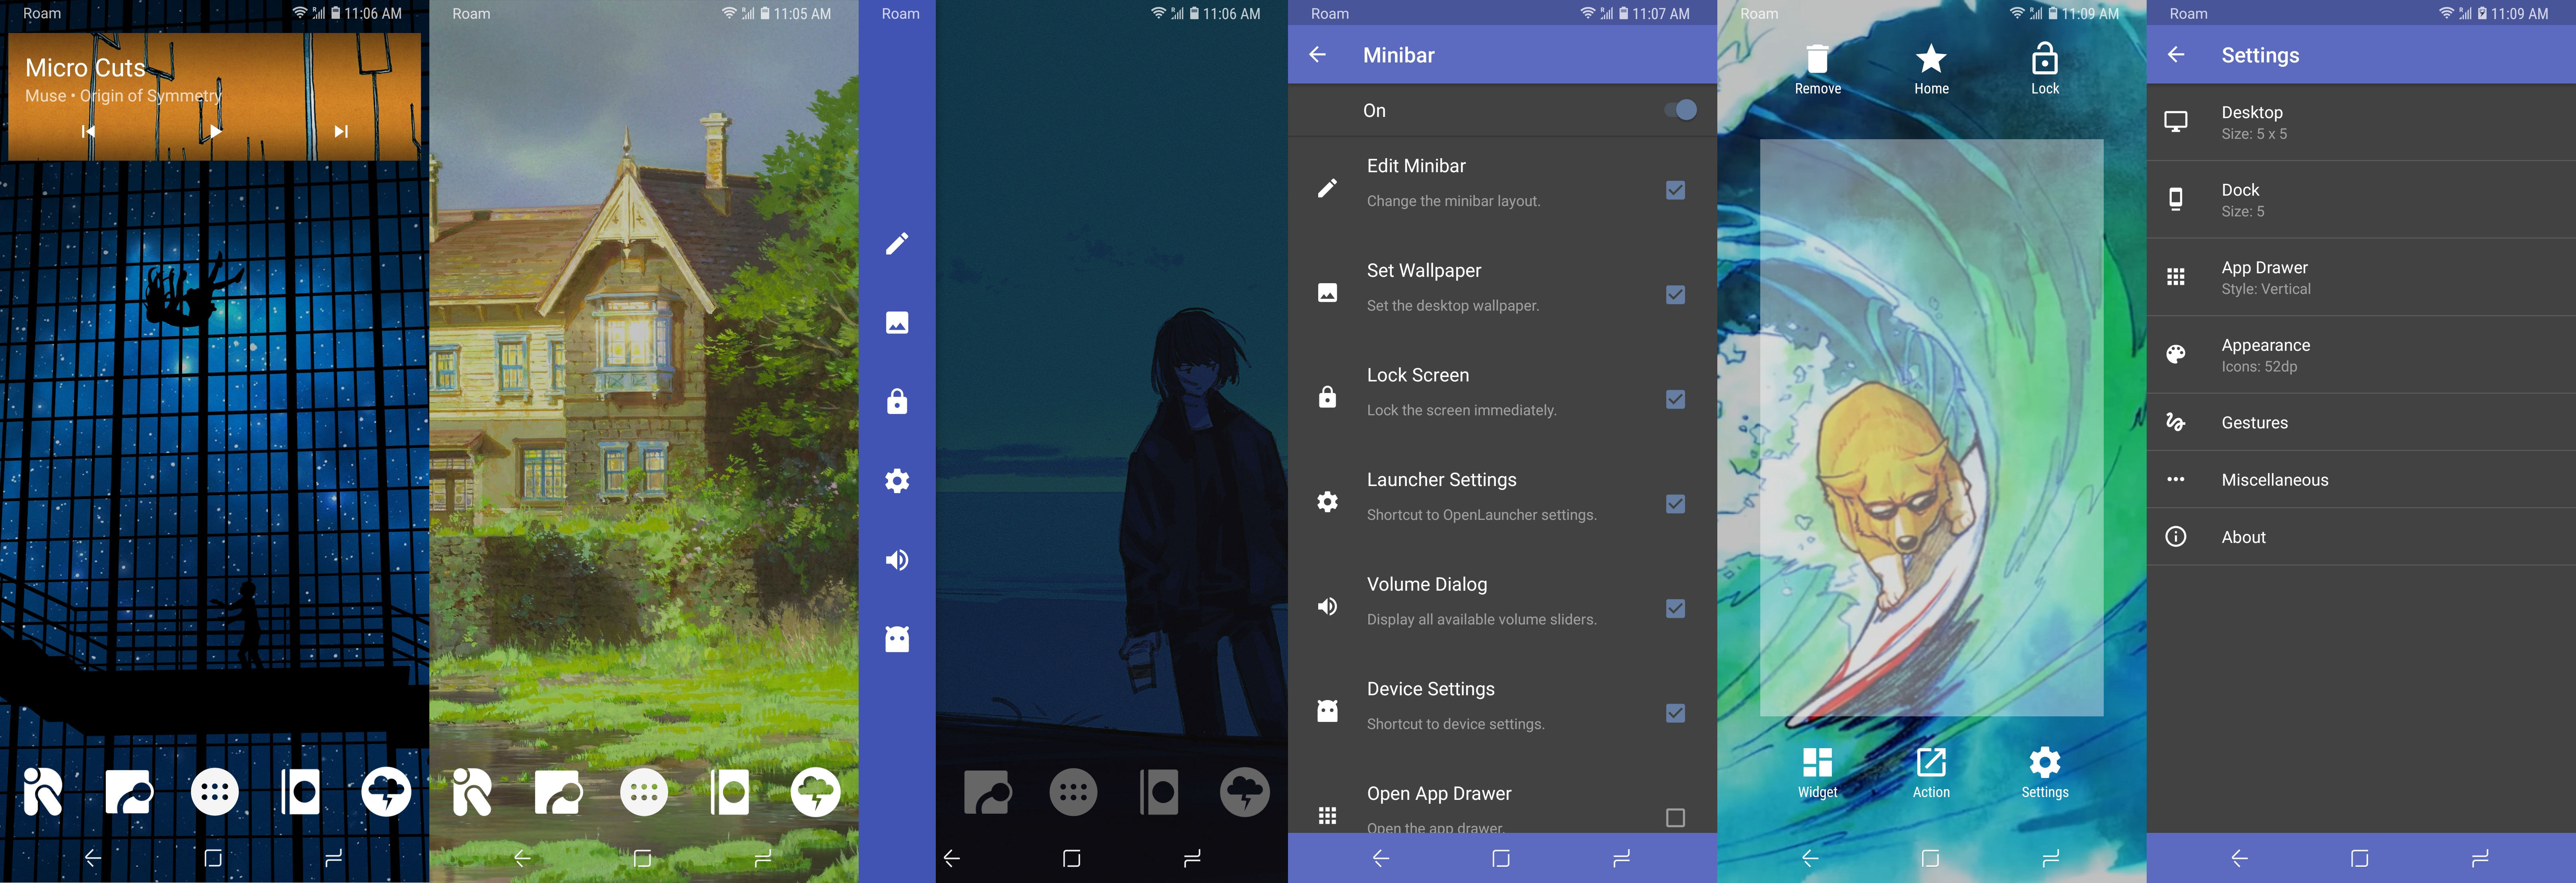
- Paged desktop
- Dock
- Drag and drop
- Hide apps
- Scrollable background
- Search bar
- Icon packs
The project is always open for contributions and accepts pull requests. Please use the auto reformat feature in Android Studio before sending a pull request. Translations can be contributed on GitHub. You can use Stringlate to translate the project directly on your Android phone. It allows you to post the translations on GitHub with little effort.
Источник
Rootless Pixel Launcher 3.9.1
AOSP = Normal version
L3GO = Android Go version
Support Rootless Pixel Bridge v3
Forward weather through bridge to fix opening weather
Update search bar to look like Pie
Remove GradientView head to hide fog at the bottom
Assets
Rootless Pixel Launcher 3.9
AOSP = Normal version
L3GO = Android Go version
Remove Rootless Pixel Bridge installation code to conform to Play Store rules.
Replace icon with material design version (by @allstargaurav).
Show launch shortcut in other launchers.
Specify tablets are supported in the manifest.
Assets
Rootless Pixel Launcher 3.8.3
AOSP = Normal version
L3GO = Android Go version
Fix a bug that caused the theme on Android 8.1 to always be transparent.
Fix a bug that caused the Now Feed to scroll up when coming back from an article.
Add support for a few more icon packs that might have been missed before.
Assets
Rootless Pixel Launcher 3.8.1
AOSP = Normal version
L3GO = Android Go version
Fixes a crash when opening the settings when the Google App is disabled or not installed.
Assets
Rootless Pixel Launcher 3.8
AOSP = Normal version
L3GO = Android Go version
Internal refactoring for a Play Store release using the Rootless Pixel Bridge.
You will have to uninstall your old launcher version before installing this.
Assets
Rootless Pixel Launcher 3.7
AOSP = Normal version
L3GO = Android Go version
Fix crashes caused by backported app shortcuts
Fix stuttering from back button presses
Change values-zu string so AOSP build script works again
Remove empty workspace page after a failed shortcut drag
Minor cleanup
Assets
Rootless Pixel Launcher 3.6
AOSP = Normal version
L3GO = Android Go version
Assets
Rootless Pixel Launcher 3.5
AOSP = Normal version
L3GO = Android Go version
Expose more colours for Substratum theming support
Rewrite Google Now Feed connection to fix disconnect issues
Improve round icon extraction to fix duplicates per app
Fix crash when searching with less than 5 app suggestions
Minor UI improvements for tablets and notch phones
Источник
Make Your Own Custom Android Launcher using Flutter

Have you ever thought of making your own stuffs and use them?
- Operation System !
- Programming Language !
- Library !
- Framework !
- Apps !
- Games !
I’m that kind of person who was always interested in making applications which are integrated to the system (literally Applications) not business or commercial applications and still i am :3
I have always dreamt about things of my own.
So once I thought to make my own Android Launcher as I’m using Android Phones.
At first I thought it’s something very hard and I won’t be able to make a launcher.Then I found it supper easy!
Today i am going to discuss about how to nake your Android Launcher !
I am using Flutter which is a Cross Platform Framework of Dart Made by Google.
There is a big community of Flutter to make cross platform applications such as Android,IOS,Desktop and Web applications.
If you haven’t installed flutter yet then have a look at their doc which is very user friendly and well decorated.
Note : I am using Visual Studio Code as a Editor or IDE and prefer terminal and command line activities.
Lets create a flutter application
flutter create -i objc -a java custom_launcher
Note : This command will create a application named custom_launcher and the native code for Android will be java
If you prefer Kotlin then just use —
flutter create custom_launcher
A flutter app will be created with similler file Structure:

We will code in main.dart file.
First We will need to edit some codes in the AndroidManifest.xml file. That will make our launcher different from normal Android Applications
Manifest file location :

- Add these lines in AndroidManifest.xml file under section :
Exit fullscreen mode
Now If you run your app , it will appear as a Launcher.
Or Press Home button of your android phone and it will ask to set it as default launcher.

Congrats You have made your launcher 😀
Yup Seriously ! It is that easy !
Now as a Flutter Application developer I hope you are able to do some of your own customizations.
I know you are concert about how can you show the installed applications in your custom Launcher.
Interact with the Applications installed in Phone
To do so we will use a flutter plugin named device_apps which will give us a List where all the necessary informations will be given.
- First import device_apps into your dart file :
Источник


